If you’re looking for a fun, festive treat that’s as adorable as it is delicious, you’ve got to try this Witch Hat Brownie Pops Recipe. I absolutely love how these spooky chocolate delights combine rich, fudgy brownie flavors with a playful Halloween twist. Whether you’re whipping them up for a party, for the kids, or just to satisfy your own sweet tooth, these witch hats are guaranteed to put a smile on your face. Let me take you through the simple steps to nail this recipe perfectly every time!
Why You’ll Love This Recipe
- Fun and Festive: These brownie pops look so cute you’ll want to make them all year round, not just Halloween!
- Perfectly Fudgy Texture: The brownie base stays moist and chewy, just the way I love it.
- Kid-Friendly Decorating: It’s a great hands-on project to do with little helpers who get a kick out of designing their own witch hats.
- Impressively Easy: Despite looking fancy, these treats come together quickly with straightforward steps.

Ingredients You’ll Need
This recipe calls for simple, everyday ingredients that work beautifully together to create rich, chocolatey brownie pops. When gathering your ingredients, try to pick high-quality cocoa powder and fresh spices to really make your witch hats stand out.
- Unsalted Butter: Softened for easy mixing and the perfect buttery flavor without extra salt.
- Sugar: Use granulated sugar for the batter, and a bit extra for rolling your brownie balls before baking to add a crisp touch.
- Eggs: Bring them to room temperature to help the batter blend smoothly.
- All-Purpose Flour: Provides structure without making the brownies dry or tough.
- Cocoa Powder: The heart of your brownie flavor — go for unsweetened and good quality.
- Baking Powder: Helps your brownie pops rise just enough for that light crumb.
- Vanilla Extract: Adds a lovely warm note that deepens the chocolate flavor.
- Chocolate Chips or Candy Melts: For assembling and decorating the witch hat “brim” and “tip.”
- Black Licorice or Edible Decorations: Optional but fun details to make your witch hats extra spooky.
Variations
I love making this Witch Hat Brownie Pops Recipe my own by switching up the decorations or adding a little flair to the brownie batter. Don’t hesitate to get creative here; the key is to have fun with it!
- Gluten-Free Version: I swapped all-purpose flour for a gluten-free mix once and it worked like a charm — great news for guests with sensitivities.
- Spiced Brownies: Adding a pinch of cinnamon and chili powder gives a surprising warm kick that my family can’t get enough of.
- Different Toppings: Instead of black licorice, try edible glitter, colored sprinkles, or mini marshmallows for a less intense look kids adore.
- Mini Witch Hats: Make bite-sized pops for party trays — they’re just as tasty and disappear even faster!
How to Make Witch Hat Brownie Pops Recipe
Step 1: Whip Up That Perfect Brownie Batter
Start by preheating your oven to 350°F (175°C) and lining a baking sheet with parchment paper. In a mixing bowl, melt the butter using gentle heat—microwave in short bursts works great to avoid overheating. Stir in your sugar and vanilla extract until smooth, then beat in the eggs one at a time. Next, sift together your flour, cocoa powder, and baking powder before folding it gently into the wet ingredients. You’ll want a thick, glossy batter that’s rich and smooth. I learned that mixing just until combined keeps the brownies fudgy rather than cakey, so resist overmixing!
Step 2: Form Your Witch Hat Shapes
Here comes the fun part! Scoop the batter into tablespoon-sized balls and place them about two inches apart on your baking sheet. These will be your “hat cones.” For the “brims,” I use chocolate chips or candy melts later, but you can get creative. Bake the balls for about 12 to 15 minutes, checking around the 12-minute mark—when the edges look set but the centers still seem slightly underbaked, they’re perfect. This trick keeps the centers delightfully chewy once cooled.
Step 3: Assemble the Witch Hats
After removing your baked brownie balls from the oven, let them cool for a few minutes until they’re manageable but still warm. Melt your chocolate chips or candy melts gently—microwave in short bursts with stirring in between works well. Dip the base of each “cone” into the melted chocolate and attach it to a round cookie or a chocolate wafer to form the brim. Then, pipe a little extra chocolate from the tip to make a curly hat point or add any decorations you love. My family goes crazy for this step since it lets everyone customize their hats!
Step 4: Let Your Witch Hat Brownie Pops Set
Place your assembled witch hats in the fridge for about 20 minutes to firm up the chocolate and make sure everything holds. This is the perfect time to get your camera ready because they look almost too cute to eat. Once ready, remove them and serve immediately or keep chilled until party time. These pops won’t last long—trust me!
Pro Tips for Making Witch Hat Brownie Pops Recipe
- Don’t Overbake Your Brownie Balls: Slightly underbaking keeps them fudgy and soft inside — a texture you’ll be so glad you nailed.
- Use Room Temperature Ingredients: This helps your batter come together smoothly and bake evenly without weird lumps.
- Chill Chocolate Before Assembly: Slightly cooling the melted chocolate before dipping prevents it from sliding off and makes assembly easier.
- Plan Your Decoration Station: Have your toppings, piping bags, and cookie brims ready before the brownie balls cool for a smooth workflow.
How to Serve Witch Hat Brownie Pops Recipe
Garnishes
I love topping mine with sprinkles, edible glitter, or tiny candy bats because they add just the right amount of whimsy and sparkle. Sometimes, a simple drizzle of white chocolate can turn these witch hats into mini masterpieces without overwhelming the chocolatey flavor.
Side Dishes
Serve these Witch Hat Brownie Pops alongside a glass of cold milk or a hot cup of spiced apple cider—that combo always feels cozy and festive. For a Halloween party, they’re also great paired with popcorn or simple fruit kabobs to balance the richness.
Creative Ways to Present
One of my favorite tricks is to arrange the pops upright in a decorated foam block inside a witch-themed tin or cauldron—it looks enchanting and makes it easy for guests to grab a treat. You could also tie little ribbons around each stick for a festive touch or place them in mini cupcake liners for a polished look. Trust me, the presentation gets as many compliments as the taste!
Make Ahead and Storage
Storing Leftovers
I usually keep my Witch Hat Brownie Pops in an airtight container in the fridge for up to 4 days. This helps the chocolate and brownie stay fresh but also makes them delightfully chilled for hot days. Just make sure to separate layers with parchment paper so nothing sticks together.
Freezing
If you want to prep these ahead, I’ve froze the pops individually wrapped in plastic wrap and stored in a zip-top bag. When thawed at room temp for about 30 minutes, they retain their fudge-like texture perfectly. Just avoid freezing if you’ve used delicate toppings that might get soggy.
Reheating
Honestly, these are perfect cold or at room temperature. If you want to warm them slightly, I pop them in the microwave for about 10 seconds—just enough to soften the brownie a bit but not melt the decorations. It’s a quick way to get that fresh-from-the-oven feel without losing their shape.
FAQs
-
Can I make the Witch Hat Brownie Pops Recipe dairy-free?
Yes! You can swap the butter for a dairy-free margarine or coconut oil, and use dairy-free chocolate chips for dipping and decorating. Just keep in mind this may slightly affect texture and flavor, but they still turn out wonderfully tasty.
-
How do I prevent the brownie balls from cracking during baking?
Make sure your batter is well mixed but not overbeaten, and bake at the correct temperature. Avoid opening the oven door too often, as temperature changes can cause cracking. Also, knocking the pans gently on the counter after baking helps create that perfect crackle texture instead of random cracks.
-
Can I prepare the brownie batter ahead of time?
Absolutely! You can mix the batter a day ahead and keep it tightly covered in the fridge. Just bring it to room temperature and give it a gentle stir before scooping the balls for baking.
-
What can I use as a stick for the pops?
I often like using sturdy lollipop sticks or even pretzel rods for a salty-sweet combo. Just make sure to insert the stick firmly into the brownie ball before baking to keep everything secure.
Final Thoughts
This Witch Hat Brownie Pops Recipe holds a special place in my heart because it combines my love for baking with playful creativity, making dessert time a true experience. Every time I make them, my family and friends can’t get enough—there’s something magical about these little chocolate hats that just makes celebrations extra sweet. I can’t wait for you to give this recipe a try and see how much fun you have making (and eating!) your own witchy creations. Happy baking, friend!
Print
Witch Hat Brownie Pops Recipe
- Prep Time: 20 minutes
- Cook Time: 10 minutes
- Total Time: 30 minutes
- Yield: 18 large cookies or 40 mini cookies
- Category: Dessert
- Method: Baking
- Cuisine: American
Description
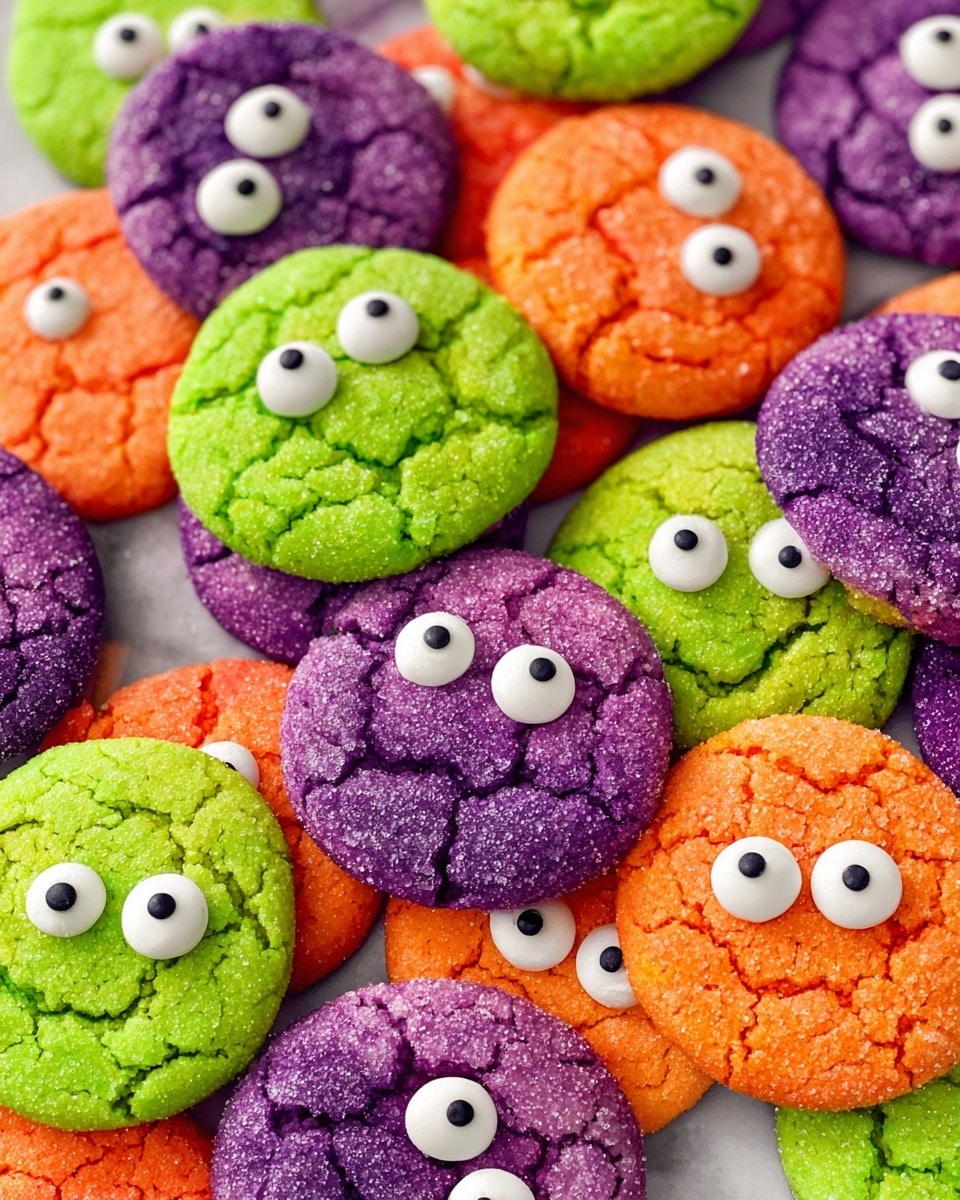
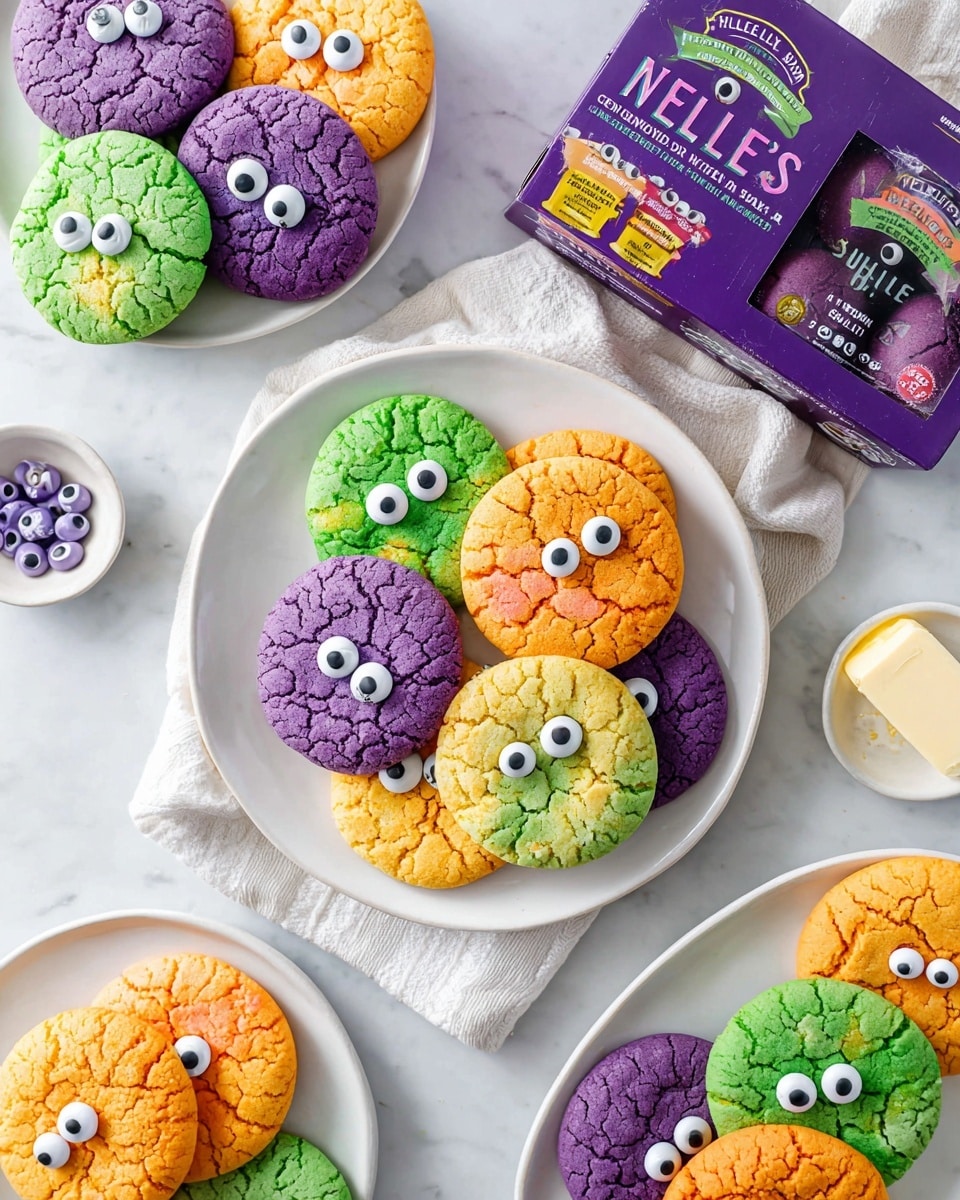
Chewy Monster Eyeball Sugar Cookies are a fun and festive treat perfect for Halloween or any monster-themed party. These cookies feature a classic sugar cookie flavor with a soft, chewy center and crispy edges. Each cookie is adorned with colorful dough and topped with candy eyeballs, creating a spooky and playful design kids and adults will love.
Ingredients
Cookie Dough
- 10 tablespoons (1 1/4 sticks) unsalted butter, softened
- 2 tablespoons light corn syrup
- 1 1/4 cups sugar
- 1 1/2 teaspoons vanilla extract
- 1 large egg
- 2 1/2 cups all-purpose flour
- 1 teaspoon baking soda
- 1/2 teaspoon salt
For Coating and Decorating
- 1 cup sugar (for coating)
- Purple, orange, and/or green natural or artificial food coloring (optional)
- Candy eyeballs
Instructions
- Prep and line: Preheat your oven to 375°F (190°C) and line two baking sheets with parchment paper to prevent sticking and ensure even baking.
- Cream butter, sugars, and vanilla: Using a hand or stand mixer on medium-high speed, cream together the softened butter, 1 1/4 cups sugar, light corn syrup, and vanilla extract for 1 to 2 minutes until the mixture is very light and fluffy.
- Beat in the egg: Add the large egg and continue beating on medium-high speed for another 30 seconds until the batter looks smooth, opaque, and slightly fluffy.
- Mix in dry ingredients: Lower mixer speed to low and add the all-purpose flour, baking soda, and salt. Mix until fully combined, then increase to medium-low speed and beat briefly for 15 to 20 seconds. Scrape the bowl midway to ensure uniform mixing. The dough should be smooth and stiff.
- Color your dough (optional): Divide the dough evenly into separate bowls for each desired color. Add food coloring and knead by hand until the color is evenly distributed. Coloring is optional if you prefer plain dough.
- Scoop and coat: Pour 1 cup sugar into a small wide bowl. Scoop dough into balls approximately 2 tablespoons each for large cookies or 1 tablespoon each for mini cookies. Roll each dough ball between your hands to make it smooth and round, then roll thoroughly in the sugar to coat.
- Tray and bake: Arrange the sugar-coated dough balls on the prepared baking sheets, spacing them at least 3 inches apart. Gently press a few candy eyeballs onto the surface of each cookie. Bake large cookies for 9 to 12 minutes, or mini cookies for 6 to 8 minutes, until the bottoms are golden brown and the tops look set and crackled. Avoid over-baking to keep a chewy texture and vibrant colors.
- Knock ’em down: Immediately after removing the trays from the oven, firmly tap each tray on the counter or stovetop. This collapses the cookie domes and creates a signature crackled appearance.
- Cool, share, and enjoy: Allow the cookies to cool completely so the centers set perfectly chewy and the edges become crisp. Serve these monstrously delightful treats to bring smiles to any party or gathering.
Notes
- These chewy sugar cookies feature a classic flavor with an almost gooey center, perfect for those who love traditional sugar cookies but want a playful twist.
- Adding food coloring to the dough is optional but makes the cookies more festive and fun for themed occasions.
- Be careful not to over-bake the cookies; they should look a little underbaked for the best chewy texture.
- Pressing candy eyeballs while the cookies are warm helps them adhere better.
- Knocking the trays after baking collapses the cookie tops to produce a beautiful crackled surface.
Nutrition
- Serving Size: 1 large cookie
- Calories: 227 kcal
- Sugar: 27 g
- Sodium: 187 mg
- Fat: 7 g
- Saturated Fat: 4 g
- Unsaturated Fat: 3 g
- Trans Fat: 1 g
- Carbohydrates: 40 g
- Fiber: 1 g
- Protein: 2 g
- Cholesterol: 26 mg

