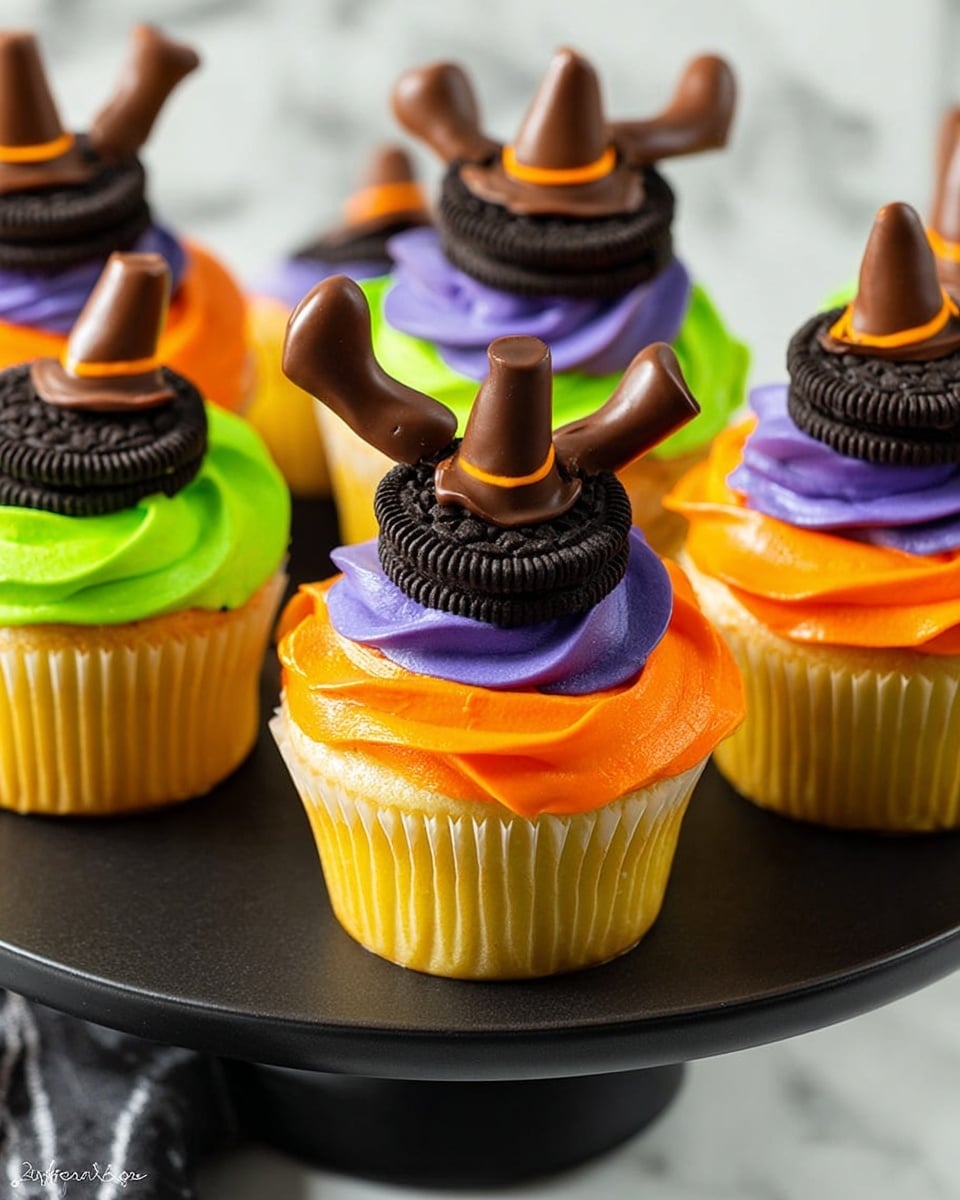
If you’re looking for a spooky, fun, and absolutely delightful treat to wow your friends (or yourself), you’ve got to try my Witch Crash Cupcakes Recipe. These cupcakes aren’t just cute—they’re a little bit magical with surprise sprinkles inside, colorful frosting, and those adorably quirky crashed witch decorations that’ll have everyone talking. Trust me, once you see how fun these turn out, you won’t want to wait for Halloween to make them!
Why You’ll Love This Recipe
- Fun surprise inside: The sprinkles hidden inside each cupcake add a burst of color and excitement that’s just irresistible.
- Vibrant, eye-catching frosting: Dividing the frosting into bright purple, orange, and green makes decorating these cupcakes feel like a mini art project.
- Unique crashed witch design: Those cute Oreo hats plus pretzel-legged witches crashing out of cupcakes are a real crowd-pleaser that took me some trial and error to perfect.
- Easy enough for bakers of all levels: Even if you’ve never nailed a themed cupcake before, the step-by-step and little pro tips here will have you feeling like a cake boss.

Ingredients You’ll Need
All the ingredients for these cupcakes come together to make a moist, tender cake with luscious frosting that holds the whimsical decorations perfectly. I always like to use full-fat dairy here because it really elevates the flavor and texture.
- All-purpose flour: The backbone for a soft cupcake crumb that’s not too dense.
- Granulated sugar: Sweetness with a bit of structure; I love the balance it gives.
- Baking powder: This magic powder helps the cupcakes rise just right.
- Kosher salt: Enhances all the other flavors, don’t skip it!
- Unsalted butter: Melted for the batter, and room temperature for the frosting to get that creamy texture.
- Canola or vegetable oil: Adds moisture so the cupcakes stay fresh for days.
- Sour cream: Keeps the cake tender with a subtle tang; I swear by this trick for moist cupcakes.
- Whole milk: Balances the batter consistency perfectly.
- Eggs: The binder that gives structure.
- Vanilla extract: Adds warmth and depth to the flavors.
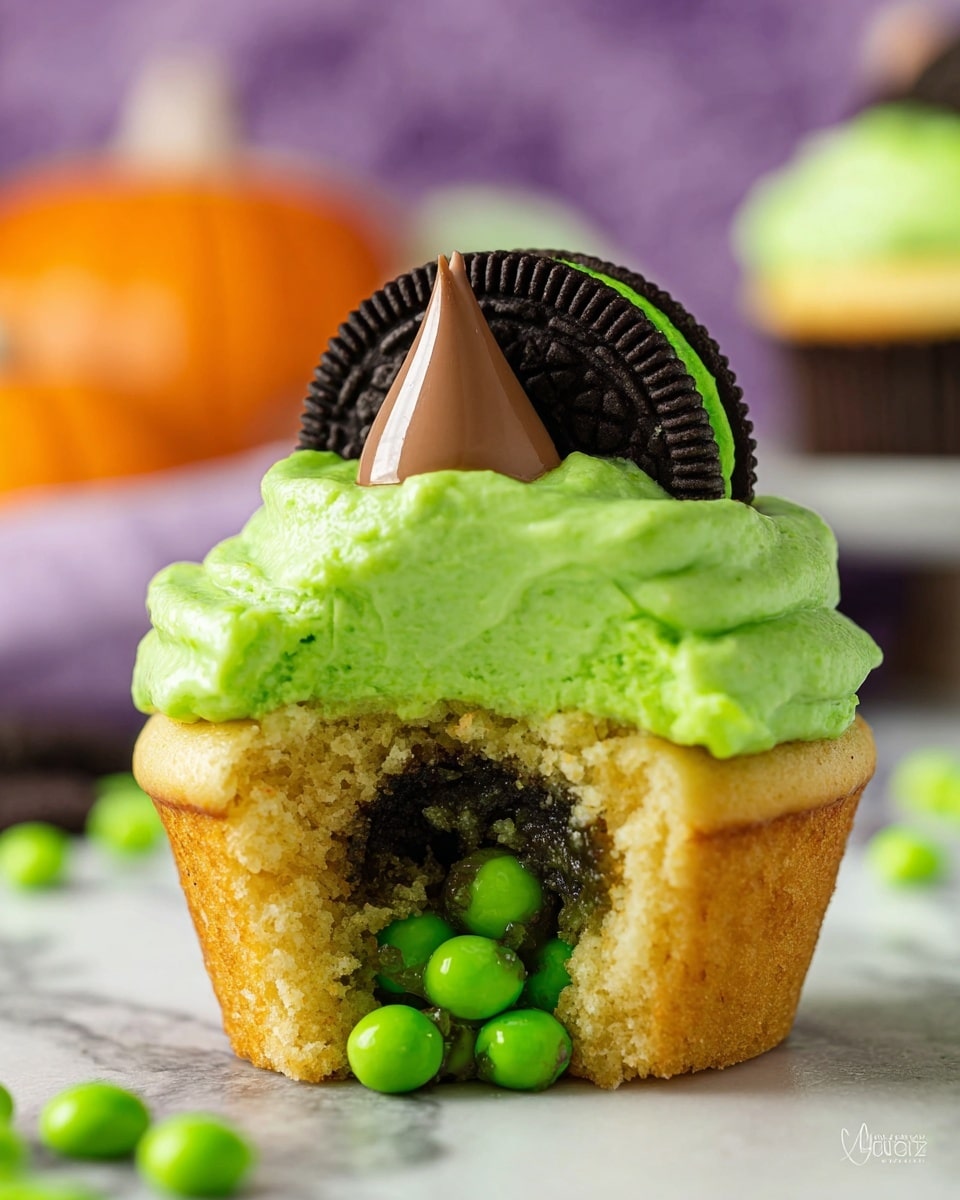
- Purple, orange, and green sprinkles: The surprise colorful crunch inside each cupcake!
- Powdered sugar: Sweetens and thickens the frosting beautifully.
- Purple, orange, and green food coloring: For those signature festive frosting colors.
- Oreo Thins and Hershey’s Kisses: For crafting the whimsical witch hats.
- Pretzel sticks and Tootsie Roll Midgees: The perfect crunchy, bendable parts for witch legs and boots.
Variations
I love making this Witch Crash Cupcakes Recipe my own depending on the occasion or who I’m baking for. Don’t be afraid to swap in your favorite colors or flavors—you can totally make these cupcakes suit your vibe.
- Flavor swaps: I once added a teaspoon of almond extract instead of vanilla for a lovely nutty twist that my friends raved about.
- Dietary variations: You can sub out dairy milk for almond or oat milk and use vegan butter to make these friendly for many diets with great results.
- Color themes: Tried pastels for a spring-themed party and it was magical—sprinkles and frosting in gentle pinks, blues, and yellows really changed the mood.
- Decoration creativity: Instead of Hershey’s Kisses, mini chocolate cones work beautifully for witch hats, in case you want a different texture.
How to Make Witch Crash Cupcakes Recipe
Step 1: Whisk Dry Ingredients
Start by preheating your oven to 350°F and lining a 12-cup cupcake pan with liners. In a large bowl, whisk together the flour, sugar, baking powder, and salt. This combines those dry ingredients evenly, which is key for a smooth batter without pockets of flour or salt.
Step 2: Mix Wet Ingredients
In another bowl, gently mix together melted butter, oil, sour cream, whole milk, eggs, and vanilla extract until smooth and well combined. The sour cream adds a subtle tang and moisture that I absolutely love—it keeps the cupcakes from drying out.
Step 3: Combine and Fill
Add the wet ingredients to the dry and gently stir until just combined. Don’t overmix here because you want your cupcakes to be tender and fluffy—not tough. Then scoop the batter into your lined pan, filling each cupcake about two-thirds full for perfect rising without spills.
Step 4: Bake and Cool
Bake for 15-20 minutes until a toothpick inserted in the middle comes out clean. I found that starting to check at 15 minutes helps avoid overbaking. Once done, let cupcakes cool for 5 minutes in the pan, then transfer to a wire rack to cool completely—frosting warm cupcakes is a no-go!
Step 5: Whip Up the Colorful Frosting
Beat room-temperature butter until creamy with a paddle attachment or hand mixer, then gradually add powdered sugar and vanilla. Add milk a little at a time until your frosting is smooth but pipeable. Divide into three bowls and dye each one purple, green, and orange. Filling three piping bags with large round tips keeps decorating fast and fun.
Step 6: Make Witch Hats and Legs
Here’s the fun crafty part! Place a Hershey’s Kiss on top of a frosting dollop for a hat, then top Oreo Thin cookies with small dollops of colored frosting to create more hats. For legs, stick pretzel sticks into Tootsie Roll Midgees and bent them into little boot shapes. It took me a couple tries to get the angle right, but once you practice, it’s easy and adorable.
Step 7: Fill Cupcakes with Sprinkles and Assemble
Carefully core out a small hole in the center of each cooled cupcake using a cupcake corer or small knife. Fill each with your colored sprinkles—four cupcakes with purple, four with green, and four with orange. Replace the cupcake tops and frost each group with its matching colored frosting. Add the witch hats on top, then gently stick in two witch legs at opposite angles to create that classic “crash” look. It’s as charming as it sounds!
Pro Tips for Making Witch Crash Cupcakes Recipe
- Don’t overmix your batter: When you combine wet and dry ingredients, stirring gently keeps cupcakes tender and light.
- Use a cupcake corer or small knife carefully: Avoid cutting all the way through the cupcake bottom when making the sprinkle well—it’s a small step, but key for disaster-free assembly.
- Room temperature butter is your best friend: For frosting, this ensures a smooth, creamy texture that pipes beautifully.
- Practice makes perfect with witch legs: Bending the Tootsie Roll Midgees can be tricky at first; warm hands speed the process up and help shape those cute little boots perfectly.
How to Serve Witch Crash Cupcakes Recipe
Garnishes
I love keeping the witch theme going by adding a few edible glitter sprinkles around the cupcakes or piping tiny frosting stars close by. A little extra sparkle makes these cupcakes pop on a dessert table, especially with some fall leaves or a Halloween-themed plate.
Side Dishes
Since these cupcakes are pretty sweet and rich, I usually serve them alongside something light and refreshing like a crisp apple cider or a tangy fruit salad to balance out the flavors.
Creative Ways to Present
For a Halloween party, I placed these cupcakes on a tiered stand surrounded by faux spider webs and mini pumpkins, turning them into a creepy-cute centerpiece. You could also present them in individual clear boxes with a tiny “Wicked Good!” tag for gifting or party favors.
Make Ahead and Storage
Storing Leftovers
I store leftover Witch Crash Cupcakes in an airtight container in the fridge. Covering them lightly with plastic wrap keeps the frosting from drying out without squishing the delicate witch hats. They last well for 3-4 days this way.
Freezing
If you want to prep ahead, freeze the unfrosted cupcakes in a single layer on a tray, then transfer to a freezer bag. When you’re ready to serve, thaw completely before frosting and decorating. I don’t recommend freezing the assembled cupcakes because the frosting and decorations don’t hold up well in deep freeze.
Reheating
If you want warm cupcakes, remove the frosting and decorations before microwaving for about 10 seconds per cupcake, then reapply the frosting. This helps keep the frosting’s texture intact and gives a lovely just-baked warmth to the cake.
FAQs
-
Can I use a different type of sprinkles for the Witch Crash Cupcakes Recipe?
Absolutely! While purple, green, and orange sprinkles keep the Halloween vibe, you can use any colors or types you like. Just choose ones that won’t melt or fade during baking to keep that surprise pop inside the cupcakes.
-
What if I don’t have cupcake corers—can I still make this recipe?
Yes! A small paring knife works well, just be gentle as you hollow out a small hole in the cupcake center. The key is to create a cavity without cutting all the way through the bottom so the sprinkles don’t spill out.
-
How do I keep the witch legs from breaking?
Warming the Tootsie Roll midges slightly in your hands before bending makes them more pliable. Also, bending slowly to a 90-degree angle prevents cracking. If they do break, just use a tiny dab of frosting as edible glue to hold pieces together.
-
Can I make these cupcakes ahead of time?
You can definitely bake the cupcakes a day or two ahead and store them airtight in the fridge. For best presentation, frost and decorate them the same day you serve so the witch hats and legs stay fresh and stable.
Final Thoughts
I absolutely love how this Witch Crash Cupcakes Recipe turns out every single time—moist cupcakes, colorful surprise sprinkles inside, and the whimsical crashed witches that make every bite fun. When I first made these for a party, they were the star of the show, and I’ve been baking and sharing ever since. So, if you want to impress with a Halloween treat that’s as tasty as it is playful, roll up your sleeves and give this a try. You’ll have so much fun assembling and eating them—I promise it’s a recipe you’ll come back to again and again!
Print
Witch Crash Cupcakes Recipe
- Prep Time: 30 minutes
- Cook Time: 15 minutes
- Total Time: 45 minutes
- Yield: 12 cupcakes
- Category: Dessert
- Method: Baking
- Cuisine: American
Description
Witch Crash Cupcakes are a fun and festive Halloween treat featuring moist vanilla cupcakes filled with colorful sprinkles, topped with vibrant tri-colored buttercream frosting, and decorated with charming witch hat chocolates and pretzel stick witch legs. These cupcakes combine a rich, buttery crumb with playful decorations to create a spooky yet delightful dessert that’s perfect for parties and celebrations.
Ingredients
Ingredients for Cupcakes
- 1 ¼ cup all-purpose flour
- ¾ cup granulated sugar
- 1 ¼ teaspoon baking powder
- ¼ teaspoon kosher salt
- ½ cup unsalted butter (melted, 1 stick)
- 1 tablespoon canola or vegetable oil
- ⅓ cup sour cream
- ½ cup whole milk
- 2 eggs
- 1 tablespoon vanilla extract
- 4 tablespoons purple sprinkles
- 4 tablespoons orange sprinkles
- 4 tablespoons green sprinkles
Ingredients for Frosting
- 1 cup salted butter (room temperature, 2 sticks)
- 3 ½ cups powdered sugar
- 1 teaspoon vanilla extract
- 1-2 tablespoons whole milk
- 3-4 drops purple food color
- 3-4 drops orange food color
- 3-4 drops green food color
Ingredients for Decorations
- 12 Oreo Thins
- 12 Hershey’s Kisses
- 2 tablespoons purple frosting
- 2 tablespoons orange frosting
- 2 tablespoons green frosting
- 24 pretzel sticks
- 24 tootsie roll midges
Instructions
- Preheat and Prepare: Preheat the oven to 350 degrees F. Line a 12-count cupcake pan with cupcake liners and set aside to prepare for baking.
- Mix Dry Ingredients: In a large bowl, whisk together the all-purpose flour, granulated sugar, baking powder, and kosher salt until well combined.
- Combine Wet Ingredients: In a medium bowl, mix the melted butter, canola or vegetable oil, sour cream, whole milk, eggs, and vanilla extract thoroughly until smooth and fully incorporated.
- Mix Batter: Gradually add the wet ingredients to the dry ingredients and stir gently until just combined. Avoid overmixing to ensure tender cupcakes.
- Fill Cupcake Liners and Bake: Spoon the batter into the cupcake liners, filling each about two-thirds full. Bake in the preheated oven for 15-20 minutes or until a toothpick inserted into the center comes out clean.
- Cool Cupcakes: Let cupcakes cool in the pan for 5 minutes, then transfer them to a wire rack to cool completely before decorating.
- Prepare Frosting: Using a hand or stand mixer fitted with a paddle attachment, beat the room temperature salted butter until smooth and creamy. Gradually add powdered sugar and vanilla extract, beating until well combined. Add whole milk one teaspoon at a time until the frosting reaches a spreadable consistency.
- Color Frosting: Divide the frosting into three equal portions. Tint each with purple, orange, and green food color drops respectively, mixing until vibrant and consistent.
- Decorate Witch Hats: Place an unwrapped Hershey’s Kiss on top of the frosting to form the witch’s hat. Dab half a tablespoon of purple frosting onto four Oreo Thin cookies to make purple hats; repeat using orange and green frosting for the other cookies.
- Create Witch Legs: Attach a pretzel stick to one end of a tootsie roll midge, bending the tootsie roll at a 90-degree angle to form a boot shape. Use your fingers and a butter knife to shape the boot heel and toe for realism.
- Fill Cupcakes: Using a cupcake corer or small paring knife, carefully create a hole in the center of each cooled cupcake without cutting through the bottom. Fill four cupcakes with purple sprinkles, four with orange sprinkles, and four with green sprinkles, then replace the removed cupcake ‘lid.’
- Frost Cupcakes: Frost the filled cupcakes with their matching colored frosting (purple sprinkles with purple frosting, etc.) using piping bags fitted with large round tips for a smooth finish.
- Assemble Decorations: Top each frosted cupcake with its corresponding colored witch hat made from the Oreo Thin and Hershey’s Kiss combo.
- Add Witch Legs: Insert two witch legs made from pretzel sticks and shaped tootsie rolls into each cupcake at opposite angles to simulate a crashed witch.
Notes
- Be careful not to overmix the batter to keep cupcakes light and fluffy.
- Allow cupcakes to cool completely before coring and frosting to prevent frosting from melting.
- Use a cupcake corer or paring knife gently to avoid cutting through the cupcake bottom.
- You can adjust the food coloring drops to achieve your desired intensity for frosting colors.
- For a dairy-free option, substitute milk and butter with plant-based alternatives.
- Decorations like witch hats and legs can be prepared in advance and stored at room temperature.
Nutrition
- Serving Size: 1 cupcake
- Calories: 912 kcal
- Sugar: 74 g
- Sodium: 1005 mg
- Fat: 38 g
- Saturated Fat: 19 g
- Unsaturated Fat: 15 g
- Trans Fat: 1 g
- Carbohydrates: 138 g
- Fiber: 4 g
- Protein: 11 g
- Cholesterol: 100 mg
