
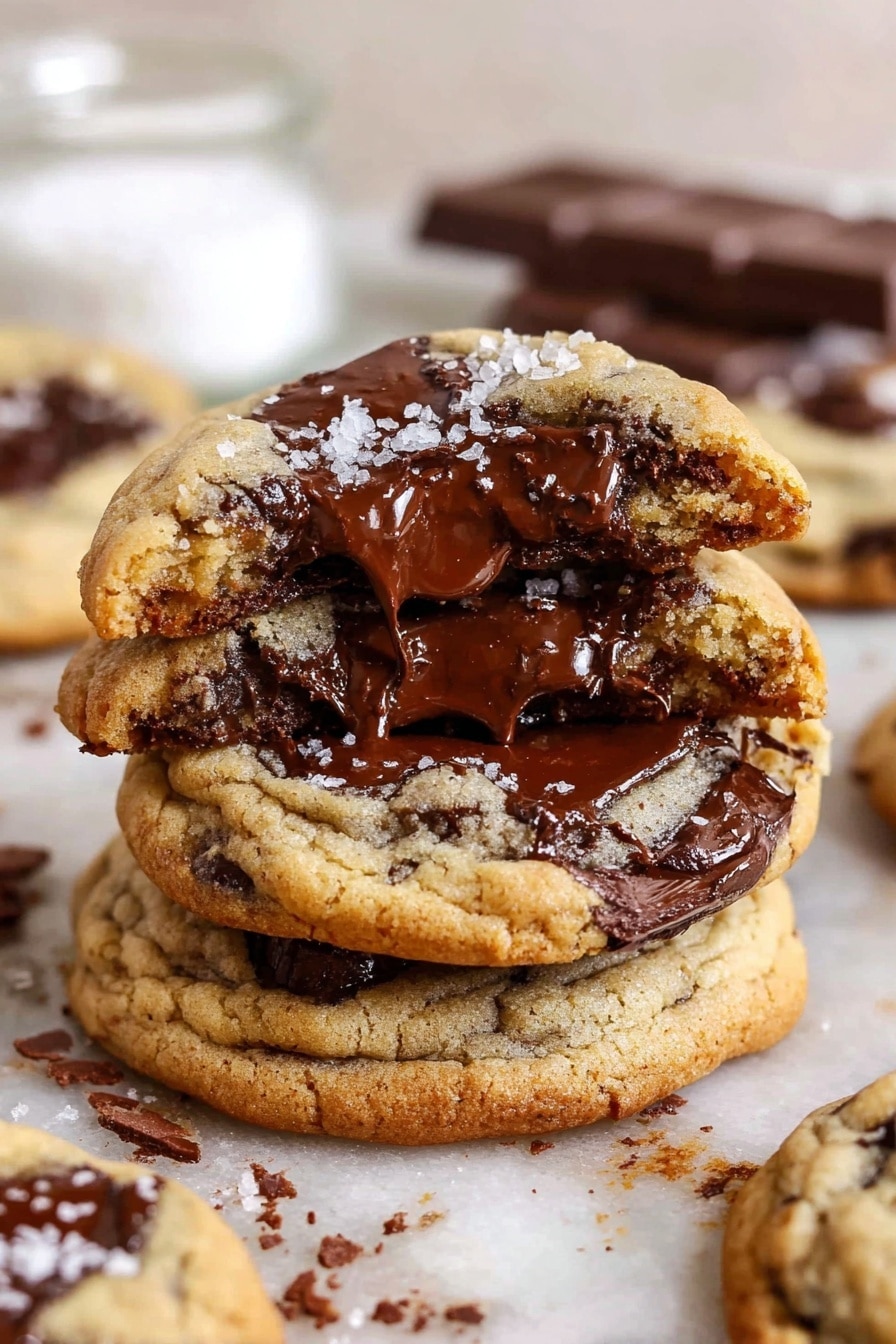
If you’ve ever dreamed of biting into a cookie that’s perfectly soft and chewy on the inside, with just the right crisp edges and rich, buttery chocolate chunks melting in your mouth, then you’re about to hit the jackpot. Today I’m sharing The BEST Chocolate Chip Cookies (Bakery Style) Recipe — my absolute go-to for homemade cookies that taste like they just came from a fancy bakery. Trust me, once you try this, you’ll never go back to your old cookie recipe!
Why You’ll Love This Recipe
- Perfect Texture: Crispy edges with soft, gooey centers — just like your favorite bakery cookies.
- Flavor Bomb: A lovely mix of brown sugar and honey adds depth and that irresistible butterscotch note.
- Simple Ingredients: No weird extras — just pantry staples blended to cookie perfection.
- Make-Ahead Friendly: Chilling the dough overnight really amps up the flavor and texture.

Ingredients You’ll Need
Each ingredient in this recipe works in harmony to give you those bakery-style cookies you crave. Using room temperature butter and egg helps with better mixing and texture, and choosing a quality dark chocolate really makes a difference.
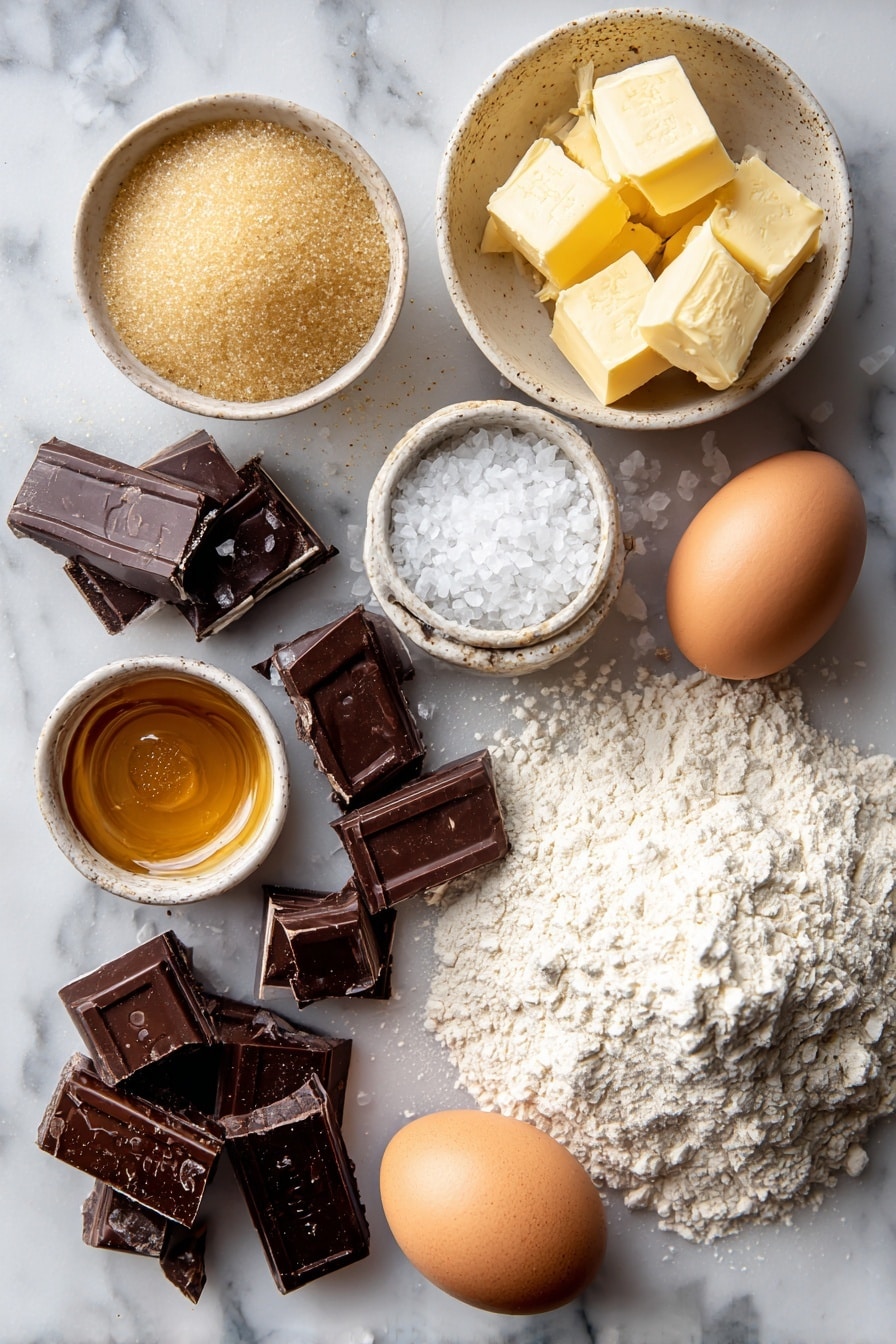
- All-purpose flour: The foundation of your cookie—choose a good quality flour for best results.
- Baking soda: Helps the cookies rise just enough without puffing up too much.
- Salt: Balances sweetness and enhances flavor; adjust depending on your butter’s salt content.
- Salted butter: Brings richness and moisture; make sure it’s softened but not melted.
- Dark brown sugar: Adds deep molasses flavor and chewiness.
- Granulated sugar: Provides crisp edges and balances out sweetness.
- Pure vanilla extract: The secret to that warm, inviting aroma and flavor.
- Honey or corn syrup: Keeps cookies soft and adds subtle sweetness and shine.
- Large egg: Helps bind ingredients and keeps the dough tender.
- Dark chocolate (55-70% cocoa): Chunky bits melt into gooey pockets—choose quality chocolate for best taste.
- Flaky sea salt: A sprinkle on top brightens up the chocolate and adds a gourmet touch.
Variations
I love how versatile this recipe is—you can tweak it to suit your mood or dietary needs. Don’t be afraid to get creative; some of my favorite variations have become family staples!
- Nuts: I often toss in chopped walnuts or pecans for an added crunch and earthy flavor.
- Milk Chocolate Swap: For a creamier, sweeter cookie, I swap dark chocolate for milk chocolate chunks—just remember it melts faster!
- Gluten-Free: Try a 1:1 gluten-free baking flour blend to make these cookies gluten-free without sacrificing texture.
- Vegan Option: Use vegan butter and an egg substitute like flax eggs; texture will be slightly different but still delicious.
How to Make The BEST Chocolate Chip Cookies (Bakery Style) Recipe
Step 1: Whisk dry ingredients evenly
Start by mixing together the all-purpose flour, baking soda, and salt in a medium bowl. Whisking these together ensures the leavening agent and salt are evenly spread through the dough so every bite tastes consistent. I like to just set this aside while I work on the wet ingredients.
Step 2: Cream butter and sugars to perfect texture
This is where the magic begins—in a large bowl (or stand mixer bowl), combine softened salted butter, dark brown sugar, granulated sugar, and the vanilla extract. I personally love using the creaming method by hand with a sturdy rubber spatula; smear and press vigorously until the mixture looks smooth and a bit fluffy, kinda like damp sand. If you’re using a mixer, medium-low speed for 1-2 minutes does the trick. Make sure to scrape the sides so nothing hides in the corners!
Step 3: Add honey and egg for moisture and binding
Next, stir in the honey (or corn syrup). This little addition keeps your cookies soft and adds a subtle glow to the dough. Then crack in the egg and mix until everything is fully combined. Make sure the egg is at room temperature for best blending — cold eggs can make the dough seize up.
Step 4: Fold in flour and chocolate chunks gently
Dump your dry ingredients into the butter mixture all at once. Stir gently but thoroughly until most of the flour is absorbed. Before fully mixing in all the flour, fold in those gorgeous chunks of dark chocolate. The goal is a soft, moist dough studded with chocolate pieces evenly distributed throughout. If you overmix, the dough can get tough, so patience here pays off!
Step 5: Chill dough for flavor and texture
This is where the recipe really shines. Cover the bowl with plastic wrap, pressing it directly against the dough’s surface to prevent drying out, and pop it in the fridge for at least 8 hours, ideally up to 24. I know waiting can be tough, but I promise it’s worth it. The chilling lets the flavors deepen and the gluten relax, which makes for the best texture you’ll ever taste in a homemade cookie.
Step 6: Shape and bake with care
When you’re ready to bake, preheat your oven to 350°F and line your cookie sheets with parchment paper. Using a 1½-ounce cookie scoop or your hands, form the dough into smooth balls. If the dough is too cold and hard, let it rest at room temperature for about 20-30 minutes to soften so it’s easier to scoop and shape. Place the balls on the trays two inches apart, and press a few extra chocolate chunks on top for a pretty bakery touch. Bake 6 cookies per tray for 9-11 minutes—edges should be golden and centers still soft. Remember, don’t overbake, as the cookies will finish cooking on the hot cookie sheet after coming out of the oven.
Smaller cookies (divide into 18 balls) take 8-10 minutes—try it if you want crispier cookies! When done, transfer the sheets to wire racks and cool the cookies for a couple minutes before moving them fully to cool. Don’t forget to sprinkle flaky sea salt while they’re still warm—it’s my secret weapon for balancing the sweetness and enhancing complexity.
Pro Tips for Making The BEST Chocolate Chip Cookies (Bakery Style) Recipe
- Room Temperature Ingredients: Using butter and egg at room temp helps you cream sugars properly and mix dough evenly without lumps.
- Don’t Skip the Chill: I used to rush baking, but chilling the dough overnight definitely improves texture and flavor depth.
- Chunk Your Chocolate: Larger chunks instead of chips melt into luscious pockets, making each bite a little piece of heaven.
- Watch Baking Time Closely: Cookies look slightly underdone in the center when you pull them — they’ll firm up as they cool.
How to Serve The BEST Chocolate Chip Cookies (Bakery Style) Recipe
Garnishes
I always sprinkle a pinch of flaky sea salt on top of the cookies right after baking because it elevates the chocolate’s richness and balances the sweetness beautifully. Sometimes, I add a little dusting of cinnamon or a spread of nut butter on warm cookies for a little extra indulgence.
Side Dishes
These cookies pair perfectly with a cold glass of milk or a steaming cup of coffee or tea. For an extra special treat, serve alongside vanilla ice cream or a fruit compote for dessert parties. I’ve even dunked them in homemade hot chocolate on chilly evenings, and my family goes crazy for that combo.
Creative Ways to Present
For birthday parties or holidays, I like stacking these cookies with parchment layers in a classic tin and decorating the top cookie with festive sprinkles or edible glitter. Another favorite is cutting the dough into small disks before baking, then sandwiching them with frosting or chocolate ganache for cookie sandwiches—always a hit!
Make Ahead and Storage
Storing Leftovers
I store leftover cookies in an airtight container at room temperature, separating layers with parchment paper to keep them from sticking. They usually last 3-4 days perfectly, maintaining that chewy texture I love.
Freezing
If I make too much dough, I freeze portioned cookie balls on a baking sheet, then transfer them to a zip-top bag. Whenever a cookie craving hits, I bake from frozen, adding a couple extra minutes to the bake time, and they come out fresh and delicious every time.
Reheating
To reheat, I pop cookies in the microwave for about 10-15 seconds or in a 300°F oven for 5 minutes to get that just-baked warmth. This brings back the gooey center and slightly crisp edges like they just came out of the oven.
FAQs
-
Can I substitute other types of chocolate for this recipe?
Absolutely! While I recommend dark chocolate (55-70% cocoa) for a rich flavor, you can swap in milk or even white chocolate chunks. Just keep in mind that milk and white chocolate melt differently and can affect baking time slightly. Enjoy experimenting with what you love.
-
How important is chilling the dough?
Chilling the dough isn’t just a suggestion—it really transforms these cookies. The wait allows the flour to hydrate and the flavors to deepen, giving you that perfect chewy texture and intense flavor. If you’re short on time, 4 hours will do, but overnight or up to 24 hours is ideal.
-
Can I make these cookies gluten-free?
Yes! Use a high-quality 1-to-1 gluten-free baking flour blend in place of the all-purpose flour. The texture will be slightly different but still delicious. I recommend chilling the dough overnight to help the gluten-free flours hydrate properly.
-
What if I don’t have a cookie scoop or scale?
No worries! Simply divide the dough into roughly equal balls—about 16 for larger cookies or 18 for smaller ones—and shape them gently by hand. Consistent size helps the cookies bake evenly, but exact precision isn’t a dealbreaker here.
-
How do I prevent flat cookies?
Make sure your butter is softened but not melted, don’t overmix the dough, and definitely chill the dough before baking. Room temperature egg also helps. These steps keep your cookies thick and chewy, not flat.
Final Thoughts
I honestly can’t recommend this The BEST Chocolate Chip Cookies (Bakery Style) Recipe enough. It’s the one I turn to when I want to impress friends, comfort my family, or just treat myself after a long day. The balance of textures and flavors hits just right every time, and the best part is how simple it is to make these feel truly special. So, are you ready to bake a batch? I promise, once you try these cookies, they’ll be your new favorite too!
Print
The BEST Chocolate Chip Cookies (Bakery Style) Recipe
- Prep Time: 10 minutes
- Cook Time: 10 minutes
- Total Time: 8 hours 20 minutes (including chilling time, minimum 8 hours)
- Yield: 16 cookies
- Category: Dessert
- Method: Baking
- Cuisine: American
Description
These BEST Chocolate Chip Cookies deliver bakery-style perfection with a rich, buttery flavor, vanilla undertones, and a hint of honey for a soft, chewy texture. Featuring crisp, caramelized edges and gooey, melty chocolate centers, these cookies offer the ultimate balance of crunch and chewiness, enhanced with flaky sea salt for a gourmet finish.
Ingredients
Dry Ingredients
- 1 ¾ cups (250g) all-purpose flour
- ¾ tsp baking soda
- ¼ tsp salt (or ¾ tsp salt if using unsalted butter)
Wet Ingredients
- 10 tbsp (140g) salted butter, at room temperature
- ¾ cup (165g) packed dark brown sugar
- ⅓ cup plus 1 tbsp (80g) granulated sugar
- 1 tsp (5ml) pure vanilla extract
- 1 tsp (5ml) honey or corn syrup
- 1 large egg, at room temperature
Add-ins
- 7 oz (200g) dark chocolate (55-70% cocoa), chopped into chunks
- Flaky sea salt, for sprinkling
Instructions
- Mix dry ingredients: In a medium bowl, whisk together all-purpose flour, baking soda, and salt until evenly combined.
- Cream butter and sugars: In a large bowl or stand mixer bowl, combine softened butter with both brown and granulated sugars and vanilla extract. Use a rubber spatula to vigorously mix by hand with the creaming method until smooth and slightly fluffy, resembling damp sand. Alternatively, use a handheld mixer or a stand mixer on medium-low speed for 1-2 minutes, scraping the bowl sides periodically.
- Add honey and egg: Stir in the honey or corn syrup thoroughly, then add the egg and mix until fully incorporated.
- Combine flour and chocolate: Add the flour mixture all at once to the butter mixture. Stir gently just until most of the flour is absorbed, then fold in the chopped chocolate chunks evenly. The dough should be soft and moderately moist.
- Chill the dough: Cover the dough surface directly with plastic wrap and refrigerate for 8 to 24 hours for optimal flavor and texture development. If pressed for time, chilling for at least 4 hours is acceptable but 8 hours is preferred.
- Prepare to bake: Preheat your oven to 350°F (175°C) and line two large cookie sheets with parchment paper.
- Portion dough: Use a 1 ½-oz cookie scoop or divide the dough into 16 balls. If dough is too hard, let it soften at room temperature for 20-30 minutes before scooping. Place dough balls on the baking sheets, spacing them about 2 inches apart. Do not flatten. For smaller cookies, divide into 18 balls.
- Add extra chocolate and bake: Press a few additional chocolate chunks on top of each dough ball. Bake 6 cookies per tray for 9-11 minutes until puffed, golden around edges but still soft in the center. Smaller cookies require 8-10 minutes baking time. Avoid over-baking as cookies will continue cooking on the hot tray.
- Cool and finish: Transfer baking sheets to a wire rack and let cookies cool on the sheets for 2 minutes. Then transfer each cookie carefully to the wire rack to cool completely. While still warm, sprinkle flaky sea salt on top if desired.
Notes
- These cookies have rich, buttery flavor with vanilla and butterscotch notes for a truly decadent experience.
- Texture is key: crisp caramelized edges combine with chewy, gooey centers.
- Chilling the dough enhances flavor and texture, so don’t rush this step if possible.
- Use high-quality dark chocolate with 55-70% cocoa for best flavor balance.
- If you want slightly smaller cookies, divide dough into 18 balls and reduce baking time by 1-2 minutes.
- Sprinkling flaky sea salt on warm cookies adds a delightful contrast to the sweetness.
Nutrition
- Serving Size: 1 cookie (approx. 45g)
- Calories: 220
- Sugar: 15g
- Sodium: 110mg
- Fat: 12g
- Saturated Fat: 7g
- Unsaturated Fat: 4g
- Trans Fat: 0g
- Carbohydrates: 27g
- Fiber: 2g
- Protein: 3g
- Cholesterol: 35mg


