
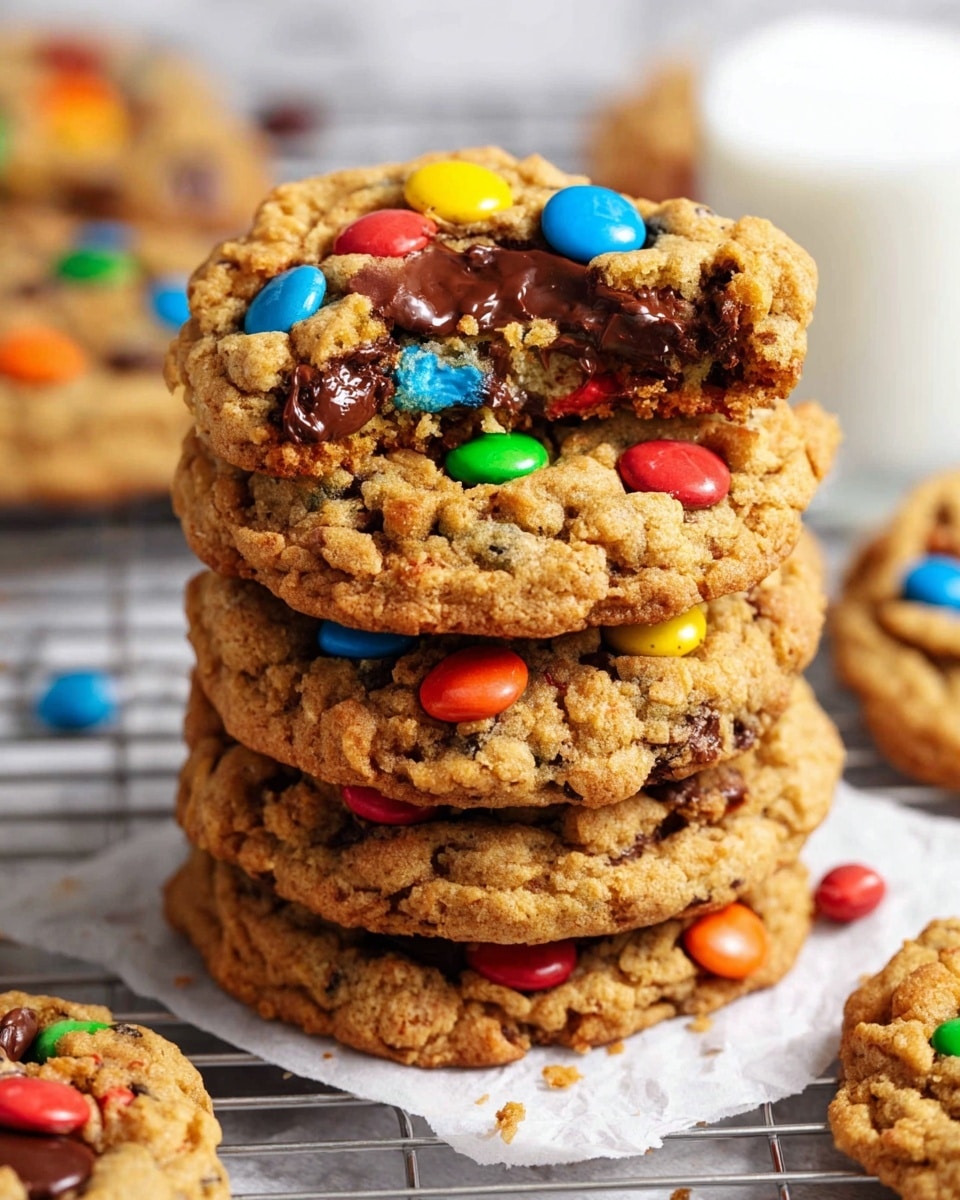
If you’re on the hunt for a cookie that’s got it all—chewy texture, a burst of chocolate, a bit of peanut butter warmth, and a little crunch—then you’re going to fall head over heels for The BEST Chewy Monster Cookies Recipe. I absolutely love this recipe because it brings together so many favorite flavors and textures in one bite, making every cookie feel like a mini celebration. Whether you’re baking for an after-school snack, a weekend treat, or a crowd-pleasing dessert, you’ll find this recipe a surefire winner every single time.
When I first tried this recipe, I was amazed at how perfectly chewy these cookies turned out without being too dense or crumbly. The combination of oats, peanut butter, and those colorful M&M’s makes every bite exciting and satisfying. Plus, it’s easy enough to whip up for beginners yet delicious enough to impress even picky eaters, which is why I always keep this one in my baking rotation. Honestly, if you want The BEST Chewy Monster Cookies Recipe, this is the one you’ll want to bookmark.
Why You’ll Love This Recipe
- Perfectly Chewy Texture: Thanks to the oats and peanut butter, these cookies stay chewy without becoming cakey or dry.
- Flavor Packed: Each cookie is bursting with rich peanut butter, warm vanilla, and melty chocolate chunks for an all-around crave-worthy bite.
- Kid-Approved Fun: The M&M’s add that colorful kick kids (and adults!) love, making these cookies ideal for parties or school lunches.
- Simple Ingredients: No fancy baking supplies needed — just everyday pantry staples you probably already have on hand.

Ingredients You’ll Need
Every ingredient in The BEST Chewy Monster Cookies Recipe plays a key role in creating that perfect balance of chewy softness, rich flavor, and fun texture. I always recommend using fresh, quality ingredients for best results—especially with things like peanut butter and chocolate chunks.
- All-purpose flour: The sturdy base that holds the cookie together, choose unbleached if you can for a better flavor.
- Baking soda and baking powder: Both help with just the right rise and texture, so don’t skip either.
- Salt: Balances sweetness and enhances the overall flavor.
- Unsalted butter: Softened to room temperature for easy creaming — this adds richness and moisture.
- Light brown sugar: Adds sweetness and a subtle caramel depth that works beautifully in chewy cookies.
- Peanut butter: Smooth and creamy, it gives these cookies their signature flavor and chewiness.
- Honey: Just a touch to add natural sweetness and help keep the cookies moist.
- Large egg: At room temperature, it binds everything and ensures even texture.
- Pure vanilla extract: A splash to brighten and deepen the cookie flavor.
- Large flake rolled oats: Adds chew and a wholesome touch — make sure you use rolled oats, not instant.
- Dark chocolate chunks: Melty pockets of rich chocolate that contrast perfectly with the peanut butter.
- M&M’s (regular and mini): For fun bursts of color and crunchy candy coating that kids adore.
Variations
I love encouraging you to make The BEST Chewy Monster Cookies Recipe your own. Over the years, I’ve played around with all kinds of variations that keep this recipe feeling fresh and exciting—without losing that signature chewiness we all crave.
- Nut-free version: Swap the peanut butter for sunflower seed butter or a mild almond butter for allergy-friendly alternatives that don’t skimp on flavor.
- Mix-ins galore: Try swapping M&M’s with raisins, chopped nuts, or white chocolate chips depending on what you have or your preferences—I personally adore adding chopped walnuts for a little extra crunch!
- Healthier twist: Substitute half the all-purpose flour with whole wheat flour and use a bit less sugar to create a slightly more wholesome cookie that still satisfies your sweet tooth.
- Seasonal flavors: During holidays, I sometimes add a sprinkle of cinnamon or swap honey for maple syrup for a warm seasonal touch.
How to Make The BEST Chewy Monster Cookies Recipe
Step 1: Whisk Together the Dry Ingredients
Start by combining your flour, baking soda, baking powder, and salt in a medium bowl. Give it a good whisk to evenly mix everything together. This step helps make sure your leavening agents are spread throughout the dough, so your cookies bake evenly without any unexpected fluff or flat spots.
Step 2: Cream Butter, Sugar, and Peanut Butter
In a large bowl, take your softened unsalted butter and brown sugar and use a spatula or mixer to cream them together until the mixture looks smooth, fluffy, and slightly lighter in color—kind of like wet sand. Then mix in the peanut butter, followed by the honey. This combination creates that luscious, super chewy texture you’re craving!
Step 3: Add Egg and Vanilla
Next, add in the egg (make sure it’s at room temp to avoid curdling) and vanilla extract. Mix just until combined; don’t overbeat. This ensures a tender cookie, so keeping that gentle touch helps maintain a chewy texture later.
Step 4: Stir in Oats and Fold in Dry Ingredients
Now fold in the oats—it adds that great chew and heartiness. Then add the dry flour mixture you whisked earlier, folding it gently just until you don’t see any streaks of flour. Overmixing here can make your cookies tough, so take it slow!
Step 5: Mix in the Chocolate and M&M’s
This is the fun part! Fold the dark chocolate chunks and both sizes of M&M’s right into the dough. They’ll spread throughout the cookies, giving you colorful pockets of sweetness and melty, gooey chocolate in every bite.
Step 6: Chill the Dough
Cover the bowl tightly with plastic wrap, pressing it directly onto the dough’s surface, then pop it into the fridge for 30 minutes. Chilling firms up the dough, which helps prevent the cookies from spreading too thin and keeps them nice and chewy.
Step 7: Scoop and Bake
Preheat your oven to 350°F (175°C) and line two cookie sheets with parchment paper. Use about 2 tablespoons of dough per cookie, rolling it into balls and spacing them at least 2 inches apart. Bake for 10-12 minutes. The edges should be lightly golden while the centers still look soft—resist the urge to over-bake! They’ll set perfectly as they cool.
Step 8: Cool and Enjoy
Let the cookies cool on the baking sheet for about 1 minute before carefully transferring them to a wire rack to cool completely. Trust me, trying to move them too soon can lead to breakage. And if you can’t wait—warm, fresh-out-of-the-oven monster cookies are downright irresistible!
Pro Tips for Making The BEST Chewy Monster Cookies Recipe
- Chill the Dough Properly: I discovered chilling the dough actually keeps the cookies from spreading too thin and enhances that chewy texture.
- Don’t Overmix: When combining your dry ingredients and folding in mix-ins, be gentle to avoid tough cookies.
- Measure Ingredients Accurately: Using a kitchen scale for flour and sugar ensures consistent results every time I bake these.
- Watch the Bake Time Closely: Pulling the cookies out when edges are set but centers seem soft is key—they’ll firm up as they cool for that perfect chew.
How to Serve The BEST Chewy Monster Cookies Recipe
Garnishes
I usually keep it simple here but sometimes sprinkle a few extra mini M&M’s on top right after scooping the dough onto the baking sheet—it gives a little fancy pop that kids go crazy for. For a grown-up twist, a tiny sprinkle of sea salt right after baking really elevates the chocolate and peanut butter flavors.
Side Dishes
These cookies are fantastic on their own, but for a fun dessert platter, I like to serve them alongside cold milk or a scoop of vanilla ice cream. They’re also perfect paired with a warm cup of coffee or tea when you need a cozy afternoon pick-me-up.
Creative Ways to Present
For birthday parties or special occasions, I’ve arranged these cookies on a colorful platter lined with parchment paper and sprinkled some edible glitter or drizzled melted white chocolate over them for a playful look. You can also package them in small cellophane bags tied with a cute ribbon for easy gifting—it’s always a hit!
Make Ahead and Storage
Storing Leftovers
I store leftover monster cookies in an airtight container at room temperature to keep them chewy for up to 4-5 days. If your kitchen is warm, I recommend storing them in the fridge to avoid melty chocolate and preserving freshness, but be mindful that refrigeration can slightly firm up the texture.
Freezing
Freezing these cookies works great! I like to freeze the dough balls on a baking sheet first, then transfer them to a freezer-safe bag. That way, you can bake fresh cookies straight from frozen whenever a craving hits, just add an extra couple minutes to the bake time.
Reheating
To warm up leftover cookies, I pop them in the microwave for about 10-15 seconds or briefly in a low oven (around 300°F). This refreshes that gooey melty center and restores the fresh-baked magic. Just don’t overheat or they’ll lose their chewiness.
FAQs
-
Can I use crunchy peanut butter instead of smooth in The BEST Chewy Monster Cookies Recipe?
Absolutely! Using crunchy peanut butter will add an extra bit of texture inside the cookies, which some people love. Just keep in mind the overall chewiness might be slightly different, but the flavor remains excellent.
-
Why do these cookies stay chewy instead of crunchy?
The combination of peanut butter, rolled oats, and brown sugar helps retain moisture and chewiness. Also, timing your bake to remove the cookies when centers are still soft allows them to set properly without drying out, creating that perfect chewy bite.
-
Can I make this recipe gluten-free?
Yes! Substitute the all-purpose flour with a gluten-free flour blend that measures cup-for-cup. Make sure your oats are certified gluten-free, as they can sometimes be cross-contaminated. The cookies bake and taste just as delicious.
-
What’s the best way to prevent cookies from spreading too thin?
Chilling the dough before baking is key—it firms up the fat (butter and peanut butter) so the cookies hold their shape as they bake. Also, spacing the dough balls at least 2 inches apart prevents them from merging.
Final Thoughts
Honestly, The BEST Chewy Monster Cookies Recipe has become my go-to for baking that truly feels like a hug in cookie form. The way the peanut butter, oats, and chocolate all come together creates a cookie that’s irresistible to both kids and adults in my family—a real crowd-pleaser every time. If you want a cookie that’s chewy, colorful, and full of flavor without any fuss, this recipe is what I recommend you try next. I’m confident you’ll love baking and eating them just as much as I do!
Print
The BEST Chewy Monster Cookies Recipe
- Prep Time: 10 minutes
- Cook Time: 12 minutes
- Total Time: 42 minutes
- Yield: 16 cookies
- Category: Dessert
- Method: Baking
- Cuisine: American
Description
These chewy monster cookies are packed with oats, peanut butter, chocolate chunks, and colorful M&M’s for a deliciously soft and decadent treat. Perfectly moist and chewy with a hint of honey sweetness, these cookies balance flavors and textures for a fun, crowd-pleasing dessert or snack.
Ingredients
Dry Ingredients
- ¾ cup (105g) all-purpose flour
- ½ teaspoon baking soda
- ½ teaspoon baking powder
- ½ teaspoon salt
Wet Ingredients
- ½ cup (113g) unsalted butter, softened
- ¾ cup (165g) packed light brown sugar
- ¼ cup (60ml) smooth regular peanut butter
- 1 tablespoon (15ml) honey
- 1 large egg, at room temperature
- 1 teaspoon (5ml) pure vanilla extract
Add-ins
- 1 cup (100g) large flake rolled oats
- ⅔ cup (113g) dark chocolate chunks
- ⅓ cup (85g) regular M&M’s or other candy coated chocolate
- ⅓ cup (85g) mini M&M’s or other candy coated chocolate
Instructions
- Mix Dry Ingredients: In a medium bowl, whisk together the all-purpose flour, baking soda, baking powder, and salt thoroughly to combine evenly.
- Cream Butter and Sugar: In a large bowl, use a spatula to cream together the softened unsalted butter and packed light brown sugar until the mixture is smooth, evenly blended, and has a fluffy, wet sand-like texture.
- Add Peanut Butter and Honey: Mix peanut butter into the creamed butter and sugar until well incorporated, then blend in the honey fully.
- Incorporate Egg and Vanilla: Add the large egg and pure vanilla extract to the mixture, stirring until everything is well combined and smooth.
- Mix in Oats: Fold the large flake rolled oats into the wet mixture, distributing evenly throughout the dough.
- Combine Dry and Wet Mixes: Add the dry flour mixture to the butter mixture and gently fold just until combined, being careful not to overmix.
- Add Chocolate and Candies: Fold in the dark chocolate chunks along with both regular and mini M&M’s or alternative candy-coated chocolates evenly through the dough.
- Chill the Dough: Place a piece of plastic wrap directly on the surface of the dough in the bowl to prevent drying, then refrigerate for 30 minutes to allow flavors to meld and the dough to firm up.
- Prepare for Baking: Preheat the oven to 350°F (175°C). Line two large baking sheets with parchment paper and set aside.
- Scoop and Shape Cookies: Using about 2 tablespoons of dough per cookie, roll the dough into balls and place them onto the prepared baking sheets, spaced at least 2 inches apart to give room for spreading.
- Bake: Bake in the preheated oven for 10-12 minutes until the cookies are lightly golden around the edges but still soft in the center. They will continue to set as they cool.
- Cool: Let the cookies cool on the baking sheets for 1 minute before transferring them individually to a wire rack to finish cooling completely.
Notes
- For best texture, do not overbake; cookies should still look soft in the center when taken out.
- Chilling the dough enhances flavor and prevents excessive spreading during baking.
- Use room temperature egg for better mixing and texture.
- You can substitute peanut butter with almond or cashew butter if preferred.
- Store cooled cookies in an airtight container at room temperature for up to 5 days or freeze for longer storage.
Nutrition
- Serving Size: 1 cookie
- Calories: 210
- Sugar: 14g
- Sodium: 120mg
- Fat: 11g
- Saturated Fat: 5g
- Unsaturated Fat: 5g
- Trans Fat: 0g
- Carbohydrates: 26g
- Fiber: 2g
- Protein: 4g
- Cholesterol: 25mg


