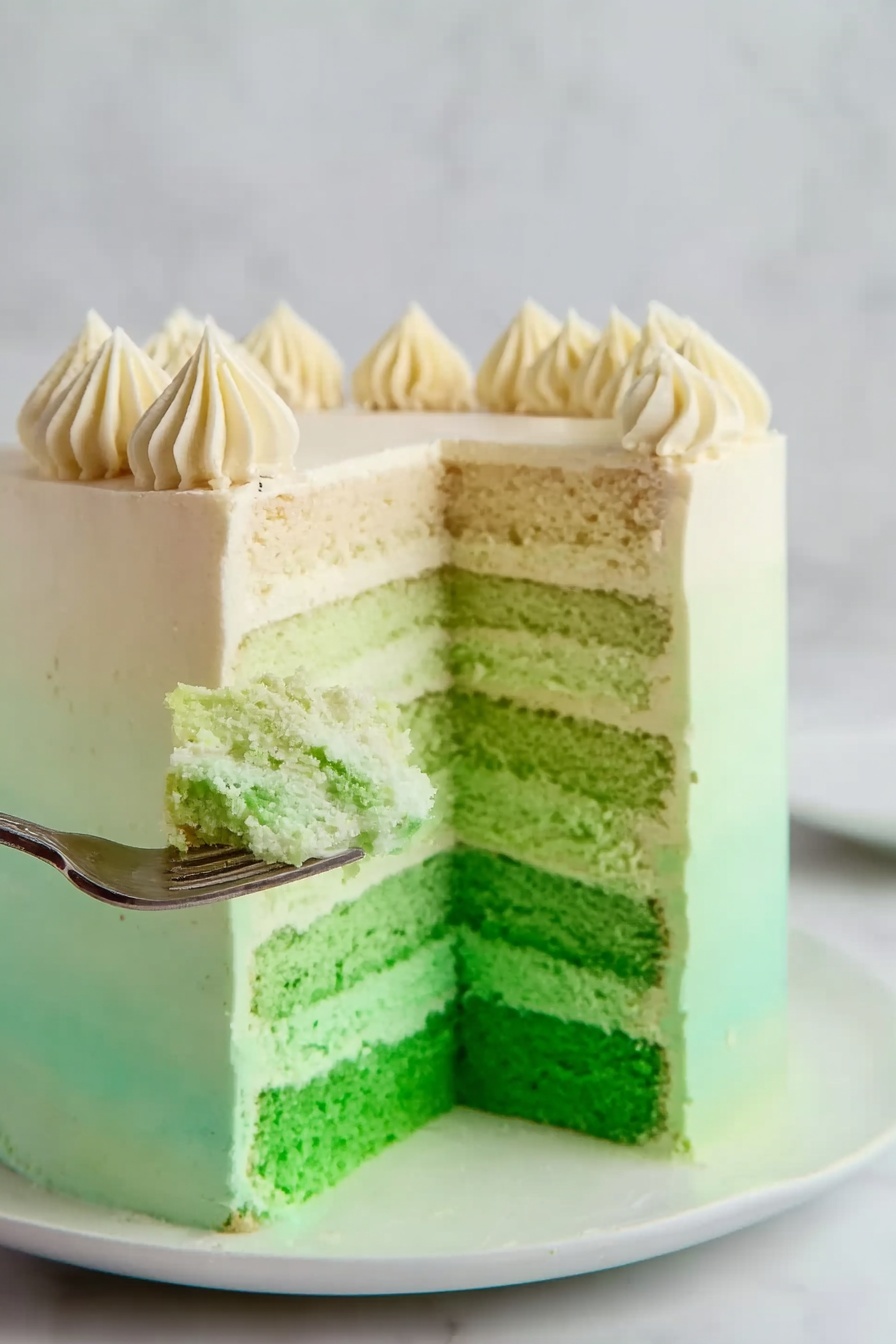
If you’re on the hunt for a show-stopping dessert this March, you’re going to love my St. Patrick’s Day Green Ombre Cake Recipe. This cake isn’t just delicious—it’s a vibrant celebration of all shades of green, perfect for impressing guests or making family celebrations extra festive. When I first tried this recipe, I couldn’t believe how easy it was to create such a stunning ombre effect, and I promise you’ll find the frosting to be smooth, creamy, and just the right balance of sweetness. Let’s dive in and I’ll walk you through how to make a St. Patrick’s Day cake that’s as fun to make as it is to eat!
Why You’ll Love This Recipe
- Beautiful Ombre Effect: The layered shades of green create a stunning visual that’s perfect for St. Patrick’s Day celebrations.
- Light & Fluffy Texture: Using egg whites and vegetable shortening gives you a cake that’s moist without being dense.
- Customizable Frosting Shades: You get to play with the frosting colors to match the cake perfectly, making it a fun project.
- Perfect for Parties & Gatherings: This cake serves a crowd and always gets people talking (and asking for seconds!).

Ingredients You’ll Need
Every ingredient in this St. Patrick’s Day Green Ombre Cake Recipe works together to create a cake that’s light, flavorful, and visually stunning. I always recommend using fresh, room-temperature ingredients for the best texture and flavor, especially when it comes to butter and egg whites.

- Unsalted butter: Softened to room temperature to ensure smooth creaming with sugar and shortening.
- Vegetable shortening: Adds tenderness and helps keep the crumb light and fluffy.
- Granulated sugar: Gives sweetness and helps with structure.
- Egg whites: Using just whites keeps the cake extra light—make sure they’re at room temp for better volume.
- Vanilla extract: Pure vanilla adds warmth and depth to the cake’s flavor.
- All-purpose flour: Provides structure but nothing too heavy; perfect for this kind of layered cake.
- Baking powder: Your rising agent, so the cake layers puff up just right.
- Salt: Balances the sweetness and enhances overall flavor.
- Milk: Adds moisture and richness; whole milk works best here.
- Green food coloring: This is the magic that gives us those gorgeous ombre shades, so don’t skimp!
- Powdered sugar: For silky-smooth frosting that holds its shape.
Variations
I love experimenting with this St. Patrick’s Day Green Ombre Cake Recipe to fit different tastes and occasions. Whether you want to amp up the citrus notes or lighten it up for a festive party, there’s room to personalize without losing the cake’s charm.
- Citrus twist: Adding a teaspoon of lemon zest to the batter really brightens up the flavor and complements the green theme beautifully—I discovered this when looking for a fresher profile.
- Mint flavor: A few drops of mint extract in the frosting can make it feel more festive, but be cautious—it can quickly overpower, so start with a little.
- Dairy-free option: Swap the milk for almond or oat milk, and use dairy-free butter alternatives to make this cake vegan-friendly without sacrificing moisture.
- Chocolate addition: For a fun twist, try layering a thin chocolate ganache between the layers for a surprise element.
How to Make St. Patrick’s Day Green Ombre Cake Recipe
Step 1: Cream the Butter, Shortening & Sugar
Start by creaming your room-temperature unsalted butter and vegetable shortening with the granulated sugar. I use an electric mixer on medium speed until it’s light and fluffy, which usually takes about 3-5 minutes. This is super important because this step traps air that helps give your cake its tender crumb. Then, add the egg whites and vanilla extract, beating well until the mixture is smooth and silky. If your egg whites aren’t at room temperature, they just won’t incorporate as nicely—trust me, I learned this the hard way!
Step 2: Mix Dry Ingredients with Milk
In a separate bowl, whisk together your all-purpose flour, baking powder, and salt. Then, add the milk and mix until just combined so the batter remains light. You don’t want to overmix here—stop as soon as you see the flour disappear to avoid a dense cake. My trick is to fold gently using a spatula toward the end if needed.
Step 3: Create Your Ombre Batter Shades
Divide your batter evenly into five bowls. Now comes the fun part! Add a few drops of green food coloring to four of the bowls, making sure each gets a progressively lighter amount until you have a gradient—darkest green to lightest green, and one bowl left plain. I usually start with six drops in the darkest bowl, then reduce by two drops for each lighter shade. Don’t worry about exact numbers; just eyeball it for a natural ombre effect.
Step 4: Bake the Cake Layers
Spray five 8-inch round cake pans with non-stick cooking spray and line the bottoms with parchment paper rounds to prevent sticking. Pour the batter evenly into each pan—this helps the layers bake evenly. Bake at 350°F for 18-22 minutes, or until a toothpick inserted in the center comes out clean. When you pull them out, let the cakes cool completely on wire racks before moving on. I like to cool mine in the pans for 10 minutes first, then invert onto racks to avoid breakage.
Step 5: Prepare Your Ombre Buttercream Frosting
While your cakes cool, start on the frosting by creaming the unsalted butter until perfectly smooth. Gradually add sifted powdered sugar, beating until it’s fluffy. Mix in vanilla extract and slowly add milk, a little at a time, until you get a creamy, spreadable consistency. Just like with the cake batter, divide the frosting into five bowls and tint four of them with the same green shades you used before. This coordination really makes the ombre effect so magical!
Step 6: Level & Stack Your Cake Layers
Use a cake leveler or a serrated knife to trim the rounded tops off each cake layer. This step is key for getting smooth, even layers in your stacked cake. Start with the darkest green cake layer placed bottom-side up on your cake plate. Spread a thin, even layer of the matching darkest green frosting on top, then layer the second darkest cake layer using the same method. Repeat this process through all five layers, working from darkest to lightest green. Trust me, this precision makes the difference between a sloppy cake and one that looks professionally done.
Step 7: Frost & Blend the Ombre Edges
Pipe lines of frosting along the outside edge of each cake layer, matching the ombre shades, then use a cake scraper to gently blend the gradients around the cake’s sides while smoothing the frosting. I love this step because it’s like frosting magic—those colors merge seamlessly to create that beautiful ombre effect. Chill the cake briefly in the fridge to set the frosting before slicing into 12 glorious portions to share!
Pro Tips for Making St. Patrick’s Day Green Ombre Cake Recipe
- Perfect Food Coloring: I recommend gel food coloring over liquid—it gives more vibrant shades without thinning your batter.
- Cooling Time: Always cool the cakes completely before frosting to prevent melting and sliding layers.
- Even Layers: Using a kitchen scale to portion batter ensures all cake layers bake evenly.
- Don’t Overmix: When adding dry ingredients, mixing just until combined keeps your cake tender.
How to Serve St. Patrick’s Day Green Ombre Cake Recipe

Garnishes
I like to keep things simple with a dusting of edible gold glitter or a few candy shamrocks placed atop the cake for a festive vibe. Sometimes I add a few white chocolate curls for texture, which also provide a nice contrast against the greens. Fresh mint leaves can add a lovely fresh touch and smell too, making your presentation feel fresh and inviting.
Side Dishes
This cake pairs wonderfully with a light cup of mint tea or a creamy Irish coffee to complement the St. Paddy’s theme. If you’re serving it at a party, I like to balance the sweetness with sliced fruit like strawberries or kiwi alongside the cake slices—it’s a nice bright contrast on the palate.
Creative Ways to Present
For a party, I’ve layered small cupcakes matching the cake’s ombre shades around the main cake for a dramatic display. Another fun idea is to serve individual single-layer cakes stacked vertically on clear glass stands—this way guests can admire the gradient while enjoying a perfect portion. Wrapping ribbon in coordinating green shades around the cake board adds a polished look.
Make Ahead and Storage
Storing Leftovers
I store leftover cake in an airtight container in the fridge to keep the frosting stable and fresh. Just slice into portions, cover well with plastic wrap or beeswax wrap, and stack gently if needed. It usually stays perfect for about 3 days—any longer and the layers can start to dry out a bit.
Freezing
If I want to prep in advance, I freeze each unfrosted cake layer wrapped tightly in plastic and foil. When ready to assemble, thaw overnight in the fridge. The frosting can be made ahead and refrigerated too, just re-whip it before frosting to refresh the texture. Freezing assembled cake is tricky because frosting texture changes, so I usually avoid that.
Reheating
Since this is a buttercream cake, reheating isn’t really recommended. That said, if you like your cake slightly warmed, I pop a single slice in the microwave for about 10-15 seconds to soften it just a bit—watch carefully so the frosting doesn’t melt.
FAQs
-
Can I use regular whole eggs instead of egg whites in this recipe?
Yes, you can substitute whole eggs, but the texture will be slightly denser and richer. Using just egg whites creates a lighter, fluffier crumb which I prefer for this layered St. Patrick’s Day Green Ombre Cake Recipe.
-
What type of green food coloring works best?
Gel or paste food colorings are your best bet because they provide vibrant color without thinning your batter or frosting. Liquid food coloring can affect the consistency, so use it sparingly if that’s all you have.
-
How far ahead can I make this cake?
You can bake the cake layers up to two days ahead, keeping them wrapped tightly at room temperature or refrigerated. Frost the cake the day of serving for best results, or assemble and keep refrigerated overnight if necessary.
-
Can I make this cake gluten-free?
Absolutely! Swap the all-purpose flour for a gluten-free flour blend that’s designed for baking. I recommend adding a teaspoon of xanthan gum if your blend doesn’t already contain it for improved texture.
Final Thoughts
I absolutely love how this St. Patrick’s Day Green Ombre Cake Recipe turns out every time. It’s one of those festive treats that not only tastes amazing but also brings a smile as soon as you see those pretty green layers stacked high. Whether you’re baking for a St. Patrick’s Day party, a family gathering, or just because you’re craving a cheerful cake, this recipe won’t disappoint. Give it a try—you’ll impress everyone and enjoy every bite, just like I do in my kitchen!
Print
St. Patrick’s Day Green Ombre Cake Recipe
- Prep Time: 40 min
- Cook Time: 22 min
- Total Time: 1 hr 2 min
- Yield: 12 servings
- Category: Dessert
- Method: Baking
- Cuisine: American
Description
Celebrate St. Patrick’s Day with this festive Ombre Cake featuring five layers of moist white cake tinted in varying shades of green, layered and frosted with smooth buttercream icing. This vibrant cake is perfect for parties and gatherings, combining classic flavors with a playful presentation.
Ingredients
White Cake
- 3/4 cup unsalted butter, softened to room temperature
- 3/4 cup vegetable shortening
- 3 cups granulated sugar
- 12 egg whites, room temperature
- 1 1/2 tablespoon vanilla extract
- 4 1/2 cups all-purpose flour
- 1 1/2 tablespoon baking powder
- 1/2 teaspoon salt
- 1 1/2 cup milk
- Green food coloring
Buttercream Frosting
- 2 cups unsalted butter, room temperature
- 8 cups powdered sugar, sifted
- 4 teaspoons vanilla extract
- 1/2 cup milk
- Green food coloring
Instructions
- Preheat the oven: Preheat your oven to 350 degrees Fahrenheit to prepare for baking the cake layers.
- Cream butter, shortening, and sugar: In a large mixing bowl, cream together the softened unsalted butter, vegetable shortening, and granulated sugar until smooth and fluffy.
- Add egg whites and vanilla: Mix in the 12 room-temperature egg whites and vanilla extract until the mixture is smooth and homogenous.
- Combine dry ingredients and milk: In a separate bowl, whisk together the all-purpose flour, baking powder, and salt. Gradually add the dry mixture alternately with the milk to the creamed mixture, blending until smooth.
- Divide and color the batter: Split the batter evenly among five bowls. Add green food coloring drops into four of the bowls to create different shades of green, leaving one bowl uncolored for the lightest shade.
- Prepare cake pans: Spray five 8-inch round cake pans with non-stick cooking spray and line the bottoms with parchment paper rounds for easy removal.
- Bake the cakes: Pour the batter evenly into the prepared pans. Bake in the preheated oven for 18 to 22 minutes or until a toothpick inserted in the center comes out clean.
- Cool the cakes: Remove cakes from the oven and let them cool completely in the pans before removing.
- Make the frosting: Cream unsalted butter until smooth. Slowly add sifted powdered sugar and mix well until fluffy. Stir in vanilla extract, then gradually add milk to reach desired consistency.
- Color the frosting: Divide the frosting into five bowls. Add green food coloring to four bowls to create matching ombre shades corresponding to the cake layers.
- Level the cake layers: Using a cake leveler or a serrated knife, trim the rounded tops off each cake layer to create flat surfaces for stacking.
- Assemble the cake: Place the darkest green cake layer top side down on a cake plate. Spread a thin, even layer of the darkest shade of green frosting on top. Repeat this process layering progressively lighter shades of green cake and frosting until all layers are stacked.
- Decorate the sides: Pipe broad lines of frosting from each of the shades around the outside edges of the cake layers. Use a frosting scraper to blend the frosting smoothly, creating a seamless ombre effect.
Notes
- The ombre effect is achieved by using various shades of green food coloring in both the cake batter and frosting.
- Using parchment paper in pans ensures easy cake removal without damaging delicate layers.
- Leveling the cake layers ensures a stable and professional-looking stacked cake.
- Applying the frosting in layers and then blending with a scraper gives a smooth gradient finish perfect for St. Patrick’s Day celebrations.
- This recipe makes 12 servings, ideal for medium-sized parties.
Nutrition
- Serving Size: 1 slice
- Calories: 610
- Sugar: 63g
- Sodium: 188mg
- Fat: 29g
- Saturated Fat: 16g
- Unsaturated Fat: 11g
- Trans Fat: 0g
- Carbohydrates: 84g
- Fiber: 1g
- Protein: 5g
- Cholesterol: 62mg


