
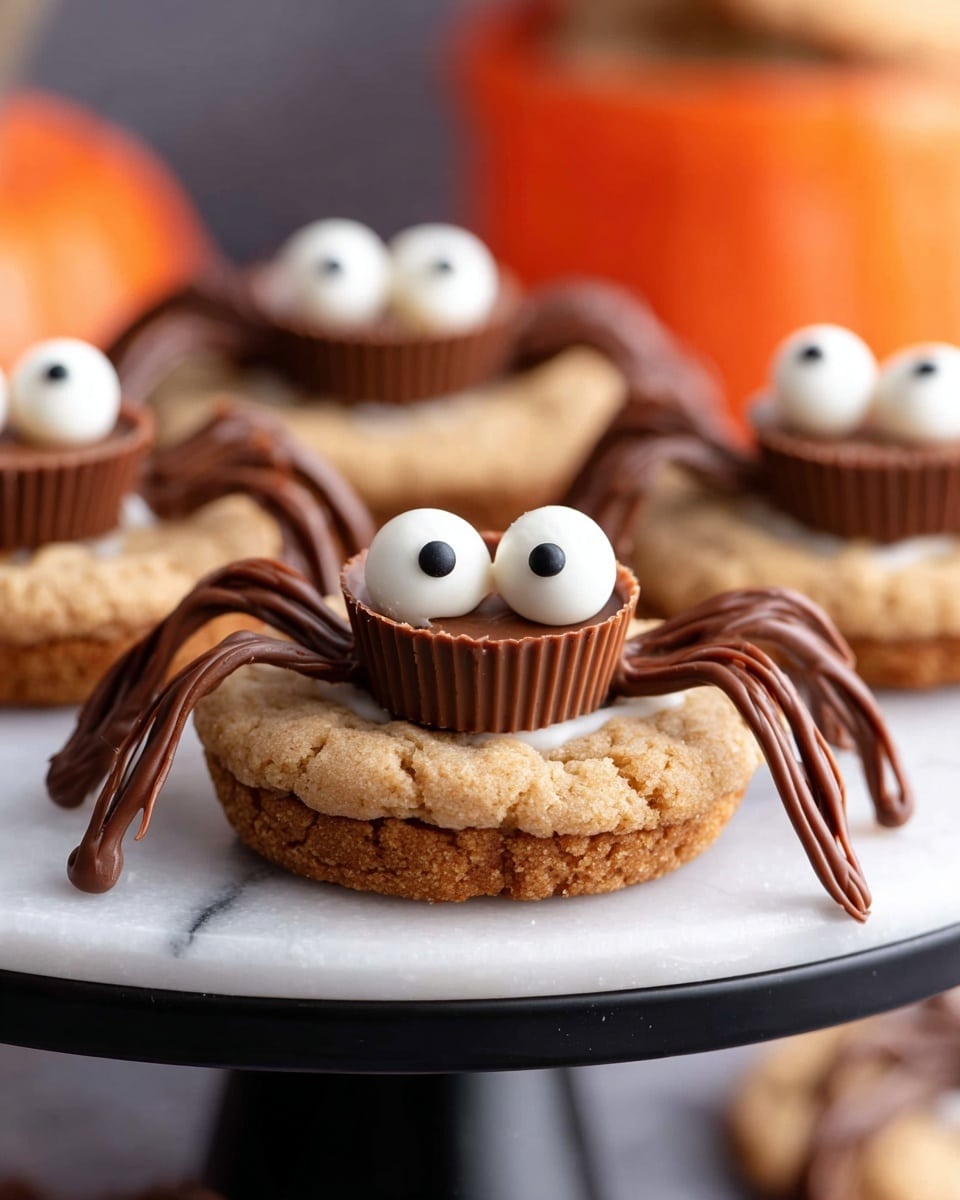
If you’re looking for a fun, festive treat that’s as adorable as it is delicious, you’ve got to try this Spider Peanut Butter Cookie Bites with Candy Eyes and Chocolate Legs Recipe. I absolutely love how these mini spider cookies combine smooth peanut butter goodness with cute candy eyes and a drizzle of chocolate that forms the legs – it’s a total crowd-pleaser, especially around Halloween. Plus, they’re super simple to make, so you can whip up a batch even if you’re short on time but crave a little creative baking session.
Why You’ll Love This Recipe
- Super Quick and Easy: You only need a few ingredients, and the dough comes together in minutes – perfect for last-minute baking emergencies.
- Kid-Friendly Fun: Decorating with candy eyes and chocolate legs makes this a great activity to get the little ones involved and excited about baking.
- Perfect Party Treat: These little spider bites are sure to be the star at any Halloween party or spooky-themed gathering.
- Delicious Peanut Butter Flavor: The rich, creamy peanut butter base has a comforting, nostalgic taste that pairs wonderfully with chocolate and candy.

Ingredients You’ll Need
All you really need are classic peanut butter cookie ingredients plus some fun decorations to turn these into spider cookie bites. I like to keep the ingredient list simple to make this recipe approachable even if baking’s not your main thing.
- Creamy Peanut Butter: Use good quality peanut butter for that rich flavor and creamy texture that makes the cookies so irresistible.
- Granulated Sugar: I even roll the cookie dough in sugar for a light crunch and sweet outer shell.
- Egg: This binds everything together perfectly, giving the cookies their soft but structured form.
- Chocolate Melting Wafers: Perfect for melting down smoothly to pipe the spider legs and attach candy eyes.
- Miniature Reese’s Peanut Butter Cups: They sit right on top of each cookie and become the spider’s body – peanut butter on peanut butter? Yes, please!
- Mini Candy Eyes: The final cute touch that really brings these spider bites to life.
Variations
One of the things I really love about this Spider Peanut Butter Cookie Bites with Candy Eyes and Chocolate Legs Recipe is how easy it is to make your own by swapping ingredients depending on what you have on hand or your dietary needs.
- Nut-Free Version: I once made these with sunflower seed butter for a friend with allergies and swapped Reese’s for nut-free candy cups – still delicious and spooky!
- Darker Chocolate: If you prefer intense chocolate flavor, try semi-sweet chocolate chips instead of melting wafers – just melt them slowly and stir carefully.
- Seasonal Themes: Around Christmas, you can swap candy eyes for mini red and green candies and call them “Christmas critters” instead!
How to Make Spider Peanut Butter Cookie Bites with Candy Eyes and Chocolate Legs Recipe
Step 1: Mix Your Dough and Get It Ready
First things first, preheat your oven to 350°F and line a baking sheet with parchment paper or a silicone baking mat. Next, combine the creamy peanut butter, granulated sugar, and egg in a medium bowl. When I make this, I like to mix just until smooth—don’t overwork it! If you find the dough is super sticky, pop it in the fridge for 10-20 minutes; this makes rolling so much easier.
Step 2: Shape, Sugar-Coat, and Press
Use a medium cookie scoop or your hands to form the dough into twelve 1-inch balls. Roll each ball in granulated sugar so they get a nice little crunch on the outside. Place them on your lined sheet and gently press each ball down with the tines of a fork in a cross pattern—that classic peanut butter cookie look. This step also helps the cookies bake evenly.
Step 3: Bake and Wait for the Magic
Pop the cookies into the oven and bake for 8 to 10 minutes, or until the bottoms just start to show a light golden brown. You want them soft, not crispy. Let them rest 2 minutes on the baking sheet before moving to a cooling rack. This waiting game is key for the cookies to set without falling apart.
Step 4: Top with Reese’s and Cool Completely
While the cookies are still warm, gently press one miniature Reese’s peanut butter cup right onto the center of each cookie. This melts it just slightly and helps it stick perfectly. Let the cookies cool completely on a rack before going in with the chocolate decoration—patience really pays off here!
Step 5: Decorate the Spiders with Chocolate and Candy Eyes
Now for the fun part! Melt your chocolate wafers in the microwave in 30-second intervals, stirring in-between until silky smooth. Spoon the chocolate into a small zip-top bag, snip off a tiny tip, and pipe two little dots on top of each Reese’s cup for the spider’s eyes’ pupils. Then attach two mini candy eyes on top of the chocolate dots. Finally, draw four squiggly legs on each side of the Reese’s with the chocolate. Let the chocolate harden completely before moving or serving.
Pro Tips for Making Spider Peanut Butter Cookie Bites with Candy Eyes and Chocolate Legs Recipe
- Chill the Dough if Sticky: I learned the hard way that cold dough is much easier to handle and prevents cookies from spreading too much while baking.
- Use Parchment or Silicone Mats: This avoids cookies sticking and makes cleanup a breeze—trust me, it saves you time!
- Microwave Chocolate Slowly: Melting the chocolate in short bursts stops it from burning and keeps it smooth for decorating.
- Warm Cookies for Reese’s Placement: Adding the peanut butter cups while cookies are warm helps them stick without sliding off later.
How to Serve Spider Peanut Butter Cookie Bites with Candy Eyes and Chocolate Legs Recipe
Garnishes
I keep the garnish simple—mini candy eyes and the chocolate legs usually do all the work. But for an extra spooky touch, I sometimes sprinkle crushed pretzels around the display to mimic “webs.” This adds a salty crunch that complements the sweetness perfectly.
Side Dishes
These cookie bites shine on their own, but if you want to turn it into a little dessert platter, pair them with a cold glass of milk or a warm cup of hot chocolate. For a party, fresh fruit like apple slices or grapes offer a fresh balance to the rich peanut butter treats.
Creative Ways to Present
I’ve found that serving these Spider Peanut Butter Cookie Bites on a black or spider-web-patterned platter amps up the Halloween vibe. Another fun idea I tried was building a “spider nest” by arranging them on shredded paper grass or edible coconut shreds dyed with black food coloring. It’s such a cute surprise for kids!
Make Ahead and Storage
Storing Leftovers
These cookies keep well at room temperature for about 3 days if you store them in an airtight container, but I noticed the chocolate decorations start losing their snappiness after a day or two. So if you want that perfect texture, try to enjoy them within the first 24 hours.
Freezing
I’ve frozen plain peanut butter cookie dough balls before baking, which makes baking fresh-sized batches super easy later on. Freezing the fully decorated cookies isn’t ideal because the chocolate can get a little dull when thawed, but it still tastes great if you wrap them tightly.
Reheating
If your cookies lose a bit of their warmth, a 10-second zap in the microwave refreshes the peanut butter softness but be careful not to melt the chocolate decorations. I usually skip reheating once decorated and just enjoy them cool.
FAQs
-
Can I make Spider Peanut Butter Cookie Bites with Candy Eyes and Chocolate Legs Recipe dairy-free?
Yes! Swap the regular miniature Reese’s peanut butter cups for a dairy-free alternative or vegan peanut butter cups. Also, make sure your chocolate melting wafers are dairy-free. Many brands offer allergen-free options nowadays.
-
What if I don’t have candy eyes?
You can skip the candy eyes and instead pipe small white dots of melted white chocolate for eyes, or even just use the chocolate dots to simulate eyes. It still looks cute and spooky!
-
How do I prevent these cookies from spreading too much?
Make sure your dough is chilled if it feels too sticky. Also, pressing the cookie balls flat with a fork helps the cookies hold their shape better and bake evenly without spreading too wide.
-
Can I use crunchy peanut butter instead of creamy?
Absolutely! Crunchy peanut butter adds a bit of texture to the cookies, which some people love. Just know it might slightly change the dough’s consistency, so refrigerate a bit longer if needed.
-
How should I serve these at a Halloween party?
Arrange the Spider Peanut Butter Cookie Bites on a fun Halloween platter with themed decorations like plastic spiders, cobwebs, or orange and black confetti for extra flair. Pair with drinks like pumpkin spice lattes or simple milk for a festive spread.
Final Thoughts
I hope you give this Spider Peanut Butter Cookie Bites with Candy Eyes and Chocolate Legs Recipe a try because it’s one of those treats that brings out smiles every time. I discovered this little gem when I wanted a Halloween cookie that wasn’t the usual sugar or chocolate chip—and my family goes crazy for these. Plus, making the spider legs and decorating together is genuinely fun, especially when you have kids or friends around. So go ahead and bake up some cookie magic that’s as sweet and spooky as you want!
Print
Spider Peanut Butter Cookie Bites with Candy Eyes and Chocolate Legs Recipe
- Prep Time: 10 minutes
- Cook Time: 9 minutes
- Total Time: 19 minutes
- Yield: 12 cookies
- Category: Dessert
- Method: Baking
- Cuisine: American
Description
Spider Cookies are a fun and festive Halloween treat featuring soft peanut butter cookies topped with miniature Reese’s peanut butter cups and decorated with candy eyes and chocolate to resemble spiders. These easy-to-make cookies combine classic flavors with a playful presentation, perfect for parties or spooky celebrations.
Ingredients
Cookie Dough
- 1 cup creamy peanut butter
- 1/2 cup granulated sugar, plus more for rolling
- 1 egg
Decoration
- 1/4 cup chocolate melting wafers
- 12 miniature Reese’s peanut butter cups
- 24 mini candy eyes
Instructions
- Make cookie dough: Preheat your oven to 350°F (175°C). Line a baking sheet with parchment paper or a baking mat. In a medium bowl, mix together 1 cup peanut butter, 1/2 cup sugar, and 1 egg until well combined. If the dough feels sticky, refrigerate it for 10-20 minutes to make it easier to handle.
- Roll in sugar: Divide the dough into 12 equal portions, rolling each into a 1-inch ball. Roll each ball in granulated sugar until fully coated. Place the sugared dough balls onto the prepared baking sheet spaced apart. Press down on each ball with a fork to create a crosshatch pattern.
- Bake: Bake the cookies for 8-10 minutes or until the bottoms are very lightly browned. Remove the baking sheet from the oven and let the cookies rest on the pan for 2 minutes to firm up.
- Place peanut butter cups: While the cookies are still warm, gently press one miniature Reese’s peanut butter cup onto the center of each cookie. Transfer the cookies to a cooling rack to cool completely.
- Decorate like spiders: Melt the chocolate melting wafers in a microwave-safe bowl, heating in 30-second intervals and stirring in between until smooth. Transfer the melted chocolate to a zip-top bag and snip off a small corner. Pipe two dots of chocolate onto each peanut butter cup to create eyes, then attach two mini candy eyes onto the dots. Next, use the melted chocolate to draw four legs on each side of the Reese’s cup to resemble spider legs. Allow the chocolate to harden before serving.
Notes
- These peanut butter spider cookies are perfect for Halloween and other fun occasions.
- If the dough is too sticky to handle, chilling it before rolling helps.
- You can substitute chocolate melting wafers with regular chocolate chips if preferred.
- Be sure to allow cookies to cool before decorating to prevent melting and smudging.
- Store cookies in an airtight container at room temperature for up to 3 days.
Nutrition
- Serving Size: 1 cookie
- Calories: 273 kcal
- Sugar: 20 g
- Sodium: 199 mg
- Fat: 17 g
- Saturated Fat: 4 g
- Unsaturated Fat: 12 g
- Trans Fat: 1 g
- Carbohydrates: 26 g
- Fiber: 2 g
- Protein: 8 g
- Cholesterol: 15 mg


