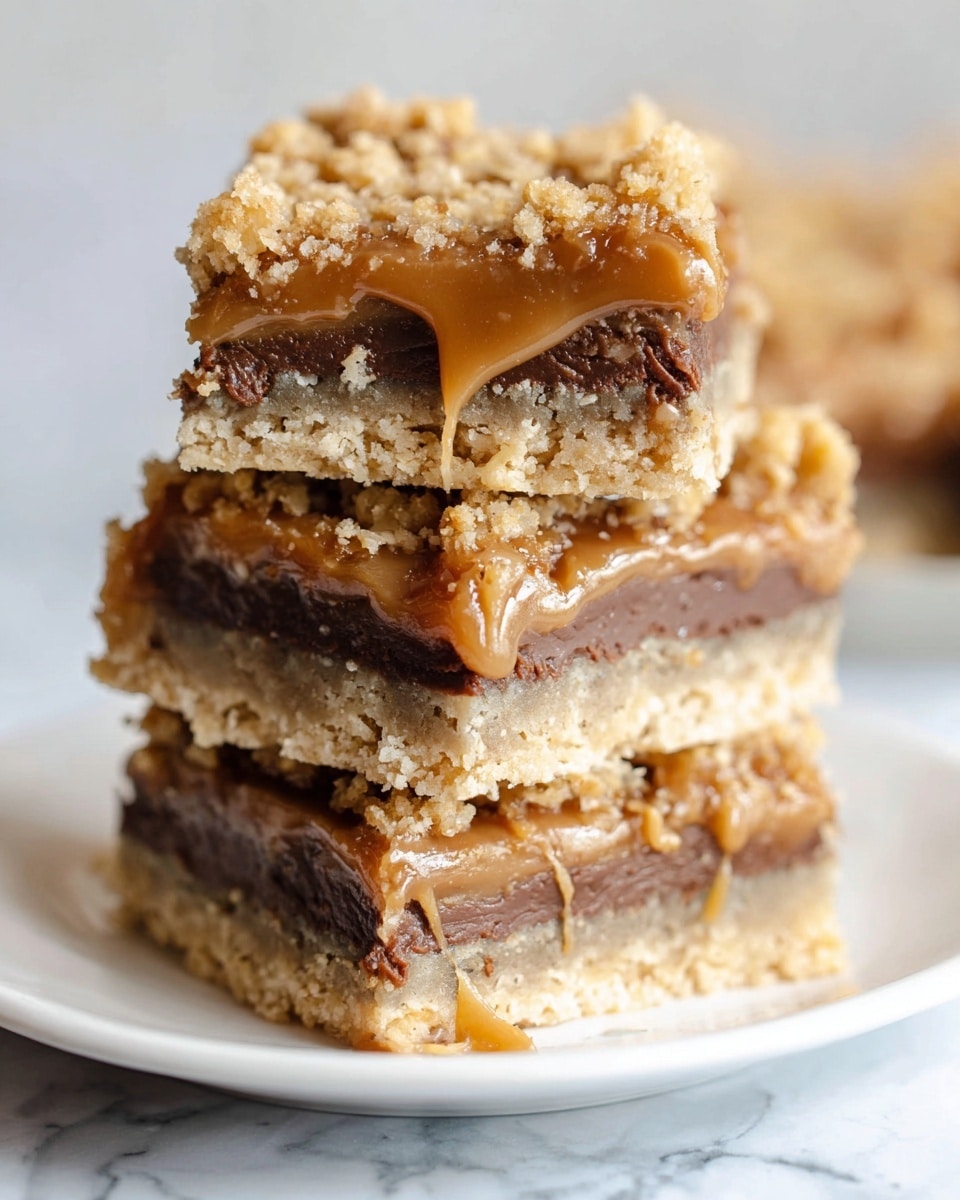
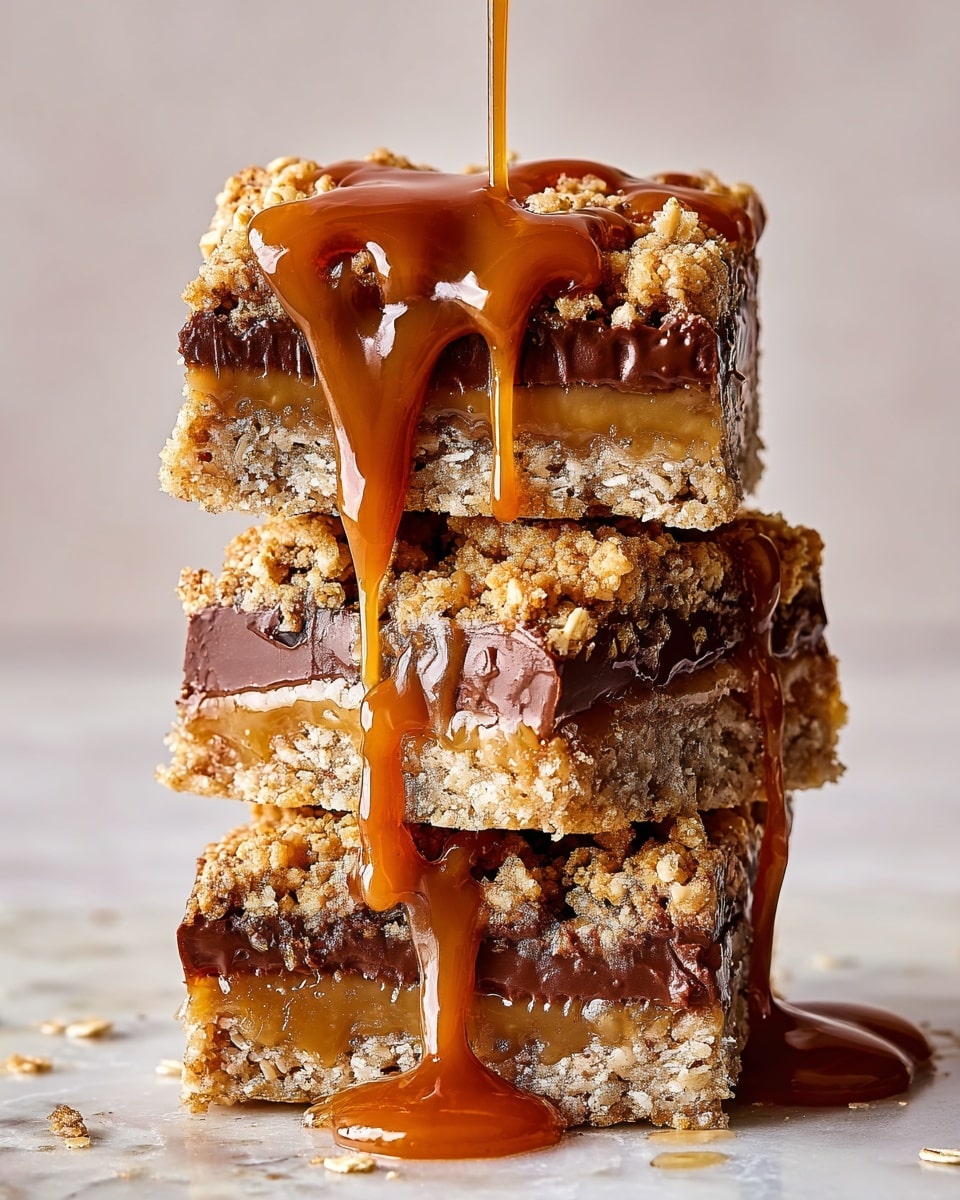
If you’re anything like me, you know there’s something incredibly comforting about homemade treats that marry gooey caramel, melty chocolate, and a little bit of salty goodness. That’s exactly why I adore this Salted Caramel Chocolate Chip Carmelitas Recipe. It strikes that perfect balance between chewy and crispy, sweet and salty, and truly melts in your mouth — making it one of those recipes I go back to time and again.
What makes this recipe really special is how it transforms simple pantry ingredients into a decadent bar cookie that’s perfect for sharing at picnics, potlucks, or just an afternoon coffee break. Once you whip up a batch, you’ll find that everyone can’t get enough of those layers of buttery oats, rich caramel, and smooth chocolate chips. Trust me, the pinch of flaky sea salt sprinkled on top elevates everything to the next level.
Why You’ll Love This Recipe
- Perfect Flavor Balance: The mix of salted caramel and semisweet chocolate chips creates an irresistible sweet-and-salty combo.
- Simple Ingredients: No fancy or hard-to-find components — just pantry staples you probably already have.
- Great for Any Occasion: Whether it’s a casual snack or a special dessert, these carmelitas will impress everyone.
- Easy to Customize: You can tweak the oats, chocolate, or salt level to suit your taste perfectly.

Ingredients You’ll Need
The ingredients here are straightforward, but each plays a key role in giving these Salted Caramel Chocolate Chip Carmelitas their amazing texture and flavor. I always recommend using good-quality chocolate chips and fresh oats for the best outcome.
- Cooking spray: Helps the bars release cleanly from the pan — makes cleanup a breeze.
- All-purpose flour: Provides structure and a tender crumb.
- Old-fashioned oats: For that chewy, wholesome texture that pairs beautifully with caramel.
- Unsalted butter: Using unsalted lets you control the salt balance better; it also adds a rich flavor.
- Light brown sugar: Adds moisture and depth of flavor with its mild molasses notes.
- Pure vanilla extract: A splash enhances all the other flavors.
- Kosher salt: Just a touch in the batter to balance sweetness.
- Soft caramels: The star of the show, melting into a luscious layer.
- Whole milk: Thins out the caramel for perfect pourability.
- Flaky sea salt: Sprinkled on top to boost flavor and add a bit of crunch.
- Semisweet chocolate chips: Melty, chocolatey pockets that complement the caramel beautifully.
Variations
I love playing around with this Salted Caramel Chocolate Chip Carmelitas Recipe depending on my mood or occasion. Don’t hesitate to put your own spin on it — it’s forgiving and great for experimentation.
- Nuts: I sometimes add chopped pecans or walnuts to the oat crumble for extra texture and a toasty flavor.
- Chocolate types: Swap semisweet for dark chocolate if you prefer a deeper, richer taste or even white chocolate for a sweeter twist.
- Salt variations: Try smoked sea salt for unique layers of flavor or use less salt if you prefer it milder.
- Dietary tweaks: For a gluten-free version, use a gluten-free flour blend and certified gluten-free oats — it works surprisingly well!
How to Make Salted Caramel Chocolate Chip Carmelitas Recipe
Step 1: Prep Your Pan and Oven
Start by preheating your oven to 350°F (175°C). Spray your 13″ x 9″ pan with cooking spray and line it neatly with parchment paper—this ensures your caramel bars come out cleanly and you’ll avoid any sticky situations.
Step 2: Mix the Oat Crumble Base
In a large bowl, combine the flour, oats, softened butter, brown sugar, vanilla extract, and kosher salt. I usually mix it with my hands or a sturdy spoon until it becomes crumbly but holds together when you squeeze it. This helps you create that perfect sturdy crust and topping.
Step 3: Bake the Crust
Press about half of the oat mixture firmly into the bottom of your prepared pan. Give it a gentle, even press to ensure a solid base. Bake this crust for around 12 minutes or until it’s just starting to turn golden — you’ll smell that gorgeous buttery aroma, which is my favorite part!
Step 4: Melt the Caramel
While your crust cools for about 10 minutes, melt your caramels and milk in a small saucepan over low heat. Stir gently and patiently — it takes around 12 minutes for the caramel to become smooth and pourable. Then, add your pinch of flaky sea salt to bring out that irresistible salty-sweet charisma.
Step 5: Layer the Chocolate and Caramel
Sprinkle the semisweet chocolate chips evenly over the baked crust. Pour that warm caramel mixture right on top, then quickly and gently spread it out to cover the chocolate. Finish by sprinkling the reserved oat crumble mixture over everything and pressing it lightly to flatten it a bit.
Step 6: Bake Until Golden and Bubbling
Pop the whole pan back in the oven for about 25 minutes. You’ll want to watch for the oat topping to turn a gorgeous golden brown and the caramel bubbling around the edges — that’s your sign it’s ready. Let the pan cool completely before slicing to let everything set perfectly.
Pro Tips for Making Salted Caramel Chocolate Chip Carmelitas Recipe
- Softened Butter Is Key: Make sure your butter is soft but not melted to achieve that perfect crumbly texture.
- Low and Slow Caramel: Melting the caramels and milk over low heat prevents scorching and keeps the caramel silky smooth.
- Press, Don’t Pat: Press your oat mixture firmly for the crust, but gently on top so the texture stays crumbly and light.
- Cool Completely Before Cutting: Cooling lets the caramel set properly; otherwise, you’ll have gooey, messy squares.
How to Serve Salted Caramel Chocolate Chip Carmelitas Recipe
Garnishes
I like to sprinkle a tiny bit more flaky sea salt on top of each square before serving—it enhances the flavors and adds a nice crunch. Sometimes, a drizzle of melted chocolate or even a few toasted nuts on top can make things look gorgeous for guests.
Side Dishes
These carmelitas go wonderfully with a hot cup of coffee or your favorite tea. For a party, I sometimes serve them alongside fresh berries or a simple fruit salad to lighten the richness.
Creative Ways to Present
For birthdays or holidays, I’ve layered these bars in pretty mason jars or wrapped them individually in parchment tied with twine for a charming gift. You can also cut them into bite-sized squares for easy finger food at gatherings.
Make Ahead and Storage
Storing Leftovers
I store leftover carmelitas in an airtight container at room temperature for up to 3 days. They stay chewy and delicious, though I’ll admit sometimes I sneak a second batch because they disappear so fast!
Freezing
Freezing these bars works beautifully. I cut them into squares, wrap each one individually in plastic wrap, then store them all in a freezer-safe bag. When I’m ready to enjoy, I just thaw them at room temperature or warm briefly in the microwave.
Reheating
For a warm treat, I pop a square in the microwave for about 10-15 seconds. The caramel softens even more, and it tastes like it just came from the oven. Just be careful not to overheat or the chocolate might get too melty!
FAQs
-
Can I use store-bought caramel sauce instead of soft caramels?
Yes, you can substitute good-quality store-bought caramel sauce for soft caramels. Just warm it gently and mix with milk to achieve a similar consistency to the recipe’s melted caramel before pouring over the chocolate chips.
-
What’s the difference between carmelitas and regular blondies?
Carmelitas have that signature oat crumble topping and bottom crust with a gooey caramel layer in the middle, while blondies are more like a dense, fudge-like bar without the oat texture or caramel layer. Carmelitas offer a delightful chewy and crunchy contrast.
-
Can I use quick oats instead of old-fashioned oats?
Old-fashioned oats are best because they provide more texture and chew. Quick oats tend to break down more and might make the bars less sturdy or chewy than intended.
-
How do I prevent my caramel from hardening after baking?
Make sure you melt the caramels with milk thoroughly and bake just until the caramel is bubbling but not overly browned. Cooling completely before cutting also helps caramel set with a soft, chewy texture rather than hardening.
Final Thoughts
I’ve made this Salted Caramel Chocolate Chip Carmelitas Recipe countless times, and it never gets old. Each bite reminds me of cozy afternoons and happy memories with friends and family gathered around. If you’re looking for a dessert bar that’s simple, satisfying, and downright addictive, this one’s for you—go ahead and make it your own, I promise you won’t regret it.
Print
Salted Caramel Chocolate Chip Carmelitas Recipe
- Prep Time: 15 mins
- Cook Time: 37 mins
- Total Time: 1 hr 2 mins
- Yield: 12 bars
- Category: Dessert
- Method: Baking
- Cuisine: American
Description
Deliciously chewy and rich Carmelitas featuring a buttery oat crust layered with gooey caramel and semisweet chocolate chips, topped with a golden oat crumble and a hint of flaky sea salt.
Ingredients
Crust and Topping
- 2 cups (240 g) all-purpose flour
- 2 cups old-fashioned oats
- 1 1/2 cups (3 sticks) unsalted butter, softened
- 1 1/2 cups (320 g) packed light brown sugar
- 2 tsp pure vanilla extract
- 1/4 tsp kosher salt
Carmel Layer
- 1 (11-oz) bag soft caramels
- 1/4 cup whole milk
- Pinch of flaky sea salt
Topping
- 2 cups semisweet chocolate chips
Other
- Cooking spray for greasing pan
- Parchment paper for lining pan
Instructions
- Preheat and prepare pan: Preheat your oven to 350°F (175°C). Grease a 13″ x 9″ baking pan with cooking spray, then line it with parchment paper to ensure easy removal of the Carmelitas.
- Mix crust and topping base: In a large bowl, combine the all-purpose flour, old-fashioned oats, softened unsalted butter, packed light brown sugar, pure vanilla extract, and kosher salt. Mix until the ingredients become crumbly and well combined.
- Press crust: Press half of the oat mixture firmly into the bottom of the prepared pan to create the crust layer. Set aside the remaining oat crumble for the topping.
- Bake crust: Bake the crust in the preheated oven until it just begins to turn golden brown, about 12 minutes. Remove from oven and let it cool for 10 minutes to set.
- Prepare caramel layer: While the crust is baking, place the soft caramels and whole milk in a small saucepan over low heat. Stir occasionally until the caramels are fully melted and smooth, approximately 12 minutes. Stir in a pinch of flaky sea salt to enhance the caramel flavor.
- Assemble layers: Once the crust has cooled, evenly scatter the semisweet chocolate chips over the baked crust. Pour the warm caramel mixture over the chocolate chips, gently spreading it to cover them completely. Then, sprinkle the reserved oat crumble over the caramel layer, pressing gently to flatten it evenly.
- Final bake: Return the pan to the oven and bake until the oat crumble topping is golden and the caramel is bubbling around the edges, about 25 minutes.
- Cool and serve: Allow the Carmelitas to cool completely in the pan before slicing into 12 squares and serving. Cooling ensures they set properly for clean slices.
Notes
- Ensure the caramel is melted slowly on low heat to avoid burning.
- Using parchment paper makes removing the bars easier and helps with clean edges.
- Let the Carmelitas cool fully before slicing for the best texture.
- Flaky sea salt enhances the caramel flavor but can be omitted if unavailable.
- Storage: keep in an airtight container at room temperature for up to 5 days.
Nutrition
- Serving Size: 1 bar (approx. 80g)
- Calories: 380
- Sugar: 30g
- Sodium: 110mg
- Fat: 22g
- Saturated Fat: 13g
- Unsaturated Fat: 8g
- Trans Fat: 0g
- Carbohydrates: 44g
- Fiber: 3g
- Protein: 4g
- Cholesterol: 45mg


