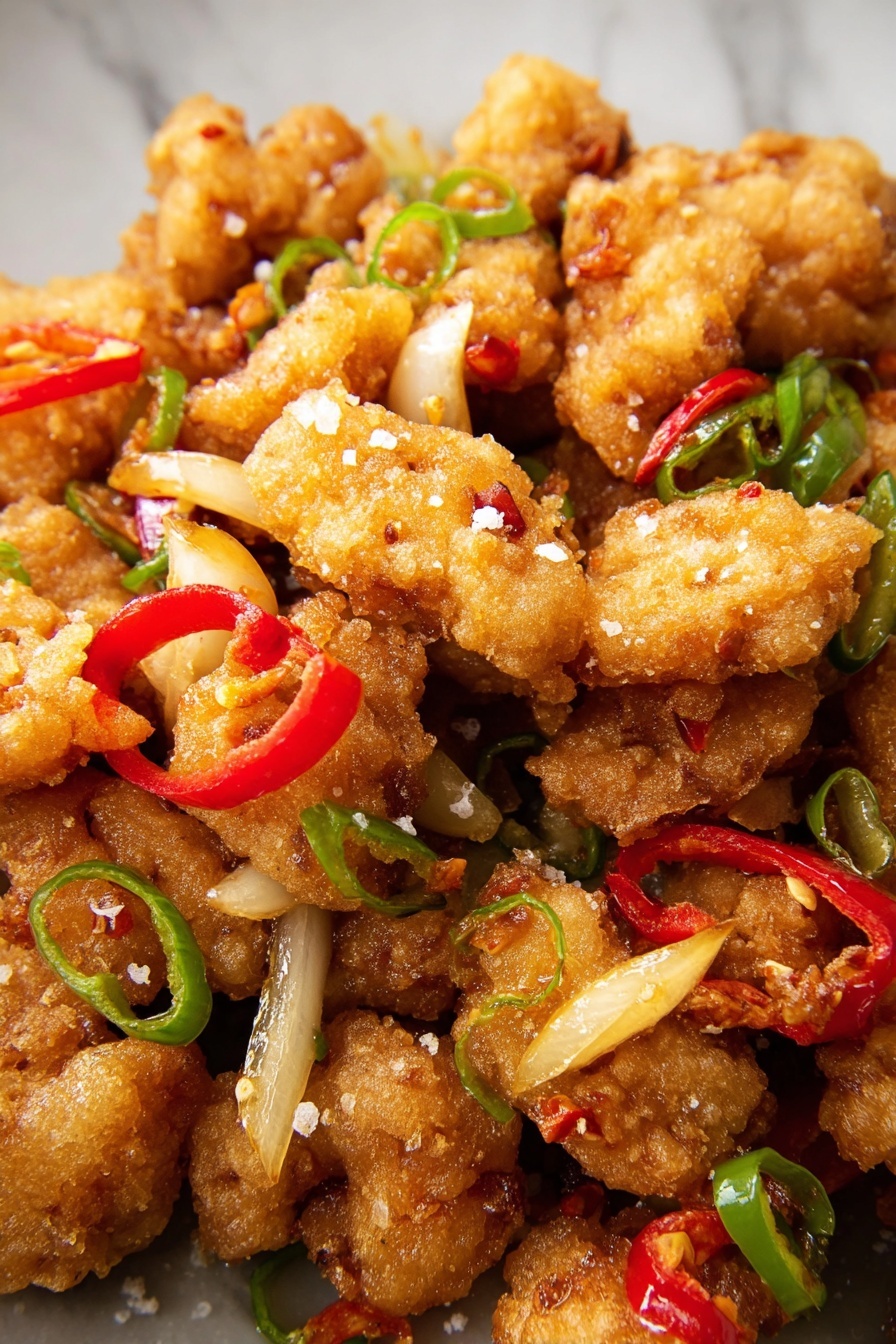
If you’re on the hunt for a seriously addictive dish to liven up your dinner table, you have to try this Salt and Chilli Chicken Recipe. It’s crispy, spicy, and packed with flavor from the first bite to the last. I absolutely love how this recipe balances that perfect salty kick with fresh chilli heat — it’s one of those meals that I keep coming back to because it’s just so darn satisfying. Stick with me, and I’ll walk you through all my best tips and tricks so your Salt and Chilli Chicken comes out perfect every single time.
Why You’ll Love This Recipe
- Perfect Crispy Texture: The magic of coating the chicken twice with cornflour keeps it irresistibly crunchy.
- Balanced Heat and Flavor: Combining fresh birds eye chillies with Chinese five-spice gives a complex yet approachable spice profile.
- Quick and Easy to Make: Despite looking gourmet, it comes together in under an hour with simple steps.
- Family Favorite: My family goes crazy for this dish and I bet yours will too!

Ingredients You’ll Need
This Salt and Chilli Chicken Recipe calls for simple ingredients that work beautifully together to create layers of flavor and texture. I always recommend getting fresh chillies and using boneless skinless chicken thighs because they stay juicy after frying.

- Boneless Skinless Chicken Thighs: Juicy and tender, thighs hold up better during frying than breast meat.
- Chinese 5 Spice: Adds warm aromatic notes that pair wonderfully with the chilli heat.
- White Pepper: Gives a subtle heat and peppery nuance that’s different from black pepper.
- Fine/Table Salt: Essential for seasoning and enhancing all the other flavors.
- Sesame Oil: Adds nuttiness and depth to the chicken marinade.
- Garlic (grated and diced): Imparts pungency and sweetness, used at different stages for maximum impact.
- Cornflour/Cornstarch: The secret to that extra crisp coating; plus some extra for coating before frying.
- Egg (beaten): Helps the coating stick to the chicken perfectly.
- Vegetable Oil: For deep frying; a neutral oil with a high smoke point is best.
- White Onion, Red and Green Peppers: Adds fresh crunch and sweetness to balance the heat.
- Red Birds Eye Chillies: For that authentic fiery punch; adjust amount to taste.
- Spring Onions: Fresh, mild onion flavor to finish the dish.
- Flaky Sea Salt: Sprinkled at the end for that delicate salty crunch.
Variations
I love how flexible the Salt and Chilli Chicken Recipe is. Over time, I’ve tinkered with it in all sorts of ways, and you should too! Don’t be shy about adapting the heat level or trying out different veggies to match the season.
- Heat Adjustment: If you’re sensitive to spice, swap birds eye chillies for milder red chillies or reduce the quantity — I’ve done this for family dinners with great success.
- Vegetarian Swap: Try substituting tofu (pressed and coated well) to make a vegetarian version that’s just as crispy and flavorful.
- Extra Crunch: Add sliced cashews or peanuts at the end for an added textural surprise; my kids love this crunch.
- Aromatic Twist: Toss in fresh Thai basil or coriander leaves at the end for a fragrant hit.
How to Make Salt and Chilli Chicken Recipe
Step 1: Marinate the Chicken with Flavor
The magic starts right here — combine your chicken thighs with sesame oil, grated garlic, Chinese five spice, salt, and white pepper. I like to mix everything with my hands so every piece gets coated evenly. Let it sit for about 30 minutes; this step really infuses the chicken and gives you a flavorful base you’ll notice from the first bite.
Step 2: The Double Cornflour Coating Hack
Now, this might seem a bit fiddly but trust me — it makes all the difference. Spoon most of your cornflour into a large dish (leave some aside to coat later). Mix 2 1/2 tablespoons of cornflour directly into the marinated chicken with your hands. It gets sticky, but that’s what we want. After a few minutes, mix in the beaten egg to help bind everything. Then, take each piece, coat it thoroughly in cornflour, and give it a good squeeze so the flour sticks in all the nooks and crannies. This is key to achieving those tiny crunch-fests on each bite!
Step 3: Fry Like a Pro to Crispy Perfection
Fill a heavy, deep pan or cast iron skillet with about three-quarters of an inch of vegetable oil and heat it to 190°C (375°F). Use a thermometer if you have one — it really helps keep the oil at the right temperature. Fry the chicken in small batches for about 3 minutes per side, until golden brown and cooked through. I always place the fried pieces on a wire rack over paper towels so the excess oil drains but the crispiness stays intact. Bring the oil back up to temperature between batches to avoid soggy chicken.
Step 4: Quick Stir-Fry for Flavorful Veg and Chillies
Use about 2 tablespoons of leftover hot oil in a wok or large pan on high heat. Toss in your sliced onions, red and green peppers, diced garlic, and those fiery birds eye chillies. Stir-fry these for 2-3 minutes until they soften just a bit but keep their crunch. Then add the crispy chicken, spring onions, plus a pinch more five spice, flaky sea salt, and white pepper. Toss everything well so the chicken gets evenly coated in that chili-tinged oil and those bursts of aroma.
Serve immediately and prepare for everyone to rave — this Salt and Chilli Chicken Recipe never fails to impress.
Pro Tips for Making Salt and Chilli Chicken Recipe
- Keep Oil Temperature Steady: I learned the hard way that maintaining 190°C is crucial; too hot and the outside burns before the chicken cooks, too cool and you end up with greasy bites.
- Use a Wire Rack, Not Paper Towel Alone: This helps keep the chicken crispy instead of soggy after frying — trust me, it’s a game changer.
- Squeeze Cornflour Into Every Crevice: It sounds tedious, but it makes the crisp coating shatter delightfully with every bite.
- Slice Chillies Thinly: This ensures you get heat evenly spread — thicker slices sometimes lead to spicy pockets that overwhelm the dish.
How to Serve Salt and Chilli Chicken Recipe

Garnishes
I’m a sucker for fresh garnishes that bring a pop of color and texture. For this dish, I always sprinkle flaky sea salt on top right before serving, plus extra spring onions sliced thinly. Sometimes, I add a handful of fresh coriander leaves for brightness — it’s a subtle contrast to the salty heat that just elevates the whole experience.
Side Dishes
My go-to side dishes are jasmine rice or simple steamed rice to soak up all the delicious sauce. Sometimes I serve it with a crisp cucumber salad dressed lightly in rice vinegar to cut through the richness. Occasionally, I add some steamed broccoli or bok choy for extra greens — it’s a perfect balance of crunchy, soft, and fresh.
Creative Ways to Present
For special occasions, I like to pile the Salt and Chilli Chicken high on a large platter, then scatter thin slices of red chilli and spring onions on top. Adding little bowls of extra chilli oil and soy sauce on the side lets family and friends customize their heat and salt levels. It’s always a big hit and looks gorgeous on the table!
Make Ahead and Storage
Storing Leftovers
I like to store leftover Salt and Chilli Chicken in an airtight container in the fridge for up to 3 days. When you’re storing, try to keep the vegetables and chicken separate if possible — it helps prevent sogginess and preserves that lovely crisp texture on the chicken.
Freezing
Freezing this dish is doable but I recommend freezing just the fried chicken pieces before tossing with the veggies and seasoning. Wrap the chicken tightly in foil or freezer bags, and it’ll keep well for about 1 month. When thawing, defrost overnight in the fridge for best results.
Reheating
The best way I’ve found to reheat Salt and Chilli Chicken leftovers is in a hot oven or air fryer. This method helps keep the chicken crispy rather than soggy like the microwave will do. I usually preheat to 180°C (350°F) and warm for about 8-10 minutes, keeping an eye so it doesn’t dry out.
FAQs
-
Can I use chicken breast instead of thighs for this Salt and Chilli Chicken Recipe?
You can, but chicken thighs are my top pick because they stay tender and juicy after frying. Breast meat tends to dry out quicker and might not deliver the same level of flavor and crispiness.
-
How spicy is this Salt and Chilli Chicken Recipe?
It carries a moderate heat level from the fresh birds eye chillies, which you can easily adjust. If you’re sensitive to spice, start by using fewer chillies or milder types, and add more next time as you get comfortable with the flavor.
-
Why is cornflour used twice in this recipe?
Mixing some cornflour into the chicken first helps it absorb the marinade and creates a sticky base; then coating each piece in extra cornflour produces a flaky, perfectly crunchy crust when fried. This double coating technique is what gives the dish its signature texture.
-
Can I make this recipe gluten-free?
Absolutely! Just make sure you use gluten-free cornflour and a soy sauce or seasoning blend that’s certified gluten-free to keep it safe for gluten sensitivities.
Final Thoughts
I still remember the first time I made this Salt and Chilli Chicken Recipe — my kitchen smelled incredible and my family couldn’t stop munching on it. It’s become one of those dishes I recommend without hesitation whenever someone wants something both comforting and exciting. If you try it out, I’m sure you’ll love how easy it is to create restaurant-quality crispy chicken with vibrant spices right at home. Give it a go and watch this one become a fast favorite in your meal rotation!
Print
Salt and Chilli Chicken Recipe
- Prep Time: 25 minutes
- Cook Time: 15 minutes
- Total Time: 70 minutes
- Yield: 4 servings
- Category: Main Dish
- Method: Frying
- Cuisine: Chinese
Description
Salt and Chilli Chicken is a deliciously crispy and flavorful Chinese-inspired dish featuring succulent boneless chicken thighs marinated in aromatic spices, coated in cornflour for a perfect crunch, then stir-fried with vibrant peppers, garlic, chillies, and spring onions. This recipe offers a delightful combination of crispy texture and bold savory heat, ideal for a satisfying meal.
Ingredients
Chicken and Marinade
- 600g / 1.3lb boneless skinless Chicken Thighs
- 1 tsp Chinese 5 Spice
- 1 tsp White Pepper
- 1 tsp Fine/Table Salt
- 2 tsp Sesame Oil
- 2 cloves of Garlic, finely grated into a paste
Coating
- 160g / 2 packed cups Cornflour/Cornstarch, plus more if needed
- 1 medium Egg, beaten
Cooking Oil
- 360ml / 1 1/2 cups Vegetable Oil, or as needed for frying
Vegetables and Stir-Fry Seasoning
- 1 small/medium White Onion, thinly sliced
- 1/2 Red Pepper, thinly sliced
- 1/2 Green Pepper, thinly sliced
- 2 cloves of Garlic, finely diced
- 2 Red Birds Eye Chillies, thinly sliced
- 2 Spring Onions, thinly sliced
- 1/2 tsp Flaky Sea Salt
- 1/4 tsp Chinese 5 Spice
- 1/8 tsp White Pepper
Instructions
- Marinate the Chicken: In a medium-sized mixing bowl, combine the diced chicken with sesame oil, grated garlic paste, Chinese 5 spice, salt, and white pepper. Mix well to ensure the chicken is evenly coated. Cover and leave to marinate for 30 minutes to infuse the flavors.
- Prepare the Coating: Place the cornflour in a large shallow dish. Take 2 1/2 tablespoons of cornflour from the dish and mix it thoroughly into the marinated chicken using your hands. Allow the chicken to rest for a few minutes so the cornflour absorbs the moisture and becomes sticky.
- Add Egg and Coat the Chicken: Mix the beaten egg into the sticky chicken mixture until evenly combined. One by one, take each piece of chicken and thoroughly coat it in the remaining cornflour on the dish, pressing the cornflour into every crevice to ensure a crispy texture. Shake off any excess cornflour and place the coated pieces on a baking tray. Add more cornflour if needed to coat all pieces well.
- Deep Fry the Chicken: Pour vegetable oil into a heavy-based or cast-iron pan to a depth of about 3/4 inch, enough to cover just over half the size of the chicken pieces. Heat the oil on medium-high until it reaches 190°C / 375°F. Working in 2-3 batches, fry the chicken pieces until golden brown and crisp on the outside and fully cooked inside, about 3 minutes per side. Use a wire rack lined with kitchen paper to drain excess oil after frying each batch, and bring the oil back to temperature before starting the next batch.
- Stir-Fry Vegetables and Seasoning: Remove all but 2 tablespoons of the leftover frying oil and heat it in a wok or deep pan over high heat. Once very hot, add the sliced onion, red and green peppers, diced garlic, and sliced red chilli. Stir-fry for 2-3 minutes until the vegetables soften slightly and release their aroma.
- Combine Chicken with Vegetables: Add the fried chicken, sliced spring onions, flaky sea salt, Chinese 5 spice, and white pepper to the wok. Toss everything together thoroughly to ensure the chicken is coated evenly with the seasoning and mixed well with the vegetables.
- Serve Immediately: Once everything is well combined and heated through, serve the salt and chilli chicken immediately for the best crispy texture and vibrant flavors. Enjoy!
Notes
- This is the classic method to achieve the signature crispy texture of salt and chilli chicken by combining marination, cornflour coating, deep frying, and flavorful stir-frying.
- Be careful when handling the bird’s eye chillies; adjust their quantity based on your heat preference.
- Maintaining the oil temperature at 190°C / 375°F is key to cooking the chicken perfectly crispy without absorbing excess oil.
- Using a wire rack for draining the chicken helps keep it crispy by avoiding sogginess from resting in oil.
Nutrition
- Serving Size: 1 serving
- Calories: 486
- Sugar: 3.87 g
- Sodium: 895 mg
- Fat: 18.84 g
- Saturated Fat: 9.75 g
- Unsaturated Fat: 7.42 g
- Trans Fat: 0.034 g
- Carbohydrates: 45.04 g
- Fiber: 2.2 g
- Protein: 32.44 g
- Cholesterol: 182 mg


