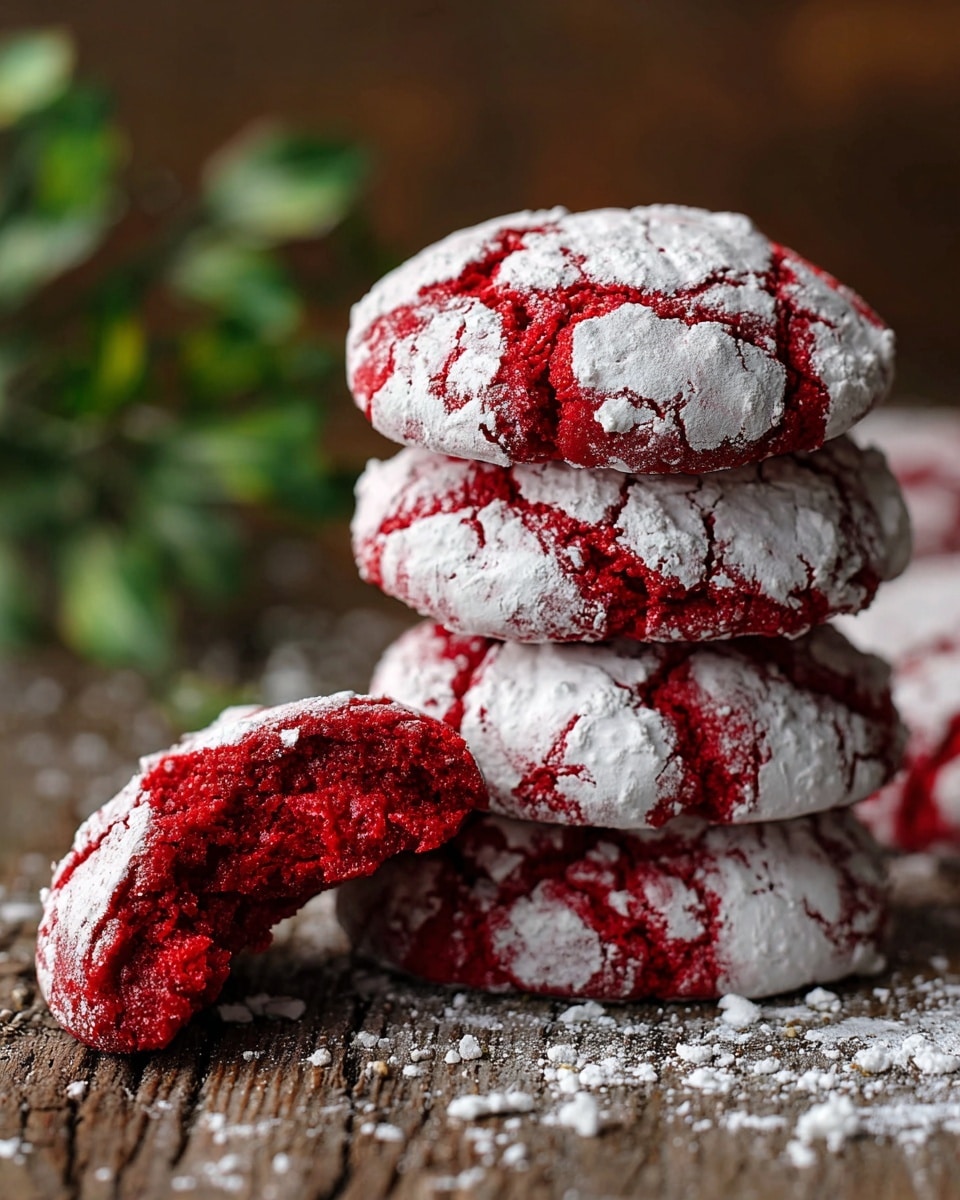
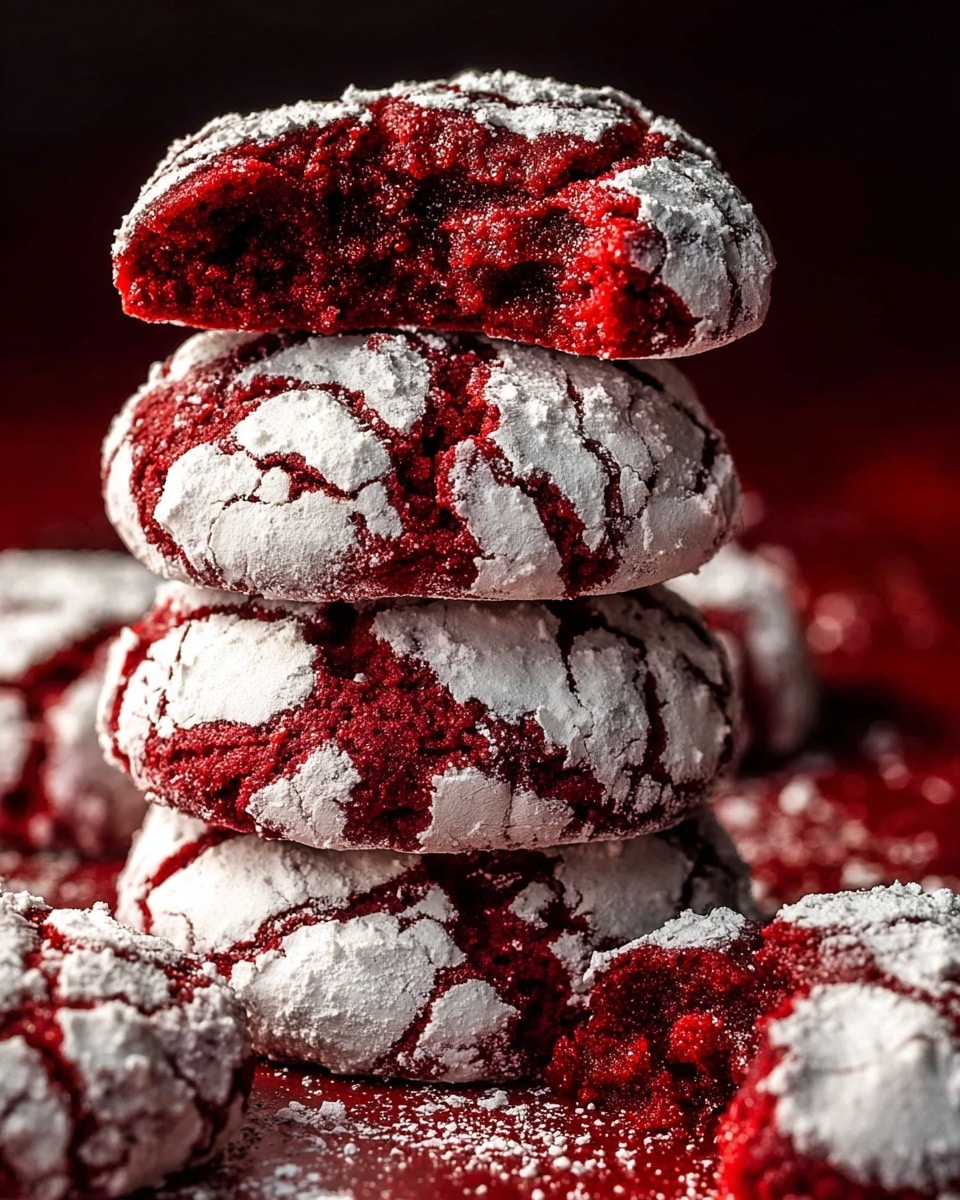
If you’ve been on the hunt for a truly indulgent Red Velvet Cookies Recipe, I’ve got just the one for you. These cookies are a delightful twist on the classic red velvet cake flavor but in a perfectly chewy, soft cookie form. I love this recipe because it’s straightforward to whip up, and the little tang from the vinegar combined with the richness of cocoa and butter just makes each bite absolutely irresistible.
You’ll find that these red velvet cookies are perfect for any occasion — whether you’re impressing guests at a holiday party or simply craving a comforting treat with your afternoon coffee. What makes this Red Velvet Cookies Recipe really special is the balance of flavors and that gorgeous red color, which is just as eye-catching as it is delicious. Trust me, once you try these, they’ll become a go-to comfort dessert in your baking arsenal.
Why You’ll Love This Recipe
- Perfect Texture: These cookies come out super soft and chewy, thanks to the combo of butter and olive oil.
- Vibrant Color: The red food coloring and cocoa powder create that classic red velvet look and flavor in every bite.
- Simple Ingredients: You likely already have everything in your pantry, making it an easy go-to recipe.
- Fun Finishing Touch: Rolling the cookies in powdered sugar adds a pretty, crackled surface and a touch of sweetness.

Ingredients You’ll Need
All the ingredients play an important role in getting that classic red velvet cookie flavor and texture. From the tangy vinegar to the soft butter and a hint of cocoa, each piece works together to create a perfect bite.
- Granulated sugar: Brings sweetness and helps with the chewy texture.
- Unsalted butter: Adds richness and flavor without any extra salt to balance out.
- Extra-virgin olive oil: Boosts moisture and gives a subtle depth to the dough.
- Large egg: Helps bind everything and create a tender crumb.
- Kosher salt: Enhances all the flavors without overpowering.
- Red food coloring: The star of the show for that signature red velvet look.
- Vinegar: Adds a subtle tang and reacts with baking soda for lightness.
- Pure vanilla extract: Rounds out the flavor and keeps things balanced.
- All-purpose flour: The base of the cookie structure, use good quality for best results.
- Unsweetened cocoa powder: Gives that faint chocolate undertone.
- Baking soda: Leavens and helps the cookies rise slightly.
- Powdered sugar: For that lovely dusted coating once the cookies are baked.
Variations
I always like to tweak the Red Velvet Cookies Recipe slightly depending on the occasion or what I have on hand, and you can easily do the same. It’s a pretty flexible recipe, so don’t be afraid to experiment a bit!
- Chocolate Chips: Adding white or semi-sweet chocolate chips turns these cookies into a little chocolate lover’s dream—my family absolutely devours them this way.
- Nut Addition: Chopped pecans or walnuts add a lovely crunch and complement the soft texture well.
- Vegan Substitute: Swap the egg and butter for flaxseed “egg” and vegan margarine to enjoy these as a plant-based treat.
- Less Coloring: If you’re wary of too much food coloring, just use half the amount—the flavor remains great and you get a softer blush red hue.
How to Make Red Velvet Cookies Recipe
Step 1: Prep and Cream Your Base
Start by preheating your oven to 350°F (180°C)—this ensures it’s hot and ready when your dough is formed. Then, in a large bowl or your stand mixer, cream together the granulated sugar, butter, olive oil, egg, and kosher salt. I love using a paddle attachment here because it incorporates air nicely, making the mixture fluffy and pale. Take your time with this step; it usually takes about 3-4 minutes to get that perfect texture.
Step 2: Mix in the Flavor Magic
Next, add the red food coloring, vinegar, and vanilla extract to the creamed mixture. The vinegar is a game changer—it reacts with the baking soda later to give you an airy yet tender crumb, which is a classic red velvet touch. Mix these ingredients in until combined, but don’t overdo it or you’ll lose some of that fluffy texture.
Step 3: Combine Dry Ingredients
In a separate bowl, whisk together the flour, cocoa powder, and baking soda. This step ensures even distribution of the cocoa and baking soda, so you won’t end up with any bitter patches of cocoa or lumps. Then gently fold this dry mix into the wet ingredients until just combined. Over-mixing can make the cookies tough, so stop as soon as you see no more flour streaks.
Step 4: Chill and Coat for the Perfect Finish
Here’s a trick I learned that really improves the cookies’ final texture: scoop the dough into balls using a medium ice cream scoop onto a plate, then freeze them for about 10 minutes. This chilling step helps prevent too much spreading while baking. After the chill, roll each dough ball in powdered sugar until they’re completely coated. This gives the cookies a beautiful, crackly powdered surface after baking and adds a subtle sweetness.
Step 5: Bake and Cool
Place the coated cookie dough balls on a lined half sheet pan baking tray, spaced a couple of inches apart. Bake for 20 minutes, then remove from the oven and let them cool on the pan for a bit. The cookies will look soft but they’ll firm up while cooling—if you try to move them too early, they might break. Once cooled, you can store them in an airtight container or just enjoy immediately (I won’t judge if you eat them straight from the pan!).
Pro Tips for Making Red Velvet Cookies Recipe
- Don’t Skip the Freeze: Chilling cookie dough balls helps control spread and locks in moisture, resulting in a perfectly chewy center.
- Careful With Red Food Coloring: Use gel-based food coloring for a more vibrant color without thinning the dough.
- Gentle Mixing: Avoid overmixing after adding flour to keep cookies tender, not dense.
- Even Coating: Roll dough balls well in powdered sugar so the beautiful crackle pattern shows post baking.
How to Serve Red Velvet Cookies Recipe
Garnishes
I like to keep things simple and dust just a little extra powdered sugar on top right before serving to enhance that pretty classic red velvet look. Sometimes, I add a small dollop of cream cheese frosting on the side or even sandwich two cookies with it—it’s a decadent treat that really elevates the flavor.
Side Dishes
These cookies pair beautifully with a cold glass of milk or a steaming cup of coffee or tea. At parties, I’ve even served them alongside a simple berry compote or vanilla ice cream, which complements the tanginess and richness perfectly.
Creative Ways to Present
For special occasions, I’ve arranged these cookies on a tiered serving tray with a few fresh raspberries and mint leaves scattered around for a pop of color and freshness. They also look amazing stacked in a clear jar tied with a festive ribbon — instant gift idea that everyone loves!
Make Ahead and Storage
Storing Leftovers
I usually store leftover cookies in an airtight container at room temperature. They stay soft and delicious for about 3-4 days—just make sure they’re completely cool before sealing the container, or they might turn soggy.
Freezing
Freeze extra dough balls before baking in a single layer on a baking sheet, then transfer to a freezer bag. When you’re ready, bake straight from frozen, adding a couple of extra minutes to the baking time. This trick has saved me more than once when I wanted fresh cookies with little effort.
Reheating
To warm leftover cookies, pop them in the microwave for about 10-15 seconds or warm briefly in a 300°F oven for 5 minutes. This will revive that soft, chewy texture perfectly without drying them out.
FAQs
-
Can I use a different type of food coloring in the Red Velvet Cookies Recipe?
Absolutely! Gel or paste food coloring tends to give the best, most vibrant red without thinning the dough. Liquid food coloring works too but sometimes requires more to achieve that bright red, which can slightly affect the texture.
-
Why is vinegar used in this Red Velvet Cookies Recipe?
Vinegar adds a subtle tang that’s characteristic of red velvet flavor and reacts with the baking soda to help the cookies rise and stay tender. You can use any mild vinegar like apple cider, white, or rice vinegar—just avoid balsamic as it may change the flavor.
-
How long do these cookies stay fresh?
When stored in an airtight container at room temperature, these cookies stay fresh and soft for about 3-4 days. For longer storage, freezing is recommended.
-
Can I make these cookies gluten-free?
You can try substituting the all-purpose flour with a gluten-free blend, but watch the texture closely as it may change slightly. Adding a bit of xanthan gum can help mimic the structure that gluten provides.
Final Thoughts
I absolutely love how this Red Velvet Cookies Recipe turns out every single time—soft, chewy, and bursting with classic flavor that always wows anyone who takes a bite. When I first made these, I was amazed at how simple ingredients created such a special treat, and since then, they’ve been a staple in my kitchen. You’ll find this recipe straightforward, forgiving, and downright delicious, so I can’t recommend giving it a try enough—consider it your new favorite way to enjoy red velvet in cookie form!
Print
Red Velvet Cookies Recipe
- Prep Time: 30 Minutes
- Cook Time: 20 Minutes
- Total Time: 50 Minutes
- Yield: 8 cookies
- Category: Dessert
- Method: Baking
- Cuisine: American
Description
These Red Velvet Cookies offer a delicious twist on the classic red velvet cake flavors, featuring a soft, moist texture with the perfect balance of cocoa and a hint of tang from vinegar. Coated generously in powdered sugar, these cookies are festive, visually striking, and perfect for any occasion or holiday treat.
Ingredients
Main Ingredients
- 1 1/4 cup (250 grams) granulated sugar
- 4 tablespoon (½ stick or 57 grams) unsalted butter, room temperature
- 3 tablespoon extra-virgin olive oil
- 1 large egg
- 1 teaspoon kosher salt
- 1 tablespoon red food coloring
- 1 tablespoon vinegar (any kind: red, white, rice, or apple cider; avoid balsamic)
- 1 teaspoon pure vanilla extract
- 1 3/4 cup (219 grams) all-purpose flour
- 1/4 cup (21 grams) unsweetened cocoa powder
- 1/2 teaspoon baking soda
For Coating
- Powdered sugar, for dusting
Instructions
- Preheat Oven: Heat the oven to 350°F (180°C) to prepare for baking the cookies evenly.
- Cream Wet Ingredients: In a large bowl or stand mixer fitted with a paddle attachment, cream together the granulated sugar, unsalted butter, extra-virgin olive oil, egg, and kosher salt until the mixture is fluffy and pale yellow. Then add the red food coloring, vinegar, and vanilla extract, mixing until everything is well combined.
- Combine Dry Ingredients: In a separate medium bowl, mix the all-purpose flour, unsweetened cocoa powder, and baking soda until evenly distributed. Gradually add this dry mixture to the wet ingredients and gently stir until just incorporated to avoid overmixing.
- Chill and Shape Dough: Using a medium ice cream scoop, portion the cookie dough onto a plate (should yield approximately 8 cookies). Freeze the dough balls for 10 minutes to make them easier to handle. Once chilled, roll each dough scoop into a ball with your hands, then roll the balls in powdered sugar to fully coat the outsides.
- Bake: Arrange the coated cookie balls on a half sheet pan and bake in the preheated oven for 20 minutes. After baking, allow the cookies to cool before transferring to a container or enjoying immediately straight from the pan.
Notes
- Freezing the dough before rolling makes it easier to handle and helps maintain the cookie shape during baking.
- Any type of vinegar can be used except balsamic, which would alter the flavor profile.
- Rolling cookies in powdered sugar after chilling gives them a classic red velvet look and adds a sweet crust.
- Ensure not to overmix the dough to keep the cookies tender and soft.
- The olive oil adds moisture and richness, complementing the butter perfectly.
Nutrition
- Serving Size: 1 cookie
- Calories: 230
- Sugar: 18g
- Sodium: 210mg
- Fat: 11g
- Saturated Fat: 4g
- Unsaturated Fat: 6g
- Trans Fat: 0g
- Carbohydrates: 31g
- Fiber: 1g
- Protein: 2g
- Cholesterol: 30mg


