
If you’re looking for a dessert that truly wows, you’ve got to try this Red Velvet Cheesecake Recipe. It’s where the vibrant, red-hued magic of red velvet cake meets the luscious, creamy goodness of cheesecake—all without baking! I absolutely love this recipe because it’s decadent yet light, with a gorgeous chocolate twist that melts in your mouth. Trust me, once you try it, you’ll find it’s your go-to dessert for impressing friends and family.
Why You’ll Love This Recipe
- No-Bake Convenience: Perfect if you don’t want to fire up the oven but still crave a fancy dessert.
- Showstopper Appearance: That deep red color grabs attention and makes every slice look like a special occasion.
- Rich & Velvety Texture: The creamy cheesecake combined with chocolate and red velvet notes is a total mouthfeel dream.
- Impress Without Stress: It’s complex enough to impress, but simple enough to make ahead, so you can enjoy your company.

Ingredients You’ll Need
Every ingredient in this Red Velvet Cheesecake Recipe plays a crucial part—whether it’s building that sturdy Oreo crust or giving the filling that rich chocolatey velvety texture. I always recommend using the freshest cream cheese and good-quality chocolate for the best flavor.

- Oreo cookies: The classic base for a sturdy, chocolaty crust; no need to fuss with fancy biscuits here.
- Unsalted butter: Melted to bind the crust perfectly without adding saltiness that competes with the cheesecake.
- Gelatine powder: Unflavoured is key here; it gives the cheesecake that perfect, sliceable firmness.
- Water: Just enough to bloom the gelatine, so it blends beautifully into the cream cheese mix.
- Heavy/thickened cream: Make sure it’s chilled—that helps it whip to soft peaks for a light yet rich filling.
- Cream cheese: Softened block cream cheese ensures a smooth, creamy texture without lumps.
- Caster sugar: Superfine sugar dissolves faster, giving smooth sweetness without graininess.
- Vanilla extract: Always use pure for that warm, authentic flavor that rounds everything out.
- 70% dark chocolate: I prefer this slightly bitter dark chocolate for depth that balances the sweet and tangy.
- Red food coloring: The star for that iconic red velvet look—add as much as you prefer for intensity.
- Extra caster sugar and vanilla extract for the whipped cream: To sweeten and flavor it just right without overpowering.
- Optional dark chocolate shavings: A final decorative touch that adds elegance and a little extra cocoa punch.
Variations
I love making this Red Velvet Cheesecake Recipe my own by swapping out ingredients or adding a little twist to suit the occasion. It’s so versatile! Feel free to experiment and make it your signature dessert.
- Chocolate Intensity: Sometimes I use milk chocolate instead of dark, especially when serving to kids who prefer it sweeter and creamier.
- Dairy-Free Version: I’ve tried substituting cream cheese and heavy cream with coconut-based alternatives; it’s a bit different but still deliciously creamy.
- Flavor Twists: Adding a teaspoon of espresso powder to the chocolate mixture enhances the chocolate notes beautifully.
- Reduced Sugar: You can trim down the sugar slightly if you want a less sweet dessert, but keep the cream cheese and whipped cream sweetness balanced.
How to Make Red Velvet Cheesecake Recipe
Step 1: Prepare the Crust and Pan for Easy Release
First off, flip the base of your 20cm (8-inch) springform pan upside down—that little trick I discovered makes removing the cheesecake so much easier, especially given its delicate texture. Lightly butter the pan base and press a square of baking paper onto it. Then clip the sides on and line those with more baking paper, letting the edges stick out for easy removal later. Press the crushed Oreo cookies mixed with melted butter firmly into the base and pop it in the fridge while you prepare the filling. This step ensures a sturdy base that won’t crumble when you slice.
Step 2: Bloom the Gelatine
Sprinkle the gelatine powder over a couple of tablespoons of water and let it sit for about 5 minutes to soften. I always make sure to bloom it properly—that little step prevents lumps and ensures perfectly smooth setting. Then gently warm it (careful not to boil) until it’s fully dissolved, and set aside.
Step 3: Whip the Cream
Grab your chilled heavy cream and whip it to soft peaks with a bit of caster sugar and vanilla extract. Soft peaks are crucial here—you want volume without it becoming stiff or grainy, which could affect the cheesecake’s texture. Set the whipped cream aside; you’ll fold it into the filling next.
Step 4: Make the Cheesecake Filling
In a large bowl, beat softened cream cheese with caster sugar and vanilla until smooth and creamy—this can take a few minutes, but it’s worth it for that silky texture. Melt the dark chocolate gently and mix it in, followed by the warmed gelatine. Now the fun part: stir in the red food coloring gradually until you hit that signature red velvet shade you want. Finally, gently fold the whipped cream into the cream cheese mixture to keep it light and airy.
Step 5: Assemble and Chill
Pour the filling over your chilled Oreo crust, smoothing the top with a spatula. Cover the pan loosely with cling film (to avoid condensation) and pop it in the fridge for at least 6 hours, or ideally overnight. Patience here really pays off—the cheesecake sets beautifully, making slicing clean and neat.
Step 6: Top with Whipped Cream and Chocolate Shavings
Before serving, whip up a fresh batch of cream with sugar and vanilla until soft peaks form, then spread or pipe it over the cheesecake. Finish with plenty of dark chocolate shavings for that elegant, chocolaty flair. I like using a potato peeler for those perfect curls—it adds a touch of class that always impresses my guests.
Pro Tips for Making Red Velvet Cheesecake Recipe
- Softened Cream Cheese: Don’t rush this step—properly softened cream cheese prevents lumps and makes your cheesecake extra smooth.
- Chill Your Cream: Always whip cream straight from the fridge; it whips faster and holds its shape better.
- Fold, Don’t Mix: Fold the whipped cream gently into the batter to keep it light and airy—stirring too much can deflate it.
- Remove Cheesecake Carefully: Use the excess baking paper edges to lift the cheesecake out of the pan, avoiding any cracks or breaks.
How to Serve Red Velvet Cheesecake Recipe

Garnishes
I usually keep it simple with freshly whipped cream and those gorgeous dark chocolate shavings on top—they add a nice texture contrast and a little extra richness. Sometimes, I’ll add a few fresh raspberries or strawberries for a pop of freshness and color, which complements the deep red velvet beautifully.
Side Dishes
This cheesecake shines all on its own, but if I’m serving it for a party, I like pairing it with a light berry coulis or even a simple scoop of vanilla bean ice cream. These help balance the richness with a bit of tang and cool creaminess.
Creative Ways to Present
For special occasions, I like making mini cheesecake jars with this Red Velvet Cheesecake Recipe layered with crushed Oreos and topped with whipped cream and a sprinkle of cocoa powder. It’s a fun way to serve guests and looks super impressive on a dessert table.
Make Ahead and Storage
Storing Leftovers
I always keep leftovers in an airtight container or tightly wrapped in the fridge, and the cheesecake lasts beautifully for up to 4 days. Keeping it cold keeps the texture firm and fresh-tasting, so you’ll enjoy every bite even a few days after making it.
Freezing
I’ve frozen this cheesecake a couple of times, slicing it first into portions and wrapping each piece tightly in cling film and foil. It freezes well for up to 2 months and thaws overnight in the fridge without losing any of its creamy texture.
Reheating
Since it’s a no-bake cheesecake, reheating is not necessary—and honestly, I like it best chilled. If you want it a bit softer, let it sit at room temperature for 15-20 minutes before serving, but avoid warming it otherwise.
FAQs
-
Can I use regular cream cheese instead of block cream cheese?
It’s really best to use block cream cheese that’s been softened to room temperature. The cream cheese in a tub often has a different texture and added stabilizers, which can affect the smoothness and structure of the cheesecake filling.
-
Is red food coloring necessary for this recipe?
Red food coloring is key to achieving that iconic red velvet look, which makes this cheesecake stand out. You could omit it if you prefer, but the cheesecake will look more like a chocolate cheesecake rather than a red velvet one.
-
Can I substitute the gelatine for another setting agent?
Gelatine is the best choice here for a smooth, firm set, but if you want a vegetarian alternative, you can try agar-agar. Keep in mind that agar sets quicker and firmer, so the texture might be slightly different.
-
How long should I chill the cheesecake for the best results?
I recommend chilling it for at least 6 hours, but overnight is ideal. This resting time allows the gelatine to set fully and the flavors to meld, making slicing easier and the texture perfect.
Final Thoughts
I can’t tell you how many times this Red Velvet Cheesecake Recipe has been my dessert lifesaver—whether it’s for a last-minute dinner party or a special holiday treat. It’s one of those recipes that feels fancy but is surprisingly easy to pull off, and folks always ask for seconds (and the recipe!). Give it a try—you’ll love sharing this creamy, lush slice of joy with your family and friends, just like I do.
Print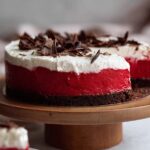
Red Velvet Cheesecake Recipe
- Prep Time: 30 minutes
- Cook Time: 0 minutes (no-bake, but chilling time required)
- Total Time: 6 hours 30 minutes (including chilling time)
- Yield: 12 to 16 servings
- Category: Dessert
- Method: No-Cook
- Cuisine: American-inspired
Description
A no-bake Red Velvet Cheesecake that combines the iconic red velvet cake flavor with a creamy, chocolatey cheesecake filling. This visually striking dessert features an Oreo cookie crust and a smooth, velvety texture that melts in your mouth. Perfect for special occasions when you want to impress guests with a rich yet light treat.
Ingredients
Crust
- 200g / 7oz Oreo cookies (about 1.5 standard packs)
- 60g / 4 tbsp unsalted butter, melted
Gelatin Mixture
- 2 tsp unflavoured gelatine powder
- 2 tbsp water
Cheesecake Filling
- 1 cup heavy/thickened cream, fridge cold
- 500g / 1 lb cream cheese, softened (block form)
- 3/4 cup caster sugar / superfine sugar
- 1 tsp vanilla extract
- 150g / 5 oz 70% dark chocolate
- 6 tsp red food colouring
Whipped Cream Topping
- 1 1/4 cups heavy/thickened cream, fridge cold
- 3 tbsp caster sugar / superfine sugar
- 1 tsp vanilla extract
- Optional: 2 tbsp shaved or grated dark chocolate (for garnish)
Instructions
- Prepare the pan: Invert the base of a 20cm / 8″ springform pan and lightly butter it. Press a square sheet of baking paper onto the base, then attach the pan sides back onto the base, letting the excess paper hang over the edges. Butter and line the sides with more baking paper for easy removal later.
- Make the crust: Crush the Oreo cookies finely, then mix thoroughly with melted butter. Press this mixture evenly into the base of the prepared pan. Chill in the fridge while preparing the filling.
- Bloom the gelatine: Sprinkle the gelatine powder over the 2 tbsp water and let it stand until it softens, about 5 minutes. Then gently warm to dissolve completely, either in a microwave or over a pan of simmering water.
- Whip the cream: Whip the 1 cup of cold heavy cream to medium peaks and set aside.
- Prepare the chocolate: Melt the 150g dark chocolate gently until smooth. Allow to cool slightly.
- Make the cheesecake filling: In a large bowl, beat the softened cream cheese with the caster sugar and vanilla extract until smooth and creamy. Stir in the melted chocolate and red food colouring until uniformly combined. Add the dissolved gelatine and mix well. Finally, fold in the whipped cream gently to maintain airiness.
- Assemble the cheesecake: Pour the filling onto the chilled Oreo base in the springform pan. Smooth the top evenly and refrigerate for at least 6 hours, preferably overnight, until set.
- Prepare whipped cream topping: Whip the remaining 1 1/4 cups of cold heavy cream with the caster sugar and vanilla extract until stiff peaks form. If desired, stabilize the cream for longer hold.
- Finish the cheesecake: Once the cheesecake is fully set, remove it from the pan using the overhanging baking paper. Spread or pipe the whipped cream topping evenly over the surface. Garnish with shaved or grated dark chocolate if desired.
- Serve: Slice the cheesecake into 12 to 16 portions and serve chilled for best texture and flavor.
Notes
- This no-bake cheesecake is a perfect combination of the classic red velvet cake flavor with rich, creamy cheesecake texture.
- Using a springform pan with baking paper lining makes removal easier and keeps the cheesecake edges neat.
- Ensure the cream cheese is softened to avoid lumps in the filling.
- Red food colouring intensity can be adjusted to your preference; UK readers should note the recommended quantity.
- The gelatin stabilizes the filling to help it set firmly without baking.
- Chilling overnight yields the best sliceable texture.
- Optional grated chocolate adds a decorative and flavorful finish.
- Watch the linked recipe video for a step-by-step visual guide.
Nutrition
- Serving Size: 1 slice
- Calories: 540 kcal
- Sugar: 29 g
- Sodium: 210 mg
- Fat: 43 g
- Saturated Fat: 25 g
- Unsaturated Fat: 14 g
- Trans Fat: 0.2 g
- Carbohydrates: 37 g
- Fiber: 2 g
- Protein: 6 g
- Cholesterol: 103 mg


