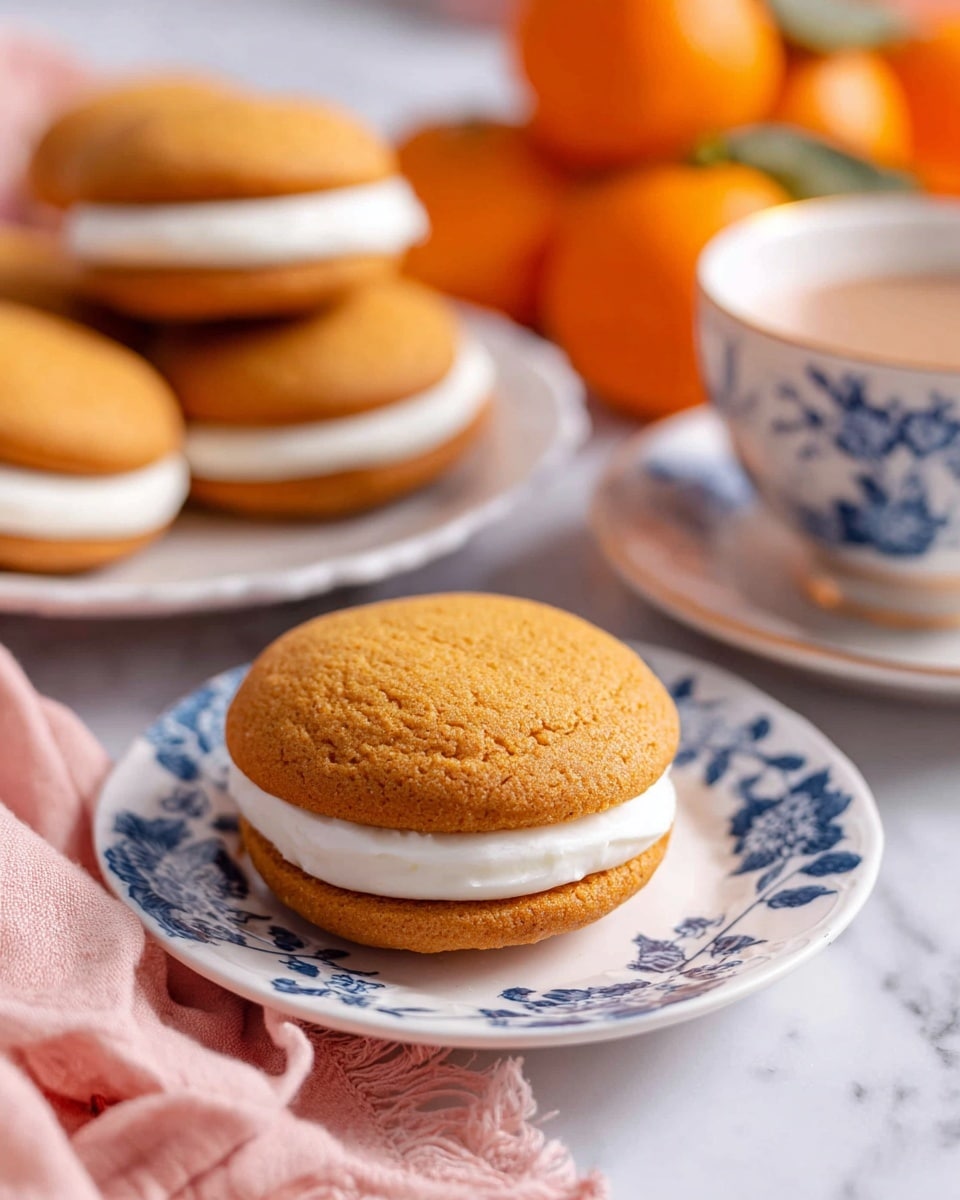
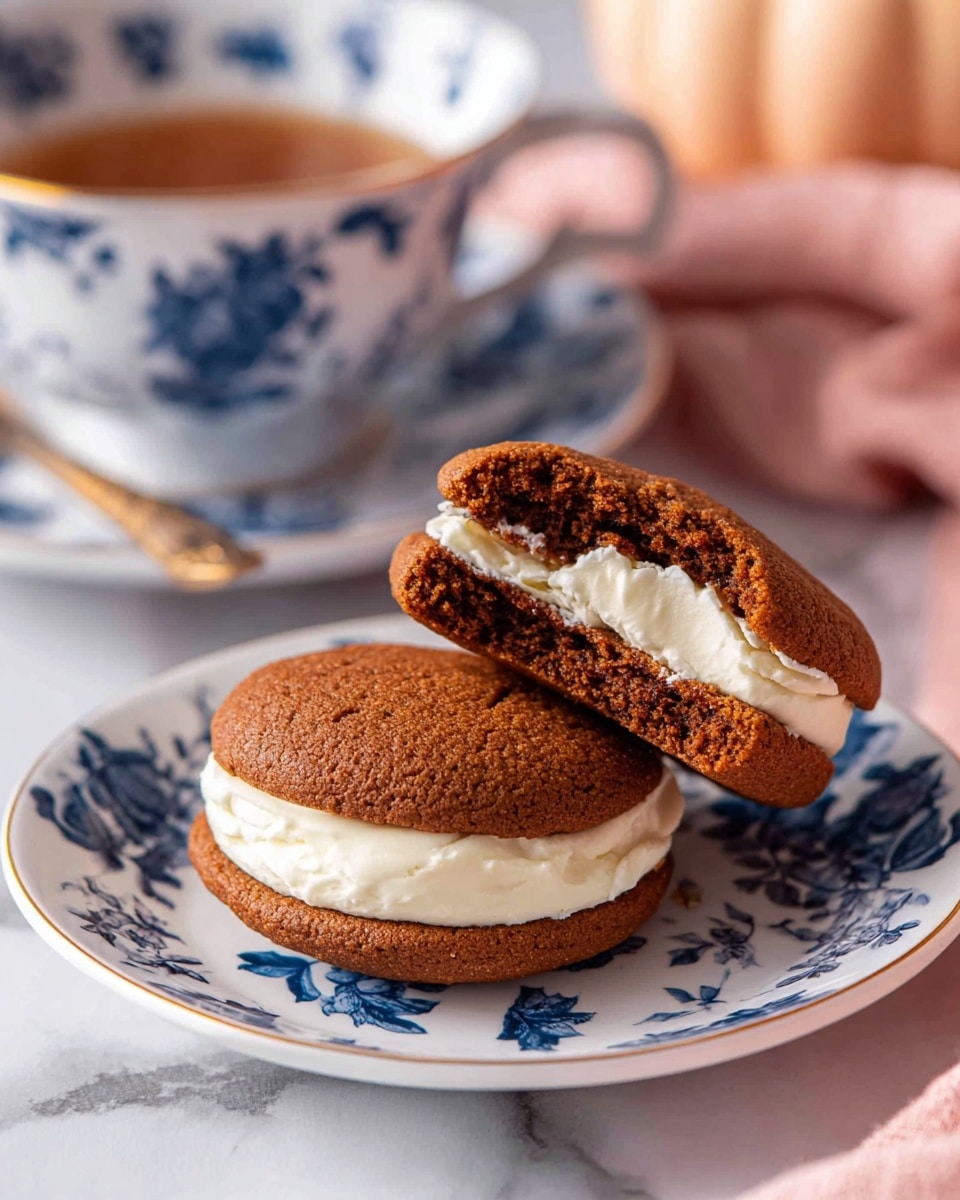
I absolutely love how this Pumpkin Whoopie Pies Recipe brings together the cozy flavors of fall into such a fun, handheld treat. When you first bite into the soft, spiced pumpkin cakes sandwiching that creamy cinnamon filling, you’ll see why they’re a favorite at family gatherings and holiday parties in my house. They feel like a warm hug wrapped in a little cake, and the texture is perfectly tender and moist without being too cakey or cookie-like.
What makes this Pumpkin Whoopie Pies Recipe special is how easy it is to make without sacrificing that homemade charm. Whether you’re baking for a crowd or just craving something seasonal to enjoy with a cup of coffee, you’ll find these whoopie pies come together quickly and taste like you spent hours in the kitchen. Plus, I’m sharing all my kitchen-tested tips to help you get the best texture and flavor every time.
Why You’ll Love This Recipe
- Effortless Fall Flavor: The warm spices and pumpkin puree create classic autumn tastes with minimal fuss.
- Soft & Moist Texture: These whoopie pies have just the right balance between fluffy cake and cookie-like softness.
- Make-Ahead Convenience: You can prep the pies and filling in advance, perfect for holiday gatherings or busy days.
- Family-Friendly and Crowd-Pleasing: My family goes crazy for this, and I bet yours will too!

Ingredients You’ll Need
Choosing your ingredients wisely makes a huge difference for these pumpkin whoopie pies. I always opt for fresh pumpkin puree and quality spices to really bring out the flavors, and softened butter helps the dough come together perfectly smooth and sticky.
- All-purpose flour: The base for the soft cake; makes sure to spoon it into your measuring cup for accurate measurement.
- Ground cinnamon: Adds warm spice essential to pumpkin desserts.
- Baking powder: Helps the cakes rise and stay fluffy.
- Baking soda: Reacts with the acidic pumpkin to aid in leavening.
- Ground ginger: Offers a subtle, zesty warmth that complements cinnamon.
- Kosher salt: Balances the sweetness and enhances flavors.
- Ground allspice: Deepens the spice profile with a hint of cloves and cinnamon.
- Ground cloves: A little goes a long way to add depth to the spice blend.
- Ground nutmeg: Gives a sweet, nutty aroma that pairs beautifully with pumpkin.
- Dark brown sugar: Adds molasses notes and moisture to the cakes.
- Unsalted butter: Makes the batter rich and tender; ensure it’s softened for easy mixing.
- Large eggs: Provide structure and help bind ingredients.
- Pumpkin puree: The star ingredient for that luscious autumn flavor — use pure pumpkin, not pumpkin pie filling.
- Vegetable or neutral oil: Keeps the cakes moist and tender without overpowering flavors.
- Pure vanilla extract: Rounds out the flavor and adds sweetness depth.
Variations
I love playing around with the filling to give this Pumpkin Whoopie Pies Recipe my own twist. Some days I add a little maple syrup or ginger to the cream cheese filling, and other times I swap in different spices or even try a dairy-free version. You can totally make this recipe your own!
- Maple Cinnamon Filling: Adding maple syrup to the cream cheese filling gives a lovely depth and extra sweetness my family enjoyed on a chilly fall afternoon.
- Dairy-Free Version: Substitute cream cheese and butter with vegan alternatives to make it allergy-friendly without losing creaminess.
- Spice Mix Tweaks: I sometimes experiment by upping the ginger or nutmeg for a spicier kick depending on the season and my mood.
- Mini Whoopie Pies: Pipe smaller rounds for bite-sized treats perfect for parties or lunchboxes.
How to Make Pumpkin Whoopie Pies Recipe
Step 1: Whisk Together the Dry Ingredients
Start by preheating your oven to 350°F. In a medium bowl, whisk together the all-purpose flour, cinnamon, baking powder, baking soda, ginger, kosher salt, allspice, cloves, and nutmeg. This mix of spices really sets the tone for those classic pumpkin flavors. Make sure to break up any clumps in the flour so you get an even distribution in the batter.
Step 2: Cream the Butter and Sugar, then Add Wet Ingredients
Using a stand mixer fitted with the whisk attachment, beat the softened butter and dark brown sugar together on medium-high speed until creamy and combined. This usually takes about 2 to 3 minutes. Next, add the eggs, pumpkin puree, oil, and vanilla extract, and continue beating until the mixture is smooth. I found that the batter should be silky and sticky — that’s how you know it’s just right before adding the flour.
Step 3: Incorporate Dry Ingredients Carefully
Lower your mixer speed to medium-low, then gradually add the dry ingredients to the wet mix. Stir just until everything is combined—overmixing here can make the whoopie pies tough instead of soft and tender. Your batter should feel sticky and smooth, perfect for piping onto the pan.
Step 4: Pipe and Bake the Whoopie Pies
Transfer your batter into a large piping bag or a gallon-sized freezer bag with a 1-inch corner snipped off. Pipe 2-inch rounds onto parchment-lined baking sheets, spacing them about 2 inches apart so they have room to spread. If the tops look a bit domed, gently smooth them with the back of a spoon or a wet fingertip—that’s a trick I learned when I wanted perfect flat tops for easier sandwiching.
Bake the whoopie pies for 15 to 20 minutes. You’ll know they’re done when they spring back lightly to the touch. Be patient here; taking them out too soon can make them fall apart, and leaving them too long will dry them out.
Step 5: Make the Cream Cheese Filling
While the pies cool, whip up the filling. Beat softened cream cheese and butter on medium-high speed until smooth and creamy. Then add confectioners’ sugar, cinnamon, vanilla extract, and honey, continuing to beat until the filling becomes light and fluffy — this usually takes about 3 minutes. Chilling the filling for a bit helps it firm up, making it much easier to spread.
Step 6: Assemble Your Pumpkin Whoopie Pies
Flip half of the whoopie pies so the domed side is down. Spread a generous dollop (or swirl!) of the cream cheese filling on the flat side of these pies. Then top with the remaining whoopie pies, domed side up, creating perfect little sandwich cakes. Press gently to stick them together but be careful not to squish the filling out!
Pro Tips for Making Pumpkin Whoopie Pies Recipe
- Perfect Batter Consistency: Aim for a sticky but not runny batter; if it’s too loose, add a tablespoon of flour to help it pipe better.
- Smooth the Tops: I discovered smoothing the domed tops with a wet finger before baking creates better sandwich surfaces.
- Avoid Overbaking: Check for springiness at 15 minutes, or they’ll dry out and lose their signature tender crumb.
- Chill the Filling: Letting the cream cheese filling chill makes spreading and piping so much easier and cleaner.
How to Serve Pumpkin Whoopie Pies Recipe
Garnishes
I love dusting these pumpkin whoopie pies lightly with powdered sugar just before serving; it adds a pretty, snowy touch that pairs perfectly with the rich flavors. Sometimes, I sprinkle a few crushed toasted pecans or a drizzle of maple glaze for an elegant finish when serving guests.
Side Dishes
These whoopie pies stand wonderfully on their own, but I like pairing them with a hot cup of chai tea or a frothy latte to balance the sweetness. For a fall-themed spread, you might also serve them alongside roasted spiced nuts or a fresh apple cider for that perfect autumn vibe.
Creative Ways to Present
For special occasions, I’ve wrapped each pumpkin whoopie pie individually in clear cellophane and tied them with a festive ribbon—it makes darling party favors or gifts. Another fun way I’ve served them is stacked on a tiered cake stand at a fall brunch, which always impresses guests.
Make Ahead and Storage
Storing Leftovers
If you have leftovers—and trust me, you might—store pumpkin whoopie pies in an airtight container in the refrigerator. They stay soft and fresh for up to 5 days, and the flavors even mellow and improve after a day or two. I usually keep a batch handy for midweek treats!
Freezing
I’ve frozen the assembled whoopie pies by wrapping each individually in plastic wrap and placing them in a freezer-safe bag. They freeze beautifully for up to 3 months. When I want one, I let it thaw overnight in the fridge, and it tastes just like freshly made, which is a lifesaver during busy holiday seasons.
Reheating
Usually, these whoopie pies are perfect fresh or cold, but if you want a warm treat, I pop one in the microwave for about 10 seconds. This softens the filling nicely without melting it completely. Just be careful not to overheat, or you’ll lose that creamy texture.
FAQs
-
Can I use canned pumpkin pie filling instead of pumpkin puree?
It’s best to use pure pumpkin puree for this recipe, not pumpkin pie filling. Pie filling contains added sugars and spices which can throw off the texture and flavor balance of the whoopie pies.
-
How do I prevent my whoopie pies from cracking?
Make sure not to overmix the batter once you add the dry ingredients, and pipe the batter evenly with enough space between each round. Also, smoothing the tops gently before baking helps prevent cracking and creates a nice flat surface for the filling.
-
Can I make the whoopie pies gluten-free?
Yes, you can substitute the all-purpose flour for a gluten-free blend that’s designed for baking, but be aware that texture might slightly differ. Adding a bit of xanthan gum can help keep the structure.
-
How long do these Pumpkin Whoopie Pies last?
Stored in an airtight container in the fridge, they last up to 5 days and maintain their flavor and softness.
-
Can I prepare the filling a day ahead?
Absolutely! Making the cream cheese filling a day ahead helps it develop a fuller flavor and makes spreading easier on assembly day.
Final Thoughts
This Pumpkin Whoopie Pies Recipe has become one of those crowd-pleasers I keep returning to each season because it strikes the perfect balance of nostalgia and ease. It’s a recipe that’s approachable whether you’re a baking newbie or a seasoned pro, and I promise you’ll savor each bite. I can’t recommend it enough for your next fall get-together or cozy night in—give it a try, and watch how quickly these little delights disappear from the plate!
Print
Pumpkin Whoopie Pies Recipe
- Prep Time: 15 mins
- Cook Time: 20 mins
- Total Time: 45 mins
- Yield: 12 servings
- Category: Dessert
- Method: Baking
- Cuisine: American
Description
These Pumpkin Whoopie Pies are soft, spiced pumpkin cakes sandwiched with a creamy cinnamon-vanilla cream cheese filling. Perfectly moist and flavorful, they make a delightful fall treat or dessert to share at gatherings.
Ingredients
Pies
- 3 cups (360 g) all-purpose flour
- 1 Tbsp ground cinnamon
- 1 tsp baking powder
- 1 tsp baking soda
- 1 tsp ground ginger
- 1 tsp kosher salt
- 1/2 tsp ground allspice
- 1/2 tsp ground cloves
- 1/4 tsp ground nutmeg
- 2 cups (430 g) packed dark brown sugar
- 1/2 cup (1 stick) unsalted butter, softened
- 2 large eggs
- 1 cup pumpkin puree
- 1/4 cup vegetable or neutral oil
- 1 1/2 tsp pure vanilla extract
Filling & Assembly
- 1 (8-oz) block cream cheese, softened
- 1/2 cup (1 stick) unsalted butter, softened
- 2 cups (230 g) confectioners’ sugar
- 2 tsp ground cinnamon
- 2 tsp pure vanilla extract
- 1 tsp honey
Instructions
- Preheat and mix dry ingredients: Preheat oven to 350°F (175°C). In a medium bowl, whisk together the flour, cinnamon, baking powder, baking soda, ginger, kosher salt, allspice, cloves, and nutmeg until evenly combined.
- Mix wet ingredients and combine: In the large bowl of a stand mixer fitted with the whisk attachment, beat the brown sugar and softened butter on medium-high speed until fully combined. Add the eggs, pumpkin puree, vegetable oil, and vanilla extract, beating until smooth. Reduce the mixer speed to medium-low and gradually add the dry ingredient mixture until just combined, resulting in a smooth and sticky dough.
- Pipe the dough: Transfer the dough into a gallon-sized freezer bag or piping bag. Snip about one inch off one corner. Pipe rounds about 2 inches wide onto two large parchment-lined baking sheets, spacing them about 2 inches apart. Smooth the tops of each round gently with the back of a spoon or a wet finger to even them out.
- Bake: Bake the whoopie pies in the preheated oven for 15 to 20 minutes, or until they spring back lightly to the touch. Remove from oven and let them cool slightly on the baking sheets.
- Cool completely: Transfer the baked whoopie pies to a wire rack and allow them to cool completely before assembling.
- Prepare the filling: In the large bowl of a stand mixer fitted with the whisk attachment, beat the softened cream cheese and softened butter on medium-high speed until smooth and creamy. Add confectioners’ sugar, ground cinnamon, vanilla extract, and honey. Continue to beat the mixture until it is light, fluffy, and well combined. Refrigerate until ready to use.
- Assemble the whoopie pies: Turn half of the cooled whoopie pies so the domed sides are facing down. Spread the cream cheese filling evenly on the flat side of these pies. Top each with a remaining pie, domed side up, pressing gently to sandwich the filling inside.
Notes
- Ensure butter and cream cheese are softened to room temperature for easier mixing and smooth filling.
- Piping the dough helps create uniform round cakes for consistent baking.
- Cool the whoopie pies completely before filling to prevent the filling from melting.
- Store assembled whoopie pies in an airtight container in the refrigerator for up to 3 days.
- For a vegan version, substitute dairy ingredients with plant-based alternatives and use egg replacer.
Nutrition
- Serving Size: 1 whoopie pie
- Calories: 350
- Sugar: 28g
- Sodium: 200mg
- Fat: 18g
- Saturated Fat: 9g
- Unsaturated Fat: 7g
- Trans Fat: 0.1g
- Carbohydrates: 44g
- Fiber: 2g
- Protein: 4g
- Cholesterol: 45mg

