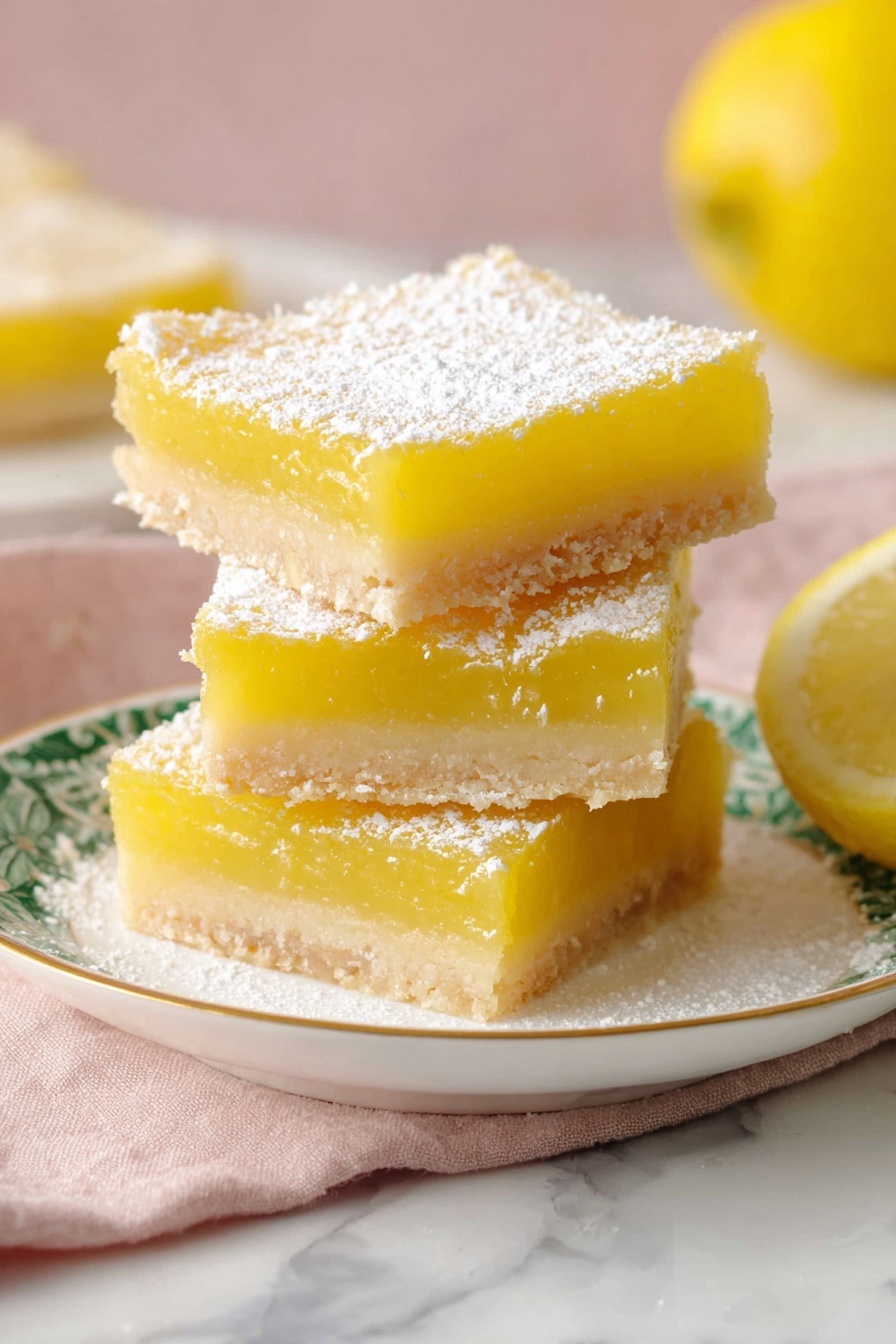
If you’re looking for that zesty, buttery treat that will absolutely brighten your day and impress everyone at the next get-together, I have to share my Perfect Lemon Bars Recipe with you. I absolutely love how this turns out every single time — the crust is crisp but tender, and the lemon filling is just the right balance of tangy and sweet. When I first tried to make lemon bars, I struggled with getting that perfect texture, but after lots of tweaking, I think I’ve nailed it and can’t wait for you to try it too!
Why You’ll Love This Recipe
- Perfect balance of flavors: The combination of tart lemon and sweet sugar gives a refreshing but rich taste every bite.
- Simple ingredients, spectacular results: No fancy ingredients necessary — just staple pantry items you probably already have.
- Make-ahead friendly: These bars hold up beautifully in the fridge, making them great for prepping ahead of your event.
- Foolproof crust: Lightly golden, buttery, and crisp without being hard or crumbly — I discovered this crust mix through trial and error, so you don’t have to.

Ingredients You’ll Need
Each one of these ingredients plays a key role: from the buttery shortbread crust to the bright lemony filling, you’ll find that having good-quality lemons and fresh eggs really makes the difference in flavor and texture.

- All-purpose flour: Divided to keep the crust tender and sturdy while thickening the filling just right.
- Powdered sugar: Adds sweetness and keeps the crust crumbly, plus perfect for that pretty dusting on top.
- Salt: Just a hint enhances all the flavors without being noticeable.
- Unsalted butter: Melted for the crust—to make it rich and golden without overpowering the lemon.
- Lemon zest: Gives that fresh citrus pop, so don’t skip zesting instead of just juice!
- Sugar: Sweetens the lemon filling, balancing that tang perfectly.
- Eggs: Room temperature for better mixing and a silky, set filling.
- Lemon juice: Freshly squeezed for the brightest, most authentic lemon flavor.
Variations
I love experimenting with this recipe, but the classic lemon bars always win in my house. If you’re feeling creative, there are simple tweaks you can try to make these your own.
- Berry twist: I once folded fresh raspberries into the filling for a fun pop of flavor; it made a pretty pink hue too!
- Gluten-free: Swap the flour for a high-quality gluten-free blend—I found keeping the crust buttery helped keep the texture spot on.
- Extra zing: Add a splash of fresh lime juice into the filling with the lemon juice for an extra citrus punch.
- Vanilla essence: Adding a dash of vanilla extract to the crust butter mixture softens the edges beautifully.
How to Make Perfect Lemon Bars Recipe
Step 1: Prepare and Bake the Crust
Start by preheating your oven to 350°F (175°C) and lining a 9×13-inch baking dish with parchment paper. This step is key to ensuring your bars don’t stick and come out easily. Whisk together 2 1/2 cups of the flour with the powdered sugar and salt. Pour in the melted butter and mix until it forms a uniform dough. A stand mixer or hand mixer with a paddle attachment works great here—and if you like, add a dash of vanilla to the butter beforehand for a subtle background note. Press the dough evenly into the pan using your hands or the back of a spoon, making sure it’s compact. Bake this crust for about 20 minutes, or until it turns a lovely light golden brown. You’ll know it’s ready when the edges start to smell buttery and look set.
Step 2: Make the Lemon Filling
While the crust is baking, pulse the sugar and lemon zest in a food processor until you see the sugar turn a pale yellow—it means the zest oils are fully incorporated, infusing the sugar with that fresh lemon aroma. Don’t have a processor? No worries; simply finely mince the zest and mix it well into the sugar by hand—though I’ve found the processor makes the flavor pop more. In a large bowl, combine the zesty sugar with the remaining 1/2 cup flour, then whisk in the fresh lemon juice and eggs thoroughly. Make sure the mixture is smooth and homogenous before moving on. This filling should be pourable and silky.
Step 3: Bake Until Set, Then Chill
Pour the filling over the warm crust as soon as it comes out of the oven (it helps it set up better). Return the pan to the oven and bake for about 25 minutes, rotating it once halfway through to ensure even baking. You’re looking for a firm but still slightly jiggly center—it will firm up as it cools. When the timer’s up, take the pan out and let it sit at room temperature for about an hour, then pop the whole thing in the fridge for at least two hours before slicing. This chilling step really helps achieve clean cuts and that perfect bar texture.
Pro Tips for Making Perfect Lemon Bars Recipe
- Use room temperature eggs: This makes mixing smoother and helps the filling set properly without curdling.
- Don’t skip zesting the sugar: I found pulsing the zest into sugar releases oils that make the bars taste fresh and store well.
- Line the pan with parchment overhang: This makes removing the bars easier, preventing breakage when cutting.
- Cut with a damp, sharp knife: It helps keep the edges smooth and prevents the filling from sticking, so your bars look as good as they taste.
How to Serve Perfect Lemon Bars Recipe

Garnishes
I usually dust a generous layer of powdered sugar on top just before serving — it adds a pretty contrast and soft sweetness. Sometimes, if I’m feeling fancy, I garnish with a few thin lemon slices or a sprig of fresh mint. The fresh mint adds a nice color pop and light aroma that complements the citrus.
Side Dishes
These lemon bars are delightful on their own, but I’ve enjoyed pairing them with a scoop of vanilla bean ice cream or alongside a cup of freshly brewed chamomile tea for a relaxing afternoon treat. They also balance beautifully with a light fruit salad if you’re serving a bigger dessert spread.
Creative Ways to Present
For birthdays or brunches, I’ve arranged the bars on a tiered dessert stand, layering each tier with edible flowers and sprigs of thyme to elevate the presentation. Another fun idea is to cut them into mini bite-sized squares and serve on cocktail picks — perfect for parties or picnics where guests can grab and go.
Make Ahead and Storage
Storing Leftovers
I usually cover my lemon bars tightly with plastic wrap or store them in an airtight container in the fridge. They keep beautifully for up to 4 days, staying fresh and moist without drying out. Just make sure they’re chilled properly first before covering.
Freezing
If I want to prep ahead, I freeze the bars fully cut, laying them flat on a baking sheet first. Once frozen, I transfer them to a freezer-safe bag with parchment between layers so they don’t stick. To thaw, I leave them in the fridge overnight, and they come back just as flavorful and tender as fresh.
Reheating
I prefer eating lemon bars chilled, but if you want to warm them slightly, a few seconds in the microwave (about 10-15 seconds) is enough to take the chill off without melting the filling. Avoid reheating too long — the texture changes quickly!
FAQs
-
Can I use bottled lemon juice instead of fresh lemon juice?
Fresh lemon juice is definitely best for achieving that bright, natural flavor in the filling. Bottled juice can work in a pinch, but it tends to lack the vibrant taste and can alter the texture slightly. If you’re using bottled, try to pick one without added preservatives for better results.
-
Why is it important to chill the bars before cutting?
Chilling the lemon bars helps the filling set properly, preventing it from being too soft and messy when cutting. It also firms up the crust, so your bars hold their shape nicely and you get clean, neat slices every time.
-
Can I make this recipe vegan or dairy-free?
For a dairy-free version, swap the butter with a quality plant-based alternative, but keep in mind the crust texture might be a bit different. Vegan egg substitutes like aquafaba or commercial egg replacers can work, but the texture of the lemon filling will change since eggs help it set firmly. I recommend experimenting if you want to adapt it fully vegan.
-
What’s the best way to get a smooth lemon filling?
Make sure to whisk the eggs, sugar mixture, and lemon juice thoroughly until smooth and combined. Using room temperature eggs prevents lumps or curdling. If you want extra smoothness, strain the filling through a fine mesh sieve before pouring it over the crust.
Final Thoughts
This Perfect Lemon Bars Recipe has become a staple in my kitchen because it’s reliably delicious, refreshing, and simple enough to whip up anytime you need a little pick-me-up or crowd-pleasing dessert. It’s one of those recipes that all my friends ask for, and honestly, I’m happy to share because I want you to experience that first bite of tangy sunshine too. Give it a try—once you do, you’ll see why it’s my go-to for lemon bars every time.
Print
Perfect Lemon Bars Recipe
- Prep Time: 20 min
- Cook Time: 45 min
- Total Time: 4 hr 20 min
- Yield: 15 bars
- Category: Dessert
- Method: Baking
- Cuisine: American
Description
These bright and zingy lemon bars feature a buttery shortbread crust topped with a tangy lemon custard filling. Perfectly balanced between sweet and tart, this classic dessert is easy to make and sure to brighten up any gathering.
Ingredients
Crust
- 2 1/2 cups all-purpose flour (300g)
- 2/3 cup powdered sugar (66g)
- 1/2 tsp salt
- 12 tbsp unsalted butter, melted (170g)
Lemon Filling
- 1/2 cup all-purpose flour (60g)
- 3 cups sugar (600g)
- 3 tbsp lemon zest (zest of 3 lemons)
- 8 large eggs, room temperature
- 1 cup fresh lemon juice (240mL)
- Additional powdered sugar for dusting
Instructions
- Preheat and Prepare Pan: Heat your oven to 350°F and line a 9×13-inch baking dish with parchment paper to ensure easy removal of the bars later.
- Make the Crust: In a bowl or stand mixer fitted with a paddle attachment, whisk together 2 1/2 cups of flour, powdered sugar, and salt. Pour in the melted butter and mix until the mixture forms a cohesive dough. Optionally, add a dash of vanilla with the butter for extra flavor.
- Press and Bake Crust: Sprinkle the dough evenly into the lined pan and press it down firmly to form a flat, even layer. Bake in the preheated oven for about 20 minutes or until the crust turns a light golden color.
- Prepare Lemon Sugar: While the crust bakes, add the sugar and lemon zest to a food processor and pulse until the zest is fully incorporated and the sugar has a light yellow color. If you don’t have a food processor, finely mince the zest and mix it with the sugar manually.
- Mix Filling Ingredients: In a large bowl, combine the lemon sugar and remaining 1/2 cup flour. Pour in the fresh lemon juice and add the eggs. Whisk or mix very well until the filling is completely combined and smooth.
- Bake Lemon Filling: Pour the lemon filling over the warm baked crust. Return the pan to the oven and bake for approximately 25 minutes, turning the pan halfway through for even baking. The filling should set but still be slightly jiggly in the center.
- Cool and Chill: Remove the lemon bars from the oven and allow them to cool at room temperature for an hour. Then transfer the dish to the refrigerator and chill for at least two hours to let the filling fully set.
- Serve: Dust the cooled lemon bars with powdered sugar. Use a clean, sharp, damp knife to cut into bars, wiping and re-wetting the knife between cuts for clean slices. Serve chilled or at room temperature.
Notes
- For best results, use freshly squeezed lemon juice and freshly grated lemon zest to maximize the citrus flavor.
- Press the crust firmly to ensure it holds together properly after baking.
- Chilling the bars thoroughly before cutting helps achieve clean slices and firm texture.
- A sharp, damp knife prevents the filling from sticking during cutting.
- You can add a teaspoon of vanilla extract to the crust mixture if desired for extra depth of flavor.
Nutrition
- Serving Size: 1 bar
- Calories: 385 kcal
- Sugar: 46 g
- Sodium: 113 mg
- Fat: 12 g
- Saturated Fat: 7 g
- Unsaturated Fat: 5 g
- Trans Fat: 0 g
- Carbohydrates: 66 g
- Fiber: 1 g
- Protein: 6 g
- Cholesterol: 111 mg

