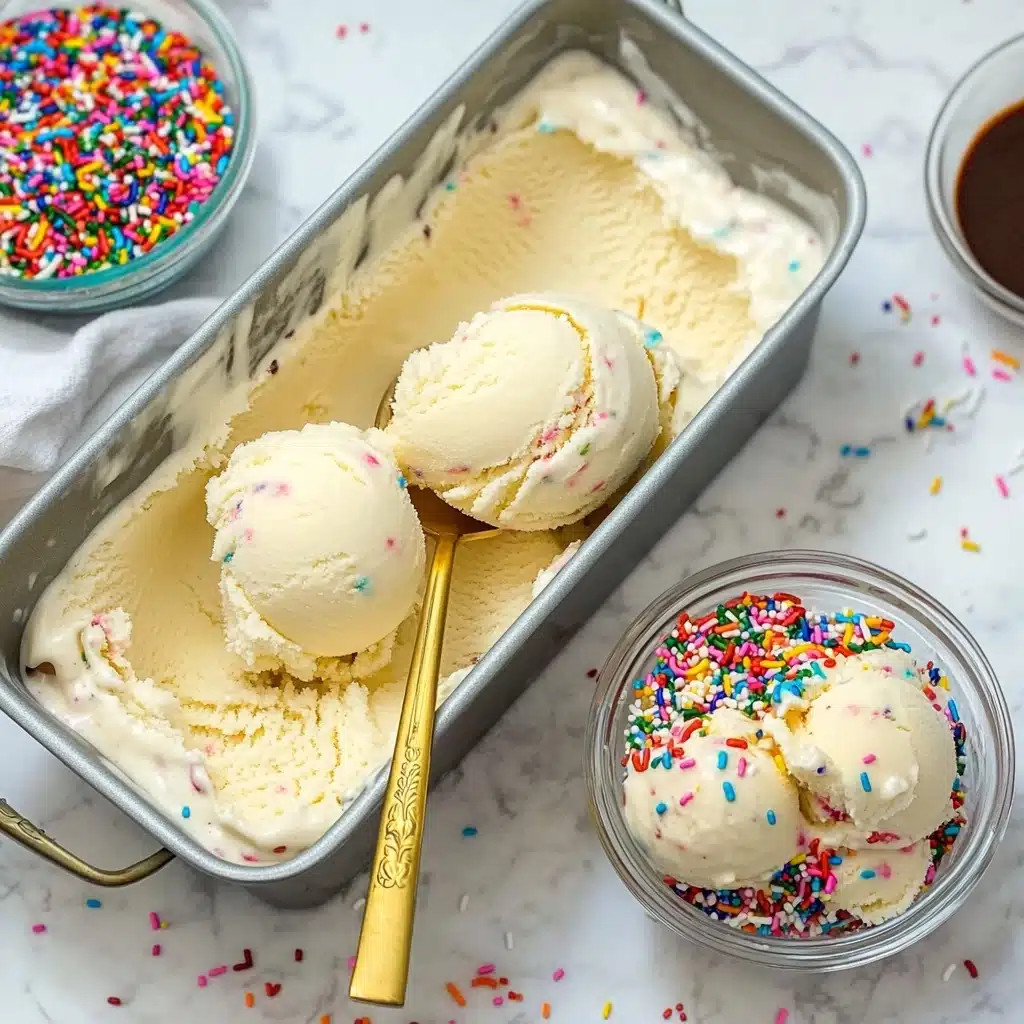
There is nothing more magical (or easier!) than making a batch of No Churn Vanilla Ice Cream at home. With just a few simple pantry ingredients and absolutely zero fancy equipment, you can scoop up rich, ultra-creamy vanilla perfection right from your own freezer. This recipe transforms the basics into an ice cream dreamy enough to rival any scoop shop—no churning required!
Why You’ll Love This Recipe
- No Ice Cream Maker Needed: Forget about any expensive gadgets—this No Churn Vanilla Ice Cream is pure simplicity, and you only need a hand mixer!
- Dreamy, Scoopable Texture: Thanks to a combination of heavy cream, condensed milk, and just a hint of cream cheese, every scoop is incredibly smooth and creamy.
- Intense Natural Vanilla Flavor: Real vanilla bean paste infuses every bite for that classic, aromatic flavor you crave in old-fashioned vanilla ice cream.
- Easy to Customize: Keep it classic or go wild with your favorite mix-ins; this base is super versatile and adapts beautifully.

Ingredients You’ll Need
True to its promise, this No Churn Vanilla Ice Cream keeps things blissfully simple. Each ingredient plays a star role in giving your finished ice cream its signature flavor and irresistible texture—no fillers or stabilizers required!
- Cold Heavy Cream: This is what gives your ice cream its fluffy structure and luscious mouthfeel. Be sure it’s well-chilled for maximum volume when whipping.
- Sweetened Condensed Milk: The secret to a scoopable, creamy finish! It sweetens the ice cream and prevents iciness.
- Evaporated Milk: Adds extra richness and helps create that classic custard flavor—without eggs or cooking.
- Full-Fat Cream Cheese (softened): Just a few spoonfuls add body and a subtle tang that takes the vanilla flavor over the top.
- Vanilla Bean Paste: Far superior to extract, this paste speckles your ice cream with real vanilla seeds and brings that deep, unforgettable aroma.
- Light Corn Syrup: Helps keep the texture ultra-smooth and prevents crystallization, especially helpful for freezer storage.
- Fine Sea Salt: Just a pinch balances the sweetness and enhances all the flavors.
Variations
One of the joys of homemade No Churn Vanilla Ice Cream is that it’s a delicious blank canvas—so don’t be shy about making it your own! Here are a few ideas to inspire your next batch.
- Chocolate Chip Swirl: Fold in mini chocolate chips or ripple softened fudge sauce through the ice cream before freezing for a “chipwich” effect.
- Berry Burst: Gently swirl in blueberry, raspberry, or strawberry jam just before freezing to add fruit ribbons and a pop of color.
- Dairy-Free Swap: Substitute full-fat coconut milk for the heavy cream and vegan condensed milk plus vegan cream cheese for a plant-based treat.
- Cookie Crunch: Crumble in shortbread, Oreos, or your favorite cookies after folding in the cream to add texture and extra decadence.
How to Make No Churn Vanilla Ice Cream
Step 1: Whip the Cream
Start by pouring your well-chilled heavy cream into a large bowl. Using a hand mixer or stand mixer, beat the cream until stiff peaks form—this should take about 2–3 minutes on medium-high speed. You’ll know it’s ready when you lift your beaters and the peaks don’t flop over. Set this magical cloud aside while you prep the vanilla base.
Step 2: Make the Vanilla Base
In a separate bowl, whisk the softened cream cheese until it’s completely smooth—no lumps! Add the sweetened condensed milk, evaporated milk, salt, vanilla bean paste, and corn syrup. Whisk again until the mixture is glossy and uniform, taking care to break up any stubborn cream cheese. This buttery base is where all your classic vanilla flavor shines through.
Step 3: Fold and Combine
Now comes the step where magic meets patience! Gently add the whipped cream to your vanilla mixture in 2–3 additions, folding it in with a spatula. Use gentle, swooping motions to keep everything light and airy—you don’t want to lose all that fluff you just created. Keep folding until you see no streaks. Your No Churn Vanilla Ice Cream base is now ready for its freezer debut!
Step 4: Freeze and Enjoy
Pour the mixture into a standard loaf pan or 1–2 airtight freezer containers. Smooth the top, then press a piece of parchment or plastic wrap directly onto the surface before covering with a tight lid (this wards off icy crystals). Transfer to the freezer and let it set for at least 6 hours, or overnight for best results. That’s it—your masterpiece is ready to scoop and share!
Pro Tips for Making No Churn Vanilla Ice Cream
- Whip It Cold: Always use well-chilled heavy cream—the colder the cream, the more stable and airy your whipped peaks will be, which guarantees that fluffy, scoopable texture.
- Super-Smooth Base: Make sure the cream cheese is at room temperature before whisking so it blends seamlessly; any lumps will translate to your finished ice cream.
- Direct Contact Cover: Press plastic wrap or parchment directly onto the surface of the ice cream before freezing—this tiny step keeps your No Churn Vanilla Ice Cream fresh and free from freezer burn.
- Let It Rest Before Scooping: If your ice cream is too hard to scoop, let it sit on the counter for 5–10 minutes. The texture will soften just enough for those perfect, creamy scoops.
How to Serve No Churn Vanilla Ice Cream
Garnishes
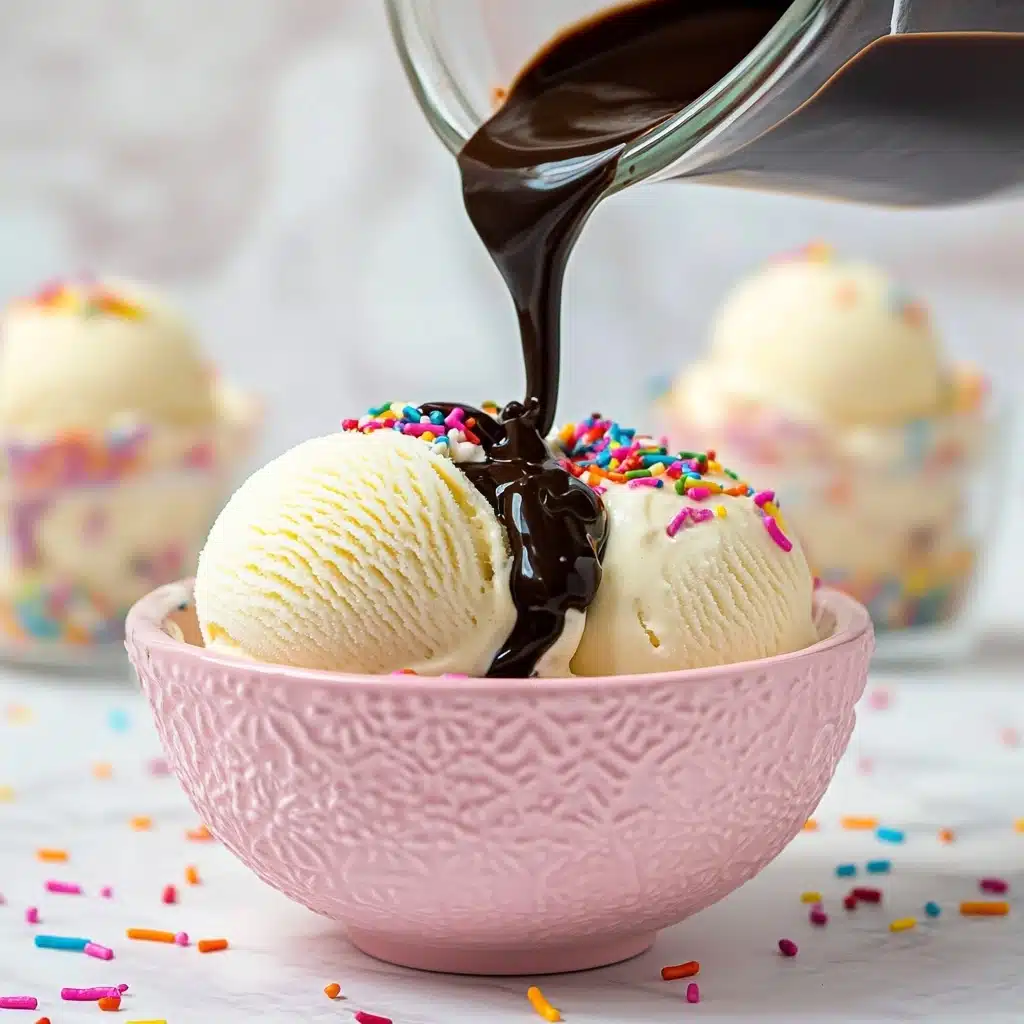
No Churn Vanilla Ice Cream loves a touch of flair! Sprinkle on rainbow jimmies, shaved chocolate, or toasted nuts for crunch. A drizzle of hot fudge, caramel, or fruit sauce adds color and extra indulgence. For the ultimate classic, tuck in a crisp wafer or fresh summer berries just before serving.
Side Dishes
This homemade ice cream is spectacular all on its own, but it truly shines alongside warm desserts—think gooey brownies, apple pie, grilled peaches, or banana bread. It’s also perfect sandwiched between cookies or paired with coffee for an affogato-style treat.
Creative Ways to Present
Why not go big? Serve scoops in pretty glass parfaits layered with fruit and cookie crumbs. Try mini cones for a party, or whip up DIY ice cream sandwiches. For kids (and kids at heart), carve out little “ice cream boats” with fresh fruit or punch out rounds for a sundae bar. No Churn Vanilla Ice Cream is the base for so many show-stopping desserts!
Make Ahead and Storage
Storing Leftovers
Store any leftover No Churn Vanilla Ice Cream in an airtight container with a piece of parchment or plastic wrap pressed against the surface. This keeps it luscious for up to 2 weeks (though mine rarely lasts that long!).
Freezing
Freeze your ice cream as soon as it’s mixed for best results—immediate chilling ensures the creamiest texture. Keep the container towards the back of your freezer to avoid temperature swings, which can cause ice crystals to form.
Reheating
No need to reheat, but if your ice cream is super firm after freezing, simply let it rest at room temperature for 5–10 minutes until scoopable—no microwave needed. That wait makes each bite even creamier!
FAQs
-
Can I make No Churn Vanilla Ice Cream without an electric mixer?
Absolutely! While a mixer makes whipping the cream much faster, you can use a large whisk and plenty of elbow grease to achieve stiff peaks. Just whip the cream very well to ensure that airy, smooth finish.
-
How do I avoid icy or grainy ice cream?
The secret is in the mixing: ensure your cream cheese is smooth and all the ingredients are fully combined before folding in the whipped cream. Also, make sure to fold gently to avoid deflating the mix, and always freeze with a direct-contact covering.
-
Can I use vanilla extract if I don’t have vanilla bean paste?
Yes, you can substitute 2 teaspoons of pure vanilla extract for the paste if needed. Your No Churn Vanilla Ice Cream will still be delicious, though you’ll miss those pretty vanilla bean specks and the extra flavor depth from the paste.
-
Is it possible to double the recipe for a party?
Definitely! Just double all ingredients and use a larger mixing bowl for whipping the cream. Divide the finished mixture between large pans or containers and add a little extra freezing time for best results.
Final Thoughts
There’s just something extra special about serving homemade No Churn Vanilla Ice Cream—especially when it’s this easy and this good. Whether you keep it classic or riff with your own mix-ins, each creamy scoop is pure bliss. I can’t wait for you to give it a try!
Print
No Churn Vanilla Ice Cream Recipe
- Prep Time: 15 minutes
- Total Time: 6 hours 15 minutes
- Yield: 6 servings
- Category: Dessert
- Method: Mixing, Freezing
- Cuisine: Global
- Diet: Vegetarian
Description
Indulge in the creamy goodness of homemade vanilla ice cream with this easy no-churn recipe. With just a few simple ingredients and a little patience, you can enjoy a delicious frozen treat anytime.
Ingredients
For the Ice Cream:
- 2 1/4 cups cold heavy cream
- 1/2 cup sweetened condensed milk
- 1/2 cup evaporated milk
- 4 tbsp full-fat cream cheese, softened
- 2 tbsp vanilla bean paste
- 1 tbsp light corn syrup
- 1/2 tsp fine sea salt
Instructions
- Whip the Heavy Cream: In a large mixing bowl, whip the cold heavy cream to stiff peaks using a hand mixer or stand mixer. Set aside.
- Prepare the Vanilla Mixture: In another large bowl, whisk the softened cream cheese until smooth. Add in sweetened condensed milk, evaporated milk, salt, vanilla bean paste, and corn syrup. Whisk until smooth.
- Combine the Mixtures: Gently fold the whipped cream into the vanilla mixture in 2–3 additions. Use a spatula to keep the mixture light and airy.
- Freeze the Ice Cream: Pour the mixture into a loaf pan or airtight containers. Freeze for at least 6 hours or overnight until firm.
- Serve and Enjoy: Let the ice cream sit at room temperature for a few minutes before scooping. Store any leftovers in an airtight container for up to 2 weeks.
Notes
- Let the ice cream sit at room temperature before serving for easier scooping.
- For best texture and flavor, store any leftovers in an airtight container.
Nutrition
- Serving Size: 1 serving
- Calories: 320
- Sugar: 15g
- Sodium: 180mg
- Fat: 28g
- Saturated Fat: 17g
- Unsaturated Fat: 8g
- Trans Fat: 0g
- Carbohydrates: 15g
- Fiber: 0g
- Protein: 3g
- Cholesterol: 100mg

