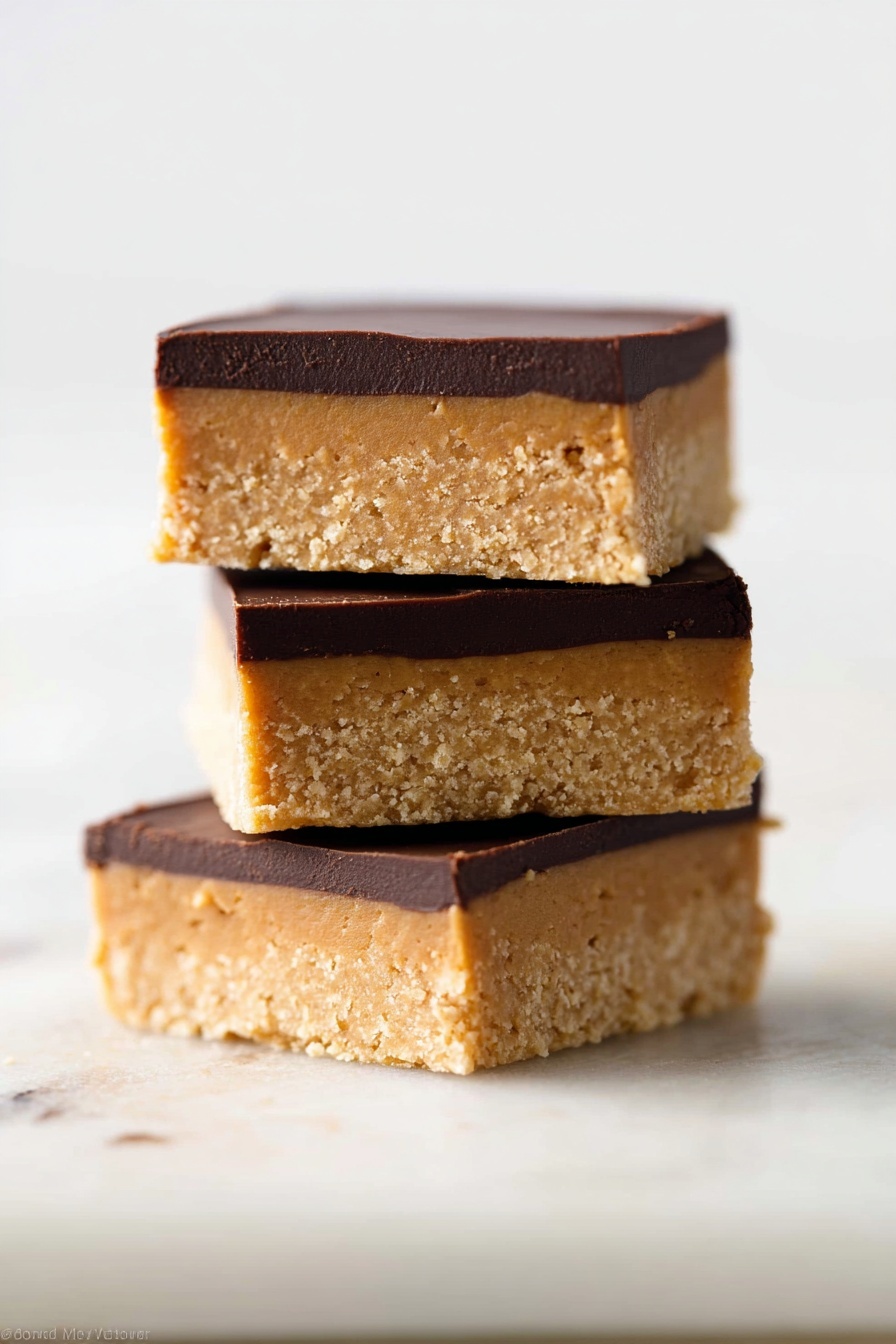
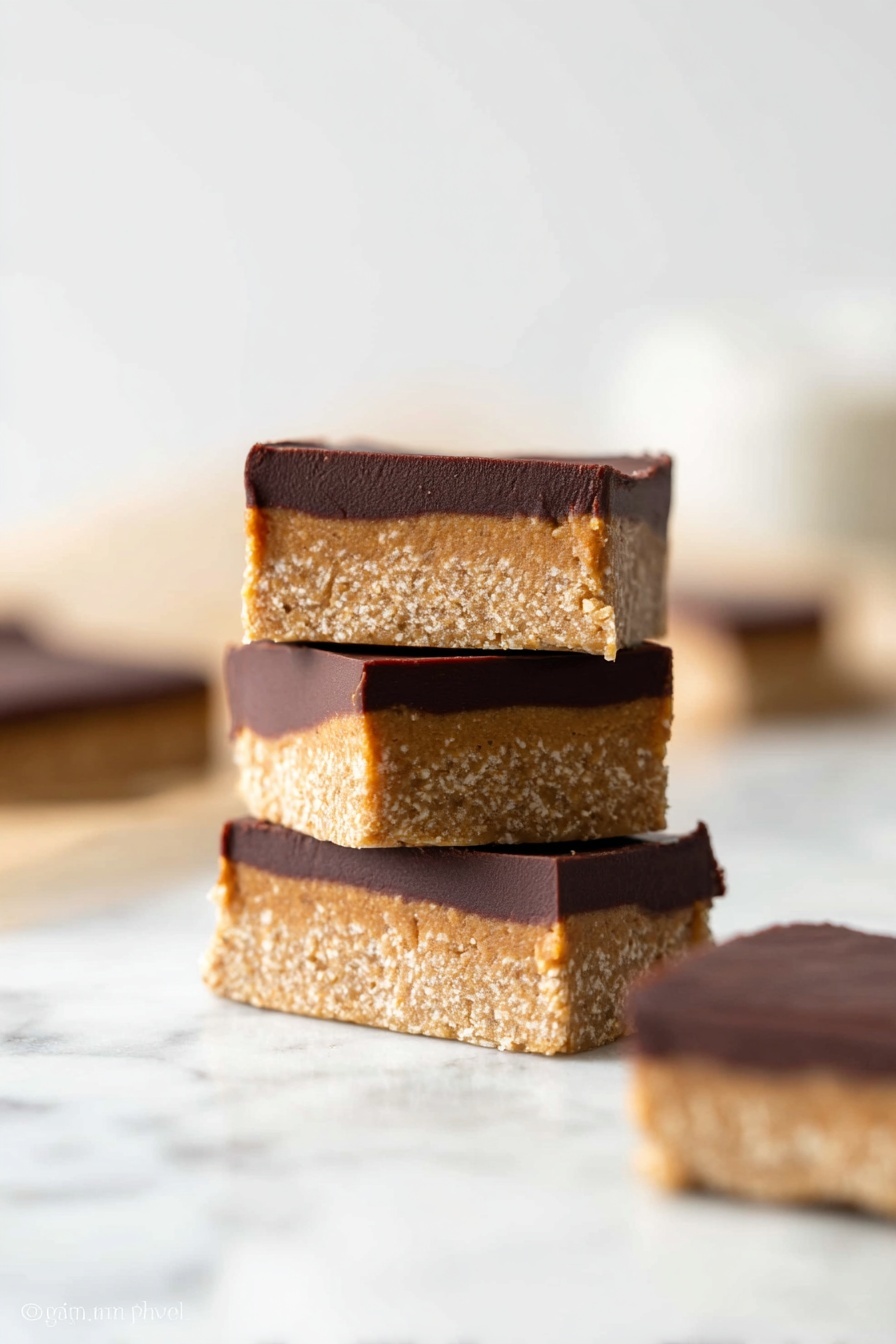
If you’re on the hunt for a dessert that’s outrageously good but doesn’t require turning on the oven, you’re gonna love this No-Bake Chocolate Peanut Butter Bars Recipe. I absolutely love how these bars come together with just a handful of ingredients, delivering that perfect combo of creamy peanut butter and rich chocolate without any fuss. When I first tried this, I was amazed at how simple and quick it was—yet the result is deeply satisfying and so addictive. Keep reading, and I’ll walk you through every step to make sure your bars turn out perfect every time!
Why You’ll Love This Recipe
- No Oven Needed: Perfect for hot days or when you want dessert fast without heating up your kitchen.
- Five Simple Ingredients: You probably already have everything on hand—no complicated shopping runs.
- Crowd-Pleaser: Every time I bring these to a party, they disappear in minutes.
- Customizable: Easy to tweak depending on your peanut butter or chocolate preference.

Ingredients You’ll Need
These ingredients come together so well—the graham cracker crumbs give these bars a lovely crunch, while the peanut butter and chocolate provide creamy, luscious layers. When you pick your chocolate chips and peanut butter, choosing good-quality versions really makes a difference.
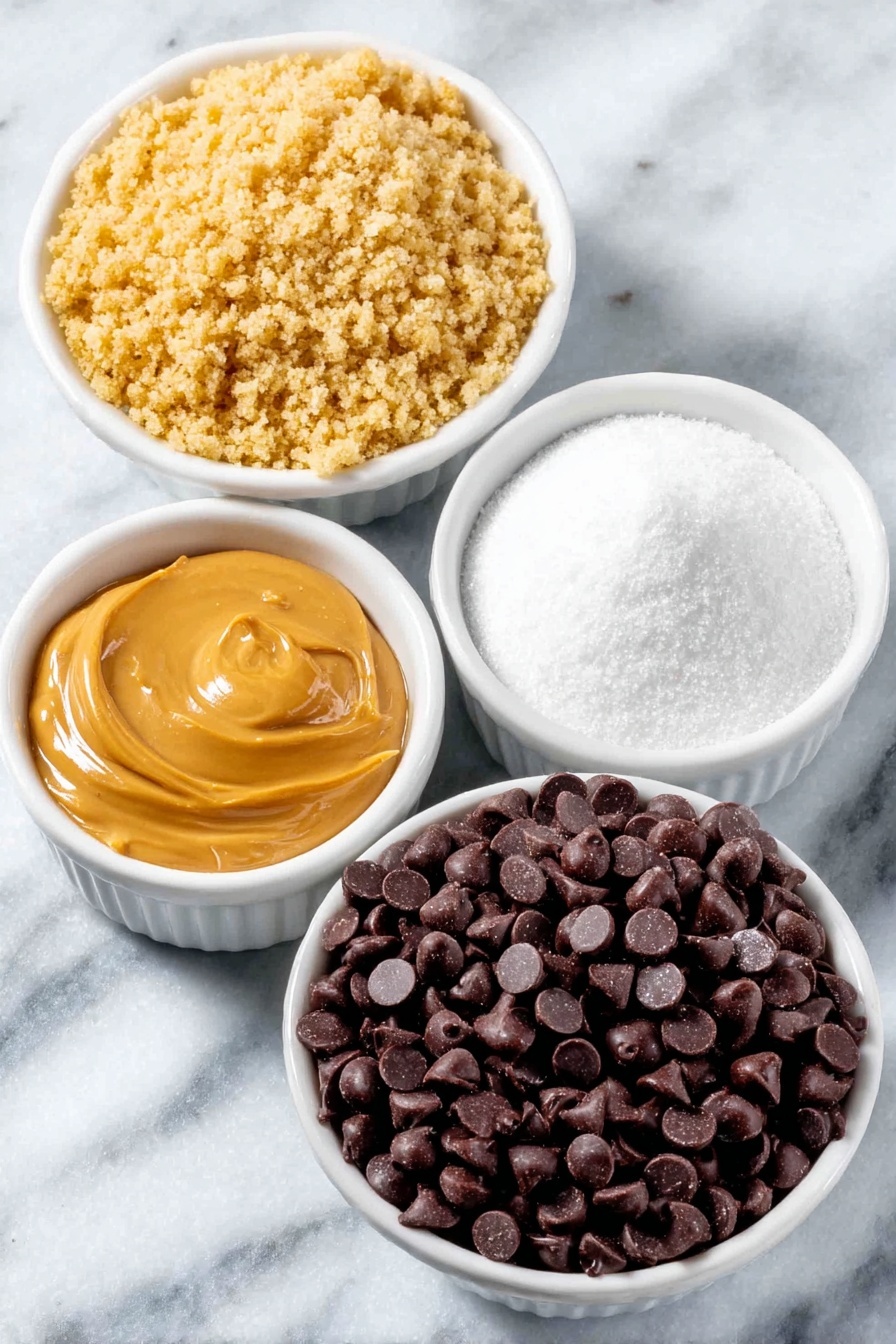
- Salted Butter: Using salted butter balances the sweetness and adds depth of flavor.
- Graham Cracker Crumbs: You can crush whole graham crackers at home for the freshest crumbs.
- Confectioners’ Sugar: This fine sugar blends smoothly into the peanut butter layer for that melt-in-your-mouth texture.
- Creamy Peanut Butter: I prefer natural peanut butter with just peanuts and salt—no added sugar or oil for a clean taste.
- Semi-Sweet Chocolate Chips: These add just the right amount of sweetness without overpowering the peanut butter.
Variations
I love that this No-Bake Chocolate Peanut Butter Bars Recipe is super flexible. Over time, I’ve tried a few twists and found that the bars still come out fantastic—so don’t be afraid to play around and make it your own.
- Peanut Butter Swap: I once swapped creamy peanut butter for almond butter, and it added a lovely nutty flavor that my family enjoyed just as much.
- Chocolate Variety: Dark chocolate chips can add a bit of an intense cocoa punch if you want less sweetness.
- Add Nuts or Sea Salt: Sprinkling chopped peanuts or flaky sea salt on top before chilling gives a lovely crunch and a touch of savory contrast.
- Make it Vegan: Use dairy-free butter and vegan chocolate chips for a plant-based version that’s just as delicious.
How to Make No-Bake Chocolate Peanut Butter Bars Recipe
Step 1: Prep Your Pan and Mix Base Layers
First, line an 8-inch or 9-inch square pan with foil or parchment paper—trust me, this makes it sooo much easier to lift out the bars later without any mess. Then, melt your salted butter. When I do this step, I always use just enough time in the microwave to avoid hot spots or grease separating, about 30 seconds, stirring halfway through. Next, mix the melted butter with graham cracker crumbs and confectioners’ sugar until everything looks like a sandy, slightly tacky mixture. Stir in 1 cup of creamy peanut butter thoroughly. The consistency should hold together when pressed—if it feels dry, a teaspoon of warm water or a bit more peanut butter helps.
Step 2: Press the Mixture Evenly Into the Pan
This part is key—you want an even, firm base for your bars. I like to use the bottom of a measuring cup or a flat spatula to press the mixture evenly into the prepared pan. Press firmly but don’t compact it too hard or it can get overly dense. Smoothness at this stage means your bars will slice cleanly later. Pop this base layer into the fridge while you melt the chocolate topping.
Step 3: Melt the Chocolate and Peanut Butter Topping
Now for the fun part! Combine the remaining 2 tablespoons of peanut butter and the chocolate chips in a microwave-safe bowl. Heat in short bursts of 20-30 seconds, stirring well each time until silky smooth. You can also melt this over a double boiler if you prefer. The peanut butter keeps the chocolate glossy and adds a subtle nuttiness that really makes these bars stand out. Once melted and smooth, spread evenly over the peanut butter layer you chilled earlier.
Step 4: Chill and Serve
Refrigerate the bars for at least 2 hours to let them set properly. I always remind myself not to rush this step! The chilling lets the layers firm up so they slice beautifully. Before cutting, let the bars sit at room temperature for about 10 minutes—it helps soften the chocolate just enough for easier slicing without stickiness. Don’t be shy about using a sharp knife warmed slightly under hot water to get clean edges. Serve chilled for a refreshing treat that’s hard to resist.
Pro Tips for Making No-Bake Chocolate Peanut Butter Bars Recipe
- Press, Don’t Pack: Press the base firmly but don’t over-compact; it keeps the texture perfect.
- Warm Your Knife: Running your knife under hot water before slicing gives smoother cuts without cracking the chocolate.
- Use Fresh Ingredients: Fresh peanut butter and graham crackers give the best flavor; avoid stale or oily ingredients.
- Let Them Rest a Bit: Let bars sit out for 10 minutes before serving for ideal texture and flavor release.
How to Serve No-Bake Chocolate Peanut Butter Bars Recipe
Garnishes
I often sprinkle a bit of flaky sea salt or chopped roasted peanuts on top of the chocolate layer before chilling—it adds a fantastic salty crunch that brightens every bite. Some days, I drizzle a little white chocolate for a fun contrast. Plus, a few fresh raspberries on the side bring a nice tartness that pairs beautifully.
Side Dishes
These bars are rich, so I like pairing them with fresh fruit salad or a light vanilla yogurt for balance. They also go well with a hot cup of coffee or tea—perfect for an afternoon pick-me-up.
Creative Ways to Present
For parties, I cut these bars into bite-sized squares and arrange them on a tiered dessert stand with sprigs of mint or edible flowers for a pretty touch. Wrapping individual bars in parchment paper and tying with twine makes a charming homemade gift, especially around the holidays.
Make Ahead and Storage
Storing Leftovers
I keep leftover bars tightly wrapped in plastic wrap or stored in an airtight container in the fridge. They last up to a week, and honestly, I never find they last that long because my family can’t resist!
Freezing
If I want to stash some for later, I freeze the bars in a single layer on a baking sheet, then transfer them to a freezer-safe bag. They freeze beautifully and thaw in the fridge overnight—still creamy and delicious just like fresh.
Reheating
These bars are best served cold or at room temperature, so no real reheating needed. If they feel too firm after chilling, simply let them sit out for 10-15 minutes—this softens them up nicely without losing that lovely firm texture.
FAQs
-
Can I use crunchy peanut butter instead of creamy?
Absolutely! Crunchy peanut butter will add a delightful texture to the bars, providing little peanut bursts in each bite. Just keep in mind the bars might be a bit less smooth but still delicious.
-
Is it possible to make these bars gluten-free?
Yes! Simply swap out the graham cracker crumbs for a gluten-free alternative or use gluten-free cookies crushed into crumbs. The rest of the ingredients are naturally gluten-free.
-
How long do no-bake chocolate peanut butter bars keep?
Stored properly in an airtight container in the fridge, these bars will stay fresh and tasty for up to one week. For longer storage, freezing is your best bet.
-
Can I double the recipe for a larger batch?
Yes, doubling works great—just use a larger pan or two pans to spread the layers evenly. The chilling time might increase slightly due to the thicker layers.
Final Thoughts
I can’t tell you how many times this No-Bake Chocolate Peanut Butter Bars Recipe has saved me on busy days or last-minute plans. It’s such a reliable, crowd-pleasing treat that never fails to impress with minimal effort. I hope you enjoy making these bars as much as I do—and once you try them, I bet you’ll have a new favorite dessert in your repertoire, just like me!
Print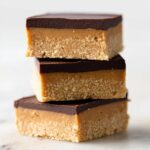
No-Bake Chocolate Peanut Butter Bars Recipe
- Prep Time: 10 minutes
- Cook Time: 0 minutes
- Total Time: 2 hours 10 minutes
- Yield: 20 to 24 squares
- Category: Dessert
- Method: No-Cook
- Cuisine: American
Description
Delicious and easy No-Bake Chocolate Peanut Butter Bars made with just five simple ingredients. These bars feature a buttery graham cracker crust topped with a smooth peanut butter and chocolate layer. Perfect for a quick dessert or snack that requires no baking and minimal prep time.
Ingredients
Base Layer
- 1/2 cup (8 Tbsp; 113g) salted butter, melted
- 1 cup (120g) graham cracker crumbs (about 8 full sheet graham crackers)
- 2 cups (240g) confectioners’ sugar
- 1 cup (about 250g) creamy peanut butter
Topping
- 2 Tablespoons (30g) creamy peanut butter
- 1 cup (180g) semi-sweet chocolate chips
Instructions
- Prepare the Pan: Line an 8-inch or 9-inch square baking pan with aluminum foil or parchment paper, ensuring the lining extends over the edges for easy removal later. Set it aside.
- Make the Base Layer: In a medium bowl, combine the melted salted butter, graham cracker crumbs, and confectioners’ sugar. Stir until well mixed. Add 1 cup of creamy peanut butter and mix thoroughly. Press the mixture evenly into the prepared baking pan, creating a compact base layer.
- Melt Chocolate Peanut Butter Topping: In a microwave-safe bowl or on the stove, melt the remaining 2 tablespoons of creamy peanut butter together with the semi-sweet chocolate chips. Stir continuously until the mixture is smooth and fully combined.
- Assemble and Chill: Spread the melted chocolate and peanut butter mixture evenly over the peanut butter crust layer. Place the pan in the refrigerator and chill for at least 2 hours, or until completely firm.
- Serve: Before cutting, allow the bars to sit at room temperature for about 10 minutes for easier slicing. Cut into 20 to 24 squares and serve chilled. Leftover bars should be tightly covered and refrigerated for up to 1 week.
Notes
- These bars are incredibly decadent and require just five simple ingredients.
- Press the base layer firmly into the pan to ensure the bars hold together well.
- Allow the bars to come to room temperature briefly before cutting to prevent cracking.
- Store leftovers refrigerated and covered to maintain freshness up to one week.
Nutrition
- Serving Size: 1 bar (approx. 1/24th of recipe)
- Calories: 210
- Sugar: 19g
- Sodium: 95mg
- Fat: 14g
- Saturated Fat: 5g
- Unsaturated Fat: 8g
- Trans Fat: 0g
- Carbohydrates: 20g
- Fiber: 1g
- Protein: 5g
- Cholesterol: 20mg


