
If you’re craving a quick, satisfying treat that hits both the sweet and wholesome notes without heating up the kitchen, you’re going to love this No Bake Chocolate Oat Bars Recipe. Seriously, it’s one of those desserts that feels indulgent but comes together in a flash, with just four simple ingredients. I discovered this recipe when I wanted something easy, nutritious, and kid-approved for after school snacks — and believe me, it’s been a family favorite ever since!
Why You’ll Love This Recipe
- Super Quick and Easy: You can whip these bars up in about 15 minutes with minimal kitchen gear—no oven needed!
- Healthy and Satisfying: Made with wholesome oats and natural sweeteners, these bars are a snack you can feel good about handing to the kids (or enjoying yourself).
- Versatile and Customizable: Whether you want to switch up the nut butter or add extras like seeds, these bars adapt beautifully.
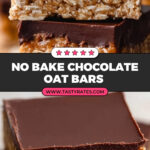
- Perfect Texture Contrast: Crispy oat base with a rich, smooth chocolate top—every bite is a delight.

Ingredients You’ll Need
These simple ingredients all work together to create that wonderful chewy yet crisp texture you want in a no-bake bar, while the chocolate topping adds a little luxe finish. I recommend using gluten-free oats if you’re sensitive, and good quality dark chocolate really makes this sing.

- Gluten Free Rolled Oats: Rolled oats provide the perfect chewy texture and nutty flavor—quick-cooking oats won’t work quite the same.
- Peanut Butter: Creamy peanut butter binds everything together and adds richness; natural or unsweetened works best for less sugar.
- Honey: This adds just the right amount of sweetness and helps hold the bars together without overpowering.
- Dark Chocolate Chips: Use a good quality dark chocolate for that smooth top layer that hardens beautifully and tastes decadent.
Variations
I love playing around with this No Bake Chocolate Oat Bars Recipe—it’s so forgiving! Feel free to swap out peanut butter for almond or sunflower seed butter. I’ve even added a sprinkle of chopped nuts on top before chilling for extra crunch.
- Add Dried Fruit or Seeds: I sometimes mix in chopped dried cranberries or chia seeds for a nutritional boost and interesting texture.
- Swap the Sweetener: Maple syrup or agave nectar works great if you prefer a vegan option instead of honey.
- Use Different Chocolate: White chocolate chips or even a mix of milk and dark chocolate can change up the flavor profile.
- Make It Nut Free: Try using sunflower seed butter and watch those nut allergies no longer stop you from enjoying these.
How to Make No Bake Chocolate Oat Bars Recipe
Step 1: Mix the Base Ingredients
Start by combining the rolled oats, peanut butter, and honey in a mixing bowl. Use a rubber spatula or sturdy spoon to mix everything together until the oats are completely coated and sticky. It takes a little muscle but trust me, this is key for that bar to hold together perfectly. This was one of my earliest lessons—don’t rush this step!
Step 2: Press Into Your Pan
Line an 8×8-inch pan with parchment paper, leaving some overhang for easy removal later. Transfer the oat mixture and press it down firmly using your hands or the back of a spoon. Make sure it’s packed tight, especially in the corners, so the bars don’t crumble when you cut them. I usually press and then press again after a few minutes—it really makes a difference.
Step 3: Melt and Pour the Chocolate
The chocolate topping is the star, so melting it carefully pays off. I use the double-boiler method—placing a small pot with chocolate over a simmering larger pot of water. Stir often until smooth and silky. If you notice the chocolate is a bit thick, add a tablespoon of coconut oil to loosen it up. Then pour the chocolate evenly over the oat base and spread it gently. It’s so tempting to dig in now, but this needs to chill!
Step 4: Chill and Cut
Pop the pan in the fridge for about 30 minutes until the chocolate is mostly set but still slightly soft. This is important—cutting when the chocolate is too hard will crack it. If that happens, just let the whole pan sit out for five minutes before cutting. Once cut, the individual bars are ready to enjoy!
Pro Tips for Making No Bake Chocolate Oat Bars Recipe
- Firm Pressing: Don’t skimp on pressing the oat mixture tightly—it prevents crumbly bars later.
- Chocolate Tempering Hack: Adding coconut oil smooths the melted chocolate and helps it set just right.
- Cutting Tip: Always cut just before chocolate fully hardens to avoid cracking or breaking.
- Make Ahead: Prepare the base mix ahead and keep it refrigerated for quick chocolate topping and assembly.
How to Serve No Bake Chocolate Oat Bars Recipe

Garnishes
I usually keep it simple with these bars, but sometimes I sprinkle flaky sea salt or a few chopped nuts on the chocolate layer before it sets—that salty crunch paired with the sweetness is unbeatable. A light dusting of cocoa powder on top also adds a nice touch for chocolate lovers.
Side Dishes
These bars are perfect on their own but pair beautifully with fresh fruit like sliced strawberries or apple slices. For a cozy afternoon, try them alongside a cup of coffee or a creamy chai latte—the flavors complement each other wonderfully.
Creative Ways to Present
For special occasions, I like to stack these bars on a pretty platter, tied with twine or decorated with edible flowers for a rustic, charming look. They also make fantastic homemade gifts—just pop them in a decorative box and share the joy!
Make Ahead and Storage
Storing Leftovers
Once cut, I store the bars in an airtight container in the fridge. They keep well for about a week, and I find that the flavors meld together even more after a day or two. Just make sure they’re cold so the chocolate stays firm.
Freezing
I’ve frozen these bars successfully by wrapping individual pieces in parchment paper and placing them in a freezer-safe bag. When you want a quick snack, just thaw at room temperature for about 30 minutes. The texture holds up surprisingly well!
Reheating
Since these are no-bake bars, reheating isn’t generally necessary, but if you prefer softer chocolate, leaving them out at room temperature for 10–15 minutes is perfect. Avoid microwaving, as it can melt the chocolate unevenly.
FAQs
-
Can I use quick oats instead of rolled oats?
Quick oats are more processed and tend to create a softer, less chewy texture, which might make your bars too mushy. Rolled oats hold their shape and provide the best texture for this recipe.
-
Do I need to use parchment paper in the pan?
Using parchment paper makes it much easier to lift the bars out of the pan in one piece. If you skip it, your bars may stick and crumble when cutting.
-
Can I substitute the peanut butter for another nut or seed butter?
Absolutely! Almond butter, cashew butter, or sunflower seed butter all work well here. Just pick a smooth variety for the best binding.
-
What’s the best way to melt the chocolate?
The double-boiler method is my favorite to prevent scorching your chocolate—just make sure no water gets into the chocolate. You can also melt chocolate in short bursts in the microwave, stirring in between.
-
How long do these bars last?
Stored in an airtight container in the fridge, they keep fresh for up to one week. For longer storage, freeze them as described above.
Final Thoughts
Honestly, this No Bake Chocolate Oat Bars Recipe is one of those gems I keep coming back to. They’re simple, satisfying, and just a bit indulgent—all without any oven time, which I especially appreciate on warm days or busy afternoons. I hope you enjoy making (and eating!) them as much as my family and I do. Once you try this, you’ll find yourself reaching for these bars as a smart, delicious snack any time of day. Trust me, they’ll quickly become a staple in your kitchen!
Print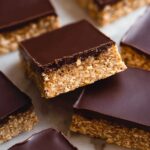
No Bake Chocolate Oat Bars Recipe
- Prep Time: 15 minutes
- Cook Time: 0 minutes
- Total Time: 45 minutes
- Yield: 16 bars
- Category: Snack
- Method: No-Cook
- Cuisine: American
- Diet: Gluten Free
Description
Delicious and easy No Bake Chocolate Oat Bars featuring a crispy, nutty oat base combined with rich dark chocolate topping. These bars are gluten free, dairy free, and can be prepared quickly without any baking, making them a perfect wholesome snack or treat for kids and adults alike.
Ingredients
Base Ingredients
- 2 cups gluten free rolled oats
- 1 cup peanut butter
- 1/3 cup honey
Topping
- 1 1/2 cups dark chocolate chips
- 1 tablespoon coconut oil (optional, for thinning chocolate)
Instructions
- Mix the base: In a mixing bowl, combine the gluten free rolled oats, peanut butter, and honey. Stir thoroughly with a rubber spatula or spoon until the oats are evenly coated with the peanut butter and honey mixture, forming a sticky and cohesive base.
- Press into pan: Line an 8 x 8 inch pan with parchment paper. Transfer the oat mixture into the pan and firmly press it down using your hands or the back of a spoon, making sure to pack it tightly especially along the corners for an even layer.
- Melt the chocolate: Using the double-boiler method, melt the dark chocolate chips by placing them in a small pot which is then set over a larger pot with simmering water. Stir continuously until the chocolate is melted and smooth. If the chocolate is too thick, add a tablespoon of coconut oil to thin it out.
- Top with chocolate: Pour the melted chocolate evenly over the pressed oat mixture in the pan, spreading it gently if needed to cover all oats.
- Chill to set: Place the pan in the refrigerator and chill for about 30 minutes or until the chocolate layer has set but is still slightly soft. This will make cutting the bars easier.
- Cut and serve: Remove the pan from the fridge just before the chocolate is fully hardened. Cut into 16 squares. If the chocolate is too hard to cut, let the pan sit at room temperature for a few minutes to soften the chocolate before slicing.
Notes
- These no bake bars have a texture similar to chocolate rice krispie treats but are healthier with a nutty oat base and rich dark chocolate topping.
- They are naturally gluten free and dairy free, perfect for special dietary needs.
- Ready in about 10 to 15 minutes plus chilling time, making them a quick and convenient snack.
- Add coconut oil when melting chocolate for a smoother topping that is easier to spread and set.
- For easier cutting, allow the chocolate to soften slightly after refrigeration if it becomes too firm.
Nutrition
- Serving Size: 1 bar
- Calories: 246 kcal
- Sugar: 13 g
- Sodium: 93 mg
- Fat: 14 g
- Saturated Fat: 7 g
- Unsaturated Fat: 7 g
- Trans Fat: 0 g
- Carbohydrates: 25 g
- Fiber: 3 g
- Protein: 7 g
- Cholesterol: 1 mg


