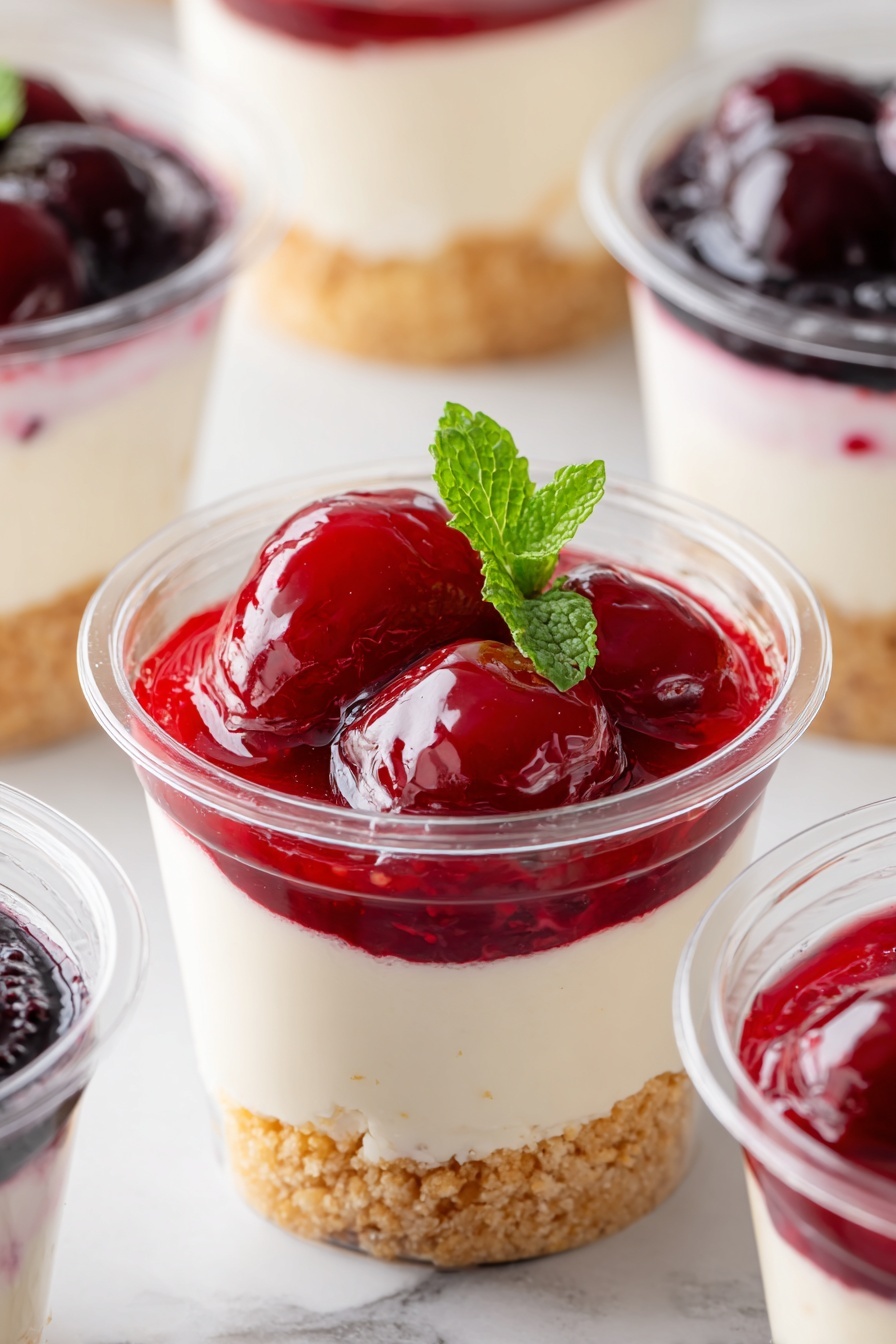
If you’ve been on the hunt for a crowd-pleasing, fuss-free dessert that’s both creamy and indulgent, you’re going to absolutely love this No-Bake Cheesecake Cups Recipe. Seriously, this little gem of a recipe is my go-to when I want something impressive but don’t want to turn on the oven or spend hours in the kitchen. Plus, it’s super customizable so you can make it your own every time.
Why You’ll Love This Recipe
- No oven required: Perfect for hot days or last-minute guests when firing up the oven isn’t an option.
- Made with simple ingredients: You likely have everything on hand, so no special trips required.
- Customizable toppings: Whether you like fruity, chocolatey, or crunchy, you can dress these cups however you want.
- Great for entertaining: Individual servings mean less fuss and less cleanup, which is a win in my book!

Ingredients You’ll Need
The beauty of this No-Bake Cheesecake Cups Recipe is in the balance between creamy, sweet, and crunchy. You’ll want quality cream cheese and fresh heavy cream for that perfect silky texture, and the graham cracker crumbs give the right touch of sweetness and crunch.
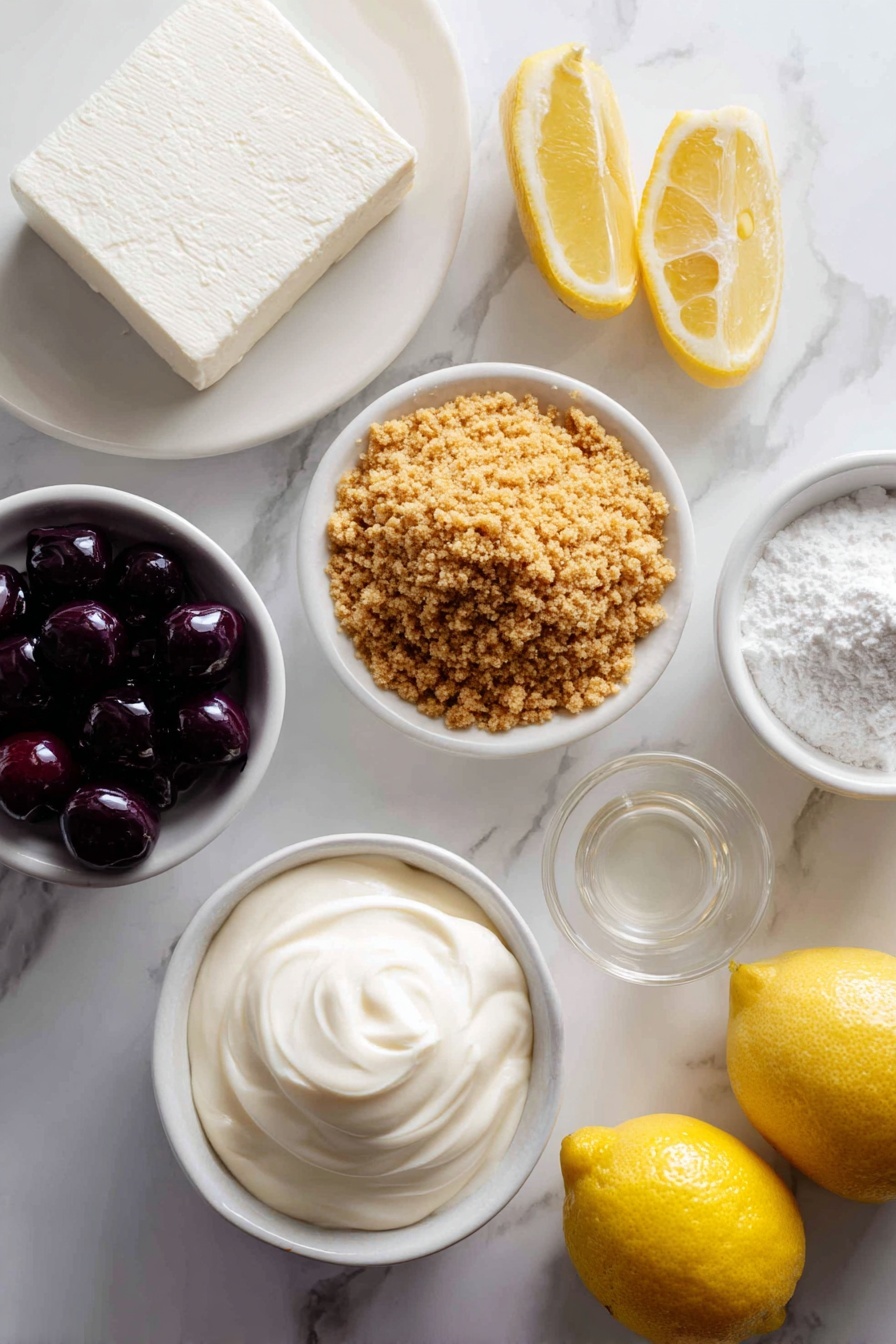
- Graham cracker crumbs: These create that classic cheesecake base; I like to use finely crushed crumbs for the best texture.
- Cream cheese: Full-fat and softened to room temperature for smooth mixing—avoid cold cream cheese to dodge lumps.
- Heavy whipping cream: It whips up beautifully to give the filling that light yet rich mouthfeel.
- Powdered sugar: It dissolves perfectly into the filling, giving sweetness without grit.
- Fresh lemon juice: Adds a subtle tanginess that cuts through the richness—don’t skip it!
- Vanilla extract: Enhances the overall flavor with a warm, comforting note.
Variations
One of my favorite things about this No-Bake Cheesecake Cups Recipe is how easy it is to tweak depending on your mood or what’s in the pantry. Trust me, once you get the base down, the toppings and flavor twists are endless!
- Mixed berry topping: I often swirl in a homemade strawberry sauce or top with fresh blueberries for a bright, fresh flavor that my family can’t get enough of.
- Chocolate lovers: Stir in some melted dark chocolate into the cream cheese mix or sprinkle crushed Oreos and chocolate chips on top.
- Nutty twist: Toasted pecans or almonds add a lovely crunch contrast that gives it an extra layer of texture.
- Diet-friendly swaps: For a lighter version, try using reduced-fat cream cheese and whipping cream alternatives, although the richness won’t be quite as velvety.
How to Make No-Bake Cheesecake Cups Recipe
Step 1: Prep Your Cups and Chill the Bowl
The size of your cups will set the number of servings and how much crust goes in. I use big 9-ounce cups and add 2 tablespoons of graham cracker crumbs to the bottom—this gives just the right crunch without overwhelming the creamy filling. Smaller cups? Go for 1 tablespoon per cup and more servings! Also, pop a metal or glass mixing bowl in the freezer for 15 minutes—that cold bowl will help your heavy cream whip up faster and fluffier.
Step 2: Cream the Cheese and Sugar
Once your cream cheese is softened (room temp is key here), beat it with 1 cup of powdered sugar until silky smooth. This step is important to get rid of any lumps and ensure that your filling is creamy and luscious.
Step 3: Whip the Cream and Flavorings
Take the chilled bowl out and add heavy whipping cream, ½ cup powdered sugar, fresh lemon juice, and vanilla extract. Whip with an electric mixer until you see stiff peaks form—this usually takes about 4-5 minutes. It’s magic to see it turn from liquid to fluffy clouds of cream!
Step 4: Combine Cream Cheese and Whipped Cream
Gently fold the whipped cream into the cream cheese mixture on low speed until everything is blended evenly, about 1-2 minutes. Be careful not to overmix—you want it smooth but still light and airy. I once overbeat and ended up with a dense filling, so trust me, a few seconds too long can make a difference.
Step 5: Assemble and Chill Your Cheesecake Cups
Load your cheesecake filling into a piping bag or a simple zip-top bag with the corner snipped off, then pipe the filling on top of your graham cracker crust in each cup—fill about three-quarters full. Pop these in the fridge for 1-2 hours so they can set up nicely. If you’re prepping ahead, I recommend covering them with plastic wrap and chilling overnight.
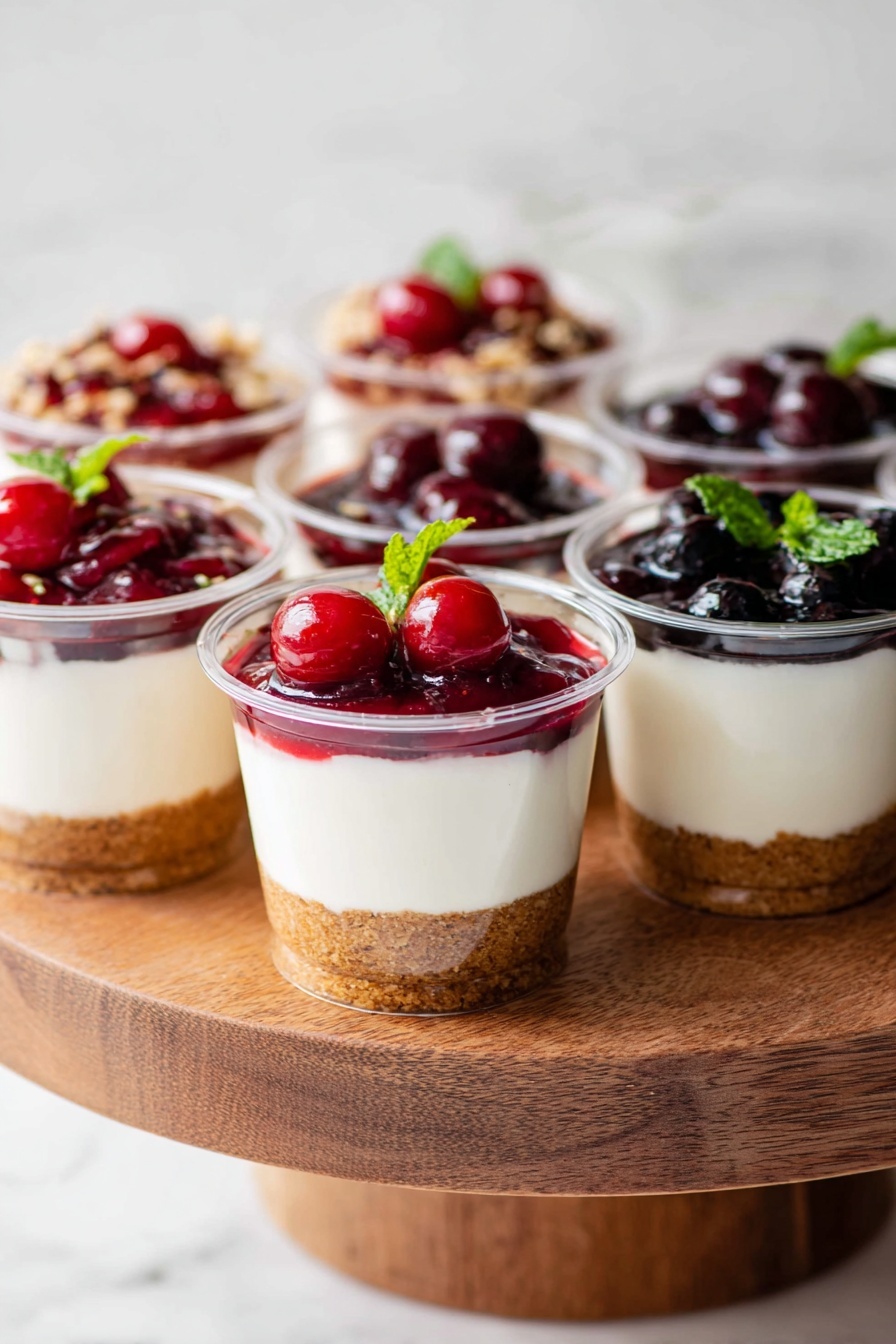
Step 6: Add Your Favorite Toppings
This is the fun part! From cherry pie filling to crushed Oreos, or a drizzle of chocolate ganache—pick your poison and go wild. I like to keep a variety out when guests come over so everyone can mix and match. It’s like a mini dessert bar in each cup!
Pro Tips for Making No-Bake Cheesecake Cups Recipe
- Softened Cream Cheese: Always let your cream cheese come to room temperature before mixing to avoid lumps.
- Cold Mixing Bowl: Freezing your bowl before whipping cream helps get those stiff peaks faster and better.
- Don’t Overmix: Fold whipped cream into the cream cheese gently and briefly to keep it light.
- Cover When Chilling: Prevents your cheesecake cups from absorbing fridge odors and keeps the surface smooth.
How to Serve No-Bake Cheesecake Cups Recipe
Garnishes
My absolute favorite garnishes to use are fresh berries piled high, a spoonful of homemade fruit compote, or a sprinkling of crushed cookies for crunch. Adding a mint leaf on top brings a pop of color and fresh aroma. Personally, I steer clear of overly sweet toppings so the creamy cheesecake flavor shines through.
Side Dishes
This dessert pairs wonderfully with a light herbal tea or even a chilled glass of sparkling wine if you’re celebrating. I like serving it after a spicy meal because the cool, creamy texture is so refreshing and soothing on the palate.
Creative Ways to Present
For parties, I love layering the cheesecake filling with alternating layers of crushed fruit and cookie crumbs inside clear glasses—it looks stunning and lets guests see all the flavors. You can also serve them in mini mason jars for a rustic vibe or on a dessert platter sprinkled with nuts and edible flowers for a fancy touch.
Make Ahead and Storage
Storing Leftovers
I keep leftover cheesecake cups tightly covered in the fridge, either with plastic wrap or airtight lids, for up to 3 days. They actually taste better after a day since the flavors have time to meld. Just make sure to keep them chilled until serving for the best texture.
Freezing
Freezing no-bake cheesecake cups can be a bit tricky because of the whipped cream, but I’ve had success wrapping each cup tightly in plastic wrap and placing them in a freezer-safe container for up to 2 months. When you’re ready, thaw them overnight in the fridge and give a gentle stir before serving—some texture changes are normal, but they’re still delicious!
Reheating
This dessert is best enjoyed cold, so reheating isn’t really necessary. If you want to soften the filling just a bit, take the cup out of the fridge 10-15 minutes ahead of serving room temperature, and it will be perfectly creamy and ready to enjoy.
FAQs
-
Can I use low-fat cream cheese or whipped cream for this recipe?
You can, but full-fat versions give the best creamy texture and flavor. Low-fat options might make the filling less smooth and more watery, so if you’re looking for a lighter dessert, consider adjusting expectations on richness.
-
How long do No-Bake Cheesecake Cups last in the fridge?
Stored in an airtight container or covered tightly, these cheesecake cups keep well for 3 to 4 days. After that, the texture may begin to change as the whipped cream starts to break down.
-
Can I make these ahead of a party?
Absolutely! In fact, I recommend making them a few hours or even the day before your event. Just cover them tightly in the fridge and add fresh toppings right before serving for the best presentation.
-
What can I use instead of graham cracker crumbs?
If you can’t find graham cracker crumbs, digestive biscuits, vanilla wafers, or even crushed pretzels work great as a crust alternative. Just keep the quantity and texture in mind and adjust to your taste.
-
Is it possible to make this gluten-free?
Yes! Simply swap the graham crackers for a gluten-free variety or use gluten-free cookies crushed to crumbs. The rest of the ingredients are naturally gluten-free, making this dessert easy to adapt.
Final Thoughts
I absolutely love how this No-Bake Cheesecake Cups Recipe comes together quickly but tastes like you spent hours on it. It feels fancy but is so forgiving to make, which makes it my secret weapon for everything from weeknight treats to holiday parties. Give it a try, and I promise you’ll have people asking for the recipe again and again—because nothing beats rich, creamy cheesecake served in perfectly portioned cups, topped just how you like it!
Print
No-Bake Cheesecake Cups Recipe
- Prep Time: 15 minutes
- Cook Time: 0 minutes
- Total Time: 75 minutes
- Yield: 8 servings
- Category: Dessert
- Method: No-Cook
- Cuisine: American
Description
These Easy Cheese Cake Cups are a delicious no-bake dessert featuring a simple graham cracker crust topped with a creamy, whipped cheesecake filling. Perfect for entertaining, they can be customized with your favorite toppings like cherry or blueberry pie filling, strawberry sauce, or chocolate ganache. Ready in just over an hour and with minimal ingredients, they offer a rich and indulgent treat in convenient single-serving portions.
Ingredients
Crust
- 2 tablespoons graham cracker crumbs (per 9 oz cup)
Cheesecake Filling
- 16 oz full fat cream cheese (2 x 8 oz packages), room temperature
- 2 cups (473 ml) heavy whipping cream (1 pint)
- 1 ½ cups (169 g) powdered sugar, divided (1 cup + ½ cup)
- 1 tablespoon fresh lemon juice
- 2 teaspoons vanilla extract
Instructions
- Prepare the Cups: Choose your cup size to determine the amount of graham cracker crumbs needed. For large 9 oz cups, place 2 tablespoons of graham cracker crumbs at the bottom of each cup. For smaller cups (4-6 oz), use 1 tablespoon of crumbs per cup.
- Chill Mixing Bowl: Place a metal or glass mixing bowl in the freezer for 15 minutes to ensure the whipping cream whips up properly in the next steps.
- Beat Cream Cheese: In a separate bowl, beat the room temperature cream cheese with 1 cup of powdered sugar using an electric mixer until the mixture is smooth and creamy, about 1-2 minutes. Set aside.
- Whip Cream: Remove the chilled mixing bowl from the freezer. Add heavy whipping cream, ½ cup powdered sugar, fresh lemon juice, and vanilla extract to the bowl. Beat with an electric mixer until stiff peaks form, about 4-5 minutes.
- Combine Mixtures: Gently fold the beaten cream cheese into the whipped cream mixture, mixing on low speed for 1-2 minutes just until fully combined and smooth.
- Assemble Cups: Transfer the cheesecake filling to a piping bag or a ziplock bag with a corner cut off. Pipe the filling into the prepared cups, filling each about ¾ full.
- Chill: Refrigerate the cheesecake cups for 1-2 hours to set. For longer storage, cover with plastic wrap. They can also be refrigerated overnight.
- Add Toppings: Before serving, top with your favorite toppings such as cherry pie filling, blueberry pie filling, homemade strawberry sauce, chocolate ganache, Oreo crumbs, or chopped candies.
Notes
- Cheesecake cups are a perfect no-bake dessert ideal for easy entertaining with minimal ingredients.
- The type and size of cups you use will affect the quantity of crust and number of servings.
- Be sure to chill the mixing bowl before whipping cream to achieve the best results.
- Use room temperature cream cheese for smooth mixing without lumps.
- These cups can be refrigerated overnight to prepare ahead of time.
- Experiment with various toppings to customize flavors for different occasions.
Nutrition
- Serving Size: 1 cup (approximately 9 oz)
- Calories: 491 kcal
- Sugar: 26 g
- Sodium: 194 mg
- Fat: 41 g
- Saturated Fat: 25 g
- Unsaturated Fat: 12 g
- Trans Fat: 0 g
- Carbohydrates: 28 g
- Fiber: 0.01 g
- Protein: 5 g
- Cholesterol: 124 mg

