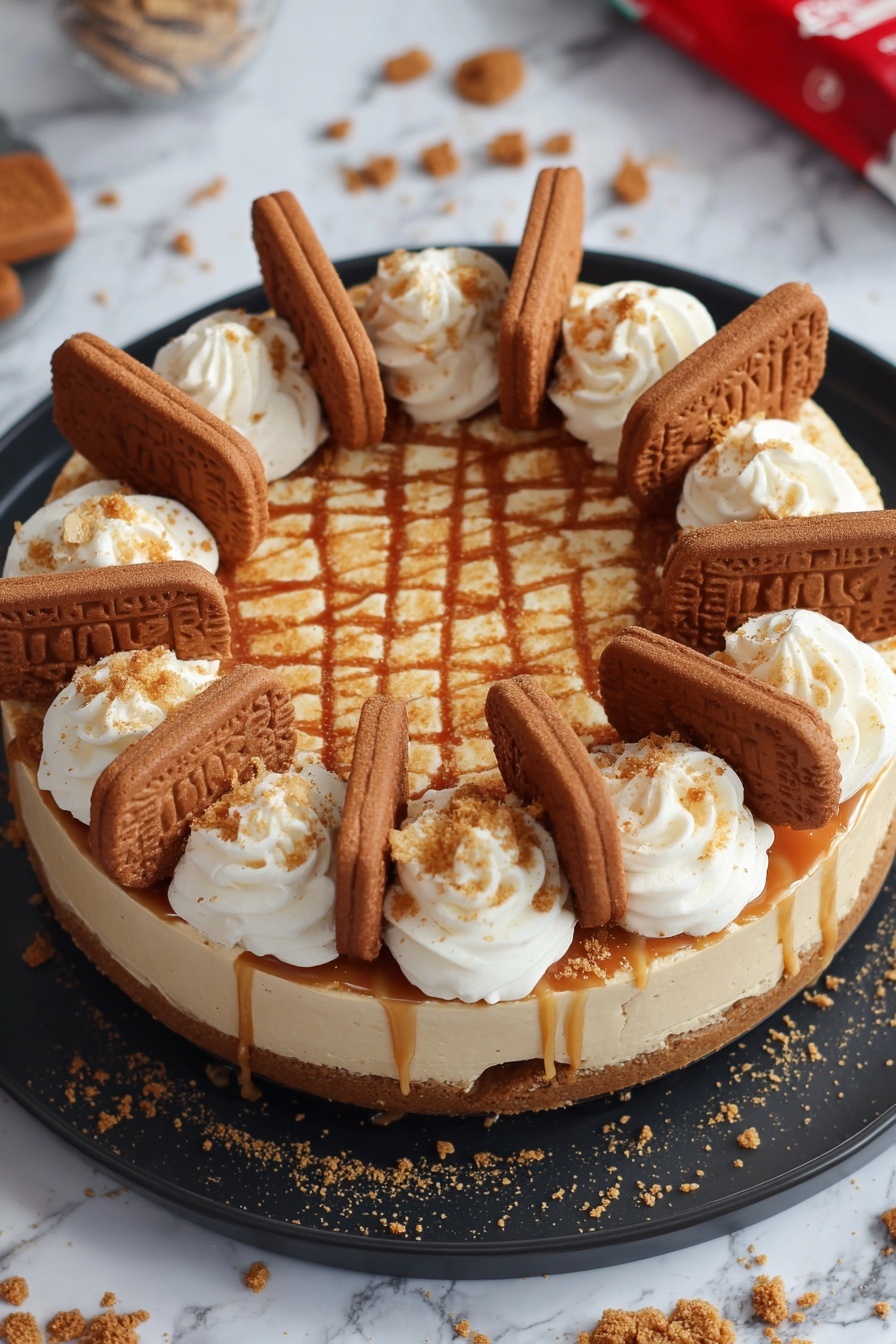
If you love rich, creamy desserts but dread turning on the oven, you’re going to absolutely adore this No-Bake Biscoff Cheesecake Recipe. I first made it on a lazy weekend craving something indulgent yet effortless, and since then, it’s become a crowd-pleaser in my kitchen. With a buttery Lotus biscuit base and the irresistible caramel notes of Biscoff spread folded into silky cream cheese, it’s dessert magic without any baking stress. Stick around because I’m sharing all my tips to help you nail this fan-freaking-tastic cheesecake every single time.
Why You’ll Love This Recipe
- No Oven Needed: Perfect for hot days or when you want dessert quick without turning on your oven.
- Irresistibly Creamy: The cream cheese and whipped cream combo gives a light yet rich texture you’ll crave.
- That Biscoff Twist: Using Lotus biscuits and Biscoff spread gives this cheesecake a unique caramelized flavor punch.
- Family Favorite: My crew goes crazy for this dessert—it’s always requested at celebrations and weekend treats.

Ingredients You’ll Need
The star ingredients here are simple but pack so much flavor together. Using Lotus/Biscoff biscuits as the base is key—they bring that signature caramel crunch, while the mix of cream cheese and Biscoff spread creates that dream cheesecake filling. Make sure you grab full-fat cream cheese and double cream for the best texture and taste.

- Lotus/Biscoff biscuits: These give the base a crunchy, caramelized flavor you won’t find in plain digestives.
- Unsalted butter: Melted butter binds the biscuit crumbs—using unsalted helps you control the sweetness.
- Cream cheese (full fat): This is the creamy foundation—full fat gives the cheesecake its luscious texture.
- Icing sugar: Just enough sweetness without overpowering the Biscoff flavor.
- Biscoff spread (smooth or crunchy): The magic ingredient—smooth is traditional, crunchy adds extra texture.
- Vanilla extract: A splash enhances the overall flavor depth.
- Double cream: Whipped into thick peaks, it lightens the filling and makes it silky smooth.
- Icing sugar (for topping): Combined with cream for a lightly sweetened finishing touch.
- Biscoff spread (melted): For drizzling on top, intensifying that caramel goodness.
- Biscoff biscuits (for decoration): Adds charm and crunch on serving.
Variations
While I generally stick with the classic flavor combo, I’ve played around with this recipe a bit. Don’t be afraid to make it your own—adding little twists can keep it exciting. I encourage you to experiment based on what you have or your taste preferences.
- Nutty Crunch: I once folded chopped toasted hazelnuts into the filling for an extra crunch and nutty flavor—such a lovely surprise in every bite.
- Flavored Spread: Swap out regular Biscoff for the crunchy version if you want added texture in the filling.
- Vegan Version: Try using vegan cream cheese and coconut cream instead of dairy options, plus vegan buttery spread for the base, for a plant-based take.
- Chocolate Swirl: Add a ripple of melted dark chocolate into the filling before setting it for a decadent twist.
How to Make No-Bake Biscoff Cheesecake Recipe
Step 1: Create the Perfect Biscuit Base
Start by blitzing those Biscoff biscuits in a food processor until you get fine crumbs—this is easier than crushing them by hand and leads to a more uniform base. Mix these crumbs with the melted unsalted butter, making sure every crumb is coated so it binds well. Press this mixture firmly and evenly into the base of an 8-inch (20 cm) deep springform tin. I find using the bottom of a glass helps pack it down smoothly for a solid, sturdy crust that holds up well to the creamy topping.
Step 2: Whip Up the Creamy Filling
Using your electric mixer (I swear by my KitchenAid here), beat the cream cheese, vanilla extract, icing sugar, and Biscoff spread together until perfectly smooth. Then, slowly add the 300 ml of double cream and whisk gently but steadily until the mixture thickens and holds its shape. Patience is key here—whip too fast and you’ll break the cream; take your time and you’ll get that luxurious, fluffy texture. Alternatively, you can whip the cream separately to stiff peaks and carefully fold it into the Biscoff mixture to keep things light and airy.
Step 3: Assemble and Chill
Spread your luscious Biscoff cheesecake filling evenly over the chilled biscuit base. Pop it into the fridge for at least 5-6 hours—overnight is even better—to let it firm up nicely. This step makes all the difference; the cheesecake sets beautifully and slices cleanly. Trust me, the waiting is so worth it!
Step 4: Decorate for Extra Flair
For the finishing touch, I whisk together the remaining 150 ml of double cream with 2 tablespoons of icing sugar until thick, then pipe it decoratively on top. I add a Biscoff biscuit slice on each piece and drizzle some melted Biscoff spread over everything for that extra wow factor. Feel free to get creative here—you could sprinkle crushed biscuits, add toasted nuts, or even a dusting of cinnamon.
Pro Tips for Making No-Bake Biscoff Cheesecake Recipe
- Don’t Skip Chilling Time: This cheesecake needs time to set fully; cutting it too early results in a soft, messy slice.
- Low and Slow Whipping: When incorporating the cream, slow steady mixing preserves its fluffiness without curdling.
- Use a Springform Tin: This makes it so much easier to remove your cheesecake cleanly without damaging the edges.
- Blend Biscoff Spread Well: Heating or gently melting the spread before mixing helps it blend smoothly without lumps.
How to Serve No-Bake Biscoff Cheesecake Recipe

Garnishes
I love keeping it classic with a generous swirl of whipped cream on top, a crunchy Biscoff biscuit, and a warm drizzle of melted Biscoff spread. Sometimes, I sprinkle crushed biscuits or a dusting of cinnamon for extra texture and warmth—it always earns compliments! This combo really highlights that signature Biscoff flavor.
Side Dishes
Personally, I enjoy serving this cheesecake alongside a simple mixed berry compote or fresh raspberries. The tartness really balances the rich caramel sweetness of the cheesecake. A cup of strong coffee or espresso also pairs perfectly, cutting through all that creamy goodness.
Creative Ways to Present
For celebrations, I like to make individual portions in clear glass jars layered with biscuit crumbs and filling—super cute and perfect for sharing. You can also pipe fancy whipped cream rosettes on top and add edible gold leaf or flowers for a fancy touch. Trust me, these little details wow guests every time.
Make Ahead and Storage
Storing Leftovers
I store leftovers covered tightly in the fridge, ideally in the springform tin or an airtight container. This cheesecake keeps wonderfully for up to 3 days and actually tastes better as the flavors deepen overnight—so it’s a perfect make-ahead treat.
Freezing
Yes, you can freeze this cheesecake! I wrap it securely in plastic wrap and then foil, freezing for up to a month. When ready to eat, thaw it overnight in the fridge and gently refresh the topping if needed. The texture stays nearly as good as fresh.
Reheating
Since it’s a cold, no-bake dessert, I recommend enjoying it chilled—no reheating needed. If it’s been frozen and thawed, just bring it to fridge temp and serve straight from there for the best experience.
FAQs
-
Can I use regular biscuits instead of Biscoff for this cheesecake?
Absolutely! While Biscoff biscuits give the cheesecake its unique caramelized flavor, you can substitute digestive or graham crackers in a pinch. However, expect a different flavor profile—it won’t have that distinctive caramel note that Biscoff provides.
-
How long should I chill the cheesecake before serving?
I recommend chilling it at least 5-6 hours, but preferably overnight. This allows the filling to set properly and the flavors to meld beautifully, making slicing easier and the texture just right.
-
Can I prepare this cheesecake a day ahead?
Yes, prepping it a day ahead is ideal! Making it in advance gives the cheesecake time to set and the flavors to deepen. It’s a great dessert to plan for parties or gatherings.
-
What’s the best way to get smooth, lump-free Biscoff filling?
Warming the Biscoff spread slightly (you can soften it in the microwave for about 20 seconds) makes it easier to blend smoothly with the cream cheese. Mixing slowly and thoroughly prevents lumps and ensures a creamy finish.
-
Is there a way to make this cheesecake more stable for warmer climates?
In warmer environments, you can add a little gelatin dissolved in warm water to the filling to help it set firmer. Just be sure to sprinkle gelatin over cold water before warming to avoid lumps. This keeps your cheesecake intact and sliceable even if it warms slightly.
Final Thoughts
I absolutely love how this No-Bake Biscoff Cheesecake Recipe turns out every single time—it’s creamy, indulgent, and surprisingly simple. When I first tried it, I was hooked by how the Biscoff flavor shines through in every bite without fussing with an oven. If you want a dessert that feels special but can fit into a busy day (or impress with minimal effort), this cheesecake is your new best friend. Give it a try and watch how quickly it disappears—your family and friends will thank you!
Print
No-Bake Biscoff Cheesecake Recipe
- Prep Time: 10 minutes
- Cook Time: 10 minutes
- Total Time: 5 hours 20 minutes
- Yield: 12 servings (12 slices)
- Category: Dessert
- Method: No-Cook
- Cuisine: International
Description
This indulgent No-Bake Biscoff Cheesecake features a crunchy Lotus biscuit base and a creamy, velvety Biscoff-flavored filling. Perfect for those who love the unique caramelized flavor of Biscoff spread, this cheesecake requires no baking and is chilled to set, making it a wonderfully easy yet impressive dessert for any occasion.
Ingredients
Base
- 300 g Lotus/Biscoff biscuits
- 125 g unsalted butter, melted
Cheesecake Filling
- 500 g full-fat cream cheese
- 100 g icing sugar
- 250 g Biscoff spread (smooth or crunchy)
- 1 tsp vanilla extract
- 300 ml double cream
Topping
- 150 ml double cream
- 2 tbsp icing sugar
- 75 g Biscoff spread, melted
- Additional Biscoff biscuits, for decoration
Instructions
- Prepare the base: Blitz the 300 g of Lotus/Biscoff biscuits in a food processor until they turn into fine crumbs. Combine the biscuit crumbs with 125 g melted unsalted butter and mix thoroughly. Press this mixture firmly into the base of an 8 inch (20 cm) deep springform tin to form an even layer.
- Make the cheesecake filling: Using an electric mixer, mix 500 g cream cheese, 1 tsp vanilla extract, 100 g icing sugar, and 250 g Biscoff spread until completely smooth and well incorporated.
- Whip the cream: Add 300 ml double cream to the cream cheese mixture and whisk gently but steadily until the mixture thickens and holds stiff peaks. Alternatively, whip the cream separately to stiff peaks and gently fold it into the cream cheese mixture to maintain a light texture.
- Assemble and chill: Spread the cheesecake mixture evenly over the biscuit base in the springform tin. Cover and chill in the refrigerator for at least 5-6 hours, preferably overnight, to allow the cheesecake to set firmly.
- Prepare the topping: Whip 150 ml double cream with 2 tbsp icing sugar until stiff peaks form. Melt 75 g Biscoff spread to use for drizzling.
- Decorate and serve: Carefully remove the cheesecake from the tin. Pipe or spread the whipped cream topping over the chilled cheesecake. Drizzle the melted Biscoff spread on top and decorate with extra Biscoff biscuits, adding one biscuit per slice for presentation before serving.
Notes
- This no-bake cheesecake is perfect for Biscoff lovers and offers a rich, creamy texture with a crunchy biscuit base.
- Ensure the cream is whipped gently to avoid overwhipping which can cause separation.
- For best results, chill the cheesecake overnight to allow it to fully set.
- Use a deep 8-inch springform tin to allow for the thick cheesecake layers and easy removal.
- Leftovers should be stored covered in the refrigerator and consumed within 2-3 days for the best freshness.
Nutrition
- Serving Size: 1 slice
- Calories: 490 kcal
- Sugar: 18 g
- Sodium: 268 mg
- Fat: 39 g
- Saturated Fat: 22 g
- Unsaturated Fat: 17 g
- Trans Fat: 0.5 g
- Carbohydrates: 31 g
- Fiber: 2 g
- Protein: 5 g
- Cholesterol: 119 mg


