
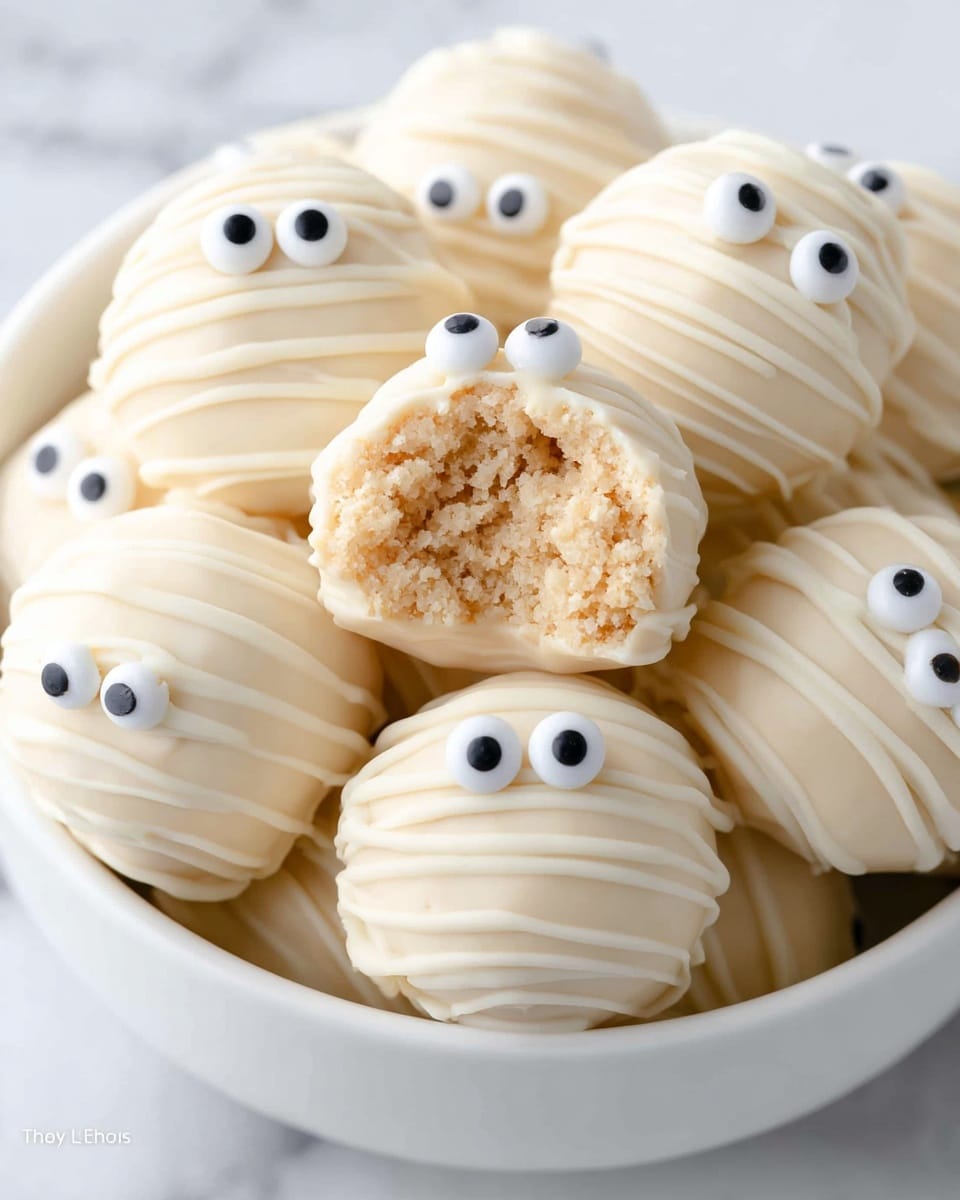
If you’re looking for a fun, festive treat that’s sure to wow at any Halloween party, you’re going to adore this Mummy Oreo Balls Recipe. I absolutely love how these little bundles of creamy, chocolatey goodness turn out — they’re simple to make, no-bake, and so irresistibly cute with their mummy “wrappings” and little candy eyes staring back at you. Trust me, once you try these, they’ll become a Halloween staple in your kitchen!
Why You’ll Love This Recipe
- No-Bake & Easy: You don’t need an oven or complicated steps — perfect for a quick festive treat.
- Kid-Friendly Fun: My kids love helping to roll balls and add those cute little eyes, making it a fun kitchen activity.
- Deliciously Creamy & Crunchy: The combo of smooth cream cheese and crunchy Oreo crumbs is just next level.
- Perfect for Halloween Parties: Served on a spooky platter, these mummy balls steal the show every time.

Ingredients You’ll Need
The ingredient list here is wonderfully simple — just a few pantry staples, but together they make magic. Golden Oreos bring a light and sweet base, cream cheese adds that silky richness, and the vanilla candy melts give you a perfectly smooth coating for decorating. Don’t forget those candy eyes to bring your mummies to life!
- Golden Oreos: I always recommend using golden rather than chocolate Oreos here for a lighter “mummy” look that really pops against the white chocolate.
- Cream Cheese: Make sure it’s softened to room temp — it’s way easier to blend evenly with the crumbs this way.
- Vanilla Candy Melts or Dipping Wafers: These melt down smoothly and harden neatly, perfect for dipping and drizzling your mummy balls.
- Candy Eyes: These are what take the Mummy Oreo Balls from tasty to totally adorable, so don’t skip them!
Variations
I love how versatile the Mummy Oreo Balls Recipe is — you can switch up the flavors and decorations with just a few tweaks. Over the years, I’ve played around with different coatings and mix-ins, and it’s always fun to personalize these little treats to your taste and occasion.
- Chocolate Candy Melts: Try using orange or black candy melts for a more vibrant Halloween look — it adds a splash of spooky color that kids adore.
- Mix-ins: For a double punch, stir in mini chocolate chips or crushed nuts into the Oreo and cream cheese mixture before shaping.
- Allergy-Friendly: Use dairy-free cream cheese and vegan chocolate melts for a friendly version that everyone can enjoy.
- Seasonal Twist: Add a pinch of cinnamon or pumpkin pie spice to the cookie crumbs for a festive fall flavor.
How to Make Mummy Oreo Balls Recipe
Step 1: Crush and Combine Oreos with Cream Cheese
Start by pulsing your Golden Oreos in a food processor until they’re super fine crumbs — like, almost flour-like. Then pour those crumbs into a big mixing bowl. Add in your softened cream cheese and mix it all together until you have a smooth, creamy dough. I like to use a sturdy spoon or even my hands for this step to make sure there are no lumps. It feels a bit sticky, which means you’re on the right track!
Step 2: Shape the Oreo Mixture into Balls
Grab your cookie scoop or just use a tablespoon to portion out the dough. Roll each portion between your palms until it’s a smooth, 1-inch ball. My secret? Keep your hands slightly damp so the dough doesn’t stick to you — it makes for a clean, smooth finish. Place these balls evenly spaced on a parchment-lined baking sheet and pop them into the freezer for about 30 minutes to firm up. This step is essential for a clean dip later on.
Step 3: Melt and Dip in Vanilla Candy Coating
While your balls chill, melt your vanilla candy melts according to the package directions. I always melt mine in short bursts in the microwave, stirring in between, to prevent scorching. Working one at a time, use a fork to gently lower each ball onto the melted chocolate — here’s a neat trick: lay the ball on top of the fork tines instead of poking through it, so it stays intact when coated. Swirl it until fully coated, then tap off any excess before returning the ball to your lined baking sheet.
Step 4: Create the Mummy Wraps & Add Eyes
Pour the remaining melted chocolate into a small Ziploc bag and snip a tiny hole in one corner. Drizzle thin strips over each coated Oreo ball, mimicking mummy wrappings — this part is so satisfying! Before the drizzle hardens, stick two candy eyes to each ball. If the chocolate sets too fast, just add a tiny dot of melted candy on the back of the eyes to make sure they stick perfectly. Pop everything into the fridge for 15-20 minutes so the coating sets thoroughly.
Step 5: Serve and Enjoy Your Spooky Treats!
Once chilled, these mummy beauties are ready for the spotlight. I’ve found they’re best served cold but not frozen, so you get that creamy, melt-in-your-mouth texture. They disappear faster than you’d expect, so make sure you have enough to share… or maybe just don’t tell anyone you made extras!
Pro Tips for Making Mummy Oreo Balls Recipe
- Keep Cream Cheese Soft: If it’s too cold, your mixture will be lumpy — I learned this the hard way! Let it sit out at least 30 minutes.
- Don’t Skip Freezing: Freezing the balls before dipping helps the coating go on smoothly and avoids falling apart.
- Use a Fork for Dipping: Supporting the balls on the fork without poking prevents breaking or cracking in the chocolate layer.
- Fast-Setting Chocolate Hack: If your candy melts harden too quickly, stir in a tiny bit of vegetable oil to keep it workable longer.
How to Serve Mummy Oreo Balls Recipe
Garnishes
I love adding a sprinkle of edible glitter or a dash of orange sanding sugar over the drizzled chocolate to give a little festive sparkle. You could also add little piped red dots with a food-safe pen to mimic spooky “bloody” accents if you want to get creative!
Side Dishes
Pair these mummy balls with other easy Halloween snacks like caramel popcorn, candy corn, or even a cauldron of spooky punch for a full-themed spread that will impress guests of all ages.
Creative Ways to Present
One of my favorite presentation tricks is serving these on a black platter lined with gauzy cheesecloth to mimic spider webs. Add plastic spiders or faux cobwebs around the plate, and you’ve got a spooky centerpiece that’s sure to start conversations!
Make Ahead and Storage
Storing Leftovers
Leftover mummy Oreo balls store beautifully in an airtight container in the fridge for up to a week. I usually layer them with parchment paper between so they don’t stick together or lose their shape.
Freezing
I’ve frozen these before, and they thaw without losing texture — just place them in a freezer-safe container, separated with parchment paper, and freeze for up to 2 months. When you’re ready, thaw in the fridge overnight.
Reheating
These don’t really need reheating — I prefer them chilled! But if you do want a slightly softer center, let them sit at room temperature for 10-15 minutes before enjoying.
FAQs
-
Can I use regular Oreos instead of Golden Oreos for the Mummy Oreo Balls Recipe?
Yes, you can absolutely use classic chocolate Oreos if that’s what you have on hand. However, the golden Oreos give the mummy balls a lighter, more mummy-like appearance once coated with white candy melts. Chocolate Oreos will make the center darker but still delicious!
-
What’s the best way to melt candy melts without them seizing?
Melting candy melts slowly is key — I use short 20-30 second intervals in the microwave, stirring well in between. Avoid adding water or steam near the melts as it can cause seizing. If your melts do seize, try adding a little vegetable oil or shortening to bring back smoothness.
- Can kids help with this Mummy Oreo Balls Recipe?
Absolutely! This recipe is kid-friendly and lots of fun for little hands, especially the rolling, decorating, and placing candy eyes steps. Just supervise the melting chocolate part for safety.
- How do I store leftover mummy Oreo balls?
Store them in an airtight container in the fridge for up to a week. Layer them with parchment paper to keep them from sticking together. For longer storage, freeze them for up to 2 months and thaw in the fridge before serving.
Final Thoughts
I’ll be honest — when I first tried making these Mummy Oreo Balls, I wasn’t sure if the simplicity would translate to flavor and cuteness. But once my family took a bite, they went crazy for the creamy texture and that playful mummy look. These are honestly one of my go-to Halloween treats because they’re so easy to make yet feel special. If you want a recipe that’s fun for kids, perfect for last-minute parties, and absolutely delicious, give this Mummy Oreo Balls Recipe a try. You’ll love how it turns out — and so will everyone you share it with!
Print
Mummy Oreo Balls Recipe
- Prep Time: 20 minutes
- Cook Time: 0 minutes
- Total Time: 50 minutes
- Yield: 14 Oreo balls
- Category: Dessert
- Method: No-Cook
- Cuisine: American
Description
These Mummy Oreo Balls are a spooky and fun Halloween treat made with just four simple ingredients. Featuring a creamy Oreo and cream cheese center coated in a hard vanilla candy melt shell, they’re easy to make and perfect for parties or festive snacks.
Ingredients
Base
- 20 Golden Oreos
- 4 ounces cream cheese (softened to room temperature)
Coating & Decoration
- 10 ounces vanilla candy melts or dipping wafers
- 1 package candy eyes
Instructions
- Prepare the baking sheet: Line a large baking sheet with parchment paper and set it aside to keep the Oreo balls from sticking after coating.
- Crush the Oreos: Pulse the Golden Oreos in a food processor until they become very fine crumbs, ensuring a smooth texture for the balls.
- Mix with cream cheese: Pour the Oreo crumbs into a large mixing bowl, add the softened cream cheese, and stir until the mixture is well combined and smooth.
- Form the balls: Using a cookie scoop, form the Oreo mixture into approximately 1-inch balls. Roll each ball between your palms until smooth, then place them on the parchment-lined baking sheet. Freeze for 30 minutes to set.
- Melt the candy melts: Melt the vanilla candy melts according to the package instructions, ensuring they are smooth and ready for dipping.
- Dip the Oreo balls: Using a fork, dip each Oreo ball into the melted white chocolate, turning to coat fully and tapping off excess chocolate on the bowl’s side. Carefully place the coated balls back on the baking sheet.
- Decorate the mummies: Pour remaining melted chocolate into a Ziploc bag, cut a small hole in one corner, and drizzle it over the coated Oreo balls to create mummy-like wraps. Immediately add two candy eyes to each ball. If chocolate hardens too fast, use a dot of melted chocolate on the back of the eyes for better adhesion.
- Set the coating: Place the decorated Oreo balls in the refrigerator for 15-20 minutes to allow the chocolate to fully set and harden.
- Serve and enjoy: Once set, serve these festive mummy treats and enjoy their creamy, crunchy texture.
Notes
- This no-bake recipe is quick and easy, great for involving kids in making festive Halloween snacks.
- Use Golden Oreos for a lighter color to resemble mummy wrapping, traditional dark Oreos would change the visual effect.
- If candy melts harden while dipping or drizzling, gently reheat them to keep them smooth.
- Storing the mummy Oreo balls in the refrigerator keeps them fresh and the chocolate firm.
- Feel free to customize decoration with colored candy melts for a more colorful mummy effect.
Nutrition
- Serving Size: 1 Oreo ball
- Calories: 111 kcal
- Sugar: 7 g
- Sodium: 86 mg
- Fat: 6 g
- Saturated Fat: 2 g
- Unsaturated Fat: 3 g
- Trans Fat: 0 g
- Carbohydrates: 13 g
- Fiber: 1 g
- Protein: 1 g
- Cholesterol: 9 mg


