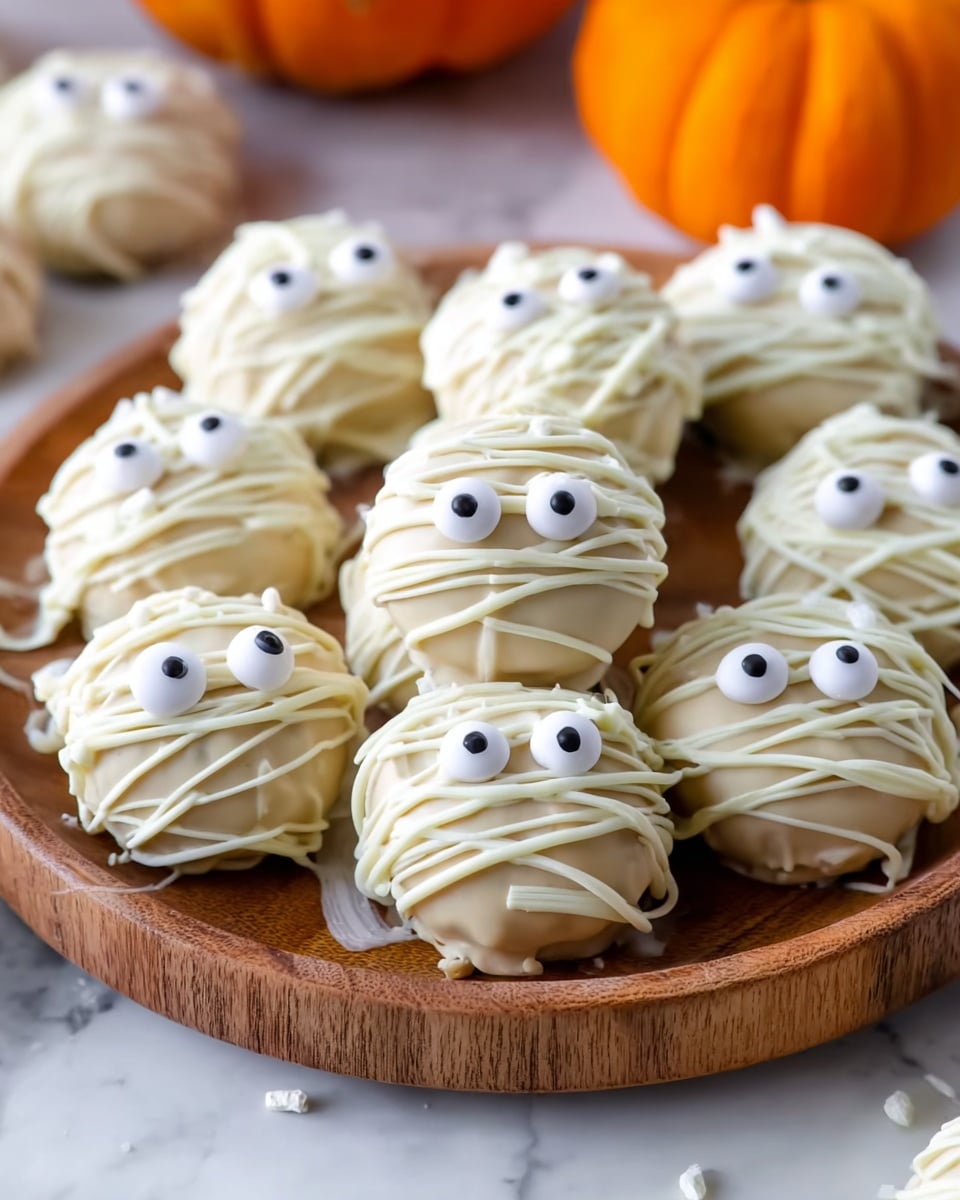
If you’re looking for a fun and festive treat that’s simple yet totally adorable, then you’re going to love this Mummy Cake Pops Recipe. I absolutely love how these little spooky bites come together with just a handful of ingredients, and trust me, they’re always a hit—especially around Halloween. Whether you’re making them with kids or just bringing some Halloween magic to your next party, this recipe is super easy and guaranteed to get everyone smiling.
Why You’ll Love This Recipe
- Ridiculously Quick: You’ll have these cake pops done in about 20 minutes flat, so no long wait times!
- Minimal Ingredients: Just five simple things you probably already have on hand or can grab easily.
- Kid-Friendly Fun: Decorating these mummies is a blast with little helpers around.
- Perfect for Parties: These bite-sized treats disappear fast at any Halloween gathering.

Ingredients You’ll Need
The magic of this Mummy Cake Pops Recipe is in how these simple ingredients work in harmony—the creamy cheesecake helps bind crushed Oreos, and the white chocolate coating creates that spooky mummy look effortlessly.
- Oreo cookies: Using the classic version with the creamy center really amps up the flavor and moisture.
- Full-fat cream cheese: Room temperature is key here; it blends smoothly and keeps the pops nice and creamy.
- White chocolate chips or chopped white chocolate: High-quality chocolate melts more evenly and gives a silky coating.
- Vegetable or canola oil: Just a little helps thin the chocolate so you can drizzle those signature mummy “bandages.”
- Small eyeball sprinkles: These are what bring the pops to life — go for colorful ones to get that perfect spooky effect.
Variations
I love to play around with these mummy cake pops because they’re so adaptable. Feel free to make them your own by swapping some ingredients or adding your favorite twists.
- Variation: Sometimes, I swap Oreos for chocolate chip cookies to add a slightly different texture and flavor, and my family totally digs it.
- Gluten-Free Version: Using gluten-free sandwich cookies works well if you’re catering to dietary needs—just make sure the cream cheese is soft.
- Dark Chocolate Coating: For a richer mummy look, I occasionally replace white chocolate with dark chocolate and drizzle white chocolate over it for contrast.
- Halloween Sprinkles: Mix in festive sprinkles besides eyeballs to add pops of color and extra fun for kids.
How to Make Mummy Cake Pops Recipe
Step 1: Crush the Oreos into Fine Crumbs
First off, pop those Oreos into your food processor and pulse them until you’ve got fine crumbs—don’t skip the creamy center, it adds so much flavor and moisture! If you don’t have a processor, sealing cookies in a bag and crushing them with a rolling pin works fine too, just takes a bit longer.
Step 2: Mix in Cream Cheese to Form the Dough
Add in the softened cream cheese and stir (or pulse a few times in the processor) until everything comes together in a moist, sticky dough. It should hold its shape when squeezed but not be overly greasy—that texture is perfect for rolling balls.
Step 3: Scoop and Chill the Cake Balls
Use a tablespoon or small cookie scoop to portion out your mixture and roll into smooth balls. Place them on a parchment-lined flat plate, then pop the plate in the fridge for about 15 minutes to firm up. This chilling step helps the balls hold onto their shape during dipping.
Step 4: Melt the White Chocolate Coating
Melt your white chocolate gently in short bursts in the microwave or over a double boiler. Stir in the vegetable oil to thin it out so it’s easy to drizzle and smoothly coat your cake pops. Watch carefully—white chocolate burns easily, so patience here pays off big time.
Step 5: Dip, Decorate, and Create Your Mummies
Using two forks for extra control, dip each cake ball into the melted white chocolate, fully coating it, then carefully set it back on the parchment paper. Before the chocolate hardens, add two eyeball sprinkles for each pop. Fill your piping bag or Ziplock bag with some of the melted white chocolate and drizzle thin lines back and forth across the pop to create the mummy wrappings effect. Don’t worry if your drizzle isn’t perfect—I find that a little messiness adds character!
Step 6: Let Them Set and Enjoy
Allow your pops to sit at room temperature or pop them in the fridge until the coating solidifies—about 10 to 15 minutes. Then, voila! You’ve got the cutest, spookiest mummy cake pops that everyone will rave about.
Pro Tips for Making Mummy Cake Pops Recipe
- Don’t Overmix: I learned the hard way that mixing too much can make the dough greasy; just combine until everything is evenly blended.
- Oil in Chocolate Is Key: Adding vegetable oil thins the chocolate and makes dipping and drizzling so much easier, leading to smoother results.
- Chill Cake Balls Properly: Let them rest in the fridge so they don’t fall apart when dipped; this step is a total game changer for neat pops.
- Be Patient with Drizzling: Take your time piping the white chocolate bandages—it’s all about layering thin lines for that authentic mummy look.
How to Serve Mummy Cake Pops Recipe
Garnishes
I always go with those small eyeball sprinkles to give my mummy cake pops their character—without them, they’re just white blobs! Sometimes I add a tiny dusting of edible glitter or a little sprinkle of black sanding sugar for texture. It’s simple, but it makes them look extra festive.
Side Dishes
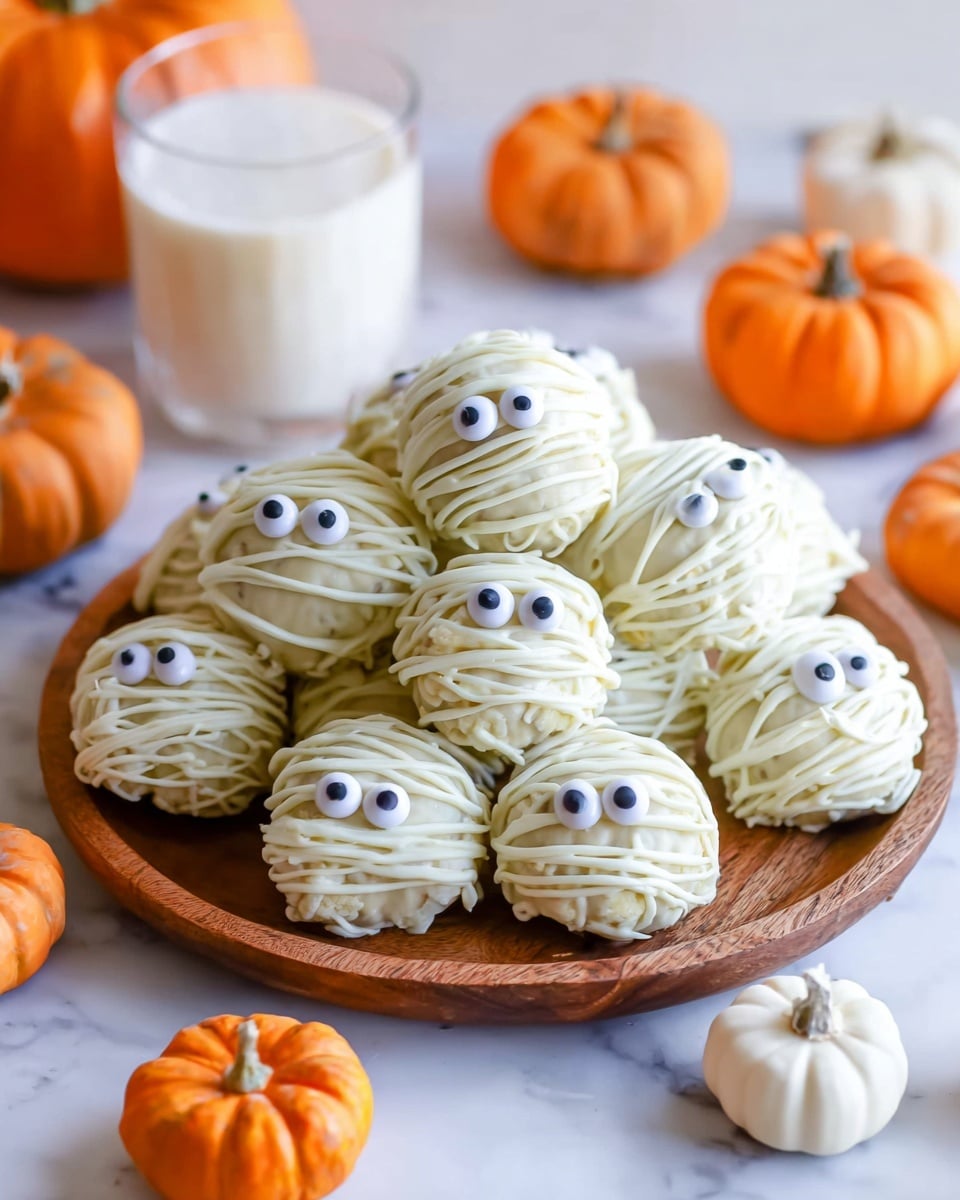
These cake pops pair beautifully with other Halloween treats like pumpkin cookies, caramel popcorn, or a creepy green punch. For parties, I like putting them on a platter alongside some fresh fruit for balance and extra color.
Creative Ways to Present
For a real festive touch, I love arranging these mummy cake pops upright in a block of dry floral foam hidden inside a decorated box—makes the pops look like they’re standing in a creepy graveyard! You could also use themed cupcake liners as stands or wrap each pop in clear cellophane tied with ribbon for gifting.
Make Ahead and Storage
Storing Leftovers
I usually keep extra mummy cake pops in an airtight container in the fridge—they stay fresh and moist for up to 4 days. Just make sure they’re not stacked too tightly to avoid smudging the decoration.
Freezing
If you’re making a big batch and want to freeze some, wrap each cake pop individually in plastic wrap and place them in a freezer-safe container. They freeze surprisingly well for up to a month, just thaw in the fridge before serving.
Reheating
Since these are cold treats, there’s no real reheating needed. If you want to soften them a bit, just leave them out at room temperature for 10 to 15 minutes and they’ll be ready to enjoy without losing texture or flavor.
FAQs
-
Can I use other cookies besides Oreos for the Mummy Cake Pops Recipe?
Absolutely! While classic Oreos work best for that rich cream center and chocolatey flavor, you can experiment with other sandwich cookies or even crushed cake pieces if you want a different texture or taste. Just make sure the crumbs are fine enough to hold together when mixed with cream cheese.
-
What if I don’t have a piping bag for the drizzle?
No worries! You can simply use a Ziplock bag and snip a tiny corner off. This makes a perfect DIY piping tool to drizzle the white chocolate “bandages” and gives you great control for decorating.
-
How long do mummy cake pops last?
Stored in an airtight container in the fridge, these cake pops stay fresh for about 4 days. For longer storage, freezing is a great option — just thaw before serving to enjoy the best texture.
-
Can I make these cake pops without cream cheese?
Cream cheese is key to binding the crumbs and adding that creamy texture. If you don’t have cream cheese, try substituting with mascarpone or even frosting, but be aware the texture and flavor will change somewhat.
Final Thoughts
When I first made this Mummy Cake Pops Recipe, I was amazed at how quick and easy it was to turn a few ingredients into something that looked so impressive and tasted even better. It’s one of those recipes that’s fun to make with friends or family, and the smiles on everyone’s faces when they see those cute, spooky eyes staring back make it all worthwhile. If you’re looking to add a little whimsy and sweetness to your Halloween festivities, I really recommend giving these mummy cake pops a try—you won’t regret it!
Print
Mummy Cake Pops Recipe
- Prep Time: 5 minutes
- Cook Time: 15 minutes
- Total Time: 20 minutes
- Yield: 30 cake pops
- Category: Dessert
- Method: No-Cook
- Cuisine: American
Description
Mummy Cake Pops are a fun and spooky Halloween treat made by blending Oreo cookies with cream cheese, coating them in white chocolate, and decorating with cute eyeball sprinkles. These delightful cake pops are easy to make, require just a handful of ingredients, and are perfect for parties or festive celebrations.
Ingredients
Cake Pop Base
- 36 classic Oreo cookies – centers and all (400g)
- 1 cup (8 oz) full-fat cream cheese, room temperature (226g)
Coating and Decoration
- 3 cups good-quality white chocolate chips or chopped-up white chocolate (525g)
- 2 tsp vegetable or canola oil (12g)
- 60 small eyeball sprinkles
Tools
- Large, flat plate
- Food processor
- 1 Tbsp cookie scoop
- Parchment paper
- 2 forks
- Small piping bag or Ziplock bag
Instructions
- Prepare the cookie mixture: Place the Oreo cookies in a food processor and pulse until you achieve fine crumbs. Transfer the crumbs to a mixing bowl, then add the room temperature cream cheese. Mix thoroughly until well combined and the mixture holds together when pressed.
- Shape the pops: Using a 1 Tbsp cookie scoop, portion the mixture into bite-sized balls. Place the balls onto a large flat plate lined with parchment paper. Refrigerate for about 10 minutes to firm up.
- Melt the white chocolate: In a microwave-safe bowl, combine the white chocolate chips and 2 teaspoons of vegetable or canola oil. Microwave in 30-second intervals, stirring in between, until the chocolate is smooth and fully melted.
- Dip the cake pops: Using two forks, gently dip each chilled cake ball into the melted white chocolate until fully coated. Allow excess chocolate to drip off before placing the pop back onto the parchment paper.
- Create mummy wraps: Spoon some melted white chocolate into a small piping bag or Ziplock bag with a tiny corner cut off. Pipe thin criss-cross lines over each cake pop to mimic mummy wrappings.
- Add the eyes: Place two small eyeball sprinkles on each mummy cake pop while the chocolate wrap is still wet, pressing them lightly so they stick in place.
- Set the pops: Allow the cake pops to sit at room temperature or refrigerate briefly until the chocolate hardens and the mummy decoration is set before serving.
Notes
- These mummy cake pops are quick and simple to make with only five main ingredients.
- Use a good-quality white chocolate for the best flavor and smooth coating.
- Make sure the cream cheese is at room temperature to blend smoothly with the cookie crumbs.
- Chilling the cake balls before dipping helps maintain their shape and prevents melting during coating.
- Store leftovers in the refrigerator in an airtight container for up to 3 days.
Nutrition
- Serving Size: 1 cake pop (about 20g)
- Calories: 183 kcal
- Sugar: 18 g
- Sodium: 78 mg
- Fat: 10 g
- Saturated Fat: 5 g
- Unsaturated Fat: 4 g
- Trans Fat: 0 g
- Carbohydrates: 22 g
- Fiber: 1 g
- Protein: 2 g
- Cholesterol: 5 mg


