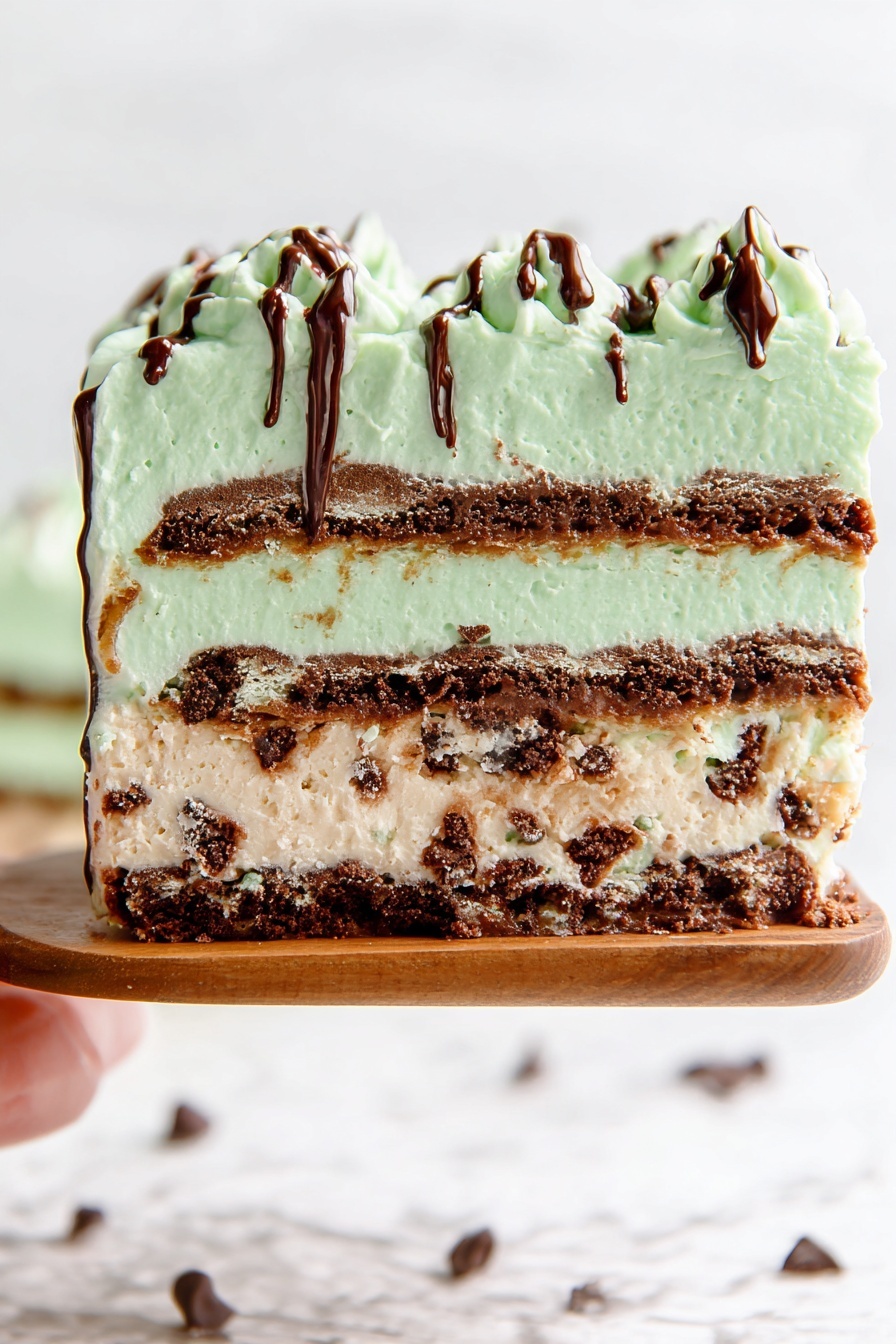
If you’re looking for a dessert that’s both fun and fabulously refreshing, you’ve got to try this Mint Chocolate Ice Cream Sandwich Cake Recipe. It combines the creamy, minty coolness of ice cream sandwiches with a dreamy whipped topping and the chocolatey goodness we all crave. I absolutely love how easy it comes together and how stunning it looks on your dessert table—plus, it’s a guaranteed crowd-pleaser at any gathering.
Why You’ll Love This Recipe
- No-Bake Convenience: This cake comes together without turning on your oven—perfect for hot days or last-minute desserts.
- Minty Fresh Flavor: The peppermint extract paired with green food coloring gives a classic mint chocolate vibe you’ll crave again and again.
- Family Favorite: My kids and friends can’t get enough of it, making it a reliable hit at parties and celebrations.

Ingredients You’ll Need
This recipe is wonderfully straightforward, using simple ingredients you might already have—or can easily grab on your next grocery run. Each element plays a key part in creating that rich, layered texture and flavor combo.

- Ice cream sandwiches: The star of the show, choose your favorite brand; I like ones with classic chocolate wafers and creamy vanilla centers.
- Cool Whip (or whipped topping): This adds fluffy creaminess and helps bind the layers together.
- Green gel food coloring: Just a few drops create that perfect minty color without affecting taste.
- Peppermint extract: A little goes a long way—start with one teaspoon and adjust to your liking if you want a stronger mint punch.
- Mini chocolate chips: They add little bursts of chocolate crunch throughout the cake.
- Chocolate sauce (hot fudge or cocoa syrup): Drizzled on top for that luscious finishing touch.
Variations
I like to mess around with this Mint Chocolate Ice Cream Sandwich Cake Recipe depending on the season or who I’m serving it to. Feel free to make it your own—the recipe is very forgiving and opens the door to lots of fun twists.
- Dairy-Free Version: Swap the Cool Whip for a dairy-free whipped topping and pick vegan ice cream sandwiches to accommodate dietary needs.
- Extra Chocolatey: Stir in some chopped Andes mints or crushed peppermint bark between layers for an extra festive crunch.
- Add Fresh Fruit: Layer thinly sliced strawberries or raspberries to bring in a burst of tartness that balances the mint and chocolate.
- Mint Intensity: Adjust the peppermint extract by half a teaspoon up or down, depending on whether you’re a subtle or bold mint lover.
How to Make Mint Chocolate Ice Cream Sandwich Cake Recipe
Step 1: Set Up Your Ice Cream Sandwich Base
Start by unwrapping 12 ice cream sandwiches and arranging them in a single layer inside a 9×13-inch pan. You might need to slice one or two sandwiches to fill the space perfectly—don’t stress about exact fit; this is a casual dessert. The key here is a solid, even base for your cake layers.
Step 2: Mix the Minty Cool Whip Topping
In a large bowl, gently fold together your thawed Cool Whip, green gel food coloring, and peppermint extract. I like to add the food coloring in small drops and stir until I hit my ideal mint shade. The peppermint extract gives the Cool Whip a fresh, minty kick that pairs perfectly with the ice cream sandwiches.
Step 3: Layer It Up with Chocolate Chips
Spread half of the minty Cool Whip mixture evenly over the ice cream sandwiches. Then sprinkle half of your mini chocolate chips on top to add those delightful little bursts of chocolate in every bite.
Step 4: Repeat the Layers
Now repeat the process: add another layer of the remaining ice cream sandwiches, spread on the rest of your mint Cool Whip, and finish with the remaining mini chocolate chips. It’s starting to look like a cake already—such a satisfying sight!
Step 5: Freeze and Finish with Chocolate Drizzle
Cover the entire pan tightly and pop it into the freezer for at least 4 hours so the layers can meld and firm up. When you’re ready to serve, drizzle the top with chocolate sauce—hot fudge or chocolate syrup works great—then slice into squares. That drizzle adds just the right touch of richness and shine.
Pro Tips for Making Mint Chocolate Ice Cream Sandwich Cake Recipe
- Thawing Cool Whip: Make sure your Cool Whip is fully thawed but still chilled to fold it smoothly without melting the ice cream sandwiches.
- Perfect Peppermint Balance: Start with one teaspoon of peppermint extract; you can always add a little more after tasting the mixture before layering.
- Room for Adjustment: Don’t fuss too much with slicing sandwiches to fit the pan—small gaps won’t affect the taste, and sometimes the edges are the best part!
- Drizzling Chocolate: Wait until just before serving to add the chocolate sauce; it keeps the cake looking glossy and prevents it from becoming sticky.
How to Serve Mint Chocolate Ice Cream Sandwich Cake Recipe

Garnishes
I love topping this cake with a few fresh mint leaves for a pop of color and a sprinkle of extra mini chocolate chips for texture. If I’m feeling extra festive, a dusting of crushed peppermint candies adds crunch and holiday charm—plus it looks gorgeous!
Side Dishes
Serve it alongside a simple fresh fruit salad or some sliced strawberries to add brightness and contrast. A cold glass of milk or minty hot chocolate also complements this dessert perfectly for an indulgent, cozy combo.
Creative Ways to Present
For birthday parties or special occasions, I’ve layered the cake in a trifle dish to showcase the distinct layers—it looks beautiful and guests love scooping from the glass. You can also pipe swirls of whipped cream on top and add edible glitter for a sparkly touch that feels extra special.
Make Ahead and Storage
Storing Leftovers
Wrap leftover cake tightly with plastic wrap or a lid to avoid freezer burn. It will keep well in the freezer for up to a week, and you won’t lose any of that fresh mint-chocolate flavor, trust me.
Freezing
I always make this cake a day or two in advance, letting it freeze solid overnight. When you’re ready to serve, transfer it to the fridge for about 20 minutes to soften slightly for easier slicing—no need to thaw completely.
Reheating
Since this is a frozen dessert, reheating isn’t really applicable—but just make sure to let slices sit out a few minutes before serving so they’re perfectly creamy, never hard or icy. If it gets too cold, the flavors won’t shine as much.
FAQs
-
Can I make Mint Chocolate Ice Cream Sandwich Cake Recipe ahead of time?
Absolutely! This cake actually improves when it has time to freeze for several hours or overnight, allowing the flavors to meld and the texture to firm up nicely.
-
What type of ice cream sandwiches work best?
I find classic vanilla ice cream sandwiches with chocolate wafers are ideal—they offer the perfect balance of flavor and texture without overpowering the mint topping.
-
Can I use homemade whipped cream instead of Cool Whip?
You can, but homemade whipped cream tends to be less stable, so the cake might not hold together as well after freezing. If you go this route, whip cream firm and consider using a stabilizer for best results.
-
How do I prevent the ice cream sandwiches from melting while assembling?
Work quickly and keep your Cool Whip chilled before mixing. Also, assemble the cake in a cool room and immediately place it back in the freezer when layers are complete.
Final Thoughts
This Mint Chocolate Ice Cream Sandwich Cake Recipe has become one of my absolute go-to treats whenever I want to impress without stress. It’s playful, beautiful, and oh-so-delicious—a real showstopper that even non-bakers can pull off. Next time you need a cool, minty dessert with minimal effort, I hope you give this recipe a try. Trust me, your friends and family will be asking for seconds!
Print
Mint Chocolate Ice Cream Sandwich Cake Recipe
- Prep Time: 15 minutes
- Cook Time: 0 minutes
- Total Time: 4 hours 15 minutes
- Yield: 20 servings
- Category: Dessert
- Method: No-Cook
- Cuisine: American
Description
This Mint Chocolate Ice Cream Sandwich Cake is a refreshing and indulgent dessert perfect for mint chocolate lovers. Layers of classic ice cream sandwiches are combined with a minty Cool Whip mixture, sprinkled with mini chocolate chips, and topped with a luscious drizzle of chocolate sauce. It’s an easy, no-bake cake that you freeze until set, making it a perfect make-ahead dessert for hot days or special occasions.
Ingredients
Ice Cream Sandwich Layer
- 24 ice cream sandwiches
Mint Cool Whip Mixture
- 1 (16 ounce) container Cool Whip, thawed
- green gel food coloring, to desired shade
- 1 teaspoon peppermint extract
Toppings
- 1/2 cup mini chocolate chips
- 1/4 cup chocolate sauce (hot chocolate syrup or jarred hot fudge)
Instructions
- Prepare the base layer: Unwrap 12 of the ice cream sandwiches and arrange them in a single layer in a 9×13-inch pan. Trim 1 or 2 sandwiches if necessary to fit the pan perfectly.
- Make the mint Cool Whip mixture: In a large mixing bowl, gently fold together the Cool Whip, green gel food coloring, and peppermint extract until the mixture achieves a smooth texture and the desired shade of mint green.
- Assemble the first Cool Whip layer: Spread half of the mint Cool Whip mixture evenly over the layer of ice cream sandwiches in the pan.
- Add chocolate chips: Sprinkle half of the mini chocolate chips evenly over the Cool Whip layer to add a delightful crunch and chocolate flavor.
- Repeat layering: Place the remaining 12 ice cream sandwiches over the chocolate chips to form the second layer, then spread the remaining mint Cool Whip mixture on top. Finish with the remaining mini chocolate chips scattered evenly on top.
- Freeze to set: Cover the pan tightly with plastic wrap or foil and freeze the assembled cake for at least 4 hours, allowing it to set completely.
- Serve: Before serving, drizzle the chocolate sauce evenly over the top. Cut into squares and serve chilled for a refreshing dessert.
Notes
- Adjust the amount of green gel food coloring gradually to achieve the perfect mint color without overpowering the flavor.
- If you don’t have a 9×13-inch pan, use a similarly sized dish, trimming sandwiches as needed.
- For extra texture, consider adding chopped nuts between layers.
- Use good quality peppermint extract to avoid bitterness.
- Store leftovers tightly covered in the freezer for up to one week.
Nutrition
- Serving Size: 1 serving
- Calories: 232
- Sugar: 20g
- Sodium: 112mg
- Fat: 9g
- Saturated Fat: 3g
- Unsaturated Fat: 5g
- Trans Fat: 0g
- Carbohydrates: 37g
- Fiber: 0g
- Protein: 4g
- Cholesterol: 18mg


