
If you’re looking for a dessert that’s creamy, sweet, and simply irresistible, you’ve got to try this Milkybar Cheesecake Recipe. I absolutely love this cheesecake because it’s no-bake (yes, please!), uses that luscious Milkybar chocolate we all adore, and comes together faster than you think. The texture is silky smooth, with just the right amount of sweetness to make everyone in the family go crazy for more. Trust me, once you make this, it’ll be your go-to showstopper for any occasion!
Why You’ll Love This Recipe
- No-Bake Convenience: Skip the oven and still end up with a rich, creamy dessert that sets perfectly in the fridge.
- Milkybar Magic: Using Milkybar chocolate takes this cheesecake to the next level with a sweet, buttery white chocolate flavor that’s so comforting.
- Family Favorite: I discovered this trick when trying to please my kids’ sweet tooth—it never fails to wow at gatherings.
- Simple Ingredients: You’ll find that you don’t need fancy stuff to make a spectacular dessert that looks and tastes like it took hours.

Ingredients You’ll Need
Gathering the right ingredients for this Milkybar Cheesecake Recipe is key to nailing its creamy texture and sweet flavor. Most are pantry staples, but make sure to get good-quality Milkybar chocolate to bring out that signature taste.

- Digestives: Perfect for the base, these biscuits give a nice crunch and subtle sweetness that balances the creamy filling.
- Unsalted butter: Melted to bind the biscuit base together—unsalted lets the Milkybar shine through without extra saltiness.
- Milkybar chocolate: The star of the show! You’ll want this creamy white chocolate to melt gently into your filling.
- Full-fat cream cheese: This gives the cheesecake its rich, velvety texture—don’t substitute with low-fat or it may get runny.
- Icing sugar: For sweetness without any graininess, and a smooth mix.
- Vanilla extract: Adds warmth and depth—a little goes a long way here.
- Double cream: Divided between the filling and the topping, it’s what makes this cheesecake so luscious.
- Milkybar buttons: For decorating the top—you can’t go wrong with some extra Milkybar goodness!
Variations
I love how versatile this Milkybar Cheesecake Recipe is. Whether you’re a purist who loves it just as is, or someone who enjoys mixing things up, these variations make it easy to customize every time.
- Berry Boost: I sometimes add fresh raspberries or strawberries on top for a pop of color and a tangy contrast that pairs beautifully with the sweetness.
- Dairy-Free Version: You can swap cream cheese and double cream for coconut-based alternatives—I tried this for a friend and it worked surprisingly well!
- Nutty Twist: Adding crushed hazelnuts or chopped pistachios into the biscuit base gives a lovely crunch that my family particularly enjoys.
- Chocolate Drizzle: For extra indulgence, melt a little dark or milk chocolate and drizzle it over the top just before serving.
How to Make Milkybar Cheesecake Recipe
Step 1: Create the Biscuit Base
Start by crushing the digestives until you have fine crumbs—either blitz them in a food processor or pop them in a plastic bag and bash with a rolling pin. Then, melt your unsalted butter gently and mix it into the biscuit crumbs until the texture resembles wet sand. Press this evenly into the base of a springform tin, using the back of a spoon or the base of a glass to compact it firmly. This helps avoid a crumbly crust when cutting. Pop it into the fridge to chill while you prepare the filling.
Step 2: Melt the Milkybar Chocolate
Break the Milkybar chocolate into chunks and melt it slowly—ideally over a bain-marie or in short bursts in the microwave, stirring often. You want it smooth and glossy without burning. Patience is key here! Once melted, set it aside to cool slightly but don’t let it harden.
Step 3: Mix the Cream Cheese Filling
Beat together the full-fat cream cheese, icing sugar, and vanilla extract until smooth and fluffy—using an electric mixer makes this super easy. Then, fold in the melted Milkybar chocolate carefully, ensuring the mixture stays light and creamy. In a separate bowl, whip 300 ml of double cream until it holds soft peaks, then gently fold this into the chocolate cream cheese mixture for that dreamy mousse-like texture.
Step 4: Assemble and Chill
Pour the filling over your chilled biscuit base and smooth out the top evenly. Refrigerate your cheesecake for at least 6 hours, or overnight if you can—the longer you chill, the firmer and more sliceable it becomes. I know it’s hard to wait, but trust me, patience pays off here!
Step 5: Whip the Cream Topping and Decorate
Whip the remaining 150 ml of double cream with 2 tablespoons of icing sugar until it holds firm peaks. Spread this over the set cheesecake gently, then drizzle with 50 g of melted Milkybar chocolate for an extra touch of indulgence. Finally, sprinkle on Milkybar buttons for that charming, playful look that always brings smiles.
Pro Tips for Making Milkybar Cheesecake Recipe
- Melting Chocolate Gently: I’d recommend using a bain-marie to melt your Milkybar slowly—it prevents burning and keeps the texture smooth.
- Chilling Time Is Key: I used to rush this part, but learned that the cheesecake slices so much cleaner if it’s left to set overnight.
- Don’t Overmix the Cream: When folding in whipped cream, be gentle to keep the airy texture—overmixing can turn it heavy and dense.
- Avoid a Soggy Base: Press your biscuit base down firmly and chill it well before adding the filling to prevent it from soaking up moisture.
How to Serve Milkybar Cheesecake Recipe

Garnishes
I love topping this cheesecake off with extra Milkybar buttons—they’re like candy on candy! Sometimes I add a few fresh berries or a light dusting of cocoa powder for a bit of contrast. If you’re feeling fancy, a sprinkle of toasted coconut or chopped nuts gives a lovely textural pop.
Side Dishes
This cheesecake pairs wonderfully with a cup of strong coffee or a glass of sweet dessert wine. For a casual gathering, I like serving it alongside fresh fruit salad or a mango sorbet to keep things light and balanced.
Creative Ways to Present
For birthdays or special occasions, I’ve layered this cheesecake in small jars for single servings—perfect for outdoor picnics or parties. Another fun idea is to create mini versions using cupcake liners for an adorable, bite-sized treat your guests will adore.
Make Ahead and Storage
Storing Leftovers
I always store leftover Milkybar Cheesecake covered in the fridge, tightly wrapped with cling film or in an airtight container—it keeps fresh for up to 4 days. Plus, the flavors actually develop even more after a day or two, in my experience.
Freezing
Freezing cheesecake can be tricky, but I’ve had good success wrapping slices individually in cling film and foil, then freezing for up to a month. When ready, thaw in the fridge overnight for best texture—avoid microwaving as it can make it grainy.
Reheating
This no-bake cheesecake is best enjoyed chilled, so I recommend serving leftovers straight from the fridge once thawed. If you want to soften the texture slightly, let it sit at room temperature for about 15 minutes before digging in.
FAQs
-
Can I use other white chocolate instead of Milkybar for this cheesecake?
Absolutely! While Milkybar offers a distinct creamy sweetness, you can substitute with any good-quality white chocolate. Just be sure it’s smooth and not overly sweet to maintain balance.
-
Do I have to use double cream, or can I swap it?
Double cream provides richness and stability to the cheesecake’s filling and topping, so it’s best to stick with it if possible. However, for a lighter twist, some have tried whipping cream or full-fat heavy cream with success, though the texture may vary slightly.
-
How long does this cheesecake need to chill before serving?
For the best results, chill your Milkybar Cheesecake for at least 6 hours in the fridge, but overnight chilling is ideal. This ensures the cheesecake sets firmly and slices beautifully.
-
Can I make this cheesecake gluten-free?
Yes! Just substitute the digestives with gluten-free biscuits of your choice. Just be mindful to check their sweetness level so the balance isn’t affected.
Final Thoughts
This Milkybar Cheesecake Recipe has become one of my favorite quick desserts to whip up when I want something indulgent but fuss-free. It’s that perfect blend of creamy, sweet, and a little bit playful with the Milkybar buttons on top. I hope you give this recipe a try and make it your own—trust me, once you do, this cheesecake will be your new dessert crush that you’ll want to bring out for every get-together. Let me know how it turns out, and don’t be surprised if you end up making it again next week!
Print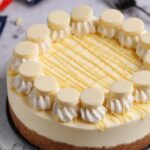
Milkybar Cheesecake Recipe
- Prep Time: 10 minutes
- Cook Time: 10 minutes (melting and mixing steps only)
- Total Time: 6 hours 20 minutes (including chilling time)
- Yield: 14 slices
- Category: Dessert
- Method: No-Cook
- Cuisine: British
Description
This creamy, no-bake Milkybar Cheesecake combines a crunchy digestive biscuit base with a rich Milkybar chocolate and cream cheese filling, topped with delicate Milkybar buttons. Perfect for chocolate lovers seeking an indulgent yet simple dessert that requires no oven time.
Ingredients
Base
- 300 g digestives
- 150 g unsalted butter
Filling
- 300 g Milkybar chocolate
- 500 g full-fat cream cheese
- 75 g icing sugar
- 1 tsp vanilla extract
- 300 ml double cream
Topping
- 150 ml double cream
- 2 tbsp icing sugar
- 50 g melted Milkybar chocolate
- Milkybar buttons (to decorate)
Instructions
- Prepare the Base: Blitz 300 g of digestive biscuits into fine crumbs using a food processor or place them in a sealed plastic bag and crush with a rolling pin. Melt 150 g of unsalted butter in a saucepan or microwave, then mix with the biscuit crumbs until fully combined. Press the mixture evenly into the base of a 20cm (8 inch) springform cake tin. Chill in the refrigerator for 10 minutes to set.
- Melt Milkybar Chocolate for Filling: Gently melt 300 g of Milkybar chocolate over a bain-marie or in short bursts in the microwave, stirring frequently to avoid burning. Allow it to cool slightly but not solidify.
- Make the Filling: In a large bowl, beat 500 g full-fat cream cheese until smooth. Add 75 g icing sugar and 1 tsp vanilla extract and mix well. Pour the melted Milkybar chocolate into the cream cheese mixture and fold in until combined.
- Whip Double Cream: In a separate clean bowl, whip 300 ml of double cream until thick and soft peaks form. Gently fold the whipped cream into the cream cheese and chocolate mixture until smooth and combined.
- Assemble Cheesecake: Pour the filling over the chilled biscuit base, smoothing the top with a spatula. Place the cheesecake back in the refrigerator to set for at least 6 hours or overnight for best results.
- Prepare the Topping: Whip 150 ml of double cream with 2 tbsp icing sugar until thick. Spread or pipe this over the set cheesecake. Drizzle 50 g of melted Milkybar chocolate over the top and decorate with Milkybar buttons evenly across the surface.
- Chill and Serve: Return the cheesecake to the fridge for at least 1 hour to allow the topping to firm. Release from the springform tin, slice into 14 portions and serve chilled.
Notes
- This cheesecake requires no baking, making it quick and simple to prepare.
- To ensure a smooth filling, allow melted chocolate to cool slightly before mixing with cream cheese.
- For best results, chill for a minimum of 6 hours or overnight to allow the cheesecake to set properly.
- You can decorate with additional Milkybar buttons or grated chocolate for extra texture and visual appeal.
- Use full-fat cream cheese and double cream for the creamiest texture and richest flavor.
Nutrition
- Serving Size: 1 slice
- Calories: 502 kcal
- Sugar: 26 g
- Sodium: 249 mg
- Fat: 41 g
- Saturated Fat: 24 g
- Unsaturated Fat: 16 g
- Trans Fat: 0 g
- Carbohydrates: 38 g
- Fiber: 1.5 g
- Protein: 5 g
- Cholesterol: 110 mg


