If you’re looking for a show-stopping Halloween treat that’s more fun than spooky and surprisingly easy to pull off, you’re in the right place! Meringue Bones: Fun and Easy Halloween Treat Recipe might sound fancy, but I promise you, it’s a total breeze and guaranteed to impress the little goblins and ghouls. When I first tried making these, I couldn’t believe how simple the process was, yet how adorable and delicious they turned out. Stick around, because I’m sharing all my tips and tricks so your batch will come out perfect every time.
Why You’ll Love This Recipe
- Simplicity: You only need a handful of ingredients and a few simple steps for a festive treat.
- Visual Impact: These bones look incredible on any Halloween dessert table and are sure to spark conversations.
- Kid-Friendly Fun: Great for baking with kids – the shapes are fun to pipe and assemble.
- Light & Crunchy: Unlike rich and heavy desserts, these meringue bones have a delicate, airy crunch that’s easy to snack on.

Ingredients You’ll Need
One of the things I adore about this Meringue Bones: Fun and Easy Halloween Treat Recipe is how basic yet magical the ingredients are when combined. Everything comes together quickly, especially if you have the meringue components prepped and ready.
- Egg whites: Use fresh, at room temperature for the best volume and stability when whipping.
- Granulated sugar: It’s essential for helping the meringue hold its shape and get that perfect glossy finish.
- Cream of tartar or lemon juice: This little acid game-changer stabilizes the egg whites so your bones don’t collapse.
- Vanilla extract: Adds just the right hint of sweetness and warmth.
- Black and white food coloring: To bring your bones to life with fun, spooky accents.
Variations
I love tweaking this recipe for different vibes depending on the year or occasion — which makes Meringue Bones: Fun and Easy Halloween Treat Recipe super flexible and forgiving. Here are some of my favorite ways to mix it up.
- Chocolate Drizzle: Once totally cooled, drizzle melted dark chocolate for a rich contrast — my family goes crazy for this combo.
- Spiced Meringue: Add a pinch of cinnamon or nutmeg to the batter before whipping for an autumnal spin.
- Gluten-Free: Since this is naturally gluten-free, feel free to share these with friends who need to avoid wheat.
- Neon Colors: Instead of classic black and white, try vibrant neon food coloring for a carnival-style Halloween party.
How to Make Meringue Bones: Fun and Easy Halloween Treat Recipe
Step 1: Whip Up the Perfect Meringue
Get your electric mixer ready and start beating those egg whites on medium speed until they get foamy. Next, add cream of tartar or a splash of lemon juice — trust me, that’s the secret to stable, shiny peaks. Slowly sprinkle in your sugar while continuing to whip until the mixture stiffens into glossy peaks. You’ll know it’s ready when it holds its shape without sliding around.
Step 2: Shape Those Bones
Once your meringue is ready, transfer it to a piping bag fitted with a small round tip. Pipe pairs of small circles (these will be the “knuckles”) connected by a thin line for the “shaft.” Don’t worry if they don’t look perfect — the rustic shape adds charm! You’ll pipe two smaller circles at the ends and a longer connecting bone shape in the middle.
Step 3: Bake Low and Slow
Pop your piped bones onto parchment-lined sheets and slide them into a preheated oven at a low temperature (225°F or 110°C). This slow bake is key — it dries the meringues thoroughly, keeping them crisp and light on the inside. Bake for about 1.5 to 2 hours, then turn off the oven and let them cool inside for an extra hour to avoid cracks.
Step 4: Add Those Spooky Details
After cooling completely, you can use edible black paint or a fine-tipped food marker to add little cracks or shading to your bones. If you’re feeling artistic, dust lightly with cocoa or colored sugar for some eerie dimension. This step makes your Meringue Bones: Fun and Easy Halloween Treat Recipe really pop visually.
Pro Tips for Making Meringue Bones: Fun and Easy Halloween Treat Recipe
- Room Temperature Eggs: I learned the hard way that cold eggs don’t whip well — letting them warm up makes all the difference.
- Slow Sugar Addition: Adding sugar gradually helped me achieve that perfect glossy finish instead of a gritty texture.
- Piping Practice: I recommend practicing your bone shapes on parchment before piping final ones; it saved me from lots of uneven shapes.
- Cooling Inside the Oven: Leaving the meringues in a turned-off oven prevents cracks and keeps them fragile but sturdy.
How to Serve Meringue Bones: Fun and Easy Halloween Treat Recipe

Garnishes
I usually sprinkle a tiny pinch of edible glitter or a little black sanding sugar over my meringue bones — it adds a subtle shimmer without overpowering the delicate sweet flavor. Edible markers to add crack details are a fun step I highly recommend for visual appeal.
Side Dishes
These crunchy meringue bones are perfect alongside a warm cup of spiced cider, hot chocolate, or even a creamy pumpkin latte — such a cozy treat combo for chilly October nights!
Creative Ways to Present
I love arranging these meringue bones spilling out of a “broken coffin” shaped box or a rustic wooden platter surrounded by autumn leaves and mini pumpkins. For parties, displaying them on black slate boards with scattered dried rose petals creates a dramatic Halloween vibe that always wows my guests.
Make Ahead and Storage
Storing Leftovers
My tip? Store your leftovers in an airtight container at room temperature. Meringues love a dry environment, so avoid any humidity and they’ll stay crisp for up to 5 days.
Freezing
I’ve frozen these before by placing the meringues in a layered container separated with parchment paper. They thaw perfectly back to their crunchy selves without sogginess, which is great if you’re prepping well ahead of the party.
Reheating
Generally, there’s no need to reheat meringues since they’re enjoyed best crisp and cool. But if they lose crunch, a quick 5-minute pop in a 250°F oven can revive them — just watch carefully so they don’t brown.
FAQs
-
Can I make Meringue Bones ahead of Halloween day?
Absolutely! These meringue bones actually improve in texture if made a day or two in advance because they get a chance to fully set and crisp up. Just store them airtight to avoid moisture.
-
What’s the best way to stabilize the egg whites?
Using cream of tartar or a splash of lemon juice when whipping helps keep your meringue from deflating. This is key for those sturdy bone shapes that hold up during baking.
-
My meringues cracked after baking. How can I prevent that?
Try cooling your meringues inside the turned-off oven with the door slightly ajar, like I do. Sudden temperature changes cause cracks, so slow cooling is your best friend here.
-
Can I use powdered sugar instead of granulated?
I recommend sticking to granulated sugar for this recipe. Powdered sugar contains cornstarch that can affect the texture and shine of your meringue.
-
How do I color the meringue bones?
A few drops of gel food coloring added during whipping will tint the meringue beautifully without changing its consistency. I usually reserve black only for details using edible markers or paint after baking.
Final Thoughts
This Meringue Bones: Fun and Easy Halloween Treat Recipe has become my go-to for Halloween baking — it offers that perfect balance of effortless prep and stunning, unique results. Whether you’re baking with kids or need a last-minute crowd-pleaser, these little bones will charm your way into the holiday spirit. I genuinely can’t wait for you to try this and see how your family lights up when they bite into these crunchy, sweet little ghosts. Happy baking!
Print
Meringue Bones: Fun and Easy Halloween Treat Recipe
- Prep Time: 40 minutes
- Cook Time: 10 minutes
- Total Time: 2 hours 50 minutes
- Yield: 24 cookies
- Category: Dessert, Snack, Cookie
- Method: Baking
- Cuisine: American
Description
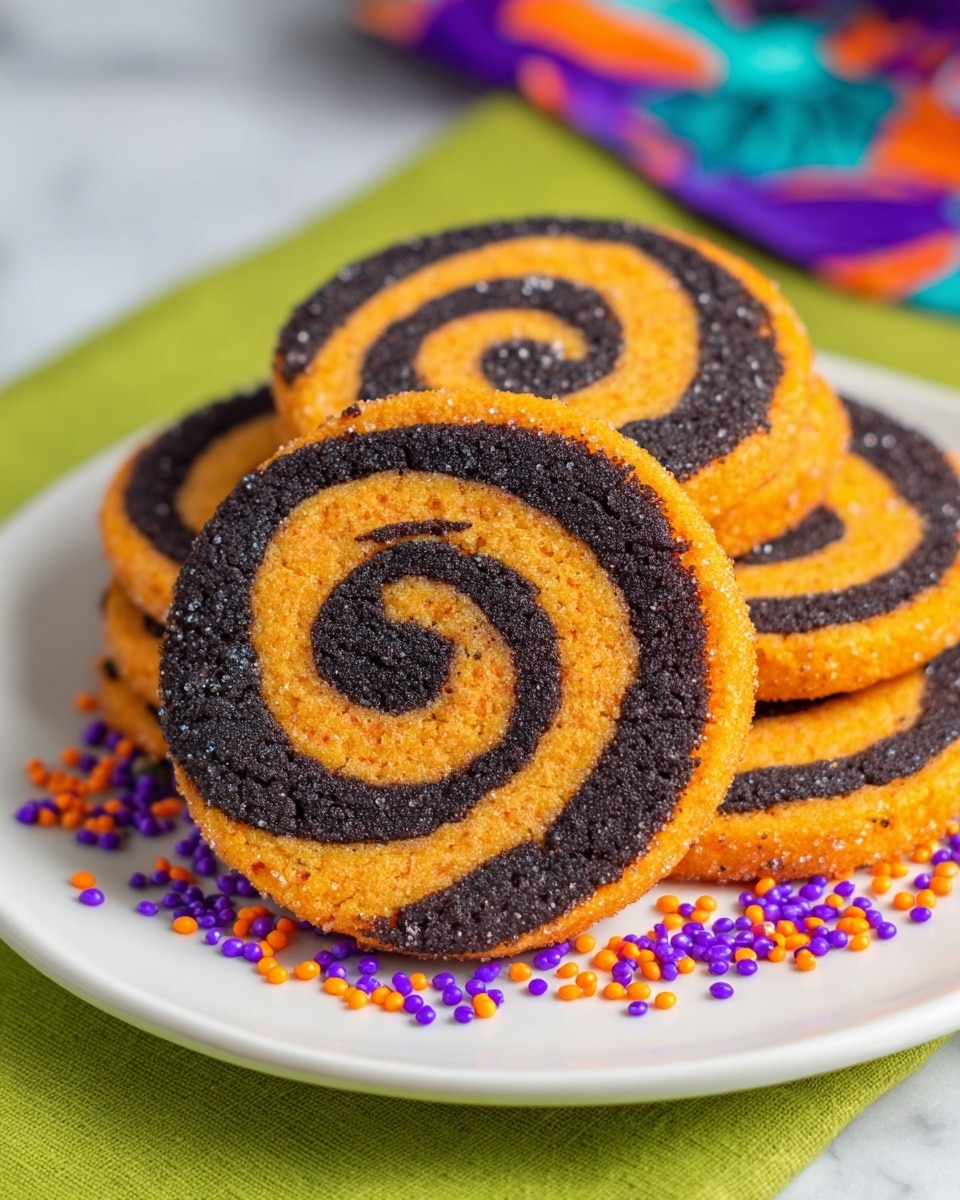
Halloween Pinwheel Cookies are festive, visually striking sugar cookies perfect for any Halloween party. Made by layering and rolling colored doughs into a spiral pattern, these cookies offer a fun twist on classic sugar cookies with vibrant orange and black swirls.
Ingredients
Dry Ingredients
- 3 cups all-purpose flour (sifted)
- ½ teaspoon baking powder
- ¼ teaspoon salt
Wet Ingredients
- 1 cup unsalted butter (softened to room temperature)
- 1 cup granulated sugar
- 2 large eggs (at room temperature)
- 2 teaspoons pure vanilla extract
Food Coloring
- Orange gel food coloring (¼ teaspoon)
- Black gel food coloring (¼ teaspoon)
Instructions
- Mix Dry Ingredients: In a medium bowl, whisk together the sifted all-purpose flour, baking powder, and salt; set this dry mixture aside.
- Cream Butter and Sugar: In a large bowl, use a mixer to beat the softened butter and granulated sugar until the mixture is smooth and creamy. Then add in the eggs and vanilla extract and beat again to combine thoroughly.
- Combine Wet and Dry: Gradually add the dry ingredients to the wet ingredients and mix gently just until no streaks of flour remain, avoiding overmixing.
- Divide and Color Dough: Split the dough evenly into two halves. Add ¼ teaspoon of orange gel food coloring to one half and knead until evenly colored. Repeat with ¼ teaspoon of black gel food coloring and the other half of dough.
- Roll Black Dough: Roll out the black-colored dough on parchment paper into a 9×15 inch rectangle. Transfer this rectangle on the parchment directly to a baking sheet and set aside.
- Roll Orange Dough: On a separate sheet of parchment paper, roll out the orange dough into the same 9×15 inch rectangle size.
- Layer and Chill: Carefully place the parchment paper with the orange dough on top of the black dough, aligning edges as closely as possible. Chill the layered dough in the refrigerator for 20 minutes to firm up.
- Prepare the Log: Remove the dough from the fridge. Peel off the top parchment from the orange dough layer and carefully place the orange dough directly on top of the black dough layer. Trim edges to make a tidy rectangle. Roll the combined dough tightly from the shorter side into a log, applying gentle pressure for layer adhesion.
- Refrigerate the Dough Log: Wrap the rolled dough log in wax paper and refrigerate for at least 2 hours to firm it up for slicing.
- Preheat Oven and Prepare Baking Sheet: Preheat your oven to 350°F (180°C), or if using a fan oven, set to 160°C. Line a baking sheet with parchment paper.
- Slice Cookies: Unwrap the chilled dough log and place it on a cutting board. Using a sharp knife, slice the dough into ¼ inch thick rounds carefully to maintain the pinwheel shape.
- Bake Cookies: Arrange the cookie slices on the prepared baking sheet with some space in between. Bake for approximately 10 minutes or until the edges are set and cookies are lightly golden.
- Cool: Remove cookies from the oven and let them cool on the baking sheet for 1-2 minutes before transferring them to a wire rack to cool completely.
Notes
- These Halloween Pinwheel Cookies are a guaranteed hit at parties with their festive orange and black swirl design.
- Make sure to chill the dough log thoroughly before slicing to ensure clean, uniform cookies.
- Using gel food coloring helps achieve vibrant colors without altering the dough consistency.
- Store cooled cookies in an airtight container to maintain freshness.
Nutrition
- Serving Size: 1 cookie
- Calories: 101 kcal
- Sugar: 9 g
- Sodium: 49 mg
- Fat: 1 g
- Saturated Fat: 0.3 g
- Unsaturated Fat: 0.4 g
- Trans Fat: 0.001 g
- Carbohydrates: 21 g
- Fiber: 0.4 g
- Protein: 2 g
- Cholesterol: 15 mg


