
If you’re in the mood for something festive, fun, and absolutely delicious this Halloween, you’re going to adore this Melted Witch Bark Recipe. It’s one of those treats that’s not just pretty to look at, but also incredibly simple to whip up—perfect for a last-minute party or a weekend treat with the kiddos. I absolutely love how the vibrant green candy melts create the perfect canvas for these little witchy masterpieces. Trust me, once you try this, it might just become your go-to for spooky season snacking!
Why You’ll Love This Recipe
- Super Simple to Make: You only need a handful of ingredients, and the process is straightforward, even if you’re not a baking pro.
- Adorable and Festive: These melted witches are show-stoppers for any Halloween spread or kids’ party.
- Customizable Fun: You can switch up the toppings based on what you have on hand or your flavor preferences.
- Yummy and Crowd-Pleasing: Whether you’re making them for family or friends, everyone goes crazy for these sweet treats.

Ingredients You’ll Need
For this Melted Witch Bark Recipe, the ingredients work beautifully together to create a perfect mix of sweet, salty, and chocolatey goodness. Pro tip: having everything prepped and within reach before you start makes the entire process way less stressful.
- Wilton Candy Melts (vibrant green): These give you that perfect witchy color and smooth melt that’s easy to work with.
- Mini chocolate chips: Dividing these helps with layering — some go into the bark, some make for swirling effects.
- Pretzel sticks: Great for the witch’s broomstick — adds a nice crunch and salty contrast.
- Mini Reese’s Peanut Butter Cups: A sweet base for your broomstick handle that kids and adults alike love.
- Halloween Oreos: Perfect as the witch’s hat — spooky and tasty!
- Hershey’s Hugs: Melting and dipping these creates great hat embellishments and eyes.
Variations
I like to switch things up depending on my mood or what I have around. This recipe is flexible, so don’t be shy about making it your own! Here are a few fun twists I’ve tried and loved.
- Variation: For a nut-free version, swap the Reese’s with small marshmallows or even mini chocolate bars — still delicious and kid-friendly.
- Variation: Try using white chocolate candy melts instead of green for a “ghostly” theme that’s just as fun.
- Variation: Add festive sprinkles or edible glitter on top before the bark sets to give it some extra Halloween sparkle.
- Variation: For a spicier kick, sprinkle a pinch of chili powder or cayenne into the melted chocolate before pouring it out. It sounds wild, but it’s surprisingly tasty!
How to Make Melted Witch Bark Recipe
Step 1: Prepare Your Workspace and Ingredients
First things first: lay out a piece of parchment paper on a cookie sheet — this is your working surface where the bark will set. Next, gather all your toppings: pretzel sticks, Reese’s, Oreos, Hugs, and mini chocolate chips. I found that having everything ready and within arm’s reach really smooths out the process, so you’re not scrambling to get items while the chocolate’s still melted.
Step 2: Melt the Green Candy Melts
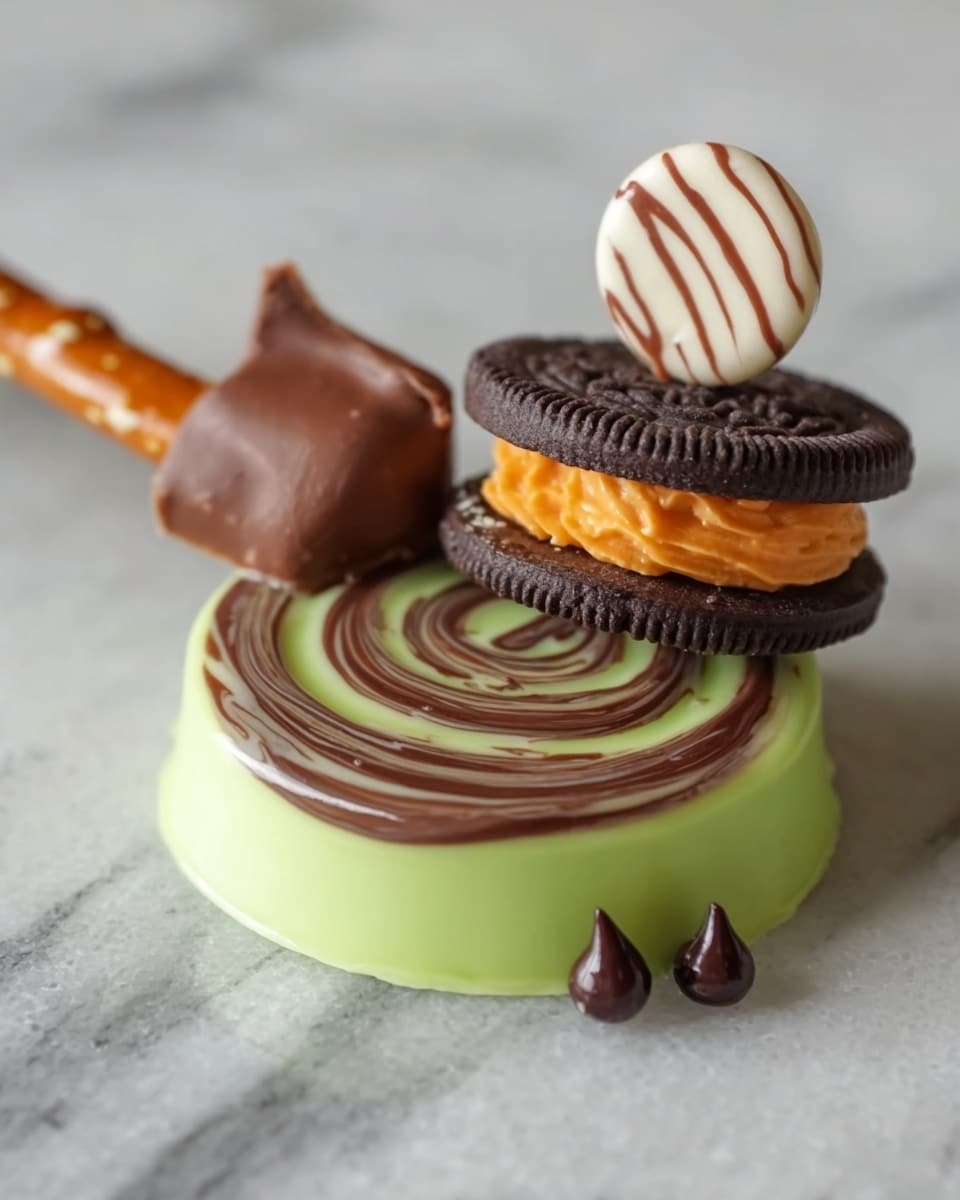
Pop about 1 cup of the Wilton Candy Melts into a small pot and melt them slowly over low heat, stirring constantly. The key here is to keep the heat low — you don’t want the chocolate to seize up. Once it’s silky smooth, spoon the melted chocolate onto your parchment paper and spread it into circles about 4 inches in diameter. We made eight circles, so each witch gets her own little patch.
Step 3: Add the Mini Chocolate Chip Swirls
Now, melt the remaining half cup of mini chocolate chips in another small pot on low heat, stirring constantly. Once melted, spoon just a tiny dollop of this now-dark chocolate onto your green circles and grab a toothpick to swirl it around. This little swirl adds depth and contrast, making your witches look even more magical.
Step 4: Create the Witch Faces and Hats
Quickly place a Halloween Oreo on one side of each green circle — that’s the witch’s hat. Dip a Hershey’s Hug into any leftover melted chocolate and place it on top of the Oreo for a cute finishing touch. Then, use the mini chocolate chips to add little eyes to the witch’s face — it’s the small details that really bring these to life.
Step 5: Assemble the Broomsticks
Stick a pretzel through each mini Reese’s Peanut Butter Cup — this is your witch’s broomstick. Place these on the opposite side of the Oreo hat for perfect balance and an adorable look. It always feels like bringing a mini Halloween story to your plate!
Step 6: Let Them Set and Enjoy
Allow your melted witch bark to set completely at room temperature or pop the sheet into the fridge if you’re in a hurry. Once firm, they’re ready to package as party favors or serve at your Halloween bash — either way, they’ll disappear fast.
Pro Tips for Making Melted Witch Bark Recipe
- Low and Slow Melting: When melting candy melts or chocolate, always keep the heat low and stir often to avoid burning or seizing.
- Prep First: Gathering all your toppings beforehand saved me so much stress, especially when working quickly before the chocolate sets.
- Use Parchment Paper: This makes cleanup a breeze and keeps the bark from sticking, so your witches stay intact.
- Be Gentle When Swirling: Swirl the mini chocolate chip melt with a light hand so the different chocolates don’t completely mix — you want the pretty marbling effect!
How to Serve Melted Witch Bark Recipe
Garnishes
I like to keep a few extra mini chocolate chips and sprinkles nearby when serving. It lets everyone add their own little touches, which makes it a fun activity as well as a tasty treat. Plus, I sometimes add edible glitter on top of the hats — it really makes them pop!
Side Dishes
Since this melted witch bark is sweet and rich, I often pair it with something simple like apple slices or a basic caramel dip to balance out the flavors. It also pairs wonderfully with a chilly cup of hot cocoa or spiced pumpkin tea.
Creative Ways to Present
One of my favorite ways to present these is on a black platter with fake spider webs stretched around for Halloween vibes. You can also wrap each little witch bark in clear cellophane tied with orange and black ribbons — they make great party favors or hostess gifts!
Make Ahead and Storage
Storing Leftovers
I store leftover melted witch bark in an airtight container at room temperature for up to 3 days. Keeping them away from heat or humidity ensures they stay crisp and fresh without melting or getting sticky.
Freezing
If you want to freeze these, wrap each bark piece individually in plastic wrap, then place them in a freezer-safe bag. When thawed, they keep their texture and flavor, though I recommend enjoying them within a month for best taste.
Reheating
Since these are delicate chocolate treats, reheating isn’t usually necessary or recommended. If you want the chocolate a bit softer, just let them sit at room temperature for 10-15 minutes before serving.
FAQs
-
Can I use regular chocolate instead of candy melts for this Melted Witch Bark Recipe?
Absolutely! You can use regular chocolate, but candy melts are great because they have stabilizers that make them easier to work with and give a nice glossy finish. If you use regular chocolate, make sure to melt it gently and temper it if you want that shiny finish and a good snap.
-
How long does it take for the melted witch bark to set?
At room temperature, it usually takes about 30 to 60 minutes to fully set depending on your kitchen’s temperature. If you’re in a rush, placing it in the fridge cuts the time down to around 15-20 minutes.
-
Can kids help make this recipe?
Definitely! This is a fun, kid-friendly project. Just be sure to handle all the melting parts yourself, especially since the chocolate gets hot. Kids will love adding the toppings and swirling the chocolate — it makes a great hands-on activity.
-
What’s the best way to store leftovers?
Store your Melted Witch Bark in an airtight container at room temperature, away from heat and moisture, to keep them crisp and fresh for a few days. Avoid refrigeration unless your home is very warm, as condensation can cause the chocolate to bloom.
Final Thoughts
I genuinely think this Melted Witch Bark Recipe is such a delightful way to bring some magic into your kitchen without fuss or fancy ingredients. I remember the first time I made it for a Halloween party, and my family couldn’t get enough – it was literally gone in minutes! Whether you’re a seasoned baker or just looking for a fun project to share with your friends or kids, you’ll enjoy how easy and pleasing this recipe is. So go ahead, gather your candy melts, get creative, and have a wickedly good time making these adorable treats!
Print
Melted Witch Bark Recipe
- Prep Time: 5 minutes
- Cook Time: 10 minutes
- Total Time: 15 minutes
- Yield: 8 melted witches
- Category: Dessert
- Method: Stovetop
- Cuisine: American
Description
Melted Witch Bark is a fun and festive Halloween treat featuring vibrant green candy melts swirled with mini chocolate chips, decorated with pretzel sticks, mini Reese’s Peanut Butter Cups, Halloween Oreos, and Hershey’s Hugs. This easy no-bake recipe is perfect for parties and makes adorable witch-themed snacks that are both visually appealing and delicious.
Ingredients
Main Ingredients
- 1 bag Wilton Candy Melts (vibrant green)
- 1/2 cup mini chocolate chips (divided)
- 8 pretzel sticks
- 8 mini Reese’s Peanut Butter Cups
- 8 Halloween Oreos
- 8 Hershey’s Hugs
Instructions
- Prepare Workstation: Begin by laying out parchment paper on a cookie sheet to work as your base for the melted candy craft.
- Organize Ingredients: Get pretzel sticks, Reese’s, Oreos, Hugs, and mini chocolate chips out and ready so they are easy to grab and decorate quickly.
- Melt Candy Melts: Place 1 cup of vibrant green candy melts in a small pot and melt over low heat, stirring constantly to ensure smooth consistency without burning.
- Create Candy Circles: Once melted, spoon the candy melts onto the parchment paper and spread into circles approximately 4 inches in diameter.
- Melt Mini Chips: Quickly add remaining mini chocolate chips to a small pot and melt on low heat stirring constantly. Spoon a small amount onto the green candy circles and use a toothpick to swirl the colors together creating a marbled effect.
- Assemble Witch Faces: Place one Halloween Oreo on each circle as the witch’s hat. Dip Hershey’s Hugs into excess melted chocolate and attach them on top of the Oreos to decorate the hats. Use mini chocolate chips for the eyes by pressing them onto the candy melts near the Oreo hats.
- Add Witch Broomsticks: Stick a pretzel into each mini Reese’s Peanut Butter Cup to resemble a broomstick handle and place it on the opposite side of the Oreo on each candy circle.
- Set and Serve: Let the candy melts set completely at room temperature until firm and ready to eat or package for later enjoyment.
Notes
- This simple Melted Witch Bark is cute, festive, and ideal for a Halloween party activity.
- Use parchment paper to prevent sticking and allow easy cleanup.
- Be sure to melt candy melts and chocolate chips on low heat to avoid scorching.
- Decorate quickly before the candy melts harden to achieve smooth swirls and proper placement of toppings.
- Store leftovers in an airtight container to maintain freshness.
Nutrition
- Serving Size: 1 melted witch (1/8 of recipe)
- Calories: 251
- Sugar: 27 g
- Sodium: 114 mg
- Fat: 12 g
- Saturated Fat: 7 g
- Unsaturated Fat: 4 g
- Trans Fat: 0 g
- Carbohydrates: 32 g
- Fiber: 1 g
- Protein: 2 g
- Cholesterol: 3 mg


