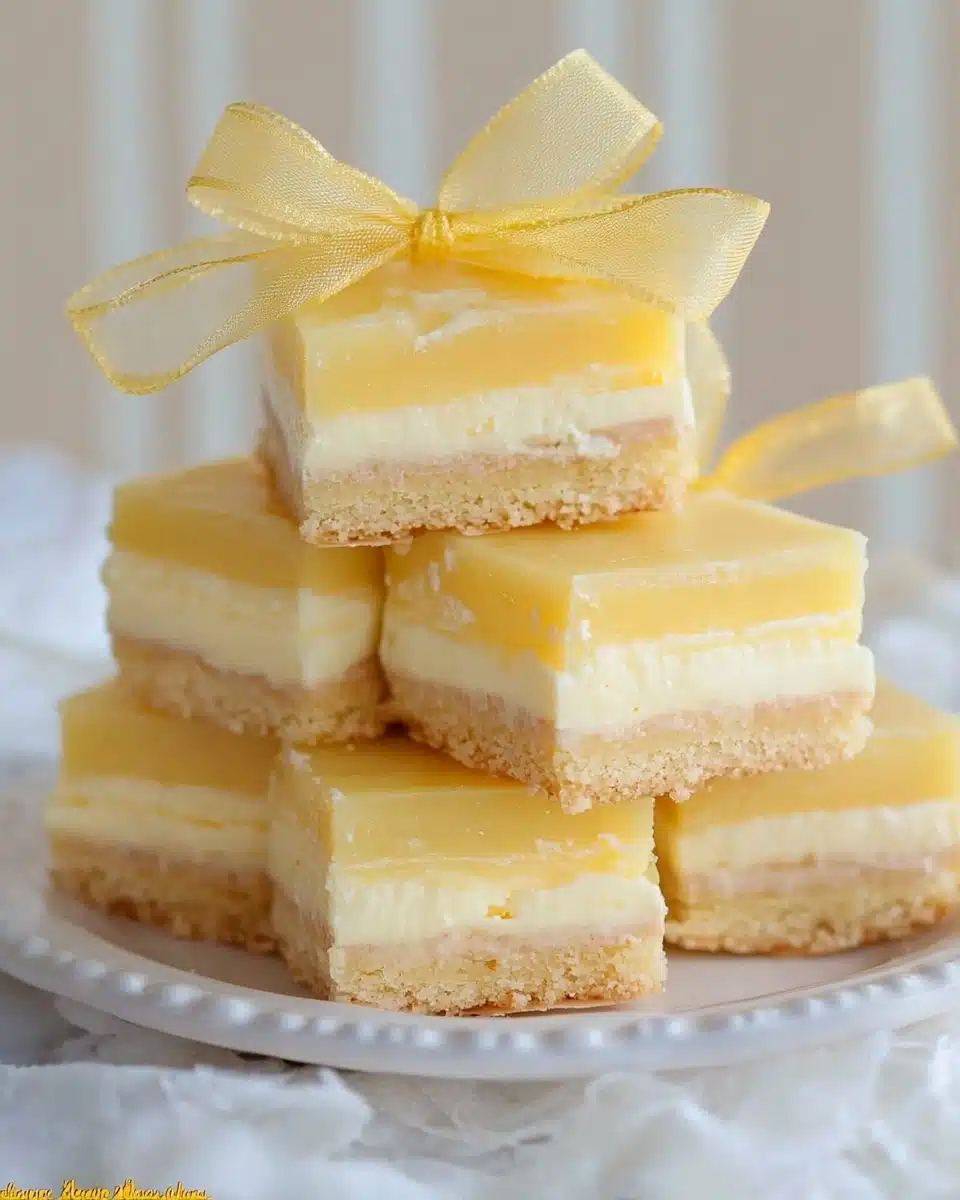
If you dream of desserts that are refreshing, nostalgic, and just a teensy bit over-the-top, these Lemon Ice Cream Bars are about to be your new summer obsession. Imagine soft lemony bars sandwiching a thick layer of creamy vanilla ice cream—zesty, cool, and totally irresistible. They’re easy, craveworthy, and perfect for picnics, birthdays, or whenever a sweet citrus chill is needed!
Why You’ll Love This Recipe
- Ultra Simple: Uses a boxed lemon bar mix and store-bought ice cream, so dessert feels effortless but tastes handmade.
- Bright, Tangy Flavor: The lemon bar layers are boldly flavorful, cutting perfectly through the rich, creamy vanilla ice cream.
- Kid (and Adult!) Approved: These Lemon Ice Cream Bars are playful, portable, and guaranteed to be the first treat to disappear at any gathering.
- Freezer-Friendly: Make them in advance and stash in the freezer for instant sunshine on a stick whenever you need it!

Ingredients You’ll Need
The ingredient list for Lemon Ice Cream Bars keeps things delightfully simple, but each item is essential for building those layers of soft, citrusy, creamy bliss. With just a few pantry and freezer staples, you get impressive flavor and texture—bright, buttery, and utterly cool.
- Krusteaz Lemon Bars Supreme Mix: This box has a crust and filling mix, which guarantees that intense lemon zing and a tender base.
- Eggs: They give the lemon bar filling its luscious, almost custardy texture—don’t skip!
- Water: Needed to blend up the filling to smooth, lemony perfection.
- Parchment Paper: For easy lifting and neat layers—no more stuck bars!
- Nonstick Spray: Ensures your bars (and your nerves) come out intact.
- Vanilla Ice Cream: The creamy “filling” for your bars; pick a good quality, classic vanilla for the best flavor contrast.
Variations
Lemon Ice Cream Bars are wonderfully easy to experiment with. Whether you like things extra tangy, dairy-free, or want to play with colors and add-ins, there’s a world of possibilities for customizing this frozen treat to suit any taste or occasion.
- Swap the Ice Cream: Try strawberry, blueberry, or coconut ice cream for a fruity twist that pairs beautifully with lemon.
- Gluten-Free Option: Use a gluten-free lemon bar mix for treats everyone can enjoy—no one will notice the difference!
- Double Lemon: Add a teaspoon of fresh lemon zest to the filling for extra citrus punch.
- Berry Surprise: Sprinkle fresh raspberries or blueberries between the ice cream and lemon layers for bursts of color and flavor.
How to Make Lemon Ice Cream Bars
Step 1: Prepare the Lemon Bar Base
Start by preheating your oven to 350°F and lining a 13×9-inch pan with parchment paper, making sure there’s a little overhang on all sides for easy bar removal later. Give the paper a light spray of nonstick spray. Press the crust mix from the Krusteaz box firmly into the bottom. Bake for about 8–10 minutes—the crust may look pale, but that’s exactly what you want at this stage. Don’t be tempted to let it brown!
Step 2: Whisk and Bake the Lemon Filling
While the crust is in the oven, combine the eggs, water, and lemon filling mix in a bowl. Whisk until smooth, then let the mixture sit while the crust bakes to help develop that signature lemon flavor. Once the crust is ready, give your filling another stir and pour it right over the hot base. Bake for about 25 minutes or until the edges are just turning golden and set. Let cool, then chill in the refrigerator for 1–2 hours—it’s worth the wait!
Step 3: Slice and Soften the Ice Cream
After chilling, use the parchment edges to lift the entire lemon bar slab out of the pan and onto a large cutting board. Carefully slice straight through the middle, horizontally, so you end up with two even 13×9-inch lemon bar layers. Set the top layer aside. Meanwhile, let your vanilla ice cream soften for 15–20 minutes so it’s perfectly spreadable, but not melted.
Step 4: Layer and Freeze
Gently spread your softened vanilla ice cream all over the bottom lemon bar layer, using a spatula to reach right to the edges. You might have a little ice cream left over (snack time!). Place the remaining lemon bar layer gently on top, lining it up as best as you can. Wrap everything tightly with plastic wrap and slide back into the freezer for 2–3 hours, or until the ice cream is completely firm and sliceable.
Pro Tips for Making Lemon Ice Cream Bars
- Slice While Frozen Solid: For the cleanest, sharpest bars, use a large knife dipped in hot water and wipe between slices while the bars are still frozen hard.
- Even Ice Cream Layer: Spoon the ice cream in dollops across the layer before spreading to avoid tearing the lemon bar base.
- Best Lemon Flavor: Letting the filling mixture rest before baking helps the lemon flavor to really pop—don’t skip the pause!
- Gentle Assembly: Use both hands and a large spatula to transfer the top lemon bar layer; it’s delicate but worth it for those gorgeous, even stacks.
How to Serve Lemon Ice Cream Bars

Garnishes
A simple dusting of powdered sugar looks beautiful against the golden lemon layers. For a little flair, add thin twists of lemon zest or a few fresh berries on top just before serving. A tiny sprig of mint is the cherry on top—so fresh!
Side Dishes
Pair these zippy bars with iced tea, strawberry lemonade, or a bubbly spritz for the ultimate summer dessert tray. They also play well with a bowl of mixed fresh fruit or a big scoop of berries in syrup—think simple, juicy, and light.
Creative Ways to Present
Stack the Lemon Ice Cream Bars on a vintage platter lined with parchment, or wrap each in wax paper for picnic-perfect portability. For parties, try cutting them into small “bites” and serve on skewers or cupcake liners. The eye-catching layers really shine arranged in a zigzag across a serving board!
Make Ahead and Storage
Storing Leftovers
Store any leftover Lemon Ice Cream Bars in an airtight container in the freezer. Layer parchment or wax paper between bars if stacking to prevent sticking, and enjoy within a week for the best flavor and texture.
Freezing
These bars are freezer superstars! Freeze them fully assembled, tightly wrapped or in a container, and they’re ready whenever you need a citrusy pick-me-up. Don’t forget to let them sit at room temperature for 2–3 minutes before serving for the perfect bite.
Reheating
Since Lemon Ice Cream Bars are basically an ice cream sandwich, reheating isn’t needed. Just let them thaw briefly until the ice cream softens enough to bite through—no oven required!
FAQs
-
Can I use homemade lemon bars instead of a boxed mix?
Absolutely! If you have a favorite homemade lemon bar recipe, prepare them in the same size pan, chill, and then follow the same steps for splitting and assembling with ice cream. Just make sure your bars are sturdy enough to hold the ice cream layer.
-
What if I don’t have parchment paper?
You really want that easy lift for these bars! If you’re out of parchment, try using heavy-duty aluminum foil and spray it very well with nonstick spray. Carefully lift later to help keep the layers intact.
-
Can these bars be made dairy-free?
Yes! Choose your favorite dairy-free, plant-based vanilla ice cream and a dairy-free lemon bar mix (if available, or make your own). The process is identical and just as delicious.
-
How long do Lemon Ice Cream Bars keep in the freezer?
For the best taste and texture, enjoy your bars within 7–10 days. After that, the ice cream may take on freezer flavors or get icy, but it’s unlikely you’ll have leftovers that long!
Final Thoughts
If you’re ready for a dessert that truly tastes like sunshine, you simply have to try Lemon Ice Cream Bars. They’re a breeze to make and genuinely crowd-pleasing—a treat that’s both a nod to nostalgic lemon bars and a nod to your inner ice cream lover. Let’s make your next gathering (or quiet afternoon) a whole lot sweeter!
Print
Lemon Ice Cream Bars Recipe
- Prep Time: 15 minutes
- Cook Time: 25 minutes
- Total Time: 40 minutes
- Yield: 16 servings
- Category: Dessert
- Method: Baking, Freezing
- Cuisine: American
- Diet: Vegetarian
Description
Indulge in the perfect combination of zesty lemon flavor and creamy vanilla ice cream with these delightful Lemon Ice Cream Bars. A refreshing treat that’s ideal for warm weather or any time you crave a sweet and tangy dessert.
Ingredients
For Lemon Bars:
- 1 package Krusteaz Lemon Bars Supreme Mix, prepared as directed
For Ice Cream Layer:
- 1/2 gallon vanilla ice cream
Instructions
- Prepare Lemon Bars: Stir together water and eggs until well blended. Add lemon filling mix and stir until smooth. Let sit while crust bakes.
- Bake Crust: Press crust mix into a 13×9-inch pan lined with sprayed parchment paper. Bake at 350°F for 8-10 minutes.
- Prepare Filling: Pour filling over hot crust and bake for 25 minutes. Chill for 1-2 hours.
- Layer Ice Cream: Soften vanilla ice cream. Cut lemon bars in half, spread ice cream over bottom layer, top with remaining bars, and freeze for 2-3 hours.
Nutrition
- Serving Size: 1 bar
- Calories: 403 kcal
- Sugar: 48g
- Sodium: 208mg
- Fat: 17g
- Saturated Fat: 9g
- Unsaturated Fat: 5g
- Trans Fat: 0.003g
- Carbohydrates: 56g
- Fiber: 1g
- Protein: 5g
- Cholesterol: 83mg


