
If you’re on the hunt for a dessert that’s got a little bit of everything — sweet, salty, gooey, and crunchy all rolled into one — this Kitchen Sink Cookie Bars Recipe is exactly what you need. I absolutely love how this recipe lets you toss in your favorite mix-ins (hence the name “kitchen sink”) and still comes out perfectly chewy and delicious every single time. Keep reading because I’ll share all my tips to help you nail these bars on your very first try!
Why You’ll Love This Recipe
- All-in-One Bowl: You mix everything by hand in one bowl, which means less cleanup and more time to enjoy your bars.
- Customizable Mix-Ins: You get to throw in whatever treats you have on hand — chocolate chips, pretzels, caramel — you name it!
- Perfect Texture: Thick, chewy, with a slight crunch from the pretzels — it’s the kind of cookie bar that hits all the right texture notes.
- Crowd-Pleaser: Every time I bring these bars to a gathering, they disappear in minutes — it’s the ultimate potluck winner.

Ingredients You’ll Need
Each ingredient plays a key role in building that luscious texture and complex flavor. When you choose quality ingredients, especially the butter and chocolates, you’ll notice a big difference in the final bars. Trust me, the little details make a huge impact!

- Unsalted Butter: Use real butter, not margarine; melting it gently is key to that soft chewy bite.
- Light Brown Sugar: Adds moisture and a subtle molasses flavor — essential for chewiness.
- Granulated Sugar: Provides a bit of crispness around the edges.
- Egg + Extra Yolk: Gives you structure and richness while keeping the bars soft inside.
- Vanilla Extract: Enhances all the flavors — never skip it!
- Baking Soda and Baking Powder: These leavening agents help the bars rise just right without becoming cakey.
- Salt: Balances sweetness and enhances the other flavors.
- All-Purpose Flour: The foundation for your dough — and feel free to add a little more if your mix seems too wet.
- Semi-Sweet Chocolate Chips: A classic that melts beautifully inside the bars.
- Milk Chocolate Chips: Adds a touch of creaminess and additional sweetness.
- Pretzels: Broken up for salty crunch that contrasts perfectly with the sweet.
- Chewy Caramels: Chopped so little pockets of caramel melt into every bite.
Variations
One of the things I love most about the Kitchen Sink Cookie Bars Recipe is how flexible it is. You can swap out ingredients based on what’s in your pantry or to suit different moods and occasions — it’s like a blank canvas for cookie goodness.
- Holiday Twist: Around the holidays, I swap the milk chocolate chips for M&M’s and add a couple of tablespoons inside the dough for a fun pop of color and crunch.
- Nuts: Feel free to throw in chopped walnuts, pecans, or almonds if you want an added nutty texture—my family goes crazy for this addition.
- Gluten-Free: Use a gluten-free all-purpose flour blend to make these bars accessible without sacrificing flavor or texture.
- Vegan: Try replacing butter with a plant-based substitute and use a flax egg instead of regular eggs for a vegan-friendly version.
How to Make Kitchen Sink Cookie Bars Recipe
Step 1: Melt and Mix
Start by preheating your oven to 350°F. Then, gently melt your unsalted butter in a microwave-safe bowl for 20 to 30 seconds — just until it’s melted, not hot or bubbling. I discovered this trick because I once melted butter too much, and it resulted in greasy bars. Once the butter cools a bit, stir in the light brown sugar and granulated sugar using a spatula — don’t reach for a mixer here! Then add in the whole egg, extra egg yolk, and vanilla extract, mixing until everything comes together smoothly.
Step 2: Add Your Dry Ingredients
Sprinkle in the baking soda, baking powder, and salt, mixing lightly to combine. Then add the all-purpose flour and stir until the flour is fully incorporated, forming a thick dough. If you find your dough is too runny and not holding shape, I learned that adding another 1/4 cup of flour really helps without making the bars dry.
Step 3: Mix in the Good Stuff
Now it’s time to add those tasty mix-ins! I love using semi-sweet and milk chocolate chips, chopped pretzels, and chewy caramel pieces — it’s the perfect balance of flavors and textures. Fold these gently into the dough so everything is evenly distributed but not smashed up.
Step 4: Bake to Perfection
Spread your dough evenly into a greased or parchment-lined 9×13” metal pan. For a little showmanship, I like to press a few extra chocolate chips and pretzel pieces right on top before baking. Bake at 350°F for 16 to 18 minutes, but keep an eye on the edges and top — you want a light golden color, and the center should no longer look wet. Depending on your oven, it might take up to 20 minutes. Once baked, place the pan on a wire rack and let the bars cool completely in the pan before slicing.
Pro Tips for Making Kitchen Sink Cookie Bars Recipe
- Gentle Butter Melting: Melt your butter just until it’s barely liquified to avoid greasy dough and cooked egg bits.
- Skip the Mixer: I found stirring by hand helps prevent overmixing, which keeps the bars tender instead of tough.
- Watch Your Oven: Oven temps vary, so start checking at 16 minutes to avoid overbaking and drying out your bars.
- Cool Completely: Cutting too soon makes the bars crumbly; waiting for full cooling keeps them neat and chewy.
How to Serve Kitchen Sink Cookie Bars Recipe

Garnishes
I personally like to sprinkle a tiny pinch of flaky sea salt on top of the bars just before serving — it really brings out the chocolate and caramel flavors. Sometimes, a drizzle of melted chocolate or a few extra caramel pieces on top makes them look stunning for guests.
Side Dishes
These cookie bars go beautifully alongside a big glass of cold milk, a scoop of vanilla ice cream, or even a warm cup of coffee or tea for an afternoon pick-me-up.
Creative Ways to Present
For parties, I’ve served these in a cute basket lined with parchment paper, then topped with fresh berries for a pop of color. Another fun idea is to cut them into bite-sized squares and serve on a platter with toothpicks for easy snacking.
Make Ahead and Storage
Storing Leftovers
Once completely cool, I store any leftovers in an airtight container at room temperature for up to 3 days. After that, they tend to dry out, which is why I usually don’t keep these sitting around too long — they’re just too good!
Freezing
Freezing works great if you want to prep ahead! I wrap the cooled bars tightly in plastic wrap and then place them in a freezer-safe bag or container. They keep well for up to 2 months and thaw quickly at room temperature.
Reheating
To warm up frozen or refrigerated bars, I pop them in the microwave for 10-15 seconds — just enough for that gooey, melty texture to come back without making them soggy. You’ll find they taste almost freshly baked this way!
FAQs
-
Can I use salted butter in this Kitchen Sink Cookie Bars Recipe?
While it’s best to use unsalted butter so you can control the saltiness precisely, you can use salted butter if that’s what you have. Just reduce or skip the additional salt in the recipe to prevent the bars from becoming too salty.
-
What can I substitute for caramel if I don’t have any?
If you don’t have caramel on hand, you can swap in butterscotch chips, toffee bits, or even small peanut butter cups for a similar rich, chewy sweetness. Each will change the flavor slightly, but that’s part of the fun with this kitchen sink style recipe!
-
How do I prevent my Kitchen Sink Cookie Bars from being greasy?
The key is melting the butter gently — if it’s too hot when combined with eggs, it can cause greasiness. Let the melted butter cool a bit before mixing and avoid stirring with a mixer to keep the texture just right.
-
Can I make these cookie bars vegan or gluten-free?
Absolutely! For gluten-free, substitute the all-purpose flour with a trusted gluten-free blend. For vegan versions, use a plant-based butter substitute and replace eggs with flax eggs (1 tablespoon ground flaxseed mixed with 3 tablespoons water per egg). Keep in mind the mix-ins should also be vegan or gluten-free depending on your needs.
-
How thick should the cookie bars be before baking?
Press the dough evenly into a 9×13-inch pan so the thickness is about 1 inch. This helps ensure a chewy center with lightly crisp edges — the perfect balance that makes these bars so irresistible.
Final Thoughts
I used to struggle with finding a cookie bar recipe that was both easy and versatile until I found this Kitchen Sink Cookie Bars Recipe. It quickly became a favorite because it’s forgiving, fun to customize, and always a hit wherever I serve it. I really recommend giving this one a try — whether you’re sneaking a treat for yourself or looking to impress friends at your next get-together, these bars won’t disappoint. Plus, once you master the basic version, you’ll have so much fun making it your own. Happy baking!
Print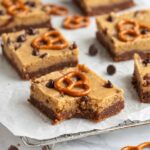
Kitchen Sink Cookie Bars Recipe
- Prep Time: 10 minutes
- Cook Time: 16 minutes
- Total Time: 30 minutes
- Yield: 24 squares
- Category: Dessert
- Method: Baking
- Cuisine: American
Description
These Kitchen Sink Cookie Bars combine a delightful mix of semi-sweet and milk chocolate chips, pretzels, and chewy caramel pieces into thick, soft, gooey, and chewy bars. Made in one bowl without any electric mixers, this easy recipe offers a perfect crowd-pleaser with a wonderful balance of sweet and salty flavors baked to perfection in a 9×13″ pan.
Ingredients
Base Ingredients
- ¾ cup unsalted butter (1 ½ sticks), melted
- ¾ cup light brown sugar
- ½ cup granulated sugar
- 1 large egg + 1 egg yolk
- 2 teaspoons vanilla extract
- 1 teaspoon baking soda
- ¼ teaspoon baking powder
- ½ teaspoon salt
- 2 cups all-purpose flour (add an extra 1/4 cup if dough is too runny)
Mix-ins
- ½ cup semi-sweet chocolate chips
- ½ cup milk chocolate chips (for holiday version, swap for M&M’s and add 2 tablespoons inside dough if desired)
- ½ cup broken pretzels
- ½ cup chewy caramel pieces (such as Kraft or Werther’s Soft), chopped
Instructions
- Preheat the oven. Set your oven to 350°F (175°C) to get it ready for baking the cookie bars.
- Melt the butter. In a medium-sized microwave-safe bowl, melt ¾ cup unsalted butter for about 20-30 seconds until just melted. Allow it to cool slightly if it is steaming to prevent cooking the eggs when added.
- Mix sugars and eggs. Add ¾ cup light brown sugar and ½ cup granulated sugar to the melted butter and stir with a spatula until combined. Then mix in 1 whole egg and 1 extra egg yolk along with 2 teaspoons vanilla extract until fully incorporated. Avoid using a mixer to maintain the desired texture.
- Add leavening agents and salt. Stir in 1 teaspoon baking soda, ¼ teaspoon baking powder, and ½ teaspoon salt, mixing well to combine evenly throughout the batter.
- Incorporate flour. Gradually add 2 cups all-purpose flour and stir until the dough comes together and no flour streaks remain. If the dough is too runny, add up to an additional ¼ cup flour for better consistency.
- Add the mix-ins. Fold in ½ cup semi-sweet chocolate chips, ½ cup milk chocolate chips, ½ cup broken pretzels, and ½ cup chopped caramel pieces until they are evenly distributed throughout the dough.
- Prepare the baking pan. Grease or line a 9×13″ metal baking pan with parchment paper. Press the cookie dough evenly into the pan, smoothing the surface. Optionally, press a few extra mix-ins on top for a decorative touch.
- Bake the bars. Place the pan in the preheated oven and bake for 16 to 18 minutes, or up to 20 minutes depending on your oven, until the edges and top turn lightly golden brown and the center looks set but still moist.
- Cool and slice. Remove the pan from the oven and place it on a cooling rack. Let the bars cool completely in the pan before slicing into 24 squares to serve.
- Store properly. To keep the bars fresh, cover the pan tightly with plastic wrap or transfer the bars into an airtight container. They will stay moist and delicious for up to 3 days at room temperature. For longer storage, consider freezing the bars.
Notes
- These cookie bars are thick, soft, gooey, and chewy – a true crowd favorite!
- Made in one bowl with hand mixing—no electric mixer required.
- If your dough feels too runny, add up to ¼ cup extra flour to achieve the proper consistency.
- For a holiday twist, substitute milk chocolate chips with M&M’s and add extra 2 tablespoons into the dough.
- Use a metal 9×13″ pan for best baking results and easier slicing.
- Cooling completely before slicing is key to clean squares and maintaining bar texture.
- Store bars covered tightly or in an airtight container for up to 3 days to prevent drying out.
- These bars can be frozen for longer storage—wrap well in plastic wrap and foil.
Nutrition
- Serving Size: 1 square
- Calories: 200 kcal
- Sugar: 18 g
- Sodium: 180 mg
- Fat: 9 g
- Saturated Fat: 5 g
- Unsaturated Fat: 3 g
- Trans Fat: 0.2 g
- Carbohydrates: 29 g
- Fiber: 1 g
- Protein: 2 g
- Cholesterol: 23 mg


