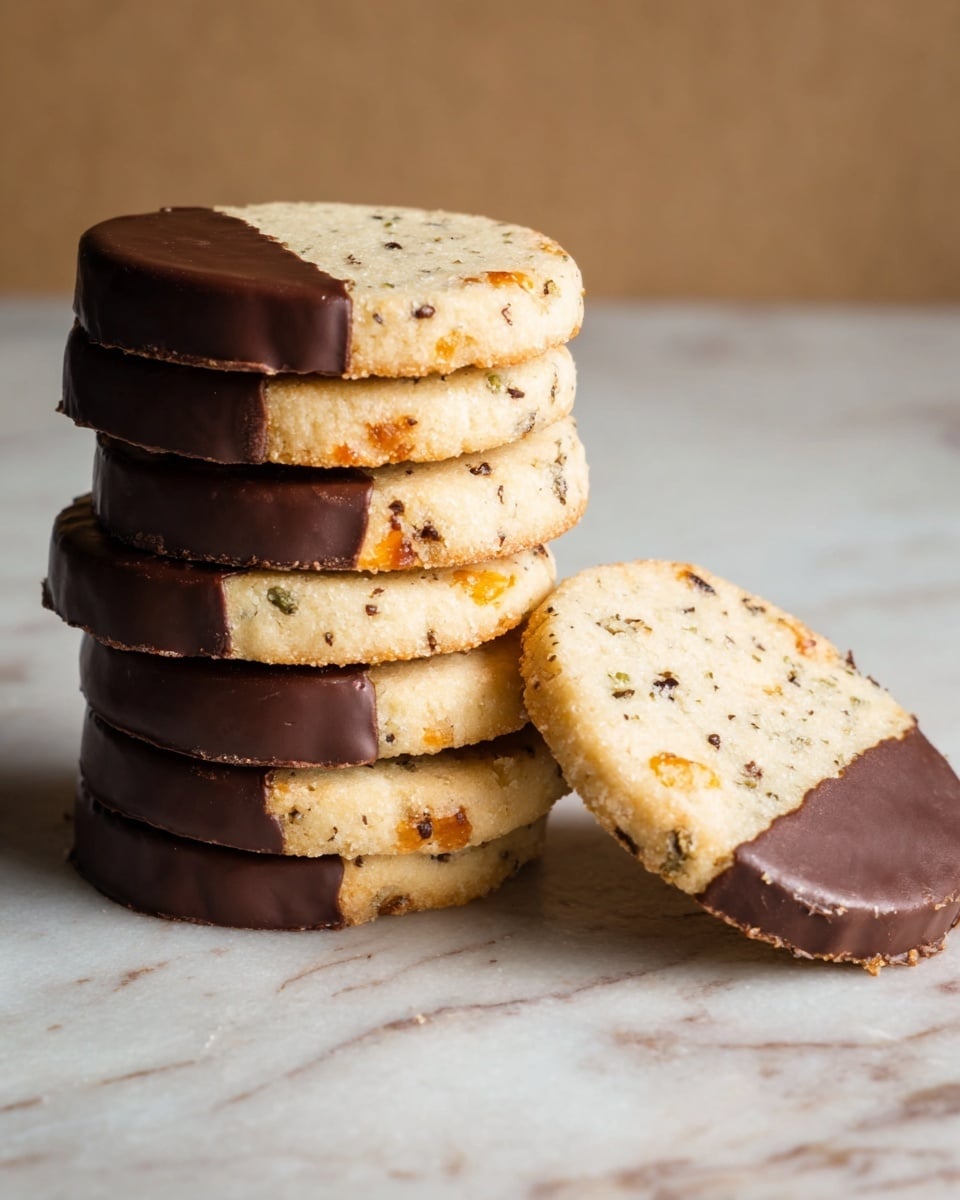
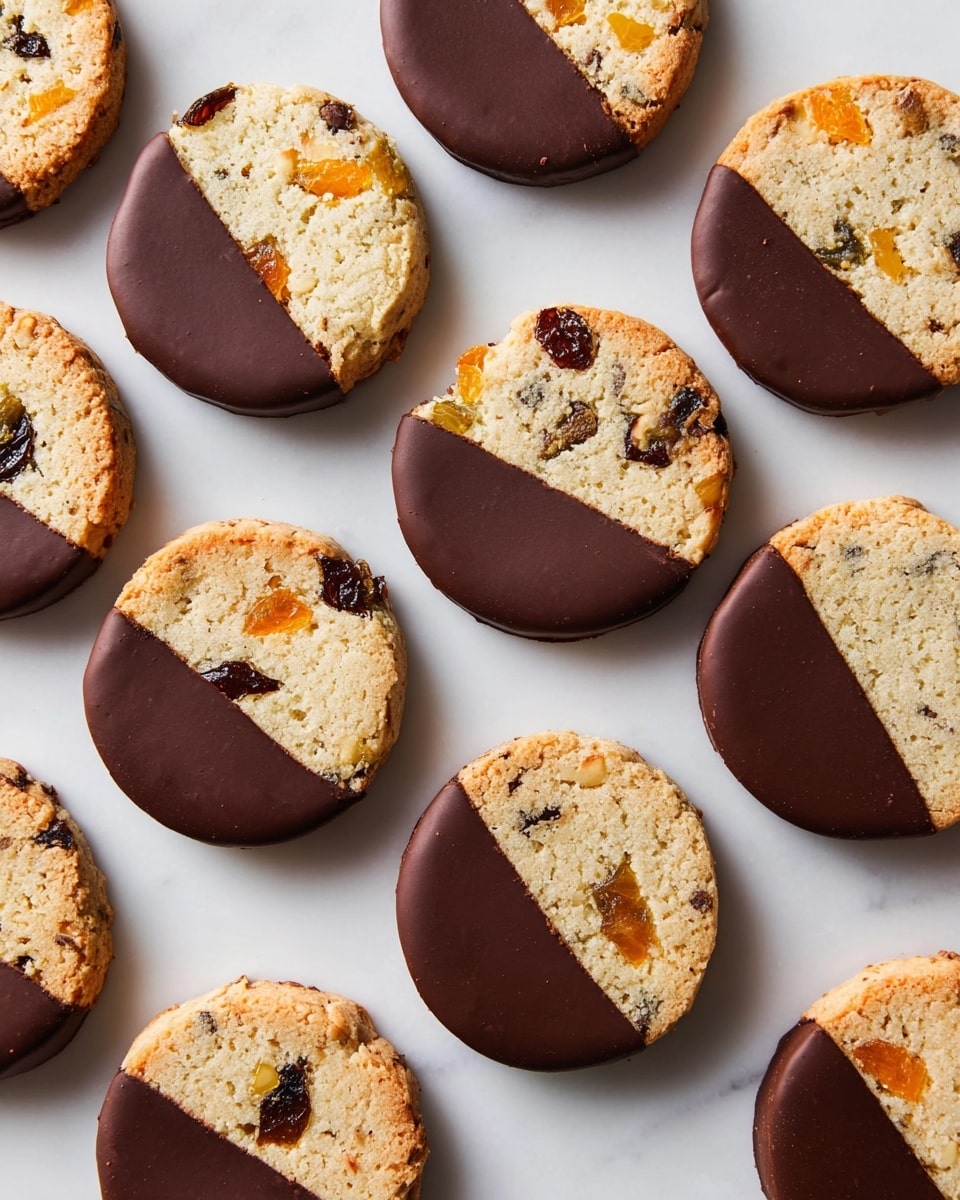
I absolutely love sharing this Jeweled Butter Cookies with Chocolate Glaze Recipe because it’s one of those treats that feels both fancy and approachable. The combination of buttery crumbly cookies studded with colorful dried fruits and nuts makes each bite so festive and satisfying. Plus, the glossy chocolate glaze ties it all together, giving these cookies a gourmet look without any complicated steps.
You’ll find that these cookies work wonderfully for holiday gift-giving, special occasions, or simply when you want to impress friends without breaking a sweat. When I first tried this recipe, I was amazed at how easy it was to roll the dough into cylinders—freezing them makes slicing a breeze, and decorating with the chocolate glaze feels almost therapeutic. I promise, once you try this Jeweled Butter Cookies with Chocolate Glaze Recipe, they’ll become a regular in your baking rotation.
Why You’ll Love This Recipe
- Elegant Yet Simple: You get stunning cookies that look high-end but come together with easy techniques.
- Burst of Flavor and Texture: The pistachios, apricots, and cherries add delightful pops of color and taste in every bite.
- Make-Ahead Friendly: Freezing the dough cylinders means you can bake fresh cookies anytime without the fuss.
- Chocolate Glaze Finish: The silky glaze adds richness and a glossy finish that makes these cookies truly special.

Ingredients You’ll Need
Each ingredient in this Jeweled Butter Cookies with Chocolate Glaze Recipe plays an essential role in creating that perfect balance of buttery richness and nutty, fruity brightness. When you pick out your dried fruits and nuts, look for freshness and bright colors to make your cookies pop both in flavor and appearance.
- Unsalted butter: Using room temperature butter helps you get a creamy texture when creaming with sugar.
- Granulated sugar: Standard granulated sugar creates just the right sweetness and texture for these cookies.
- Egg yolks: They enrich the dough and add depth to the flavor while keeping the texture tender.
- Freshly grated orange zest: The zest adds a subtle citrus aroma that brightens the cookie flavor.
- All-purpose flour: The foundation of the dough; ensures a buttery yet sturdy cookie.
- Baking powder: Adds a touch of lift so the cookies don’t feel too dense.
- Kosher salt: Enhances all the sweet and nutty flavors.
- Pistachios: Roughly chopped for that perfect pop of green and crunch.
- Dried apricots: Their natural sweetness and chew contrast beautifully with the dough.
- Dried sour cherries: These tart cherries add a lovely tartness balancing the sweetness.
- Bittersweet chocolate: Melts into a smooth glaze that adds richness and a shiny finish.
- Neutral oil (like coconut or vegetable): Keeps the chocolate glaze silky and easy to dip.
Variations
I like to mix things up with this Jeweled Butter Cookies with Chocolate Glaze Recipe, depending on the season or occasion. The great part is the dough’s versatility lets you easily swap dried fruits and nuts without losing that signature buttery goodness.
- Nut-Free Variation: I swapped pistachios for toasted coconut flakes once for a nut-free version, and my family devoured them just as fast!
- Seasonal Fruits: You could use dried cranberries or raisins in fall and winter for a cozy twist.
- Spiced Cookies: Adding a pinch of cinnamon or cardamom to the dough gives a warm flavor boost I often enjoy around the holidays.
- White Chocolate Glaze: For a lighter glaze, try melting white chocolate instead—it pairs beautifully with the orange zest.
How to Make Jeweled Butter Cookies with Chocolate Glaze Recipe
Step 1: Cream Butter and Sugar until Fluffy
Start by beating your softened butter and sugar together with an electric mixer on medium speed. I always set a timer for about 2 minutes here because you want the mixture light and fluffy—not just mixed. This aeration is key to those tender cookies. Then, beat in the egg yolks and the freshly grated orange zest until everything’s combined and fragrant. Make sure the butter isn’t too warm, or your dough might get a little greasy here.
Step 2: Add Dry Ingredients and Mix in Nuts & Fruits
Next, mix in the flour, baking powder, and kosher salt until just combined. You want to handle this part gently so the dough stays tender. Toss in the chopped pistachios, apricots, and cherries, and stir or beat just until they’re evenly spread through the dough. I like to give the dough a gentle fold with a spatula at this stage—sometimes the mixer can break up the fruits more than I want.
Step 3: Shape, Chill, and Slice
Divide the dough in half and roll each half into a 2-inch-wide cylinder on plastic wrap. This is a game changer because having two smaller logs is way easier to handle than one huge one. Wrap them tightly and pop them into the freezer for at least 2 hours until solid. When ready to bake, use a sharp knife to cut ¼-inch thick slices from the frozen logs. Too thin, and they’ll bake up crispy; too thick, and they might stay doughy—¼ inch is just right.
Step 4: Bake to Golden Perfection
Arrange the cookie slices on parchment-lined baking sheets, leaving some space because these don’t spread much. Bake in a 350°F oven for around 15 minutes or until the edges just start turning light golden. I always keep a close eye here; you want a slight color around the edges but not too dark—those edges are where the flavor concentrates! Let them cool completely on wire racks before moving on to glazing.
Step 5: Dip in Chocolate Glaze and Set
While the cookies cool, melt the bittersweet chocolate and stir in a teaspoon of neutral oil like coconut or vegetable oil to make the glaze silky and shiny. Transfer to a small glass or ramekin, just wide enough to dip one cookie at a time. Dip each cookie into the chocolate and place on parchment paper to set. Sometimes I refrigerate them for 10 minutes to speed up the process, but room temperature works just fine too. Store the glazed cookies in an airtight container; they’ll stay fresh for about a week.
Pro Tips for Making Jeweled Butter Cookies with Chocolate Glaze Recipe
- Don’t Skip the Chilling: Freezing the dough logs makes slicing precise and the cookie shapes consistent every time.
- Use Fresh Citrus Zest: I learned that fresh zest adds a brightness you won’t get from extracts or dried zest.
- Sharp Knife is Key: A clean, sharp knife slice prevents crumbs and keeps your cookie edges smooth for a professional look.
- Avoid Overbaking: The cookies continue to firm up as they cool, so pull them from the oven when edges just turn golden.
How to Serve Jeweled Butter Cookies with Chocolate Glaze Recipe
Garnishes
I usually leave these cookies just as they are after the chocolate glaze—it’s such a pretty finish! But when I want to add some extra flair, I sprinkle a few finely chopped pistachios or some extra dried fruit pieces on top of the wet chocolate before it sets. Sometimes a tiny touch of sea salt flakes on the glaze adds a delicious contrast, which my family absolutely swoons over.
Side Dishes
These cookies pair so well with a cup of freshly brewed coffee or a robust black tea—perfect for mid-afternoon snacks or after-dinner treats. I’ve also brought these to brunches alongside fruit platters and cheese boards, where the nutty, buttery sweetness really shines in contrast to savory flavors.
Creative Ways to Present
For holiday parties or gifts, I like to arrange these Jeweled Butter Cookies with Chocolate Glaze Recipe in pretty tin boxes layered between parchment paper. Another fun idea is presenting them stacked with ribbons tied around the bundle for a charming, edible gift. A glass cake stand or clear cellophane bags tied with twine also make these beauties look irresistible on dessert tables.
Make Ahead and Storage
Storing Leftovers
I keep leftover cookies in an airtight container at room temperature to preserve their crisp texture and flavor. They stay fresh and just as delicious for about a week, giving you plenty of time to enjoy a few with your coffee or share them with neighbors.
Freezing
Before baking, the dough cylinders freeze beautifully for up to one month. This means you can bake fresh cookies whenever the craving hits without starting from scratch. I’ve also frozen baked cookies (unglazed) wrapped tightly to thaw and glaze later, which still comes out wonderfully.
Reheating
If you want to warm these cookies up, I recommend gently reheating them in a low oven (about 275°F) for 5 minutes. This softens them slightly without melting the chocolate glaze. Avoid microwaving as it can turn the buttery texture greasy or soften the glaze too much.
FAQs
-
Can I use other types of nuts instead of pistachios in the Jeweled Butter Cookies with Chocolate Glaze Recipe?
Absolutely! You can substitute pistachios with walnuts, pecans, or almonds depending on your preference or what you have on hand. Just roughly chop them to maintain that lovely texture contrast in the cookies.
-
How long can I store the cookies after glazing?
Once dipped and glazed, the cookies do best stored in an airtight container at room temperature and will keep well for up to one week. The glaze stays shiny and the cookies remain tender without becoming stale.
-
Is it okay to use dried fruits other than apricots and cherries?
Yes! Feel free to experiment with dried cranberries, raisins, or chopped dates. Just make sure they’re roughly chopped to keep the visual appeal and textural balance that make these cookies “jeweled.”
-
Can I make this recipe without a mixer?
Definitely. You can cream the butter and sugar by hand using a sturdy wooden spoon until fluffy, though it will take more elbow grease and a few extra minutes. The rest of the steps can also be done by hand or with a stand mixer if you have one.
-
What should I do if my chocolate glaze becomes too thick?
If it thickens as it cools, gently warm it over a double boiler or in short bursts in the microwave, stirring frequently. Adding a tiny bit more neutral oil can help loosen it back up to the perfect dipping consistency.
Final Thoughts
This Jeweled Butter Cookies with Chocolate Glaze Recipe is one of those classic treats I always go back to because it strikes the perfect balance of elegance and ease. Whether you’re gifting them or enjoying them curled up with a warm drink, these cookies never fail to delight. I truly hope you give this a try—you might find they become your go-to for making every occasion a little more special. Happy baking, friend!
Print
Jeweled Butter Cookies with Chocolate Glaze Recipe
- Prep Time: 2 hours 10 minutes
- Cook Time: 15 minutes
- Total Time: 2 hours 25 minutes
- Yield: 3 ½ dozen (approximately 42 cookies)
- Category: Dessert
- Method: Baking
- Cuisine: American
Description
These Jeweled Butter Cookies are a delightful blend of buttery richness and vibrant, jewel-like dried fruits and pistachios. Perfectly crisp and tender, they are elegantly finished with a glossy bittersweet chocolate glaze that adds a sophisticated touch. Ideal for holiday gifting or special occasions, these cookies combine bright orange zest and chewy dried apricots and cherries to create a festive, flavorful treat.
Ingredients
For the cookies:
- 1 cup (2 sticks) unsalted butter, at room temperature
- 3/4 cup granulated sugar
- 3 large egg yolks
- 1 teaspoon freshly grated orange zest
- 2 1/2 cups all-purpose flour
- 1/2 teaspoon baking powder
- 1/2 teaspoon kosher salt
- 1/2 cup pistachios, roughly chopped
- 1/2 cup dried apricots, roughly chopped
- 1/2 cup dried sour cherries, roughly chopped
For the chocolate glaze:
- 4 ounces bittersweet chocolate, melted
- 1 teaspoon neutral oil, such as coconut or vegetable
Instructions
- Make the cookies: In a large bowl, with an electric mixer on medium speed, beat the unsalted butter and granulated sugar together until combined and fluffy, about 2 minutes. Add the egg yolks and freshly grated orange zest, then beat until fully incorporated. Gradually mix in the all-purpose flour, baking powder, and kosher salt until just combined. Fold in the roughly chopped pistachios, dried apricots, and dried sour cherries until evenly distributed throughout the dough.
- Shape and chill dough: Divide the dough into two equal portions. Place each portion onto a sheet of plastic wrap and roll into a 2-inch diameter cylinder, forming two smaller logs for easier handling. Wrap tightly and freeze the cylinders until completely solid, approximately 2 to 4 hours.
- Bake the cookies: Preheat the oven to 350°F (175°C). Using a sharp knife, carefully slice 1/4-inch thick rounds from one frozen dough cylinder. Arrange the slices on parchment-lined baking sheets, spacing them evenly. Bake in the preheated oven until the cookies are set and exhibit a light golden color around their edges, about 15 minutes. Remove from the oven and allow to cool completely on wire racks.
- Prepare and apply chocolate glaze: Line two cookie sheets with parchment paper. Stir the neutral oil into the warm melted bittersweet chocolate until smooth. Pour the chocolate mixture into a short glass or ramekin, choosing a vessel wide enough to dip cookies and deep enough to have about 1 1/2 inches of chocolate at the bottom. Dip each cooled cookie halfway into the chocolate glaze, then transfer it to the prepared parchment-lined sheets. Let the chocolate set at room temperature or place the sheets in the fridge to speed up setting.
- Store the cookies: Once the chocolate is fully set, store the cookies in an airtight container. These jeweled butter cookies will stay fresh for up to one week, making them excellent for advance preparation or gifting.
Notes
- For ease of slicing, keep the dough cylinders well frozen; if the dough gets too soft, return it to the freezer before slicing.
- Use high-quality bittersweet chocolate for the best flavor and smoothness in the glaze.
- To vary the dried fruits, try substituting other tart or sweet dried berries or fruits like cranberries or mango pieces.
- Bring butter and eggs to room temperature before starting for optimal mixing and texture.
- Store the cookies in a cool, dry place to maintain their crispness and chocolate coating integrity.
Nutrition
- Serving Size: 1 cookie (based on 42 cookies per batch)
- Calories: 110
- Sugar: 6g
- Sodium: 45mg
- Fat: 7g
- Saturated Fat: 4g
- Unsaturated Fat: 3g
- Trans Fat: 0g
- Carbohydrates: 11g
- Fiber: 1g
- Protein: 1.5g
- Cholesterol: 25mg

