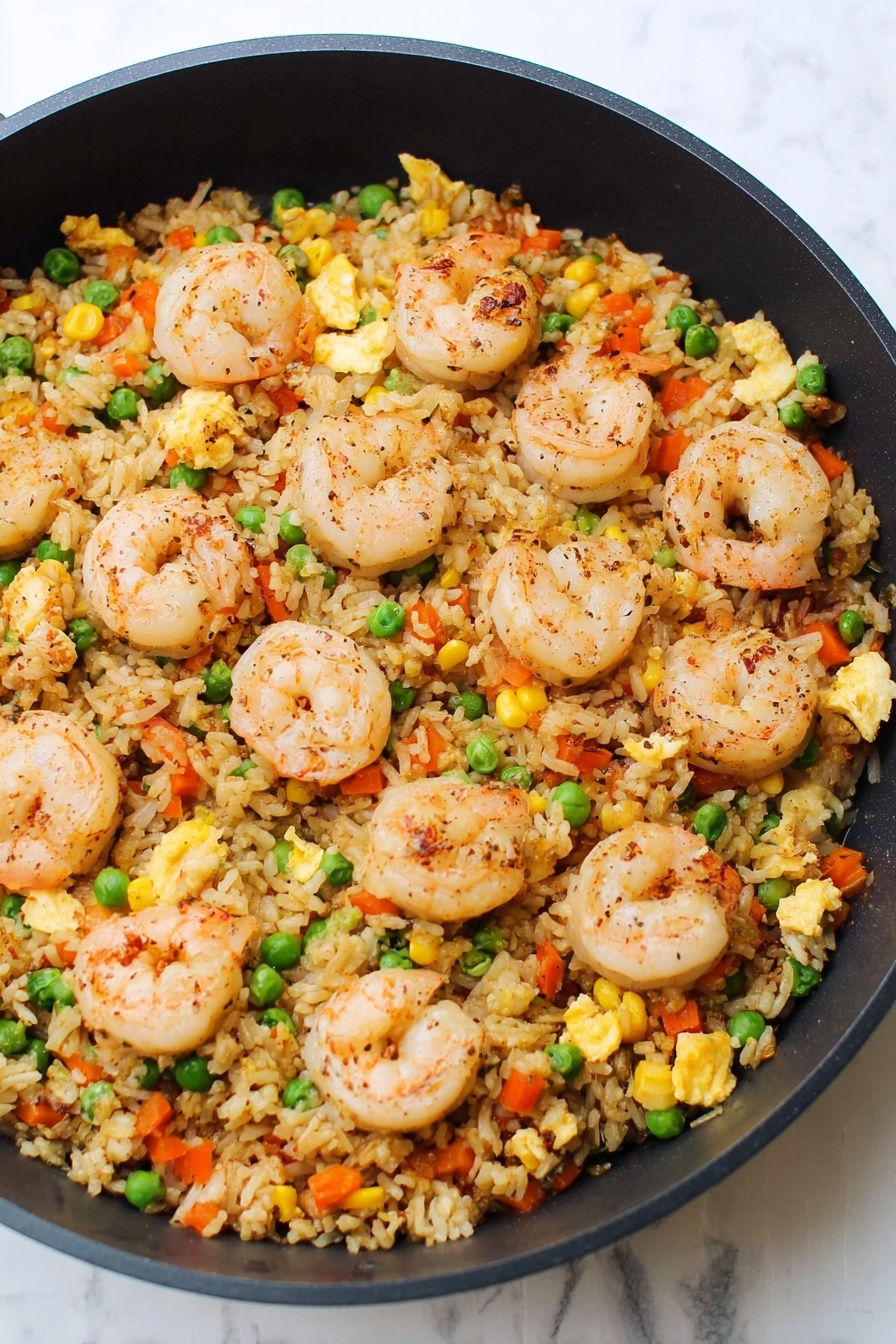
If you’re craving a dish that’s quick, satisfying, and bursting with flavor, you’re in the right place. This Homemade Shrimp Fried Rice Recipe is truly one of my go-to meals when I want something better than takeout — and trust me, it delivers every single time. It’s packed with tender shrimp, colorful veggies, and that perfect balance of savory soy sauce and warming ginger. Stick around because I’m going to take you through exactly how to make this at home, with some little tricks that’ll make you wonder why you ever ordered out.
Why You’ll Love This Recipe
- Super Quick and Easy: You’ll have dinner on the table in just about 20 minutes—no complicated steps.
- Better Than Takeout: It’s flavorful, fresh, and way less greasy than restaurant versions.
- One-Pan Wonder: Minimal cleanup with just one skillet or wok involved—my personal favorite kitchen hack.
- Family Favorite: This recipe is always a hit; my whole crew goes crazy for it every time.

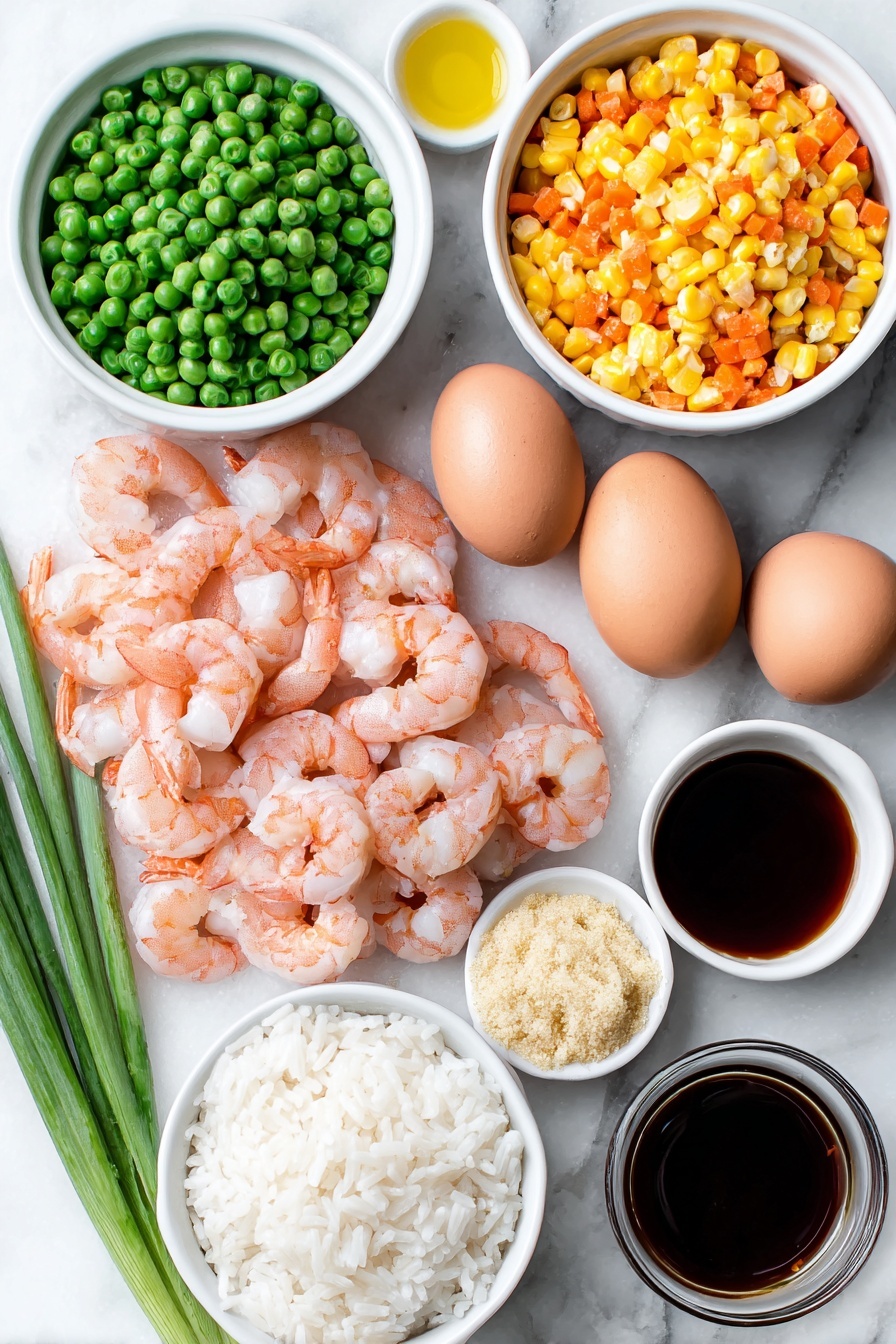
Ingredients You’ll Need
This Homemade Shrimp Fried Rice Recipe brings together simple ingredients that you might already have on hand or can easily grab at the store. The mix of fresh shrimp with frozen veggies keeps things fuss-free but full of texture and color.
- Sesame oil: Adds a toasty, nutty flavor that really makes the rice sing.
- Canola or vegetable oil: Great for high-heat cooking without overpowering the flavors.
- Fresh shrimp: I recommend medium-large size for great texture; peeled and deveined is a time-saver.
- Frozen peas and diced carrots blend: Perfect for convenience—the frozen veggies cook quickly without thawing.
- Frozen corn: I toss it in frozen to save time and retain that sweet crunch.
- Garlic cloves: Finely minced or pressed for maximum punch.
- Ground ginger: Just a pinch adds warmth and a subtle zing.
- Large eggs: Lightly beaten and cooked right in the pan for that silky, scrambled texture.
- Cooked rice: Day-old rice works best here, so the grains don’t clump up and stir fry beautifully.
- Green onions: Thinly sliced for freshness and that mild oniony crunch near the end.
- Low-sodium soy sauce: Balances saltiness without being overwhelming.
- Salt and freshly ground black pepper: To taste, rounding out the seasoning perfectly.
Variations
One of the things I love about this Homemade Shrimp Fried Rice Recipe is how easy it is to tweak. Feel free to make it your own depending on what you have in your fridge or your dietary preferences.
- Vegetarian version: Swap shrimp for firm tofu or extra veggies; I tried this once and was pleasantly surprised how well it soaked up the flavors.
- Spicy twist: Add a dash of sriracha or chili flakes when adding the soy sauce—my family loves the kick.
- Additional veggies: I sometimes toss in bell peppers or snap peas for extra crunch and color.
- Gluten-free option: Use tamari or coconut aminos instead of soy sauce; great for folks avoiding gluten.
How to Make Homemade Shrimp Fried Rice Recipe
Step 1: Cook the Shrimp Just Right
Heat that sesame and canola oil in a large non-stick skillet or wok over medium-high heat. Once shimmering, add your shrimp and cook them for about 3 minutes, flipping halfway through. You’ll know they’re ready when they turn pink and opaque but still feel slightly springy—don’t overcook! Scoop them out with a slotted spoon and set aside, leaving all those tasty oils right in the pan. Trust me, these oils are packed with flavor that’s about to take your veggies and rice to the next level.
Step 2: Sauté the Veggies
Right into the same skillet, toss in your peas, carrots, and corn—frozen works fantastic here since they steam and cook quickly. Stir every now and then and cook for about 2 minutes or until they start to soften but still have a bit of crunch. Then add your minced garlic and ground ginger, stirring through for one more minute. That little ginger hit is what brings a subtle warmth and aroma that I absolutely adore.
Step 3: Cook Your Eggs in the Same Pan
Push your veggies to one side of the skillet and pour the beaten eggs onto the empty side. Scramble gently, stirring occasionally until they’re just set but still soft. This step is quick but adds a lovely richness and texture to the fried rice that I always look forward to.
Step 4: Bring It All Together
Now it’s time to add your cooked shrimp back in along with the rice and green onions. Drizzle soy sauce evenly over everything and sprinkle with salt and black pepper to taste. Stir well to combine all the components. Cook for another 2 minutes, stirring, until everything is heated through and beautifully combined. The rice should be slightly crisp on the edges, and the shrimp warmed back up without getting rubbery—this final step is where all the flavors meld together.
Pro Tips for Making Homemade Shrimp Fried Rice Recipe
- Use Day-Old Rice: Freshly cooked rice can be too sticky; using rice made a day ahead or cooled properly helps get that perfect fried rice texture.
- Don’t Overcook Shrimp: Shrimp cooks quickly; pulling it off the heat early keeps it tender and juicy.
- High Heat Is Key: Cooking on medium-high heat helps get a slight crispiness on the rice without steaming it.
- Keep Stirring But Don’t Overdo It: Stirring frequently prevents burning but letting the rice sit briefly creates those coveted crispy bits.
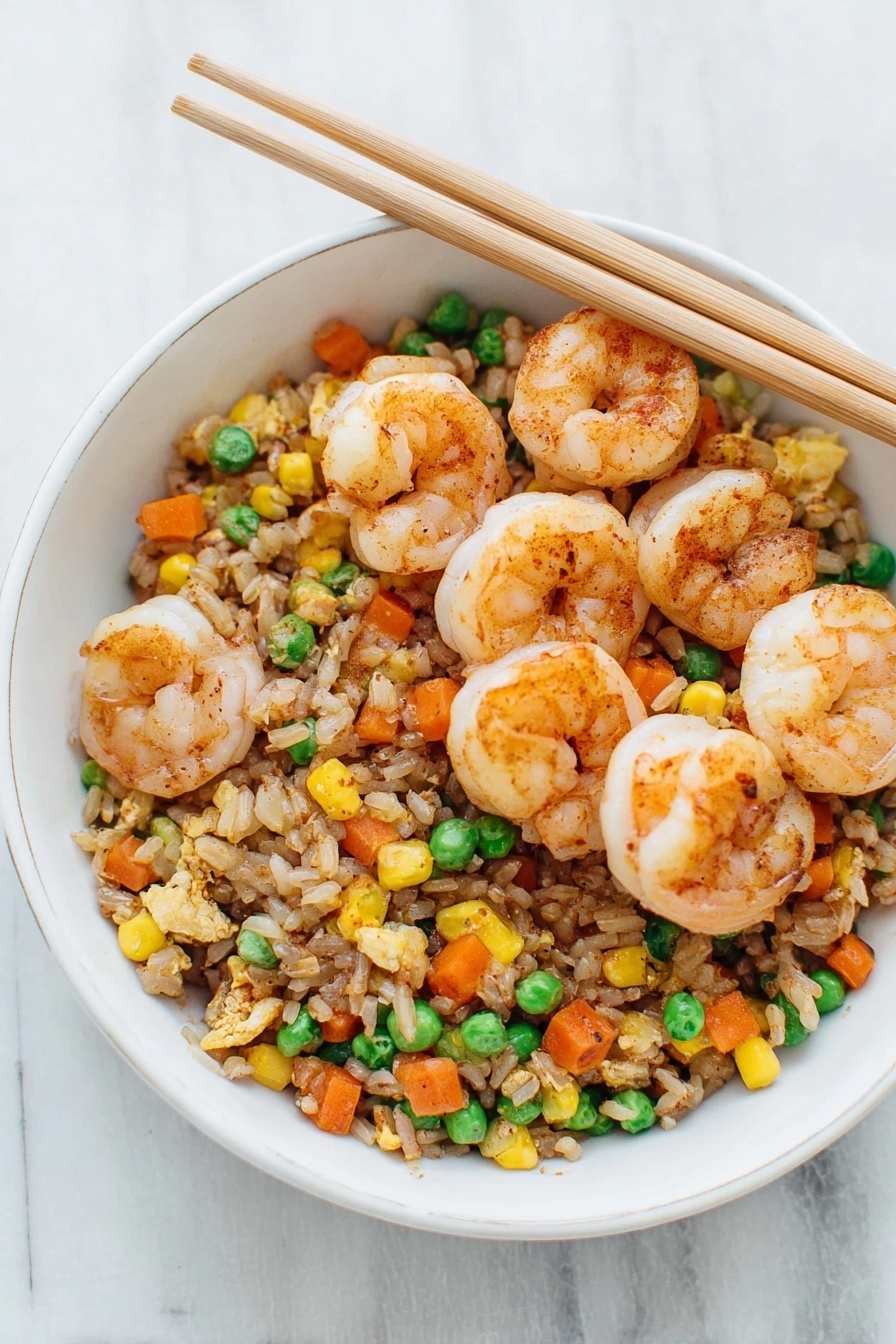
How to Serve Homemade Shrimp Fried Rice Recipe
Garnishes
I love finishing this dish with extra thin slices of green onion for freshness and a sprinkle of toasted sesame seeds for a bit of crunch and nutty flavor contrast. Sometimes I’ll add a wedge of lime on the side for a bright citrus pop that wakes up the entire plate—you should definitely try that!
Side Dishes
This shrimp fried rice is pretty much a full meal on its own, but I enjoy pairing it with steamed or roasted broccoli or a simple cucumber salad to add some crispness. My family also likes some quick pickled veggies on the side for a tangy twist.
Creative Ways to Present
For special occasions, I’ve served this fried rice stuffed inside perfectly hollowed-out bell peppers or in mini cabbage cups—makes for an impressive and fun presentation that everyone loves. Plus, it’s a neat way to portion the dish.
Make Ahead and Storage
Storing Leftovers
After making this recipe, I store leftovers in an airtight container in the fridge. It keeps wonderfully for up to 5 days, making it a great option for easy lunches or quick dinners throughout the week.
Freezing
If you want to stash some away, this shrimp fried rice freezes beautifully. I portion it out, cool it completely, and freeze in freezer-safe containers. When I’m ready to enjoy it again, I thaw it overnight in the fridge for best results.
Reheating
To reheat, I prefer warming it gently in a skillet over medium heat with a splash of water or oil to bring back some moisture and crisp up the rice again. Microwaving works too, but the skillet keeps that fresh-cooked texture.
FAQs
-
Can I use frozen shrimp for this Homemade Shrimp Fried Rice Recipe?
Absolutely! Just make sure to thaw and pat them dry before cooking to avoid excess moisture, which can make the rice soggy. You can thaw shrimp quickly by placing them in a colander under cold running water for a few minutes.
-
What’s the best type of rice to use?
Long-grain white rice or jasmine rice work best here—especially if cooked a day in advance or cooled completely to remove moisture. Freshly cooked rice tends to be sticky and can clump, which isn’t ideal for stir-frying.
-
How do I prevent my fried rice from becoming mushy?
Using day-old rice and cooking on high heat with minimal stirring will help keep your grains separated and slightly crispy. Also, avoid overcrowding the pan as that can cause steaming rather than frying.
-
Can I make this recipe vegetarian?
Yes! Just replace shrimp with tofu, tempeh, or extra vegetables. You might want to add some umami-rich ingredients like mushrooms or a splash of vegetarian-friendly soy sauce for depth.
Final Thoughts
I absolutely love how this Homemade Shrimp Fried Rice Recipe turns out every time—I still remember the first time I made it and realized I’d found a healthier, tastier alternative to takeout. It’s quick, forgiving, and packed with flavor that feels special but is so easy to whip up on any weeknight. If you give this a try, I bet it’ll become a favorite for your family too. Plus, once you master this, you can easily switch up the veggies and proteins to keep it fresh and exciting. Happy cooking, friend!
Print
Homemade Shrimp Fried Rice Recipe
- Prep Time: 5 minutes
- Cook Time: 10 minutes
- Total Time: 15 minutes
- Yield: 4 servings
- Category: Main Dish
- Method: Stovetop
- Cuisine: Asian
Description
This Easy Better-Than-Takeout Shrimp Fried Rice recipe brings restaurant-quality flavors to your home kitchen in just 20 minutes. Loaded with tender shrimp, fresh vegetables, and perfectly seasoned rice, it’s a wholesome, mouthwatering meal that’s quick to make and impossible to resist.
Ingredients
Oils
- 2 tablespoons sesame oil
- 2 tablespoons canola or vegetable oil
Shrimp & Vegetables
- 1 pound medium-large fresh shrimp (cleaned, approximately 15-20 count shrimp)
- 1 cup frozen peas and diced carrots blend (use straight from the freezer)
- 1/2 cup corn (frozen, straight from the freezer)
- 2 to 3 garlic cloves (finely minced or pressed)
- 1/2 teaspoon ground ginger
- 2 to 3 green onions (trimmed and sliced into thin rounds)
Others
- 3 large eggs (lightly beaten)
- 4 cups cooked rice
- 3 to 4 tablespoons low-sodium soy sauce
- 1/2 teaspoon salt (or to taste)
- 1/2 teaspoon freshly ground black pepper (or to taste)
Instructions
- Cook the shrimp: Heat the sesame and canola oils in a large non-stick skillet or wok over medium-high heat. Add the cleaned shrimp and cook for about 3 minutes, flipping halfway through, until pink and just cooked through. Avoid overcooking. Use a slotted spoon to remove shrimp and set aside on a plate, leaving the oil and juices in the skillet.
- Sauté the vegetables: Add the frozen peas, diced carrots, and corn directly to the skillet. Cook for about 2 minutes, stirring occasionally, until the vegetables begin to soften.
- Add aromatics: Stir in the minced garlic and ground ginger, cooking for about 1 minute while stirring occasionally to release their fragrance.
- Scramble the eggs: Push the cooked vegetables to one side of the skillet. Pour the beaten eggs into the empty side and scramble them gently, stirring as needed until fully cooked.
- Combine ingredients and season: Return the cooked shrimp to the skillet, add the cooked rice and sliced green onions. Evenly drizzle the soy sauce over the mixture, season with salt and freshly ground black pepper. Stir well to combine all ingredients evenly.
- Finish cooking: Cook the mixture for about 2 more minutes, stirring occasionally, until the shrimp is heated through and flavors meld. Serve warm for best taste.
- Storage tips: This fried rice keeps well airtight in the refrigerator for up to 5 days or can be frozen for up to 4 months. Reheat gently as desired to preserve texture and flavor.
Notes
- 🥡🍤🍚 One-skillet meal ready in 20 minutes—you’ll never want takeout again!
- Homemade tastes WAY BETTER: full of flavor, not greasy, and loaded with tender shrimp.
- Use leftover rice that’s been chilled for best texture in fried rice.
- Adjust soy sauce quantity to taste, especially if using regular instead of low-sodium version.
- Don’t overcook shrimp to keep them tender and juicy.
Nutrition
- Serving Size: 1 serving
- Calories: 450 kcal
- Sugar: 4 g
- Sodium: 882 mg
- Fat: 18 g
- Saturated Fat: 3 g
- Unsaturated Fat: 15 g
- Trans Fat: 0 g
- Carbohydrates: 58 g
- Fiber: 4 g
- Protein: 14 g
- Cholesterol: 142 mg


