
If you’ve ever thought about skipping the endless store-bought bags and diving into something truly special, then you’ll absolutely adore this Homemade Marshmallows Recipe. I’m telling you, once you try making these at home, you’ll be hooked on the pillowy softness and that light vanilla kiss that simply can’t be replicated by anything from the grocery aisle. It’s a bit of a labor of love, but the payoff? Next level marshmallows that my family goes crazy for and I can’t wait for you to experience too.
Why You’ll Love This Recipe
- Perfect Texture: The marshmallows come out pillow-soft and just springy enough, unlike store versions that can be overly chewy or stale.
- Simple Ingredients: Using just a handful of pantry staples, you can easily whip these up anytime without hunting for specialty items.
- Make-Ahead Friendly: These set at room temperature and keep beautifully airtight, so you can prepare in advance for any occasion.
- Customizable Flavor: Starting with pure vanilla, you can easily tweak this recipe with your favorite extracts or add-ins like peppermint or cocoa.

Ingredients You’ll Need
The beauty of this Homemade Marshmallows Recipe is that it revolves around straightforward ingredients that work harmoniously to create that iconic fluffy texture. I always recommend getting the best pure vanilla you can find—it truly elevates the final flavor.

- Confectioners’ sugar: This is key for dusting so your marshmallows won’t stick together—don’t skip this step.
- Cornstarch: Blended with confectioners’ sugar, it helps give that classic matte finish and keeps the marshmallows from being too sticky.
- Unflavored gelatin: The magic powerhouse that gives marshmallows their structure—make sure it’s fresh for best results.
- Cold water: Divided, some is for blooming the gelatin, others for the syrup—starting with cold ensures the right texture.
- Light corn syrup: It prevents sugar crystals from forming, which keeps your marshmallows smooth and tender.
- Granulated sugar: The main sweetener that caramelizes just enough in the syrup to add depth without messing up the softness.
- Salt: A pinch balances the sweetness perfectly—you won’t taste it but you’ll notice its impact.
- Pure vanilla extract: Adds that comforting aroma and warmth to your marshmallows; feel free to experiment with other extracts too!
Variations
I love how versatile this Homemade Marshmallows Recipe can be. Once you’ve nailed the classic, it’s fun to play around and customize to suit your taste or dietary needs. You’ll find these twists can make for fantastic gifts or festive treats.
- Chocolate Marshmallows: I whisk in some cocoa powder towards the end and sprinkle mini chocolate chips on top before setting—chocolate and marshmallows? Pure bliss.
- Flavored Extracts: Try peppermint or almond extract instead of vanilla for seasonal flavors that wow your guests.
- Vegan Option: While this recipe uses gelatin, I’ve experimented with agar-agar—though it requires a slightly different process, and the texture is a bit different but still delightful.
- Fruit Swirls: Adding a spoonful of fruit puree or jam layered into the marshmallow mixture gives a burst of fresh flavor and gorgeous color every time I’ve tried it.
How to Make Homemade Marshmallows Recipe
Step 1: Prepare Your Pan and Gelatin
Start by generously spraying a 9×13-inch glass or ceramic pan with nonstick spray—I avoid metal pans here because they can affect the flavor. Next, sift together the confectioners’ sugar and cornstarch, then lightly dust the pan with some of this mixture; this prevents sticking later. Pop the remaining mixture aside for coating the marshmallows after they set. Now, in your stand mixer bowl, combine the gelatin with half a cup of cold water. Whisk it on low to bloom—the gelatin will start softening as you prepare your syrup. This step is critical to getting that perfect marshmallow texture!
Step 2: Cook the Sugar Syrup Just Right
Into a heavy-duty saucepan, add the remaining cold water, corn syrup, granulated sugar, and a pinch of salt. Stir gently over medium heat until the sugar dissolves. Attach a candy thermometer, and watch carefully—the key is to bring it to the “soft ball stage” (235–240°F or 113–116°C). As it heats, brush down any sugar crystals from the sides with a moistened pastry brush to avoid crystallization. Patience here is your friend because this syrup is the backbone of your marshmallows!
Step 3: Combine and Whip Into Fluffy Perfection
After cooking, remove the syrup from heat and let it rest for 5 minutes (this helps to stabilize it). Then, with your mixer on low, slowly pour the hot syrup into the gelatin mix—go slow and steady because the mixture is scorching! Once combined, crank the speed up to high and whip for 10-15 minutes until you see a thick, glossy white mixture forming. This part always mesmerizes me, watching it transform from syrupy to fluffy cloud. In the final minute, add your vanilla extract—this infuses the marshmallows with that classic, comforting flavor we all crave.
Step 4: Setting and Cutting Your Marshmallows
Pour or spoon your marshmallow mixture into the prepared pan, smoothing the top with a spatula. Let it sit uncovered at room temperature—yes, patience is required here!—for at least 6 hours, preferably up to 48 for optimal firmness. When ready, dust a cutting surface with your remaining sugar-cornstarch blend. Loosen the edges from the pan, invert the whole thing carefully onto the dusted surface, and then cut into fun squares (I go about 1.5-inch each). To get clean cuts, I dip my knife in hot water and dry it between slices. Don’t forget to roll edges in the dusting mix so they’re no longer sticky—this little step changed my marshmallow game.
Pro Tips for Making Homemade Marshmallows Recipe
- Use a Candy Thermometer: I learned early on that eyeballing the syrup temperature just doesn’t work—the accuracy is what makes or breaks your marshmallows.
- Avoid Humidity: Making these on a humid day affected my last batch, making them gooey instead of fluffy—plan accordingly for best results.
- Sharp Knife Tricks: Running the blade under hot water and wiping dry helps you slice clean, smooth marshmallows that look professional.
- Don’t Skip Dusting: Coating your pan and your finished marshmallows in the sugar-cornstarch blend is key to easy removal and handling—trust me on this one!
How to Serve Homemade Marshmallows Recipe

Garnishes
I usually keep it simple with a light dusting of powdered sugar or a pinch of cinnamon sugar for a subtle twist. For parties, I’ve dipped the ends in melted chocolate and sprinkled crushed nuts or festive sprinkles, which always gets compliments and adds a fun texture.
Side Dishes
Marshmallows pair beautifully with cozy drinks—think hot chocolate, chai lattes, or even a warm cup of coffee. For a treat, serve them alongside a graham cracker crust or homemade brownies for an impromptu s’mores platter your friends will rave over.
Creative Ways to Present
I’ve wrapped individual marshmallows in cellophane tied with colorful ribbons for gifts, and for holiday gatherings, arranging them in clear jars layered with festive candies creates an eye-catching dessert centerpiece that’s both pretty and tasty.
Make Ahead and Storage
Storing Leftovers
I store leftover marshmallows in an airtight container at room temperature, placing parchment paper between layers. They keep wonderfully for up to two weeks, staying soft and fresh without drying out. Just be sure to keep them somewhere cool and dry to avoid any stickiness or melting.
Freezing
Freezing homemade marshmallows worked surprisingly well for me—just wrap them tightly in plastic wrap, then place in a freezer-safe bag. When you’re ready, thaw at room temperature and they’re good as new, perfect for stocking up ahead of holidays or big batches.
Reheating
If you want that freshly made softness back, popping marshmallows in the microwave for 5-10 seconds can revive their pillowy texture. Just watch closely so they don’t melt—this quick trick comes in handy when you’ve stored leftovers or thawed frozen batches.
FAQs
-
Can I make Homemade Marshmallows Recipe without a candy thermometer?
While it’s technically possible, I don’t recommend it. The precise temperature of the sugar syrup is crucial to getting that perfect marshmallow texture, and eyeballing can lead to either too soft or overly hard results. Investing in a good candy thermometer is a game changer here.
-
How long do homemade marshmallows last?
When stored properly in an airtight container with layers separated by parchment paper, homemade marshmallows last about two weeks at room temperature. Avoid humidity and heat to keep them fresh and soft.
-
Can I add flavors other than vanilla?
Absolutely! Vanilla is classic, but you can swap in peppermint, almond, or even coconut extract for a fun twist. Just add the flavor in the last minute of whipping to keep the texture perfect.
-
Why did my marshmallows turn out sticky or didn’t set properly?
This often happens if your syrup didn’t reach the correct temperature or if the marshmallows were made on a humid day. Make sure you’re cooking to the soft ball stage and allow enough time for setting in a dry, cool environment.
Final Thoughts
I still remember the first time I made these Homemade Marshmallows Recipe—they completely transformed how I felt about marshmallows altogether. There’s something so satisfying about pulling together a treat from simple ingredients and watching it become something magical. Whether you’re looking to elevate your hot chocolate game, craft handmade gifts, or just indulge in a sweet kitchen adventure, I can’t recommend this recipe enough. Give it a try and prepare for endless smiles and “wow” moments from everyone lucky enough to taste your homemade magic.
Print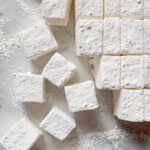
Homemade Marshmallows Recipe
- Prep Time: 35 minutes
- Cook Time: 15 minutes
- Total Time: 6 hours 50 minutes
- Yield: 54 marshmallows (about 54-60 pieces)
- Category: Dessert
- Method: Stovetop
- Cuisine: American
Description
This recipe guides you through making homemade marshmallows that are incredibly soft, pillowy, and flavorful with a delicate vanilla touch. Unlike store-bought versions, these marshmallows have a perfect sweetness and texture, making them ideal for snacking, hot chocolate, or desserts. The recipe requires some patience for setting but delivers a rewarding, fresh treat that lasts up to two weeks when stored properly.
Ingredients
For Dusting
- 1/3 cup (40g) confectioners’ sugar
- 3 Tablespoons (24g) cornstarch
Main Ingredients
- 3/4 ounce (21g) unflavored gelatin (3 standard 1/4-ounce packets)
- 1 cup (240ml) cold water, divided
- 1 cup (325g) light corn syrup
- 1 and 1/2 cups (300g) granulated sugar
- 1/4 teaspoon salt
- 1 Tablespoon pure vanilla extract
Instructions
- Prepare the Pan: Generously spray the bottom and sides of a 9×13-inch glass or ceramic baking pan with nonstick cooking spray. Sift together the confectioners’ sugar and cornstarch, then lightly sprinkle some on the pan to dust it. Set aside the remaining mixture for later use.
- Bloom the Gelatin: Place the gelatin and 1/2 cup of cold water in the bowl of a stand mixer fitted with a whisk attachment. Whisk on low speed for 1 minute to combine, then let it sit while you prepare the sugar syrup.
- Make the Sugar Syrup: In a heavy-duty 3-quart saucepan, combine the remaining 1/2 cup water, light corn syrup, granulated sugar, and salt. Stir over medium heat with a wooden spoon until the sugar dissolves. Attach a candy thermometer without touching the pan bottom. Brush down the sides regularly with a water-moistened pastry brush to avoid crystallization.
- Cook to Soft Ball Stage: Without stirring, let the syrup cook until it reaches 235–240°F (113–116°C), soft ball stage on the candy thermometer. Remove from heat and let rest for 5 minutes.
- Combine Syrup with Gelatin: With the mixer on low, slowly pour the hot syrup into the gelatin mixture. Be cautious as the syrup is extremely hot.
- Whip to Marhsmallow Texture: Increase mixer speed gradually to high and whip for 10–15 minutes until the mixture is thick, white, and glossy. Add the vanilla extract during the last minute of whipping.
- Pour and Set: Pour the marshmallow mixture into the prepared pan and smooth the top with a spatula. Let it sit uncovered at room temperature for at least 6 hours or up to 48 hours until firm.
- Cut the Marshmallows: Dust a large cutting surface with the reserved cornstarch/sugar mixture. Loosen edges of the marshmallow from the pan, invert onto the surface, and peel off the pan. Using a sharp knife dusted or wetted and dried as needed, cut into 1.5-inch squares. Roll edges of each square in the dusting mixture to prevent stickiness.
- Store: Store leftover marshmallows in an airtight container at room temperature with parchment paper layers for up to 2 weeks in a cool, dry place.
Notes
- Homemade marshmallows offer a softness and flavor far superior to store-bought varieties.
- This recipe is a great make-ahead treat since marshmallows need a minimum of 6 hours to set and last up to 2 weeks if stored properly.
- Avoid making marshmallows on humid days as high moisture can interfere with setting.
- Use a glass or ceramic baking pan as metal pans may affect the flavor.
- Running the knife under hot water and drying it before cutting helps achieve clean edges.
Nutrition
- Serving Size: 1 marshmallow (approx. 10g)
- Calories: 35
- Sugar: 6.5g
- Sodium: 10mg
- Fat: 0g
- Saturated Fat: 0g
- Unsaturated Fat: 0g
- Trans Fat: 0g
- Carbohydrates: 9g
- Fiber: 0g
- Protein: 0.2g
- Cholesterol: 0mg

