If you’ve ever dreamed of making your own rich, creamy, and perfectly spiced holiday drink, then this Homemade Eggnog Recipe is going to be your new favorite tradition. I absolutely love how this turns out—thick yet smooth, with a gentle warmth from nutmeg and just a hint of vanilla. Trust me, once you try this, you’ll never want to buy store-bought eggnog again. Stick with me, and I’ll walk you through every step so you get it just right!
Why You’ll Love This Recipe
- Ultra Creamy Texture: The combination of cream and milk makes this eggnog indulgently smooth without being too heavy.
- Perfectly Balanced Flavor: A subtle hint of nutmeg and vanilla give it that classic holiday vibe without overpowering.
- Easy to Make & Customize: You can add your favorite alcohol or keep it non-alcoholic—it’s versatile and forgiving.
- Keeps Well in Fridge: Make it ahead and enjoy for days, perfect for holiday parties and cozy nights.

Ingredients You’ll Need
Each ingredient plays an important role in creating that luscious homemade eggnog flavor. Here’s a quick rundown to help you pick the best options and elevate your batch.
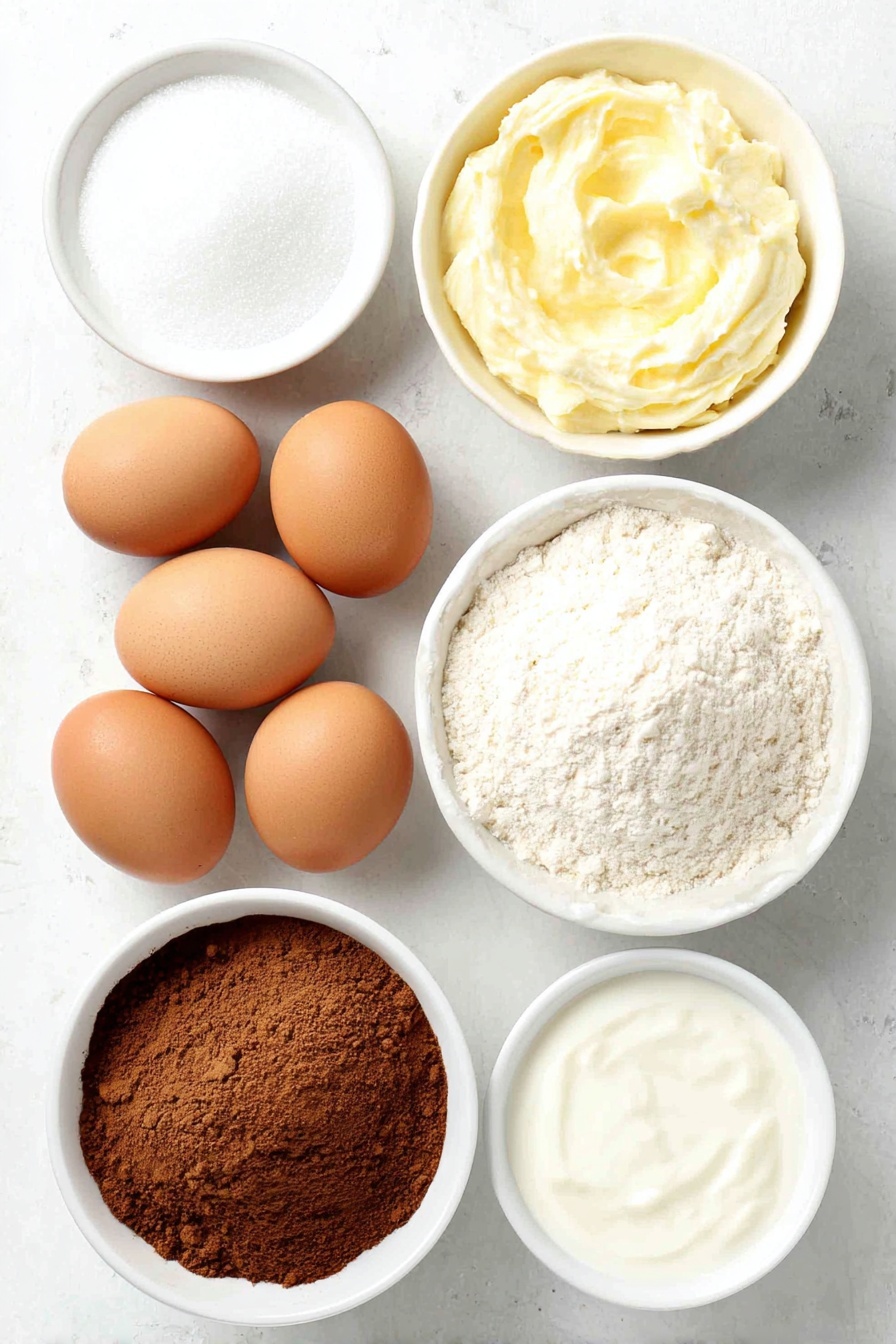
- Egg yolks: Use fresh, large eggs for richness and that silky smooth texture only yolks can provide.
- Granulated sugar: Balances the richness with sweetness, but you can adjust this to your taste.
- Heavy whipping cream: This is what makes the eggnog luxuriously creamy—don’t skip it!
- Milk: I like whole milk here for body, but 2% works if you want a lighter drink.
- Ground nutmeg: Freshly grated nutmeg is a game-changer, but pre-ground works great, too.
- Salt: Just a pinch to deepen and balance the flavors.
- Vanilla extract: Adds warming sweetness and rounds out the spices nicely.
- Ground cinnamon: For sprinkling on top to finish off with that cozy aroma.
- Alcohol (optional): Bourbon, rum, or brandy are classics here—it’s your call to keep it festive or family-friendly.
Variations
I love making this eggnog just as is, but sometimes I switch things up to match the mood or who I’m serving it to. Feel free to customize—it’s one of the best things about this homemade version!
- Alcohol Free: When kids or non-drinkers are around, I skip the alcohol and sometimes add a splash of extra vanilla or cinnamon to keep it special.
- Spiced Up: For extra festive punch, try stirring in a little ground cloves or freshly grated ginger alongside the nutmeg.
- Lightened Version: Swap heavy cream for half-and-half or reduce sugar slightly for a lighter but still satisfying treat.
- Vegan Twist: Use coconut milk and a vegan egg replacer to create a creamy, cozy holiday drink everyone can enjoy.
How to Make Homemade Eggnog Recipe
Step 1: Whisk the egg yolks and sugar until creamy
Start by separating your egg yolks and mixing them with the granulated sugar in a medium bowl. I like to whisk for a good 3-5 minutes until the mixture lightens in color and becomes smooth and creamy. This is the base of your eggnog, so patience here sets you up for success. Make sure no sugar granules remain—that helps the texture a lot!
Step 2: Heat cream, milk, nutmeg, and salt gently
In a medium saucepan over medium-high heat, combine your heavy cream, milk, ground nutmeg, and just a pinch of salt. Stir constantly and watch carefully—when you see tiny bubbles forming around the edges, that’s your cue that it’s almost at a simmer. Turn off the heat at that point, because once it boils, things can quickly get out of control.
Step 3: Temper the eggs for creamy, lump-free eggnog
This is the trickiest but most important part! Slowly and steadily add a big spoonful of the hot milk mixture to the egg and sugar mix, whisking vigorously as you go. This warms the eggs gradually to prevent them from scrambling. Repeat until you’ve added most of the hot liquid. I discovered this trick when I ruined my first batch by adding it all too fast—don’t skip this step or you’ll end up with scrambled eggs instead of silky eggnog!
Step 4: Cook the mixture until just thickened
Pour the tempered egg mixture back into the saucepan and cook over medium-low heat, whisking constantly. After about a minute, you’ll notice it thickens slightly—just like a silky custard. If you have a thermometer, aim for around 160°F. Don’t rush and remove from heat as soon as it thickens; it will continue to thicken as it cools, so patience pays off here!
Step 5: Stir in vanilla and optional alcohol, then chill
Once off the heat, whisk in the vanilla extract and if you’re adding alcohol, this is the moment to pour it in. Pour your eggnog through a fine mesh strainer into a pitcher to catch any bits of cooked egg—this step is a game changer for a smooth finish! Cover with plastic wrap and chill in the fridge for a few hours or overnight. I promise, the flavor only gets better with time.
Step 6: Serve and enjoy
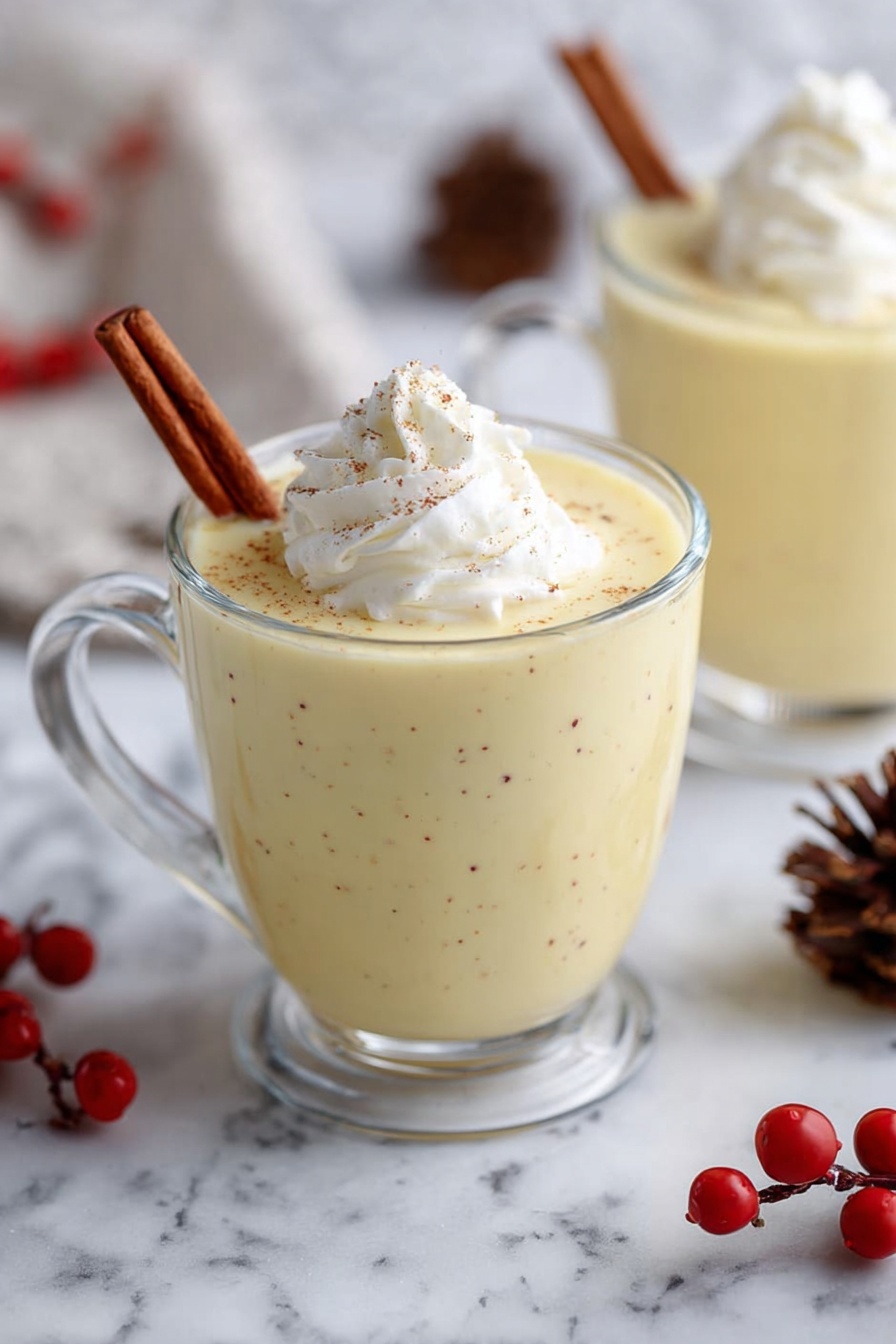
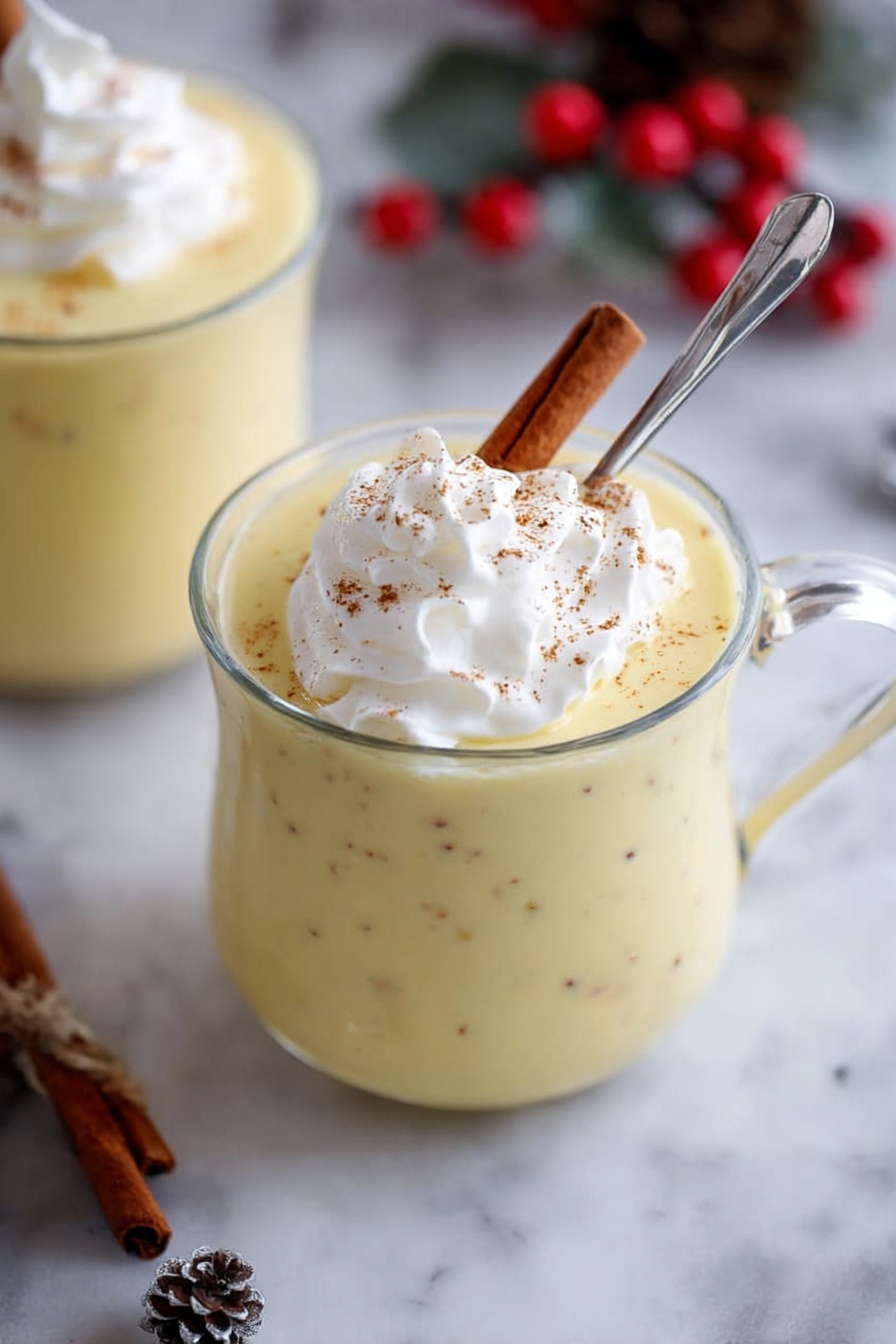
When you’re ready to serve, give your homemade eggnog a gentle stir. If it’s a little thick for your liking, you can blend it with a splash of milk to loosen it up—my family prefers it extra smooth this way. Pour into festive glasses, sprinkle fresh cinnamon or nutmeg on top, and maybe add a dollop of whipped cream if you’re feeling fancy!
Pro Tips for Making Homemade Eggnog Recipe
- Temper Slowly: Rushing with hot milk will scramble your eggs—take your time and whisk constantly.
- Use a Thermometer: Hitting around 160°F helps ensure the eggnog is safe and perfectly thickened without overcooking.
- Strain for Silky Smoothness: Straining through a fine mesh eliminates any tiny cooked bits for that perfect texture.
- Chill Overnight: Flavors deepen and texture improves after resting—make ahead for the best results.
How to Serve Homemade Eggnog Recipe
Garnishes
I’m a big fan of simplicity with garnishes—a fresh sprinkle of ground cinnamon or nutmeg on top really elevates the aroma and flavor. Sometimes I add a cinnamon stick to the glass for stirring, which doubles as a festive straw and makes the presentation feel extra special.
Side Dishes
Eggnog pairs beautifully with classic holiday treats. I like to serve it alongside gingerbread cookies, buttery shortbread, or even a slice of fruitcake. If you’re having a brunch, it’s wonderful with cinnamon rolls or French toast as well.
Creative Ways to Present
For special occasions, I love serving this homemade eggnog in vintage glass mugs or clear heatproof glasses to showcase that creamy texture. Add a dollop of homemade whipped cream and a sprinkle of grated nutmeg on top, with a little decorative evergreen sprig or star anise to set a festive mood. Presentation really brings out the magic!
Make Ahead and Storage
Storing Leftovers
I usually store leftover eggnog in an airtight container in the refrigerator. It keeps beautifully for up to one week, which means you can have this cozy treat ready for days without worry. Just give it a good stir before serving again.
Freezing
Freezing eggnog isn’t my favorite because the texture can change and separate upon thawing. However, if you’re careful, freezing in small portions can work for you, but I recommend consuming fresh for the best taste and consistency.
Reheating
When reheating, do it gently on the stovetop over low heat. Avoid boiling—just warm it enough to take the chill off. Stir continuously and enjoy warm or return to the fridge to chill again. It never quite tastes as fresh as newly made, but this method helps retain that creamy texture.
FAQs
-
Can I make this Homemade Eggnog Recipe without raw eggs?
This recipe gently cooks the eggs to a safe temperature (around 160°F) to eliminate the risk of raw eggs. If you’re still concerned, you can use pasteurized eggs or egg substitutes, but the texture may differ slightly.
-
How long does homemade eggnog last in the fridge?
Stored properly in an airtight container, homemade eggnog will keep for up to one week in the refrigerator. Always give it a sniff and stir before serving to ensure freshness.
-
What alcohol pairs best with homemade eggnog?
Bourbon, rum, and brandy are classic choices that complement the warm spices in eggnog beautifully. I often use bourbon for its smooth vanilla notes.
-
Can I make this recipe dairy-free?
Definitely! Substitute the milk and cream with full-fat coconut milk or your favorite non-dairy milk and use a suitable egg replacer to keep it creamy and festive.
Final Thoughts
Making this Homemade Eggnog Recipe was a turning point for me in holiday entertaining—there’s just something special about the flavor you get when you make it fresh yourself. I hope you’ll give it a try and share it with your family and friends, making memories one cozy glass at a time. It’s such a comforting, classic treat that really brings everyone together, and with these easy steps, I know you’ll nail it on your first go!
Print
Homemade Eggnog Recipe
- Prep Time: 15 min
- Cook Time: 10 min
- Total Time: 25 min
- Yield: 6 servings
- Category: Beverage
- Method: Stovetop
- Cuisine: American
Description
This homemade eggnog recipe is rich, creamy, and infused with the perfect blend of nutmeg and vanilla. Made from scratch using fresh eggs, milk, and cream, it offers a classic holiday treat that’s easy to prepare and customizable with optional alcohol. Serve chilled with a sprinkle of cinnamon or nutmeg for a nostalgic festive delight.
Ingredients
Eggnog Base
- 6 large egg yolks
- 1/2 cup granulated sugar
- 1 cup heavy whipping cream
- 2 cups milk
- 1/2 teaspoon ground nutmeg
- Pinch of salt
- 1/4 teaspoon vanilla extract
Toppings and Optional
- Ground cinnamon (for topping)
- Alcohol (optional, such as rum, bourbon, or brandy)
Instructions
- Whisk Egg Yolks and Sugar: In a medium bowl, whisk together the egg yolks and granulated sugar until the mixture is light in color and creamy in texture, indicating the sugar is well incorporated.
- Heat Milk and Cream Mixture: In a saucepan over medium-high heat, combine the heavy cream, milk, ground nutmeg, and a pinch of salt. Stir frequently and heat the mixture until it reaches a bare simmer, just before boiling.
- Temper the Eggs: To avoid curdling the eggs, slowly add a big spoonful of the hot milk mixture to the egg yolks while whisking vigorously. Repeat this process with additional spoonfuls until most of the hot milk has been incorporated into the eggs.
- Cook the Eggnog Mixture: Pour the tempered egg mixture back into the saucepan and cook over medium heat, whisking constantly for about a minute until the mixture thickens slightly and reaches around 160°F (71°C) on a thermometer. It will continue to thicken as it cools.
- Add Flavorings: Remove the saucepan from heat. Stir in the vanilla extract and, if using, the alcohol of your choice to taste.
- Strain and Chill: Pour the eggnog through a fine mesh strainer into a pitcher or container to remove any cooked egg bits. Cover with plastic wrap and refrigerate until chilled and thickened.
- Optional Blending: For a thinner and smoother consistency, blend the chilled eggnog mixture with 1 or 2 tablespoons of milk until smooth.
- Serve: Serve the eggnog cold, sprinkled with ground cinnamon or nutmeg. Add fresh whipped cream on top if desired.
- Storage: Store leftover eggnog in the refrigerator for up to one week to maintain freshness.
Notes
- This recipe yields thick, creamy eggnog with perfectly balanced flavors and a subtle hint of nutmeg.
- The optional alcohol can be adjusted or omitted depending on preference, making this recipe suitable for all ages.
- Use fresh eggs and maintain proper cooking temperatures to ensure food safety.
- Straining the mixture ensures a smooth, velvety texture.
- Adding whipped cream and extra cinnamon or nutmeg enhances the festive presentation.
Nutrition
- Serving Size: 1 cup (approx.)
- Calories: 307 kcal
- Sugar: 20 g
- Sodium: 58 mg
- Fat: 21 g
- Saturated Fat: 12 g
- Unsaturated Fat: 8 g
- Trans Fat: 0 g
- Carbohydrates: 22 g
- Fiber: 0 g
- Protein: 6 g
- Cholesterol: 246 mg
