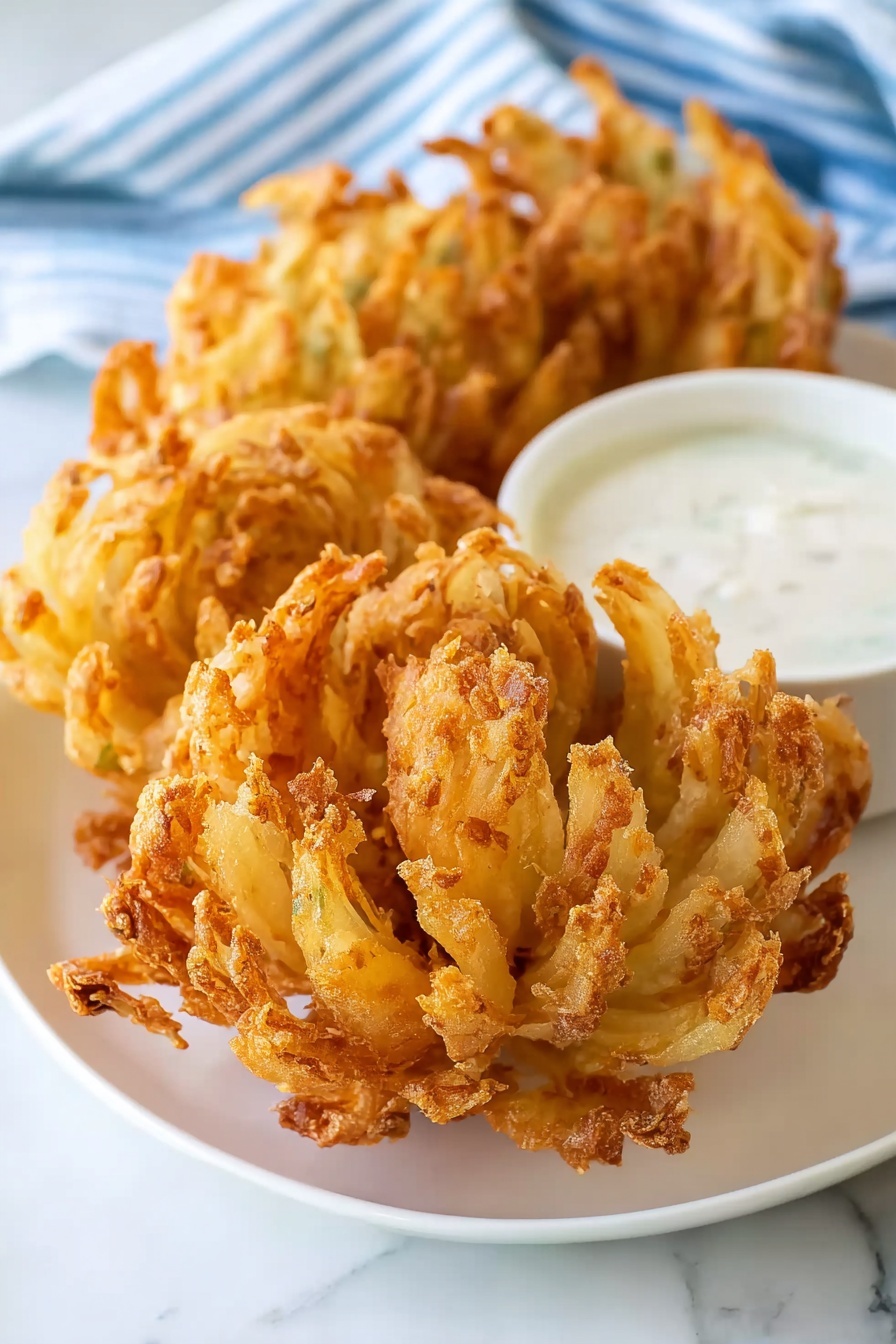
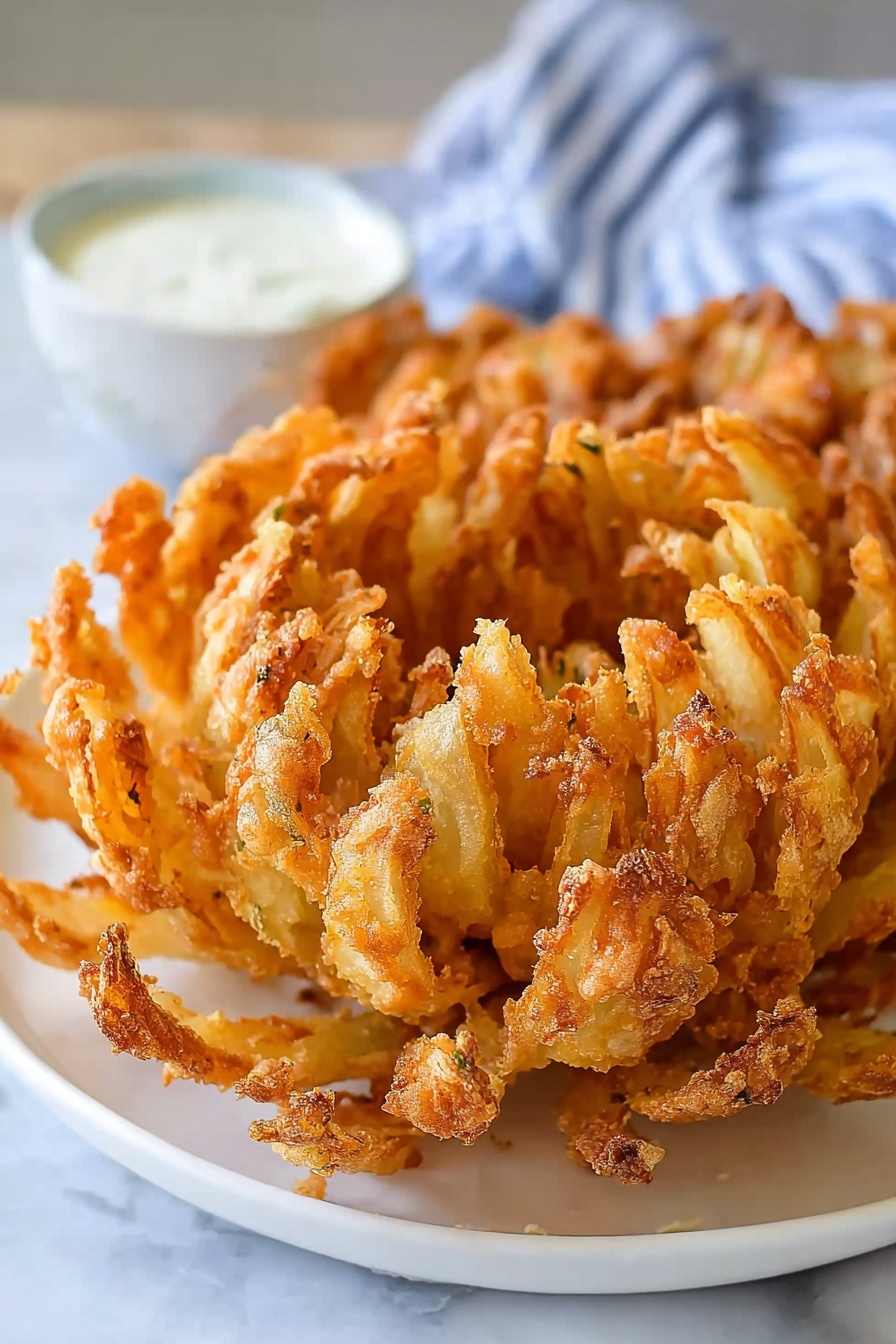
If you’ve ever found yourself craving that irresistibly crispy, flavorful appetizer from your favorite steakhouse, I’ve got just the thing for you. My Homemade Blooming Onion Recipe is not only a total crowd-pleaser but surprisingly easy to make right in your own kitchen. I absolutely love how this turns out—crispy petals, a perfect spicy pop, and that creamy dipping sauce that makes you want to lick your fingers clean. Stick with me, and I’ll walk you through the whole process so your blooming onion comes out golden, crunchy, and downright delicious every time.
Why You’ll Love This Recipe
- Restaurant Quality at Home: You’ll get that exact same crispy, spicy crunch without the drive-thru run.
- Simple Ingredients: No weird stuff—just pantry staples that blend into that signature flavor you know and love.
- Fun to Make: Slicing and breading the onion is almost therapeutic, and you’ll impress anyone you serve it to.
- Versatile Dipping Sauce: The creamy horseradish mayo dip is a total game-changer—and easy to whip up in minutes.

Ingredients You’ll Need
Every ingredient plays a role in making this homemade blooming onion absolutely irresistible. From sweet onions that hold their shape perfectly, to a spice mix that packs just the right punch, I’ve worked out the best balance here—you’ll notice the difference!
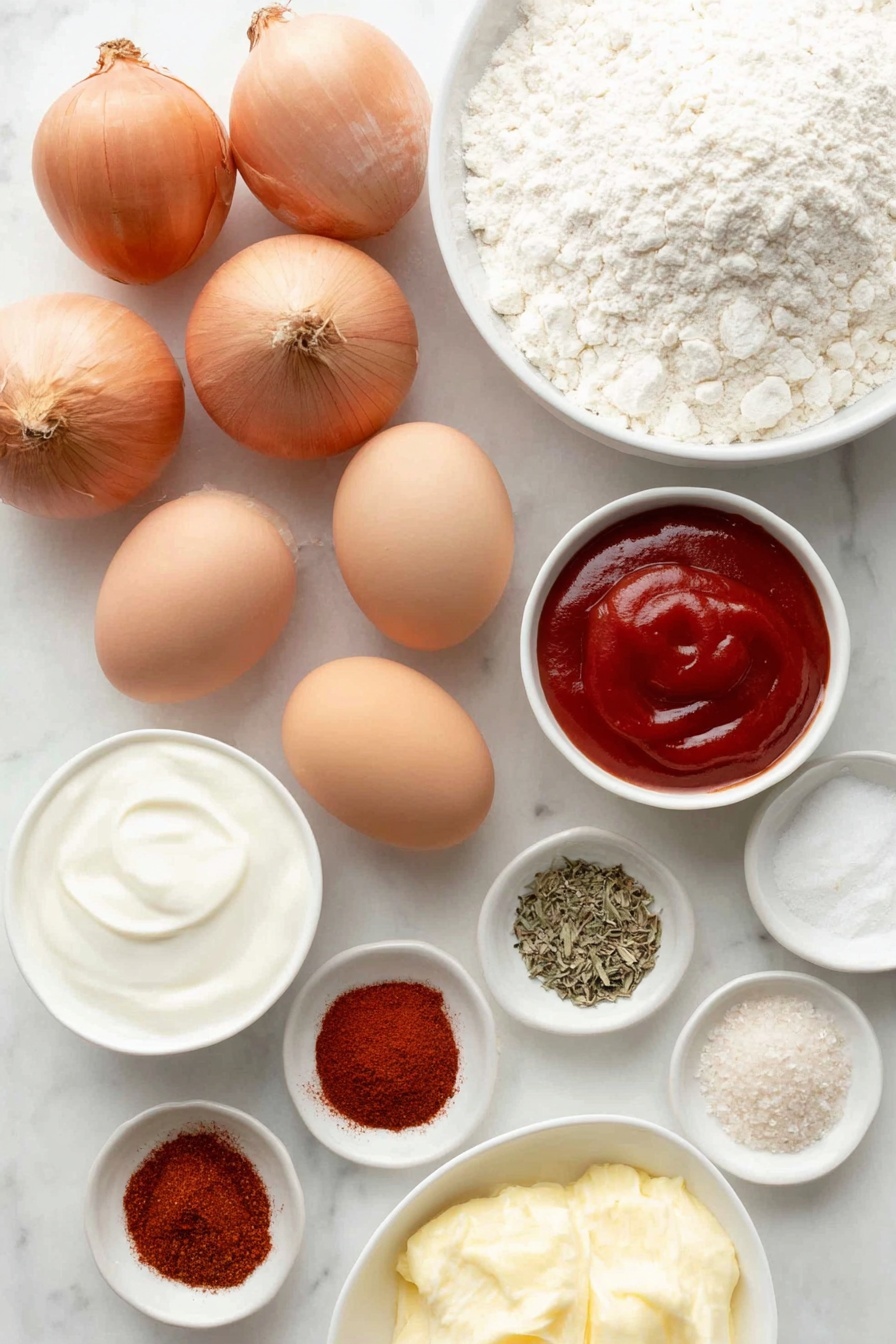
- Mayonnaise: Adds creaminess and tang to the dipping sauce, smoothing out all the spices.
- Sour Cream: Gives the dip a subtle richness and helps keep it cool against the spicy onion.
- Creamy Horseradish: This is the secret kick in the sauce that you’ll want to double next time.
- Ketchup: Adds a hint of sweetness and balances the heat in the dipping sauce.
- Paprika: Used in both the sauce and breading for that smoky depth and beautiful color.
- Garlic Powder: Because garlic and onions? A match made in heaven.
- Cayenne Pepper: Just enough to keep things spicy without overwhelming—adjust to your heat preference!
- Eggs: Help bind the coating so it sticks beautifully to each onion petal.
- Milk: Lightens the egg mixture and makes dipping easier.
- All-Purpose Flour: The base for the crunchy coating; coats the onion evenly for that perfect crisp.
- Ground Cumin, Dried Oregano, Dried Thyme: Earthy herbs and spices that elevate the flavor beyond just salty and spicy.
- Salt and Black Pepper: Essential seasonings to round out the taste.
- Sweet Onions (medium-sized): Their sweetness balances the spicy coatings perfectly. I like Vidalia or Walla Walla.
- Vegetable Oil: For frying—pick something with a high smoke point like canola or peanut oil.
Variations
One of the things I love about this homemade blooming onion recipe is how easy it is to customize. Whether you’re looking to dial up the spice or swap out ingredients for dietary needs, you’ll find this recipe adapts without missing a beat.
- Spice Level Adjustment: I’ve found that adding more cayenne or even a dash of chipotle powder gives it a smoky heat that my family goes crazy for.
- Gluten-Free Version: Swap the all-purpose flour for a gluten-free blend—just keep in mind the texture might be a little different but still delicious.
- Air Fryer Friendly: Tried frying? Me too! If you want a lighter version, air fry the onion at 360°F for about 15 minutes, flipping halfway through.
- Herb Variations: Mix up the herbs by adding rosemary or thyme for a fresher, more aromatic twist I discovered from a friend’s garden!
How to Make Homemade Blooming Onion Recipe
Step 1: Prep Your Dipping Sauce
Start by mixing together the mayonnaise, sour cream, horseradish, ketchup, paprika, garlic powder, and cayenne pepper in a small bowl. I usually make this first and let it chill in the fridge while I prep the onion—the flavors get even better as it sits!
Step 2: Slice the Onion Properly
This step always intimidated me at first, but here’s the trick: cut a small flat spot on the bottom of the onion so it sits steady, then place it flat side down with the root facing up. Slice around the onion, about half an inch from the root, into four quarters. Then, cut each quarter into three or four petals, careful not to cut all the way through the root—this keeps the onion together like a flower. You’ll find it easier to gently fan the petals open after this.
Step 3: Make Your Breading Station
In one bowl, whisk together eggs and milk. In another, mix the flour with all the spices—paprika, cumin, oregano, thyme, salt, cayenne, black pepper, and garlic powder. This spiced flour mix is where the magic happens, coating every petal with bold flavor.
Step 4: Coat the Onion Twice
This is key: first, dredge the onion in the flour mixture, pulling the petals apart carefully so all sides get coated. Then dunk the entire onion in the egg mixture, making sure it soaks in between the petals. Finally, back to the flour mixture for a second coat. Using your hands here makes all the difference—I always get a better coating than if I just try to dust it on.
Step 5: Fry the Onion Until Golden
Heat vegetable oil in a heavy pan over medium-high heat until it reaches 375°F. You only need enough oil to cover the onion partway—usually about 3 inches deep in my pot works great. Fry the onion root side up for about 7 to 10 minutes until the petals turn a gorgeous golden brown. Drain on paper towels and serve immediately with that creamy dipping sauce. It’s best enjoyed fresh!
Pro Tips for Making Homemade Blooming Onion Recipe
- Choosing the Onion: I always pick a large, sweet onion that’s firm with no soft spots to hold the shape well during frying.
- Double Coating Matters: Applying flour, then egg, then flour again creates that signature crispy crust—don’t skip this step!
- Oil Temperature: Use a thermometer to keep oil steady at 375°F; too hot and the crust browns too fast, too cool and it gets greasy.
- Gentle Petal Handling: When coating and frying, handle the onion petals gently to prevent breakage, keeping that “bloom” intact.
How to Serve Homemade Blooming Onion Recipe
Garnishes
I love sprinkling a little extra paprika on top just before serving to brighten the look. Freshly chopped parsley or chives also add a nice color and fresh note that cuts through the richness.
Side Dishes
My family and I often pair this with crispy fries or a simple green salad to balance the indulgence. It’s also fantastic alongside grilled steaks or barbecue chicken for a full, hearty meal.
Creative Ways to Present
For parties, I like to serve the blooming onion perched on a rustic wooden board surrounded by ramekins of different dipping sauces—ranch, spicy aioli, even a tangy blue cheese. It makes for a fun, interactive appetizer that everyone digs into.
Make Ahead and Storage
Storing Leftovers
If you happen to have any leftovers (which is rare at my house!), store the blooming onion in an airtight container in the fridge. It’s best eaten within 1-2 days to keep that crispness.
Freezing
I don’t recommend freezing fried blooming onions as they tend to lose their crunch. However, you could prep the coated onion, freeze it on a baking sheet, then store it in a freezer bag—fry fresh when ready for best taste.
Reheating
To reheat and revive some crispness, pop leftovers in a 375°F oven or air fryer for 5-8 minutes rather than microwaving (which gets soggy fast). This really brings back the crunchy texture you’re after.
FAQs
-
Can I use regular onions instead of sweet onions for this Homemade Blooming Onion Recipe?
Absolutely, but keep in mind sweet onions like Vidalia or Walla Walla have a milder, less sharp flavor and hold their shape better when fried. Regular onions may be a bit more pungent and can fall apart easier, but they’ll still work if you’re careful with slicing.
-
How do I know when the oil is the right temperature for frying?
The best way is to use a candy or deep-fry thermometer and aim for around 375°F. If you don’t have a thermometer, test by dropping a small piece of the flour mixture into the oil—it should sizzle and rise to the surface immediately without browning too fast.
-
Can I bake the blooming onion instead of frying?
You can! Baking at 400°F for about 25-30 minutes or using an air fryer can yield a crispy onion with less oil. It won’t be quite the same as deep-fried but is a great lighter alternative.
-
How do I keep the onion petals from sticking together?
After cutting, gently fanning out the petals carefully before breading helps. You can also use a small brush or your fingers to separate the petals gently during coating to ensure they don’t clump.
Final Thoughts
Making this Homemade Blooming Onion Recipe brought back that excitement of restaurant appetizers—only better, because you made it yourself! I love how versatile and fun this recipe is, and seeing my family’s faces light up when they bite into those crispy petals never gets old. Give it a try this weekend—I promise you’ll feel like a pro chef, and your taste buds will thank you. Plus, it’s a fantastic way to impress friends without breaking a sweat. Happy cooking!
Print
Homemade Blooming Onion Recipe
- Prep Time: 20 minutes
- Cook Time: 18 minutes
- Total Time: 38 minutes
- Yield: 3 blooming onions
- Category: Appetizer
- Method: Frying
- Cuisine: American
Description
This Blooming Onion recipe is a homemade copycat of the iconic Outback Steakhouse appetizer. Featuring crispy, perfectly battered sweet onions fried to a golden brown and served with a tangy creamy dipping sauce, this dish is a crowd-pleaser perfect for game days or family gatherings.
Ingredients
Dipping Sauce
- ¼ cup mayonnaise
- ¼ cup sour cream
- 1 ½ tablespoons creamy horseradish
- 1 ½ tablespoons ketchup
- ½ teaspoon paprika
- ½ teaspoon garlic powder
- ¼ teaspoon ground cayenne pepper
Breading
- 2 eggs
- 1 cup milk
- 2 cups all-purpose flour
- 1 tablespoon paprika
- 2 teaspoons ground cumin
- 1 teaspoon dried oregano
- 1 teaspoon dried thyme
- 1 teaspoon salt
- 1 teaspoon ground cayenne pepper
- ½ teaspoon ground black pepper
- ½ teaspoon garlic powder
Main Ingredient
- 3 medium sweet onions
- Vegetable oil (for frying)
Instructions
- Make the Dipping Sauce: In a small bowl, combine the mayonnaise, sour cream, creamy horseradish, ketchup, paprika, garlic powder, and ground cayenne pepper. Mix well and refrigerate until ready to serve.
- Prepare the Egg Mixture: In a wide and deep bowl that can fit an onion, whisk together the eggs and milk until smooth.
- Mix the Breading: In another wide bowl, combine the all-purpose flour, paprika, ground cumin, dried oregano, dried thyme, salt, ground cayenne pepper, black pepper, and garlic powder. Stir to evenly mix the spices with the flour.
- Cut the Onions: Trim a small flat piece off the non-root end of each onion to create a stable base. Remove any dry or damaged outer peels. Place the onion flat side down on a cutting board with the root end facing up. Using a sharp knife, carefully cut the onion vertically into quarters, cutting about ½ inch from the root so the onion remains intact. Then cut each quarter into 3-4 smaller sections to form the petal-like slices. Turn the onion root side down and gently fan out the slices to resemble a blooming flower.
- Coat the Onions with Flour: Using your hands, carefully dredge the onion in the flour mixture, separating petals as you coat each part well to ensure full coverage.
- Dip in Egg Mixture: Next, dunk the floured onion into the egg and milk mixture, making sure to saturate between the onion petals.
- Final Flour Coat: Return the onion to the flour mixture and coat again thoroughly using your hands for full breading coverage.
- Heat Oil: In a heavy pan, heat vegetable oil to 375°F (190°C). Use enough oil to cover at least half the depth of the onion when placed in the pan.
- Fry the Onions: Carefully place the coated onions root side up into the hot oil. Fry for 7-10 minutes until the onions turn golden brown and crisp.
- Drain and Serve: Remove the fried onions with a slotted spoon and drain on paper towels. Serve immediately with the prepared dipping sauce for best flavor and texture.
Notes
- This recipe replicates the famous Outback Steakhouse blooming onion, making it easy to enjoy this appetizer at home.
- Use sweet onions such as Vidalia or Walla Walla for the best flavor and texture.
- Maintain the oil temperature at 375°F to ensure crispy breading without greasiness.
- For even coating, use your hands to carefully separate the onion petals during breading.
- Serve immediately for optimal crispness, as the breading can soften if left too long.
Nutrition
- Serving Size: 1 blooming onion
- Calories: 638 kcal
- Sugar: 12 g
- Sodium: 1084 mg
- Fat: 25 g
- Saturated Fat: 7 g
- Unsaturated Fat: 16 g
- Trans Fat: 0.04 g
- Carbohydrates: 86 g
- Fiber: 6 g
- Protein: 18 g
- Cholesterol: 138 mg


