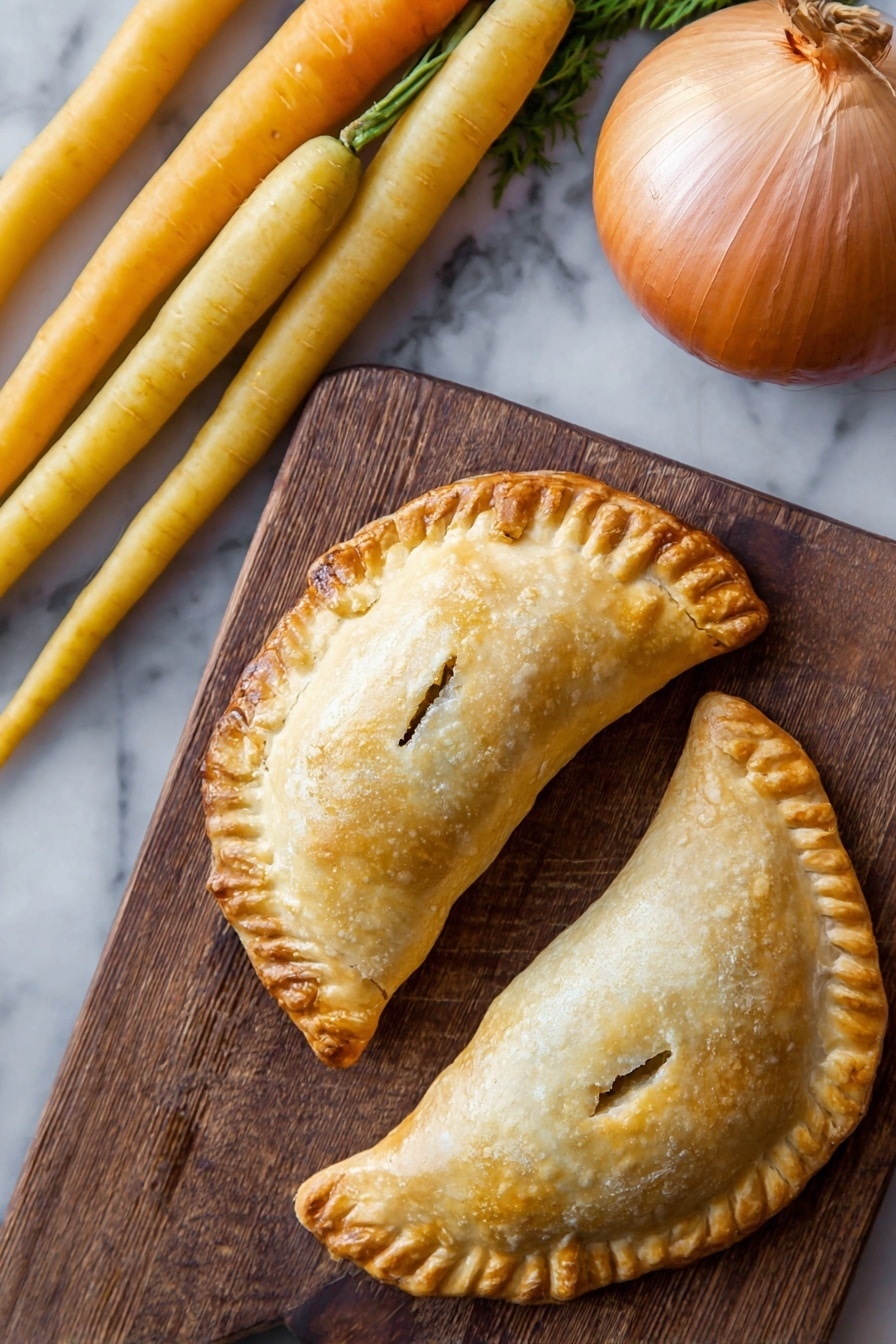
If you’ve ever wished you could carry around all the cozy, comforting goodness of a chicken pot pie without the fuss of a fork and plate, this Handheld Chicken Pot Pie Recipe is your new best friend. I absolutely love how these little pies come together: flaky, buttery crusts filled with a rich, savory chicken and veggie mix that’s as hearty as it is portable. Whether you’re packing lunch, hosting a casual get-together, or simply craving some handheld comfort food, this recipe delivers every single time.
Why You’ll Love This Recipe
- Handheld Convenience: Enjoy classic pot pie flavors without needing a fork or plate.
- Flaky, Buttery Crust: The crust is tender and flaky—perfect for holding all that delicious filling.
- Versatile and Satisfying: Great for lunches, picnics, or cozy dinners any time of year.
- Made From Scratch: My recipe shows you how to make everything homemade, which maximizes flavor and heartiness.

Ingredients You’ll Need
Each ingredient plays a starring role in creating that comfort-food magic. From the rich butter in the crust to the fresh veggies and tender chicken in the filling, these choices ensure your handheld chicken pot pies are packed with flavor and texture. Shopping tip: try to use fresh vegetables and good-quality chicken stock to deepen the flavor.
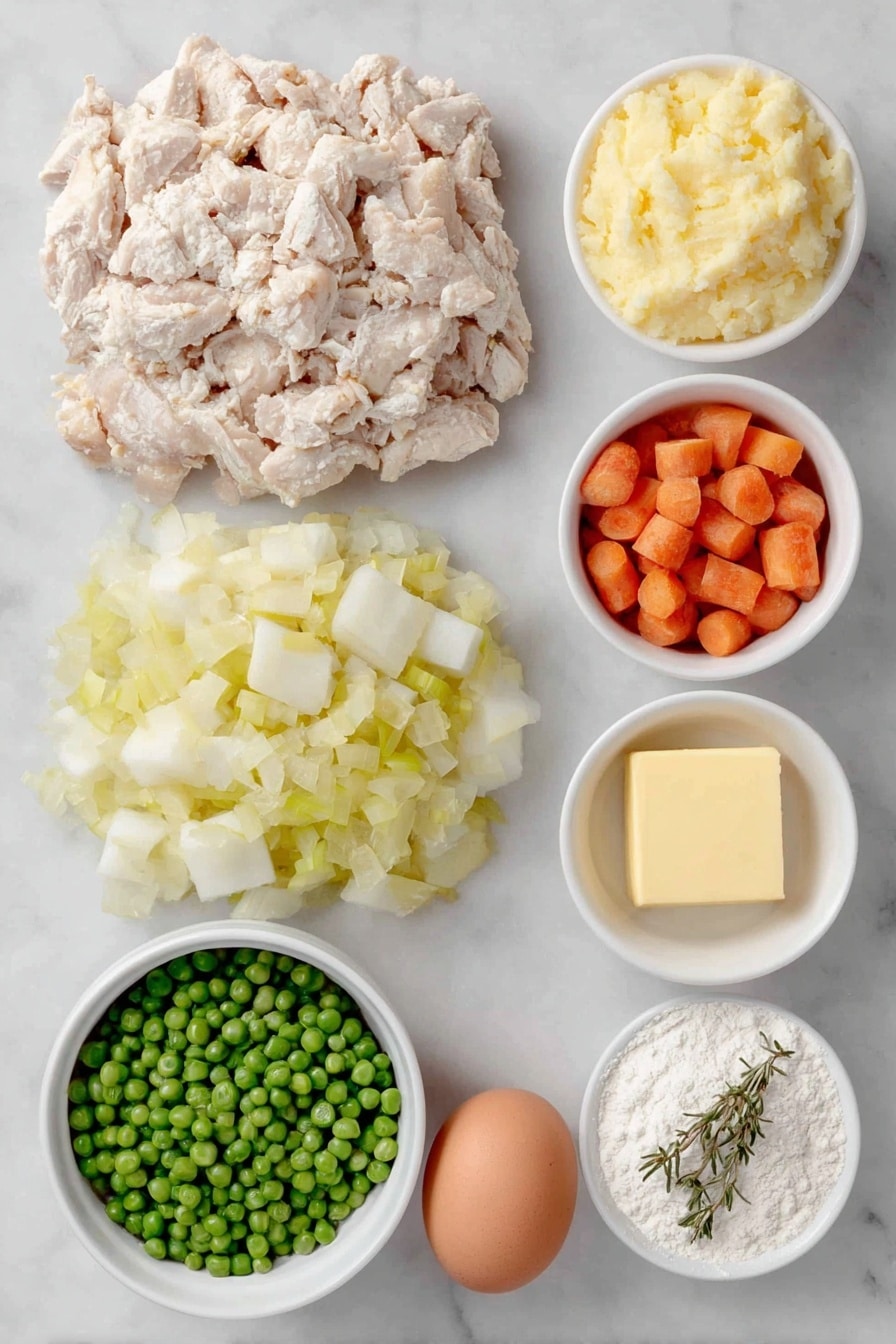
- Unsalted Butter: For the richest crust and a silky filling base; room temperature butter works best for the filling, cold cubed butter for the crust.
- Chopped Celery: Adds a subtle crunch and fresh flavor that balances the richness.
- Chopped Carrot: Sweet bits that soften during cooking and add color.
- Diced Potato: This helps thicken the filling and adds heartiness.
- Chopped Yellow Onion: Brings sweetness once sautéed thoroughly.
- Dried Thyme & Rosemary: These herbs give the filling an earthy, comforting aroma.
- Salt: Essential to bring all the flavors to life.
- Peas (frozen is fine): Bright and sweet, they add a pop of color and freshness.
- Diced Cooked Chicken: The star protein—leftover rotisserie chicken or homemade roasted works beautifully.
- Flour: Used in two ways—thickening the filling and building the crust.
- Chicken Stock: Creates a luscious sauce that brings the filling together.
- All-purpose Flour: For the perfect flaky crust texture.
- Cold Ice Water: Keeps the crust tender and flaky when mixed.
- Egg (plus water for egg wash): Gives the crust a beautiful golden shine.
Variations
I love encouraging you to make this handheld chicken pot pie recipe truly your own. Over time, I’ve played around with swapping veggies and even tried different herbs. You’ll find that small tweaks can make this classic recipe fit your flavor preferences or dietary needs perfectly.
- Vegetarian Version: Swap the chicken for a hearty mix of mushrooms and lentils for an earthy, protein-packed filling; my family enjoyed this twist especially in cooler months.
- Spicy Kick: Adding a pinch of cayenne or swapping rosemary for smoked paprika introduces a warm heat that’s surprisingly addictive.
- Gluten-Free: You can use a gluten-free flour blend for the crust—just be sure to chill it well; I’ve done this and it still turned out flaky!
- Seasonal Veggies: Feel free to add corn in summer or butternut squash in fall to give the pies a seasonal flair.
How to Make Handheld Chicken Pot Pie Recipe
Step 1: Make the Filling
Start by melting half of your butter in a large skillet over medium heat. Toss in the chopped celery, carrot, potato, and onion, stirring occasionally until everything softens, about 10 minutes. Sprinkle in your thyme, rosemary, and salt for fragrant seasoning. After the veggies are tender, stir in the flour to help thicken—the trick here is to cook the flour for a couple of minutes to avoid any raw taste. Slowly pour in the chicken stock while whisking gently, so you get a smooth sauce. Add the peas and cooked chicken near the end, just warming through. This filling is where your handheld chicken pot pie recipe really shines in flavor and texture.
Step 2: Prepare the Crust
While the filling cools a bit, mix your all-purpose flour with the cold, cubed butter. I like to use my fingertips to rub the butter into the flour until the mixture looks like coarse crumbs. This step is crucial for that perfectly flaky crust—you want little pockets of cold butter to create steam as it bakes. Gradually add in the ice water, a tablespoon at a time, just until the dough holds together when pressed (don’t overwork it or your crust will toughen). Wrap your dough in plastic and chill for at least 30 minutes.
Step 3: Assemble Your Handheld Chicken Pot Pies
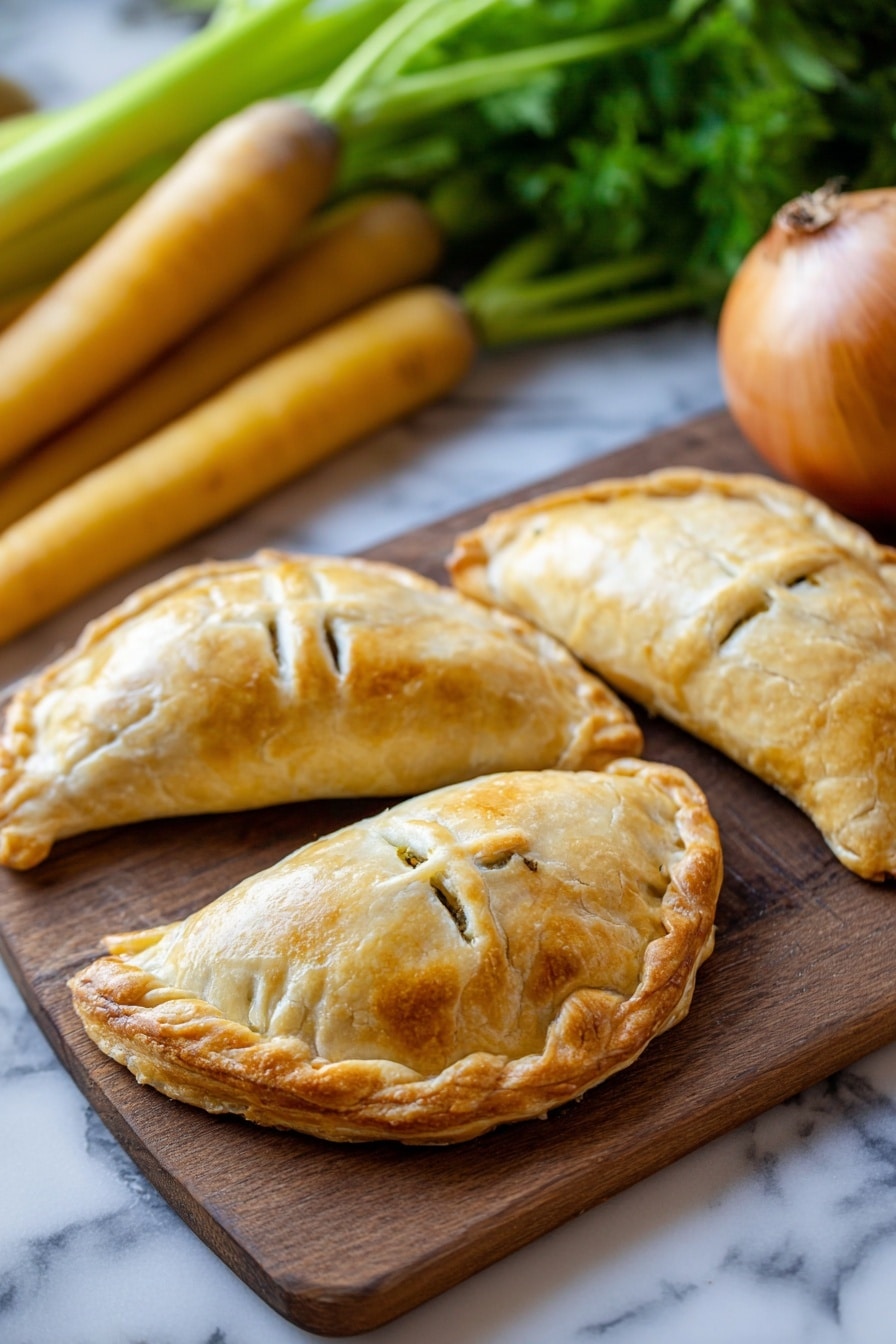
Preheat your oven to 375°F (190°C). Roll out the dough on a floured surface to about 1/8 inch thickness. Use a round cutter or bowl to cut out circles slightly larger than your hand size—mine are around 5 inches across. Spoon generous amounts of filling onto the center of half your dough circles. Brush the edges with egg wash to help seal, then top with another circle. Press around the edges with a fork to seal thoroughly and prevent leaks. Brush the tops with more egg wash for that golden finish and poke small vents with a knife to let steam escape while baking.
Step 4: Bake and Enjoy!
Place your assembled pies on a parchment-lined baking sheet and bake for 35-40 minutes until the crust is golden brown and crisp. Let them rest for about 10 minutes before digging in—this helps the filling set and keeps you from burning your mouth (been there!). These handheld chicken pot pies are best enjoyed warm and fresh, flaky crust and all.
Pro Tips for Making Handheld Chicken Pot Pie Recipe
- Chill Your Dough: I learned the hard way—warm dough ruins flaky crusts. Always chill at least 30 minutes before rolling out.
- Don’t Overfill: Filling spillover can make a mess and soggy crust; use moderate amounts for neat, handheld pies.
- Vent Properly: Cutting small slits on the top crust lets steam escape, avoiding soggy bottoms and surprise bursts.
- Egg Wash Magic: Brushing your pies with egg wash before baking gives that golden, glossy finish that makes these look as good as they taste.
How to Serve Handheld Chicken Pot Pie Recipe
Garnishes
For garnishes, I like to sprinkle freshly chopped parsley or thyme over the pies when they’re just out of the oven—this adds a pop of freshness and brightness that balances the rich filling. If you’re feeling fancy, a dusting of flaky sea salt right after baking enhances the buttery crust flavor even more.
Side Dishes
Pairing these pies with a crisp green salad or roasted seasonal vegetables works beautifully. I often serve them alongside garlicky green beans or a tangy coleslaw to bring some crunch and acidity to cut through the richness.
Creative Ways to Present
For special occasions, I’ve arranged these handheld chicken pot pies on a large wooden board garnished with fresh herbs and lemon wedges. You can also wrap each pie in parchment with a tied ribbon for a charming individual presentation—perfect for potlucks or picnics.
Make Ahead and Storage
Storing Leftovers
I usually store leftover pies in an airtight container in the fridge for up to 3 days. I make sure they’ve cooled completely before refrigerating to keep that crust from getting soggy. When you’re ready, they’re a perfect quick meal or snack!
Freezing
This handheld chicken pot pie recipe freezes beautifully. After assembling, instead of baking, freeze the raw pies individually on a tray, then transfer to a freezer bag. Bake from frozen, adding about 10-15 extra minutes to baking time. This trick saved me on busy nights more times than I can count!
Reheating
Reheat leftover pies in the oven at 350°F (175°C) for about 15 minutes until warmed through and the crust regains some crispness. Avoid the microwave if possible, since it tends to make the crust soggy. Sometimes, I finish with a quick broil for a minute to revive that golden touch.
FAQs
-
Can I use store-bought pie crust for this Handheld Chicken Pot Pie Recipe?
Absolutely! Using store-bought pie crust can save time and still result in delicious pies. Just be sure to handle it gently and keep it cold to maintain flakiness. The homemade crust will add extra buttery depth, but the convenience of store-bought is a great option too.
-
How can I make sure my pot pie filling isn’t too runny?
The key is to cook the flour with the butter and vegetables before adding chicken stock, which creates a roux to thicken the sauce. Also, letting the filling cool and thicken before assembling the pies helps prevent sogginess and runny filling inside your handheld pies.
-
Can I prepare this recipe ahead of time?
Yes! You can prepare the filling and dough separately ahead of time. Store each in the fridge for up to two days. Assemble and bake the pies when you’re ready for fresh, warm handheld chicken pot pies that taste like they’re just made.
-
How long will these handheld pies stay crispy after baking?
They’re best eaten fresh out of the oven to enjoy maximum crispiness. Leftovers refrigerated tend to lose some of their crust crunch, but reheating in the oven helps bring back much of the texture.
Final Thoughts
Honestly, this handheld chicken pot pie recipe holds a special place in my heart because it combines comfort and practicality in such a perfect way. I love how I can whip these up for a crowd or simply enjoy one wrapped in a napkin on a busy day. If you’ve ever struggled with soggy crusts or cumbersome pot pies, give this recipe a try—you’ll find the step-by-step approach makes success easy and deliciously rewarding. I’m confident these pies will become a go-to for your cozy meal repertoire!
Print
Handheld Chicken Pot Pie Recipe
- Prep Time: 30 min
- Cook Time: 1 hr
- Total Time: 1 hr 30 min
- Yield: 8 serving(s)
- Category: Main Dish
- Method: Baking
- Cuisine: American
Description
These Handheld Chicken Pot Pies are a delicious twist on the classic comfort food, featuring a flaky homemade crust filled with a savory mixture of tender chicken, vegetables, and herbs. Perfect for a hearty meal on the go, these individual pies combine the richness of butter and creaminess of chicken stock in the filling with a crisp, buttery crust wrapped around them. Ideal for potlucks, lunches, or family dinners.
Ingredients
Filling
- 6 tbsp. Unsalted Butter, Divided
- 1 cup Chopped Celery
- 1 cup Chopped Carrot
- 1 cup Diced Potato
- 2 cups Chopped Yellow Onion
- 1/4 tsp Dried Thyme
- 1/4 tsp Dried Rosemary
- 1/2 tsp Salt
- 1 cup Peas (Frozen Is Fine)
- 2 cups Diced Cooked Chicken
- 1/2 cup Flour
- 3 cups Chicken Stock
Crust
- 3 3/4 cups All-purpose Flour
- 3 sticks Unsalted Butter, Cubed
- 1/2 to 2/3 cup Cold Ice Water, As Needed
- 1 Egg, Beaten With 1 Tablespoon Water (Egg Wash)
Instructions
- Prepare the crust: In a large bowl, combine the all-purpose flour with the cubed unsalted butter. Using a pastry cutter or your fingers, blend the butter into the flour until the mixture resembles coarse crumbs. Gradually add cold ice water, a tablespoon at a time, mixing just until the dough comes together. Be careful not to overwork the dough. Form the dough into a ball, wrap it in plastic wrap, and refrigerate it for at least 30 minutes.
- Make the filling: In a large skillet, melt 3 tablespoons of unsalted butter over medium heat. Add the chopped celery, carrot, diced potato, and yellow onion. Sauté until the vegetables are tender, about 8-10 minutes. Stir in dried thyme, rosemary, and salt for flavor.
- Add the flour and chicken stock: Sprinkle 1/2 cup of flour over the cooked vegetables and stir to coat. Cook for 1-2 minutes to eliminate the raw flour taste. Gradually pour in 3 cups of chicken stock, stirring constantly to prevent lumps. Simmer the mixture until it thickens to a creamy consistency, about 5-7 minutes.
- Finish the filling: Stir in the peas and diced cooked chicken, then cook for another 2-3 minutes until heated through. Remove from heat and let the filling cool slightly.
- Roll out the dough: On a lightly floured surface, divide the chilled dough into portions appropriate for making 8 individual pot pies. Roll each portion into a circle large enough to create a base and a top for each pie.
- Assemble the handheld pot pies: Place a rolled dough circle on a baking sheet lined with parchment paper. Spoon a generous amount of the chicken filling onto the center, leaving space around the edges. Cover with another dough circle and press the edges together to seal. Use a fork to crimp the edges and create a decorative border. Cut small slits on top of each pie to allow steam to escape.
- Apply egg wash: Brush the tops of each pot pie with the beaten egg mixed with water to give them a golden, glossy finish when baked.
- Bake: Preheat the oven to 375°F (190°C). Bake the pies for about 40-45 minutes, or until the crust is golden brown and cooked through. Remove from the oven and let cool for a few minutes before serving.
Notes
- This post is dedicated to the crust lovers of the world.
- For a flakier crust, ensure the butter stays cold until baking.
- Use cooked chicken leftover from a roast or rotisserie chicken for convenience.
- Cut small vents on top to prevent filling from spilling during baking.
- Make sure not to overfill the pies to avoid bursting during baking.
- You can prepare the filling a day ahead and refrigerate it before assembling the pies.
Nutrition
- Serving Size: 1 handheld pot pie
- Calories: 480 kcal
- Sugar: 4 g
- Sodium: 650 mg
- Fat: 28 g
- Saturated Fat: 16 g
- Unsaturated Fat: 10 g
- Trans Fat: 0.3 g
- Carbohydrates: 38 g
- Fiber: 4 g
- Protein: 25 g
- Cholesterol: 95 mg


