
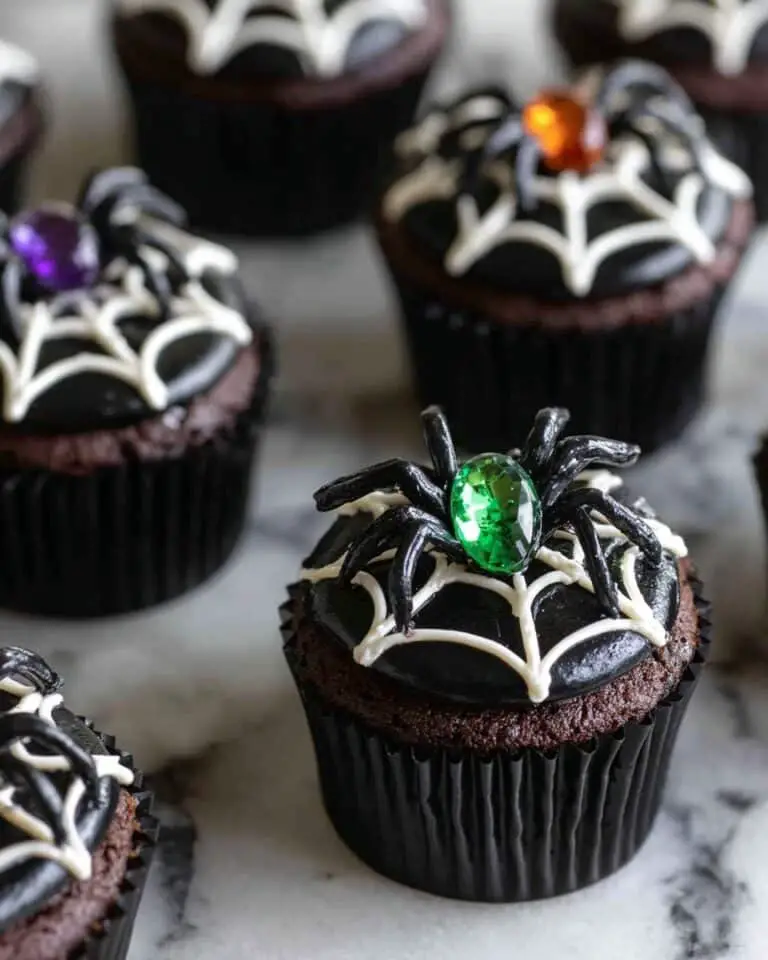
If you’re on the hunt for a fun, festive, and downright adorable treat this season, you’ve come to the right place. I’m so excited to share my Halloween Spider Chocolate Chip Cookies Recipe with you! These aren’t just any chocolate chip cookies — they’re spooky little spiders that your family and friends will absolutely rave over. The best part? They’re easy to make, bursting with chocolatey goodness, and perfect for any Halloween gathering or just a fun baking project with the kids.
Why You’ll Love This Recipe
- Fun and Festive: You don’t have to be a pro to create these spooky spider shapes — they bring Halloween magic with minimal effort.
- Classic Flavor with a Twist: The rich, buttery chocolate chip cookie base everyone loves, jazzed up with chocolate candy melts and candy eyes for a spooky finish.
- Kid-Friendly Activity: My kids have the best time decorating these — it’s a fantastic way to make baking a shared experience.
- Make-Ahead Friendly: You can prep the dough ahead and bake fresh cookies anytime, which is a lifesaver during hectic days.

Ingredients You’ll Need
These ingredients come together to create a cookie dough that’s perfectly balanced — chewy in the middle, a little crisp at the edges, and loaded with melty chocolate chips. I always recommend using quality chocolate chips and fresh vanilla extract; it really makes a difference!
- All-purpose flour: Your cookie’s structure — make sure it’s fresh for the best results.
- Baking soda: The secret to achieving that slight rise and soft texture.
- Salt: Balances the sweetness and enhances the chocolate flavor.
- Unsalted butter: Softened to room temperature for smooth, fluffy creaming.
- Sugar: Both granulated and light brown sugar add sweetness and moisture.
- Vanilla extract: Adds warmth and depth — don’t skip it!
- Large eggs: Helps bind everything with that hint of richness.
- Semisweet chocolate chips: The stars of the show — I like using extras for topping so the spiders stand out more.
- Chocolate candy melts: Essential for piping on spider legs — they melt smoothly and harden quickly.
- Candy eyes: Obviously necessary for making those creepy-cute spider faces.
Variations
I love how versatile this Halloween Spider Chocolate Chip Cookies Recipe is — you can tweak it in so many ways to suit your taste or dietary needs. Don’t be afraid to get creative and make it your own!
- Gluten-Free Version: Swap the all-purpose flour for a gluten-free blend I trust; just check that it includes xanthan gum for structure.
- Vegan Adaptation: I’ve experimented with vegan butter and flax eggs — the texture isn’t quite the same but still delicious and definitely spider-worthy!
- Spiced Twist: Adding a pinch of cinnamon or pumpkin pie spice brings a warm, seasonal flavor boost that’s fantastic for fall.
- Double Chocolate: Mix in some cocoa powder to the dough and use dark chocolate chips for a truly indulgent treat.
How to Make Halloween Spider Chocolate Chip Cookies Recipe
Step 1: Whisk Together Dry Ingredients
Start by combining your flour, baking soda, and salt in a medium bowl. Whisking these together helps distribute the leavening evenly, so your cookies bake up perfectly every time. Set this aside while you move to the wet ingredients — multitasking in the kitchen always feels like a victory!
Step 2: Cream Butter, Sugars, and Vanilla
In your stand mixer bowl using the paddle attachment, beat softened unsalted butter with the granulated sugar, brown sugar, and vanilla extract until light, fluffy, and creamy. Don’t rush here — I usually scrape down the sides a couple of times to make sure everything blends evenly. This step is key to getting that soft texture.
Step 3: Add Eggs & Dry Ingredients
Add the eggs one at a time, beating well between additions — it helps build that beautiful, rich dough. Then, mix in the flour mixture, but be careful not to overbeat. This is where some patience pays off — overmixing can lead to tougher cookies.
Step 4: Stir in Chocolate Chips & Chill
Fold in those chocolate chips until evenly distributed, then cover the dough and refrigerate it for at least 2 hours or up to overnight. I can’t stress this chilling step enough — it transforms the dough and brings out the best texture and flavor.
Step 5: Shape and Bake Your Spiders
Preheat your oven to 375°F and line baking sheets with parchment or silicone mats. Use spoons or a scoop to mound out about 2 tablespoons of dough for each cookie, making sure they’re spaced at least 2 inches apart. Press 2-3 extra chocolate chips on top to serve as the spider’s body — this little detail is what makes them pop!
Step 6: Baking and Cooling
Bake for 9 to 11 minutes until edges look set but centers are still slightly soft. I’ve learned from experience that pulling them out just before they look “done” gives the best chewy, tender inside. Let the cookies cool on the baking sheet for 5 minutes, then transfer to wire racks to cool completely before decorating.
Step 7: Decorate Your Spooky Spiders
Melt your chocolate candy melts according to the package instructions and transfer to a small piping bag or a zip-top bag with a tiny corner snipped off. Pipe eight spider legs radiating from the chocolate chip “body.” Then, dot small bits of melted chocolate above the “body” to stick on candy eyes. It’s so rewarding to see these little creatures come to life!
Pro Tips for Making Halloween Spider Chocolate Chip Cookies Recipe
- Don’t Skip the Chill: Refrigerating the dough is a game-changer — it keeps the cookies from spreading too much and deepens the flavor.
- Use Extra Chocolate Chips on Top: Adding more chips for the spider “body” makes decorating way easier and adds eye-catching texture.
- Work on a Cooling Rack: Let cookies cool fully before decorating; warm cookies can melt the candy melts and make your spiders look messy.
- Perfect Legs Piping: If you find piping tricky, start with short lines and practice your hand movements before piping on the cookies.
How to Serve Halloween Spider Chocolate Chip Cookies Recipe

Garnishes
I usually keep it simple — just the candy eyes and chocolate legs create such a fun spooky effect. Sometimes I add a light dusting of powdered sugar for a “moonlit” look, but that’s totally optional. For a kid-friendly party, you can add tiny edible glitter to give them a little Halloween sparkle.
Side Dishes
These cookies go perfectly with a cozy cup of hot chocolate or a tall glass of cold milk. For a Halloween party, I like setting out some pumpkin spice lattes or apple cider alongside these spiders — the warm drinks balance the sweet, chocolatey cookies beautifully.
Creative Ways to Present
One time, I displayed these cookies on a black platter lined with fake spider webs and placed little plastic spiders around for a super spooky vibe. Another fun idea is to wrap a few in clear cellophane with orange and black ribbons as party favors. Kids and adults love these creative touches!
Make Ahead and Storage
Storing Leftovers
Once fully decorated and set, I store these Halloween Spider Chocolate Chip Cookies in an airtight container at room temperature. They stay fresh and chewy for up to 4 days — though let’s be honest, they rarely last that long in my house!
Freezing
If you want to freeze these spiders, my favorite method is to freeze the dough balls before baking. Portion them onto a tray and freeze until solid, then transfer to a freezer-safe bag. When you’re ready, bake directly from frozen, just add a couple extra minutes to the baking time.
Reheating
To warm up leftover cookies, I pop one or two in the microwave for about 10 seconds — it brings back that freshly-baked softness without melting the decorations. Just be gentle so you don’t melt your spider legs and eyes!
FAQs
-
Can I use mini chocolate chips instead of regular size?
Absolutely! Mini chocolate chips work great and actually make piping spider legs around the “body” easier since the spiders look a little more proportional. You might want to use a few more on top to create the spider body.
-
What are the best candy eyes to use?
I recommend using small, store-bought candy eyes from the baking aisle or online. They’re perfectly sized and easy to stick with melted chocolate. Some brands are even edible on their own, so no worries if a curious kid nibbles them!
-
Can I make these cookies gluten-free or vegan?
Yes! For gluten-free, swap in your favorite gluten-free flour blend with xanthan gum. For vegan, use dairy-free butter and a flax egg substitute. The texture might shift a little, but they’ll still be delightfully spooky and delicious.
-
Is it okay to skip chilling the cookie dough?
You might be tempted to skip chilling if you’re in a hurry, but I don’t recommend it for this recipe. Chilling firms up the dough which helps the cookies hold their shape and gives them a more complex flavor. If you’re short on time, chill for at least 30 minutes, but overnight is best.
Final Thoughts
I absolutely love how this Halloween Spider Chocolate Chip Cookies Recipe combines the comfort of classic chocolate chip cookies with a festive and playful twist. They’re a fun way to bring everyone into the kitchen — from baking to decorating, it’s such a joyful process. Plus, the smiles on faces at Halloween parties (or even just snack time) make all the effort worthwhile. Trust me, once you try these, they’ll become a yearly tradition you look forward to. So grab your mixing bowls and candy eyes — let’s get baking!
Print
Halloween Spider Chocolate Chip Cookies Recipe
- Prep Time: 15 min
- Cook Time: 11 min
- Total Time: 26 min
- Yield: 26 cookies
- Category: Dessert
- Method: Baking
- Cuisine: American
Description
These Halloween Chocolate Chip Cookies are a delightful twist on the classic cookie, perfect for a spooky celebration. Soft and slightly underbaked in the center with crispy edges, each cookie is topped with chocolate chips and decorated with cute spider candy eyes and piped chocolate legs for a festive treat.
Ingredients
Dry Ingredients
- 2 1/4 cups all-purpose flour
- 1 teaspoon baking soda
- 1 teaspoon salt
Wet Ingredients
- 1 cup (2 sticks) unsalted butter, at room temperature
- 1/2 cup sugar
- 1 cup packed light brown sugar
- 1 1/2 teaspoons vanilla extract
- 2 large eggs
Chocolate and Decorations
- 2 cups semisweet chocolate chips, plus more for topping
- Chocolate candy melts (for piping spider legs)
- Candy eyes
Instructions
- Mix Dry Ingredients: In a medium bowl, whisk together the all-purpose flour, baking soda, and salt until fully combined. Set aside for later use.
- Cream Butter and Sugars: In the bowl of a stand mixer fitted with the paddle attachment, cream together the unsalted butter, sugar, brown sugar, and vanilla extract until the mixture is light and fluffy, scraping down the sides as needed to ensure even mixing.
- Add Eggs and Flour Mixture: Add the eggs one at a time, beating well after each addition. Then, gradually add the flour mixture and beat just until incorporated to avoid overmixing.
- Incorporate Chocolate Chips and Chill Dough: Stir in the semisweet chocolate chips until evenly distributed. Cover the dough and refrigerate it for at least 2 hours or up to overnight to develop flavor and improve texture.
- Preheat Oven and Prepare Baking Sheets: Preheat the oven to 375°F (190°C). Line two baking sheets with parchment paper or silicone baking mats to prevent sticking.
- Portion Dough: Using two spoons or an ice cream scoop, portion about 2 tablespoons of dough into mounds on the prepared baking sheets, spacing them at least 2 inches apart. Press 2 or 3 additional chocolate chips on top of each mound to form the spider bodies.
- Bake Cookies: Bake the cookies for 9 to 11 minutes, or until the edges are set but the centers remain slightly underbaked for a chewy texture. Remove from the oven and cool on the baking sheet for 5 minutes.
- Cool Completely: Transfer the cookies to a wire rack to cool completely before decorating to prevent melting or smudging.
- Melt Chocolate Candy Melts: Melt the chocolate candy melts according to package instructions. Transfer the melted chocolate to a piping bag or a sealable plastic bag with the tip cut off for piping.
- Decorate Cookies: Pipe spider legs extending from the chocolate chip “bodies” on each cookie. Add two dots of melted chocolate above the chocolate chips and attach candy eyes to form the spiders’ eyes. Allow the chocolate decorations to set completely before serving.
Notes
- Add a spooky twist to a dessert favorite with this quick and easy recipe perfect for Halloween parties and festive gatherings.
- For best texture, do not overbake the cookies; they should be slightly underbaked in the center.
- Refrigerating the dough helps to enhance flavor and prevents cookies from spreading too much.
- You can substitute candy eyes with mini chocolate chips or white icing and chocolate dots if candy eyes are unavailable.
Nutrition
- Serving Size: 1 cookie
- Calories: 234
- Sugar: 17 g
- Sodium: 141 mg
- Fat: 12 g
- Saturated Fat: 7 g
- Unsaturated Fat: 4 g
- Trans Fat: 0 g
- Carbohydrates: 27 g
- Fiber: 1 g
- Protein: 2 g
- Cholesterol: 32 mg


