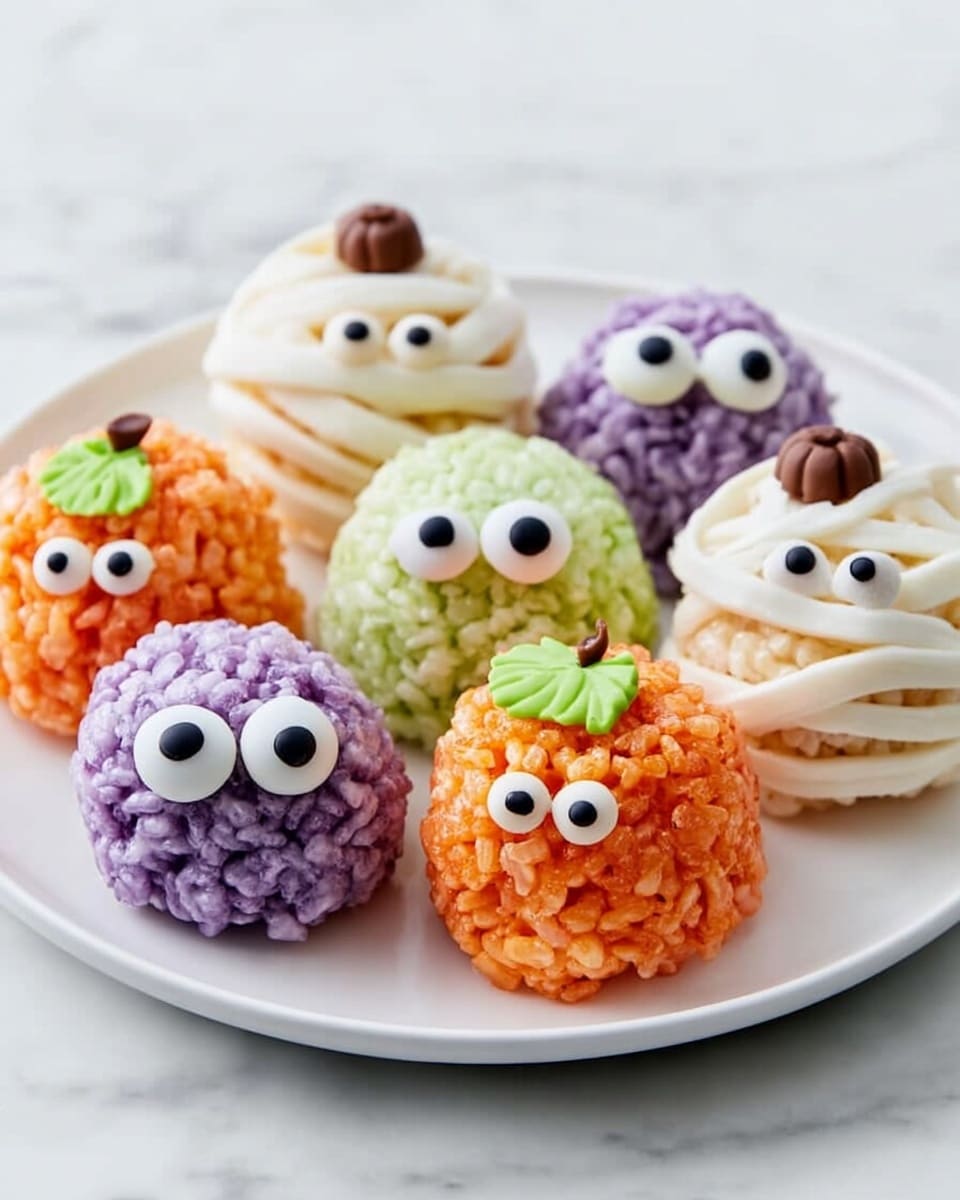
If you’re on the hunt for a fun, easy, and irresistibly festive treat this season, you’re in the right spot. I’m about to share my go-to Halloween Rice Krispie Treats Recipe that’s jam-packed with candy eyes, vibrant colors, and nostalgic crispy magic. Trust me, once you make these, you’ll see why they’re an instant party favorite—whether you’re making memories with your kids or need an easy crowd-pleaser. Let’s dive in and make some Halloween magic right in your kitchen!
Why You’ll Love This Recipe
- Super Easy & Quick: From melting butter to shaping treats, you’ll have these done in under 30 minutes.
- Fun for Kids and Adults: It’s a perfect hands-on activity with a spook-tacular payoff everyone munches happily.
- Customizable Colors & Characters: Add food coloring or candy eyes to make monsters, mummies, or pumpkins that wow.
- Classic Nostalgia: This recipe brings back those childhood flavors with a Halloween twist that feels comforting yet festive.

Ingredients You’ll Need
These simple ingredients come together magically—the buttery marshmallow base adds gooey sweetness, while the crispy cereal brings the satisfying crunch. You’ll find everything is pantry-friendly and easy to customize with food coloring and fun candy eyes.
- Salted butter: I love using salted butter here because it balances sweetness beautifully without needing extra salt.
- Mini marshmallows: The mini size melts faster and mixes more evenly than large ones—don’t skip this detail!
- Rice Krispies cereal: About half a box gives the perfect crispy texture; you can adjust slightly for preference.
- Food coloring: Adds that festive flair—go crazy with orange, green, purple, or classic spooky black.
- Wilton candy eyes: I used the large size for maximum “cute creepiness,” but smaller ones work great too.
Variations
One of the things I really like about the Halloween Rice Krispie Treats Recipe is how easy it is to make your own. I often tweak it depending on my mood or what the kids want to create next!
- Color Mixing: When I first tried splitting the marshmallow mixture into two bowls with different colors, my kids went wild picking their favorite combos to mix and match.
- Add Ins: Want to mix it up? Toss in Halloween-themed sprinkles or chopped nuts for extra texture and color.
- Healthier Twist: I’ve experimented swapping some of the marshmallows with natural sweeteners like honey and using puffed brown rice cereal — still delicious but with a wholesome vibe.
- Gluten-Free: Make sure your Rice Krispies are gluten-free if needed (they offer a certified version) so everyone can join the fun!
How to Make Halloween Rice Krispie Treats Recipe
Step 1: Prep Your Workspace
Start by lining a baking sheet with parchment paper. This helps keep things clean and makes it easy to lift the treats off once cooled. I always butter my hands lightly before shaping to prevent sticking later—it’s a game changer!
Step 2: Melt Butter and Marshmallows
In a large saucepan over medium-low heat, melt 4 tablespoons of salted butter until smooth. Stir in 10 ounces of mini marshmallows. You’re looking for them to get shiny and nearly melted—don’t rush this step or let it burn. If you’re making multiple colors, split the marshmallow mixture into separate bowls now for coloring.
Step 3: Add Food Coloring
This is where the Halloween fun really starts! Add a few drops of your chosen food coloring to each bowl and stir gently until the color is evenly mixed in. I like to experiment with layering colors later on, but making each batch bright and bold is a good rule of thumb.
Step 4: Stir in Rice Krispies
Gradually fold in 5 to 6 cups of Rice Krispies cereal, stirring to ensure every bit is coated in the marshmallow mixture. This is where you’ll see the magic happen—the marshmallow binds the cereal together into that perfect crispy texture.
Step 5: Shape and Decorate
With buttered hands, scoop about 1 ½-inch balls (roughly 0.6 ounces each) and press gently to form tight spheres. Right away, press a candy eye into the center of each one. I find it’s easiest to add the eyes while the treats are still warm so they stick well. Let cool on the parchment-lined sheet—then watch the monsters come alive!
Pro Tips for Making Halloween Rice Krispie Treats Recipe
- Use Low Heat: Melting marshmallows too fast or on high heat can cause them to seize or burn—take it slow and steady.
- Butter Your Hands Well: This prevents sticky fingers and makes shaping the balls a breeze.
- Add Eyes While Warm: Press candy eyes in immediately for the best adhesion once the treats cool.
- Don’t Overmix Cereal: Stir gently to keep that crisp texture without squashing the puffed rice.
How to Serve Halloween Rice Krispie Treats Recipe

Garnishes
I love shaking things up with glittery colored sugar or edible Halloween confetti sprinkles to add extra sparkle—especially when making mummies or pumpkin-themed treats. Sometimes a light drizzle of melted white or dark chocolate can turn these into next-level party bites.
Side Dishes
Pairing these Halloween Rice Krispie Treats with other simple snacks like caramel popcorn, candy corn, or even apple slices with cinnamon dip makes for a balanced (and super fun) Halloween spread that appeals to every palate.
Creative Ways to Present
I once arranged mine on a black platter lined with spooky-themed napkins and added toy spider rings on toothpicks right into some treats—kids loved that interactive touch! You can also stick a Halloween-themed straw into each ball for a “pop” treat or present them in transparent bags tied with orange and black ribbon.
Make Ahead and Storage
Storing Leftovers
Once completely cooled, I store these treats in an airtight container at room temperature for up to 3 days. They keep that perfect balance of chewy and crispy, honestly better than any boxed treat you’d find.
Freezing
If you want to prep ahead, I’ve frozen these treats wrapped tightly in plastic wrap and placed in freezer bags. When you’re ready to enjoy, thaw them at room temperature for about 30 minutes—they hold up surprisingly well without losing texture.
Reheating
I prefer to enjoy them as-is, but if you’re craving that fresh-out-of-the-pan gooeyness, a quick 10-15 second zap in the microwave softens them up nicely. Just watch closely to avoid melting the candy eyes!
FAQs
-
Can I make Halloween Rice Krispie Treats Recipe without candy eyes?
Absolutely! Candy eyes are a fun decorative touch but not essential. You can substitute with mini chocolate chips, colored sprinkles, or even draw eyes with edible markers once the treats have cooled.
-
What’s the best way to color the marshmallow mixture?
I recommend using gel food coloring instead of liquid because it gives a vibrant color without thinning the marshmallow mixture. Add a few drops and stir gently until fully combined.
-
Can I use regular-sized marshmallows instead of mini ones?
Yes, you can! Just know that regular marshmallows take a bit longer to melt, so keep the heat low and stir patiently to avoid burning. Breaking them into smaller pieces can speed up melting.
-
How do I keep the treats from sticking to my hands?
Coat your hands lightly with butter or cooking spray before shaping the treats. You might need to reapply occasionally if it starts to stick. This tip saved me a lot of frustration during family bake sessions.
Final Thoughts
This Halloween Rice Krispie Treats Recipe has been a staple in my kitchen for years, especially in October when everyone craves something festive but fuss-free. What I absolutely love is how it combines simple ingredients into these adorable, spooky bites that kids and adults adore alike. If you want to bring the kids into the kitchen for a hands-on project or need a last-minute treat that still wows, this recipe has your back. Go ahead, try it out this Halloween—your friends and family will thank you!
Print
Halloween Rice Krispie Treats Recipe
- Prep Time: 10 minutes
- Cook Time: 10 minutes
- Total Time: 35 minutes
- Yield: 18 pieces
- Category: Dessert
- Method: Stovetop
- Cuisine: American
- Diet: Vegetarian
Description
These Halloween Rice Krispie Treats are fun, easy-to-make, and perfect for any Halloween party. Crispy cereal balls are coated in melted marshmallow and butter, colored with food coloring, and decorated with candy eyes to create festive monsters, mummies, and pumpkins that kids and adults will love.
Ingredients
Main Ingredients
- 4 Tablespoons salted butter
- 10 ounces mini marshmallows
- 5-6 cups Rice Krispies cereal (about 1/2 box)
- Food coloring (assorted colors)
- Wilton candy eyes (large size)
Instructions
- Prep: Line a baking sheet with parchment paper and set aside. This prevents the treats from sticking and makes cleanup easier.
- Melt butter and marshmallows: In a large saucepan over medium-low heat, melt 4 tablespoons of salted butter. Add 10 ounces of mini marshmallows and stir continuously until they are almost completely melted and smooth. For multiple colors, divide the melted mixture into separate bowls at this point or prepare additional batches.
- Add food color: Add a few drops of your chosen food coloring to each marshmallow mixture bowl and stir until the color is evenly incorporated.
- Stir in cereal: Gradually add 5-6 cups of Rice Krispies cereal into each marshmallow mixture, stirring until all the cereal is thoroughly coated with the marshmallow.
- Shape into balls and decorate: Butter your hands lightly to prevent sticking, then shape the mixture into 1 1/2-inch balls, approximately 0.6 ounces each. Press one Wilton candy eye firmly into the center of each ball to create spooky or cute Halloween faces.
Notes
- These treats are ideal for Halloween parties and make fun activities for kids to decorate as monsters, mummies, or pumpkins.
- Use buttered hands to prevent sticking while shaping the balls.
- For multiple colors, divide the marshmallow mixture before adding food coloring or make separate batches.
- Store treats in an airtight container to keep them fresh.
Nutrition
- Serving Size: 1 piece (approximately 28g)
- Calories: 102 kcal
- Sugar: 10 g
- Sodium: 74 mg
- Fat: 3 g
- Saturated Fat: 2 g
- Unsaturated Fat: 1.2 g
- Trans Fat: 0.1 g
- Carbohydrates: 19 g
- Fiber: 0.05 g
- Protein: 1 g
- Cholesterol: 7 mg


