If you’re looking for a treat that’s as fun to make as it is to eat, you’re going to adore this Halloween Rice Krispie Treats Recipe. These spooky, colorful, and downright delicious snacks have become a staple in my kitchen every fall. I absolutely love how they turn out — crispy, sweet, and perfectly festive! Whether you’re baking for a party, bake sale, or just craving some Halloween magic in your mouth, this recipe is your new best friend.
Why You’ll Love This Recipe
- Super Easy to Make: It takes just 15 minutes from start to finish—perfect when you need a quick Halloween treat!
- Fun and Festive: The bright candy melts and candy eyes bring a playful spooky vibe that kids and adults go crazy for.
- Customizable Details: You can tweak the decorations or add your own spooky twists for a personal touch.
- Kid-Friendly and Crowd-Pleasing: Everyone I’ve served these to has asked for the recipe—your Halloween party just got easier!

Ingredients You’ll Need
These ingredients might seem familiar, but together they create that irresistible perfect balance of crispy, chewy, and sweet. Plus, the candy melts add a cool pop of color that really makes this Halloween Rice Krispie Treats Recipe stand out.
- Butter: Use unsalted butter to control the salt level; it gives a rich, creamy base.
- Mini marshmallows: The glue that holds everything together—make sure they’re fresh for that melty, smooth texture.
- Salt: Just a pinch to balance the sweetness—it’s the little ingredient that makes a difference.
- Vanilla extract: Adds depth and warmth to the flavor without overpowering the treats.
- Puffed rice cereal: For that classic crunch and lightness you expect from Rice Krispie treats.
- Bright green candy melts: These bring a festive Halloween color that’s bright and eye-catching.
- Bright white candy melts: Perfect for making eyes and spooky accents—you’ll love how they pop.
- Refined coconut oil (or shortening): Helps smooth out the candy melts and gives them a nice glossy finish.
- Candy eyes: The secret to turning your treats from cute to downright spooky—kids especially love these!
- Black buttercream frosting: Adds fun details like mouths or spider webs—I’ll share how I make mine in the notes.
Variations
I love experimenting with this Halloween Rice Krispie Treats Recipe and making it my own each year. You might find yourself tweaking colors, flavors, or toppings to suit your tastes or party theme—and that’s totally encouraged!
- Color Swaps: I’ve swapped the green candy melts for orange or purple—these vibrant options look fantastic for Halloween and still taste just as great.
- Flavor Boosts: Adding a teaspoon of pumpkin spice or cinnamon to the melted marshmallow mix is a seasonal trick I discovered that adds a cozy touch to the treats.
- Dietary Modifications: You can use vegan butter and dairy-free marshmallows to make these vegan-friendly without losing texture or flavor.
- Spooky Toppers: Instead of candy eyes, I sometimes use edible googly eyes or Halloween-themed sprinkles—kids enjoy helping me decorate!
How to Make Halloween Rice Krispie Treats Recipe
Step 1: Prep Your Workspace and Bakeware
First things first, line a baking sheet with parchment paper and set that aside. Then, butter or spray a 9×13 baking dish with non-stick cooking spray. This prep step is a game-changer because it prevents the treats from sticking, so when you cut your squares later, they come out perfectly clean and tidy.
Step 2: Melt Butter and Marshmallows
Place 4 tablespoons of butter in a medium stockpot over medium-low heat. Once melted, toss in those 7 cups of mini marshmallows, along with a pinch of salt and a splash of vanilla extract. Stir constantly until everything melts together into a smooth, glossy mixture. This part smells like heaven and sets the flavor tone, so don’t rush it but be careful not to burn the marshmallows—low and slow wins here.
Step 3: Fold in the Puffed Rice Cereal
Once your marshmallow mixture is beautifully melted, remove the pot from the heat. Quickly fold in 6 cups of puffed rice cereal, making sure each little piece is coated evenly. The key here is to work fast before the mixture hardens but gentle so you keep that lovely airy texture.
Step 4: Press and Cool
Transfer the mixture to your prepared 9×13 dish and use a buttered spatula or your hands (lightly greased!) to firmly press it down into an even layer. Let the treats cool completely—think around 30 minutes—until they’re set. You can speed this up by popping the dish in the fridge but don’t leave it too long, or they get hard to cut.
Step 5: Decorate with Candy Melts and Faces
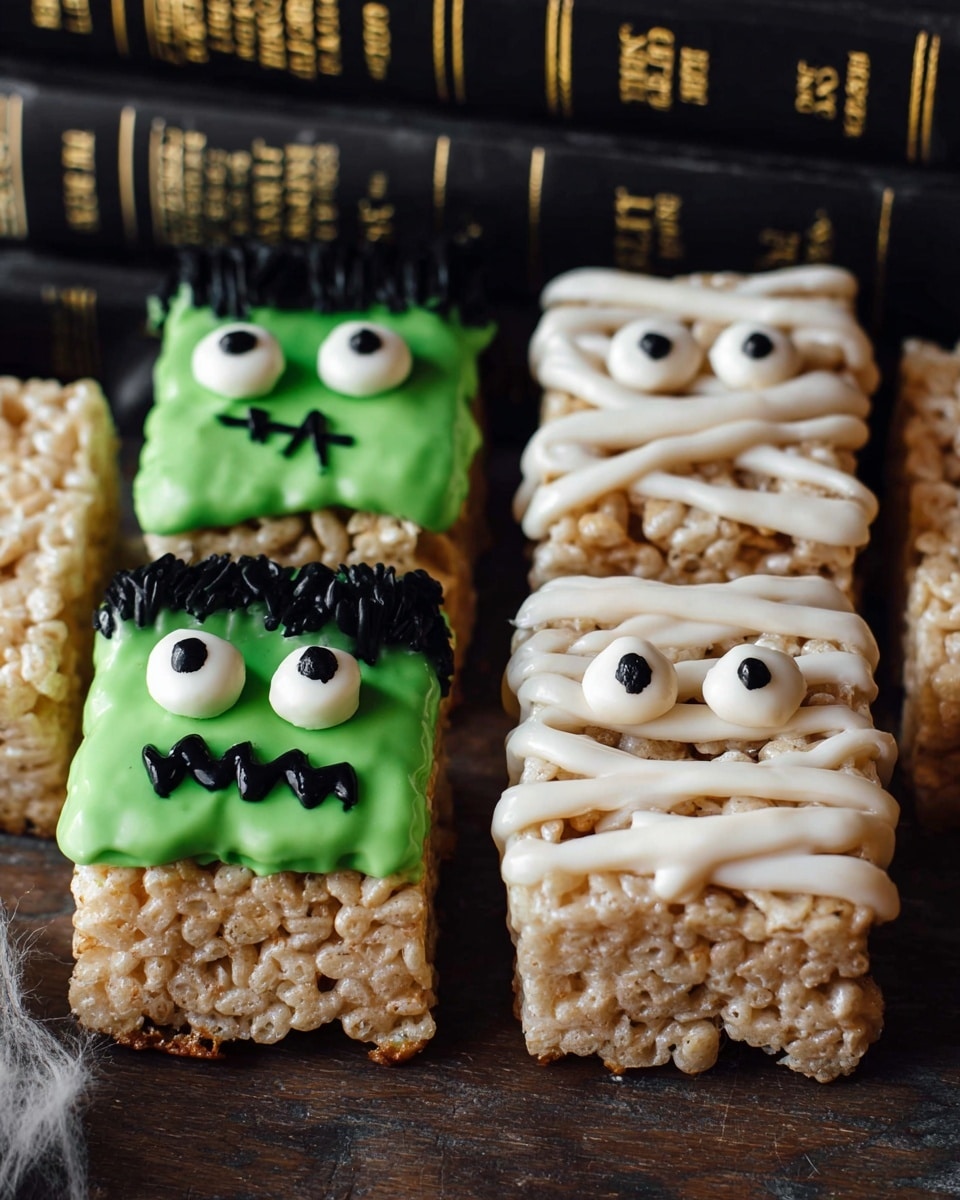
Now for the fun and spooky part! Melt the green and white candy melts separately with 2 to 4 tablespoons of refined coconut oil to get that smooth, glossy finish. You can dip, drizzle, or paint the treats with the candy melts and stick on candy eyes before the coating sets. I like to pipe silly mouths with black buttercream frosting to give each treat its own character. Trust me, decorating is where your Halloween Rice Krispie Treats Recipe truly comes to life!
Pro Tips for Making Halloween Rice Krispie Treats Recipe
- Grease Your Tools: I always butter my spatula and hands before pressing the mixture to prevent sticking—it saves so much frustration!
- Keep Heat Low: Melting marshmallows on medium-low heat prevents burning and gives you a smooth mix every time.
- Add Coconut Oil to Candy Melts: This little trick makes candy melts easier to work with and gives them that shiny coating that impresses guests.
- Avoid Overpacking: Press the cereal mixture firmly but don’t squash it too much or your treats will be dense instead of light and crispy.
How to Serve Halloween Rice Krispie Treats Recipe
Garnishes
For garnishes, I am obsessed with candy eyes—they instantly add personality and spooky charm. Black buttercream frosting is my go-to for detailing mouths, fangs, or spider webs because it pipes beautifully and contrasts well against the white or green candy melt background.
Side Dishes
When I serve these treats, I love pairing them with warm apple cider or a creamy hot chocolate—it’s a cozy combo that makes any Halloween gathering feel extra special. Sometimes, I’ll add a handful of roasted pumpkin seeds as a crunchy side to keep things interesting.
Creative Ways to Present
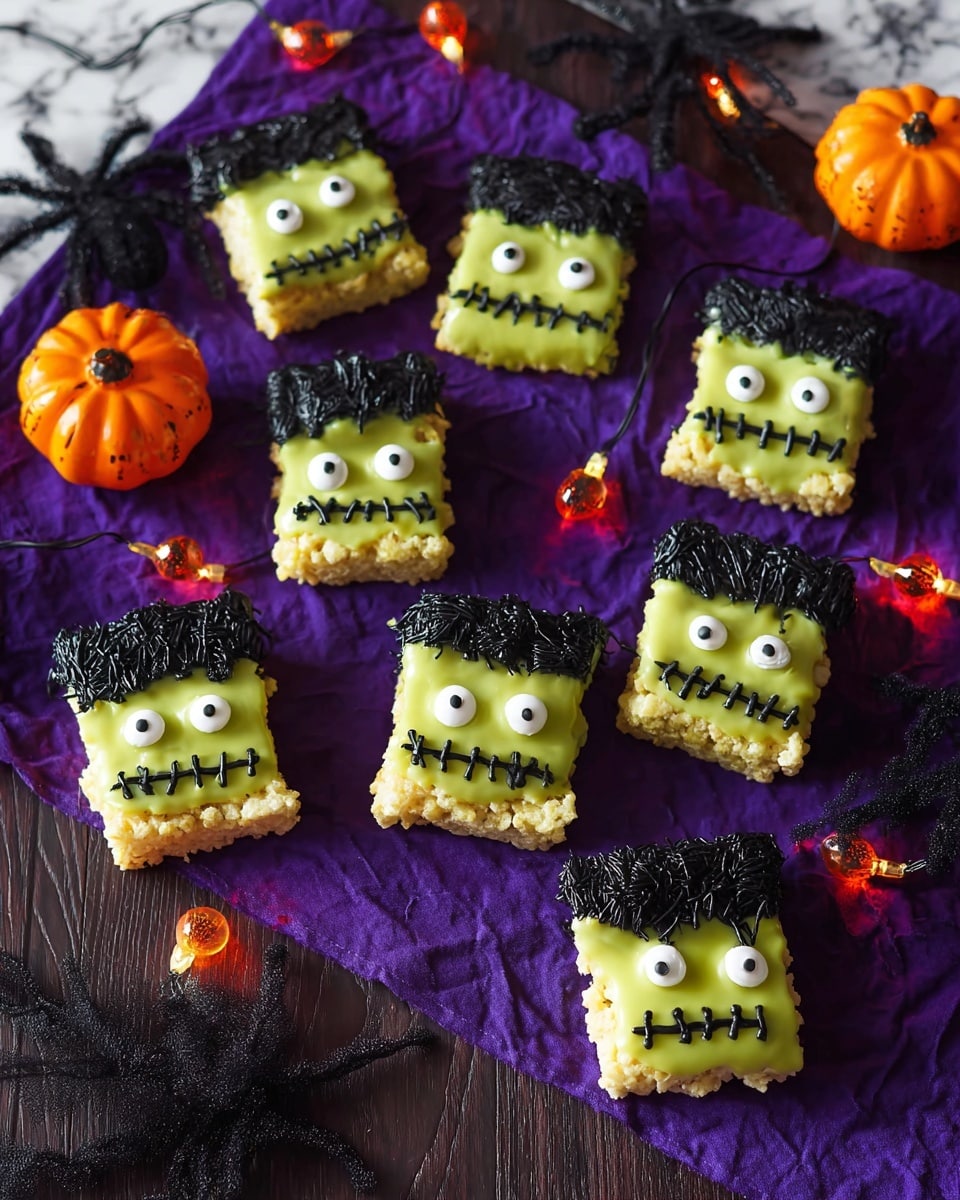
Try presenting your Halloween Rice Krispie Treats Recipe on a decorated platter with fake cobwebs and mini pumpkins for that spooky vibe. You can also stack them to look like a little rice krispie haunted house or individually wrap them in cellophane tied with orange and black ribbons—it makes for adorable party favors.
Make Ahead and Storage
Storing Leftovers
Leftover treats keep well stored in an airtight container at room temperature for up to 5 days. I keep mine on a counter out of direct sunlight to keep them from drying out or sticking together. You’ll find they stay chewy and fresh the next day—if there are any left!
Freezing
If you want to freeze some, wrap individual squares in plastic wrap, then place them in a freezer-safe bag. From my experience, freezing preserves the flavor and texture well for up to 2 months. Just be sure to thaw them completely at room temperature before decorating to avoid melting your carefully crafted candy melts.
Reheating
Reheating isn’t usually necessary, but if you want to warm them up slightly, pop a treat in the microwave for about 10 seconds wrapped in a paper towel. This softens them just enough without turning them gooey. Perfect for when you want a fresh-from-the-oven feel.
FAQs
-
Can I make Halloween Rice Krispie Treats Recipe without candy melts?
Absolutely! You can skip the candy melts and still enjoy the classic treats. To add a Halloween twist, try mixing in colored sprinkles, or drizzle melted white chocolate with food coloring instead. The candy melts just make decorating easier and more colorful, but they’re not essential.
-
How do I keep the candy melts from seizing?
The trick is to melt candy melts gently in short bursts in the microwave or over a double boiler, stirring often. Adding a bit of refined coconut oil or shortening helps keep the melts smooth and fluid. Avoid introducing water or moisture, which causes the candy to seize and become grainy.
-
Can I store decorated treats in the fridge?
While you can store them in the fridge, I generally avoid it because it can cause condensation, making the treats sticky or soggy. If you do refrigerate, place them in an airtight container and allow them to come to room temperature before serving to enjoy the best texture.
-
What if I don’t have black buttercream frosting?
No worries! You can use store-bought black decorating gel or simply pipe thin lines with melted dark chocolate for spooky details. Another option is mixing a small amount of cocoa powder into plain frosting to darken it. Get creative—it’s all about the fun!
Final Thoughts
This Halloween Rice Krispie Treats Recipe has been a festive favorite for me and my family for years now. I love how simple it is to elevate something classic into a fun, spooky delight everyone enjoys. If you give this a try, I promise you’ll be hooked—and maybe even start your own Halloween treat tradition. So, grab your marshmallows and candy melts, and let’s make some magic happen!
Print
Halloween Rice Krispie Treats Recipe
- Prep Time: 5 minutes
- Cook Time: 10 minutes
- Total Time: 15 minutes
- Yield: 24 Treats
- Category: Dessert
- Method: Stovetop
- Cuisine: American
Description
These Halloween Rice Krispie Treats are a delightful and festive twist on the classic marshmallow cereal treat. Perfectly crisp rice cereal is combined with melted marshmallows and butter, then decorated with colorful candy melts and candy eyes for a spooky seasonal snack that’s ideal for parties, bake sales, or fun Halloween treats.
Ingredients
Base Ingredients
- 4 tbsp butter
- 7 cups mini marshmallows
- 1/4 tsp salt
- 1/4 tsp vanilla extract
- 6 cups puffed rice cereal
Decorations
- 12 oz bright/light green candy melts
- 6 oz bright white candy melts
- 2-4 tbsp refined coconut oil (or shortening)
- Candy eyes
- Black buttercream frosting (see notes for instructions or substitutions)
Instructions
- Prepare pan and baking sheet: Line a baking sheet with parchment paper and set aside. Butter or spray a 9×13 inch baking dish with non-stick cooking spray and set aside.
- Melt butter and marshmallows: In a medium stock pot over medium-low heat, melt the butter. Add the mini marshmallows, salt, and vanilla extract, stirring continuously until the marshmallows are fully melted and the mixture is smooth.
- Add rice cereal: Remove the pot from heat, then quickly stir in the puffed rice cereal until all the cereal is evenly coated in the marshmallow mixture.
- Press into pan: Transfer the mixture to the prepared 9×13 baking dish and press it down evenly to form a compact layer. Allow it to cool and set completely.
- Cut into squares: Once fully cooled and set, cut the Rice Krispie treats into 24 squares.
- Decorate: Melt candy melts with refined coconut oil or shortening according to package instructions. Dip or drizzle the candy melts over the squares, add candy eyes, and pipe black buttercream frosting for spooky faces or designs to complete the Halloween theme.
Notes
- These treats are quick and easy to make, perfect for last-minute Halloween celebrations.
- You can substitute black buttercream frosting with store-bought frosting tinted black or use edible markers for decoration.
- Use refined coconut oil or shortening to achieve smooth candy melt consistency for decorating.
- Store treats in an airtight container at room temperature for up to 3 days for best freshness.
Nutrition
- Serving Size: 1 treat
- Calories: 81 kcal
- Sugar: 8 g
- Sodium: 53 mg
- Fat: 2 g
- Saturated Fat: 1 g
- Unsaturated Fat: 1 g
- Trans Fat: 0 g
- Carbohydrates: 16 g
- Fiber: 1 g
- Protein: 1 g
- Cholesterol: 5 mg


