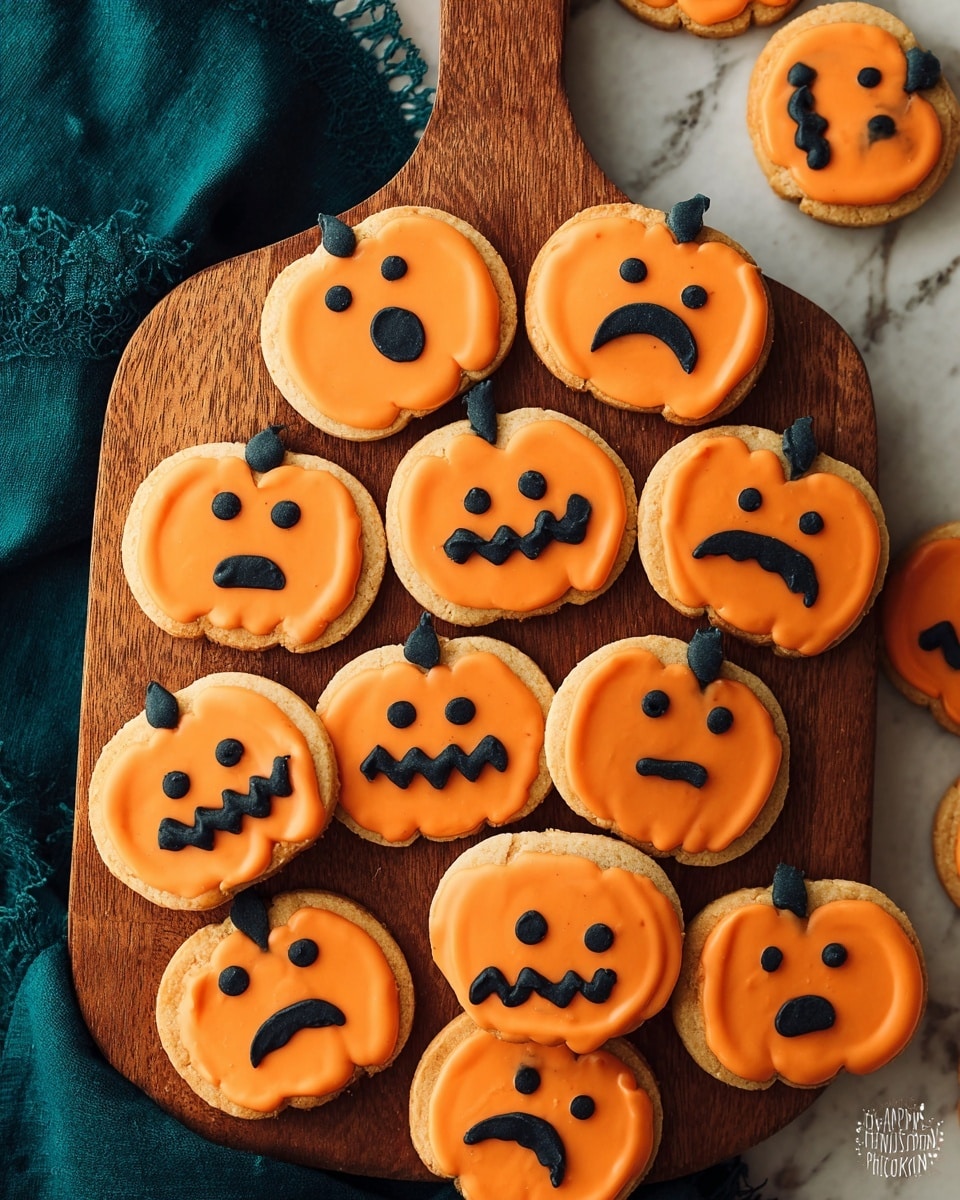
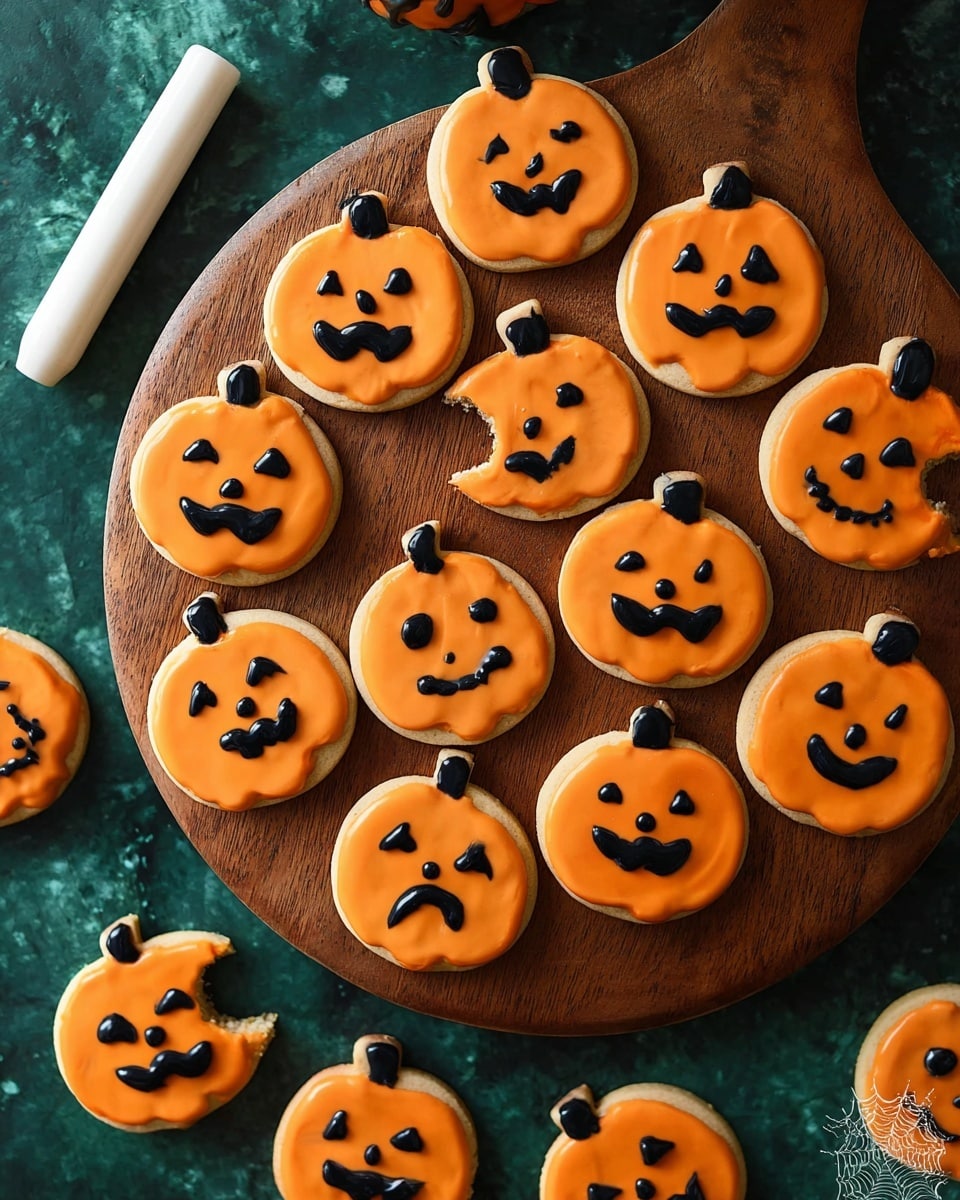
If you’re looking for a festive and fun treat to wow your friends and family this fall, you’ve got to try my Halloween Pumpkin Cookies Recipe. These cookies are delicate sugar cookies topped with bright orange sugar paste that looks just like little pumpkins—perfect for setting the spooky mood without any fuss. I absolutely love how they turn out: crisp on the edges, soft in the center, and totally irresistible. Stick with me, and I’ll share all my secret tips so you can nail this recipe every time!
Why You’ll Love This Recipe
- Simple Ingredients: You probably already have most of what you need in your pantry, making this an easy bake anytime.
- Fun to Decorate: The orange sugar paste and black icing give you total freedom to get creative with your spooky pumpkin designs.
- Perfect Texture: Soft yet crispy edges strike the perfect balance, making them so addictive.
- Great for All Skill Levels: Whether you’re a baking newbie or a seasoned pro, these cookies are straightforward enough to impress without stress.

Ingredients You’ll Need
This Halloween Pumpkin Cookies Recipe uses a classic sugar cookie base enhanced with simple additions to keep the texture just right. Plus, the orange sugar paste creates those iconic pumpkin decorations effortlessly.
- Salted butter: Using salted butter adds just the right hint of saltiness that balances the sweetness perfectly.
- White caster sugar: Its superfine texture helps the dough mix smoothly and bakes into a tender crumb.
- Eggs: One medium free-range egg binds everything together while keeping the dough soft.
- Vanilla extract: A splash adds warmth and depth, elevating the cookie flavor beautifully.
- Plain white flour: Also known as all-purpose flour; it’s the backbone providing structure for the cookies.
- Bicarbonate of soda: A subtle leavening agent that helps the cookies rise just right.
- Baking powder: Works alongside the baking soda to ensure a gentle lift.
- Salt: Enhances all the flavors and counterbalances the sweetness.
- Cornflour (cornstarch): Used for dusting when rolling out the sugar paste, so it doesn’t stick — lifesaver!
- Orange sugar paste: The star for decorating pumpkins — vegetarian-friendly options make it accessible to all.
- Icing sugar: For dusting while shaping and finishing touches.
- Black writing icing: To add the classic pumpkin stems and faces that bring these cookies to life.
Variations
I love that this Halloween Pumpkin Cookies Recipe is easy to tweak, depending on your cravings or dietary needs. Feel free to personalize it to make it your own!
- Gluten-free version: Substitute plain white flour with a gluten-free blend, and you’ll barely notice the difference in texture—my gluten-intolerant friends loved it!
- Vegan option: Use dairy-free margarine instead of butter and a flax or chia egg replacement; the sugar paste can be swapped for vegan fondant as well.
- Spiced pumpkin cookies: Add a pinch of cinnamon, nutmeg, and cloves for a warm, cozy fall twist that reminds me of pumpkin pie.
- Chocolate pumpkin cookies: Swap half the flour for cocoa powder and drizzle with melted chocolate instead of sugar paste for a rich alternative.
How to Make Halloween Pumpkin Cookies Recipe
Step 1: Cream the Butter and Sugar
Start by beating the cubed salted butter with the white caster sugar until the mixture becomes light and fluffy—about 3 to 5 minutes. This step is crucial because it aerates the dough, helping the cookies bake up tender. I usually use an electric mixer for this, but a sturdy wooden spoon works in a pinch.
Step 2: Add Eggs and Vanilla Extract
Next, crack in your medium egg along with the vanilla extract. Mix until everything is just combined. Don’t overbeat here; you just want to make sure the egg is evenly distributed to keep the dough smooth.
Step 3: Combine Dry Ingredients Separately
In a separate bowl, sift together the plain white flour, bicarbonate of soda, baking powder, and salt. Pre-sifting prevents any lumps and distributes the raising agents evenly, which means your cookies will have a perfect crumb.
Step 4: Gradually Mix Dry Ingredients Into Wet
Slowly add the dry ingredients to the butter mixture and stir until just combined. You want a soft, smooth dough that holds together without being sticky. If it’s too sticky, pop it in the fridge for 15 minutes.
Step 5: Roll Out and Cut the Cookies
Lightly dust your surface with cornflour and roll out the dough to about 1/4 inch thickness. Use a pumpkin-shaped cookie cutter for that perfect Halloween vibe. If you don’t have one, a small round cutter works just fine—you can always pipe pumpkin faces on top later.
Step 6: Bake Until Lightly Golden
Place the cookies on a baking tray lined with parchment paper and bake at 180°C (350°F) for about 6 minutes—watch closely! The edges should be just starting to turn golden while the centers stay soft. Overbaking dries them out, so keeping an eye on the oven is key.
Step 7: Cool and Decorate with Sugar Paste
Let the cookies cool completely before decorating. Roll the orange sugar paste onto a cornflour-dusted surface, then cut out pumpkin shapes to match the cookies. Carefully place the sugar paste on top, using a little icing sugar to help it stick if needed.
Step 8: Add Pumpkin Faces with Black Writing Icing
Finally, use black writing icing to draw spooky or cute pumpkin faces. This is my favorite part because you can get as creative or as creepy as you like—kids especially enjoy this step. Let the icing dry before serving or packaging.
Pro Tips for Making Halloween Pumpkin Cookies Recipe
- Butter Temperature Matters: Make sure your butter is softened but not melted to achieve that fluffy creaming stage.
- Don’t Overwork the Dough: Mixing too much can make the cookies tough – fold your dry ingredients gently.
- Use Cornflour for Rolling Sugar Paste: This keeps the paste from sticking and tearing while you work with it.
- Cool Completely Before Decorating: Warm cookies can melt the sugar paste and frosting, so patience pays off here.
How to Serve Halloween Pumpkin Cookies Recipe
Garnishes
I like to add a tiny dab of green sugar paste or icing to mimic pumpkin stems—it makes the cookies feel more realistic and festive. Sometimes I sprinkle a little edible glitter on top for a subtle shimmer, which always delights the kids.
Side Dishes
These cookies pair beautifully with a warm cup of spiced apple cider or a rich hot chocolate—especially when you’re serving a crowd at a Halloween party. For an adult twist, a scoop of vanilla ice cream alongside these cookies is pure magic!
Creative Ways to Present
For a fun display at your Halloween gathering, arrange these pumpkin cookies on a rustic wooden board surrounded by mini gourds and autumn leaves. Wrapping them individually in cellophane bags tied with orange and black ribbons also makes for adorable party favors that guests will love taking home.
Make Ahead and Storage
Storing Leftovers
After decorating, store the cookies in an airtight container at room temperature. They’ll stay fresh and tasty for up to 4 days—long enough to enjoy the spooky season without feeling rushed.
Freezing
If you want to prep ahead, you can freeze the undecorated cookies once cooled. Freeze them flat in a single layer on a baking sheet, then transfer to a sealed freezer bag. When you’re ready, thaw in the fridge overnight before decorating. This trick saved me tons of time last Halloween!
Reheating
I usually don’t reheat these cookies once decorated, as the sugar paste can soften. But if you prefer them a little warm, gently heat undecorated cookies in the oven at 150°C (300°F) for 3-4 minutes—just enough to bring back a fresh-baked feel.
FAQs
-
Can I use regular fondant instead of sugar paste for these pumpkin cookies?
Yes, regular fondant works just fine for decorating, although sugar paste tends to be firmer and easier to shape, especially for detailed pumpkin decorations. Just be sure to dust your surface with cornstarch or icing sugar to prevent sticking.
-
How long do these Halloween pumpkin cookies last?
Stored in an airtight container at room temperature, these cookies stay fresh for about 3-4 days. Beyond that, they may start to dry out, but freezing undecorated cookies is a great option for longer storage.
-
Can kids help make this recipe?
Absolutely! Kids especially enjoy rolling out the sugar paste, cutting pumpkin shapes, and decorating with icing. Just supervise them with the oven and sharp utensils. It’s a wonderful family activity that gets everyone into the Halloween spirit.
-
What if I don’t have a pumpkin cookie cutter?
No worries—any round or oval cookie cutter will work. You can always freehand carve pumpkin faces with the black writing icing to mimic the classic look. Creativity counts more than shape!
Final Thoughts
Whenever I make this Halloween Pumpkin Cookies Recipe, it instantly feels like autumn magic is in the air. They’re simple enough to whip up on a weekday afternoon yet charming enough to be the star of any Halloween party. I hope you have as much fun making (and eating) these as I do sharing them. Trust me, once you try this recipe, it’ll become your go-to festive treat year after year—so roll up your sleeves and get baking!
Print
Halloween Pumpkin Cookies Recipe
- Prep Time: 30 min
- Cook Time: 6 min
- Total Time: 36 min
- Yield: 30 cookies
- Category: Dessert
- Method: Baking
- Cuisine: American
- Diet: Vegetarian
Description
These Halloween Pumpkin Cookies are a delightful seasonal treat featuring soft sugar cookies decorated with vibrant orange sugar paste and detailed black icing to create festive pumpkin faces. Perfect for Halloween parties or a spooky snack, these cookies combine a simple buttery dough with playful decorations that are sure to impress both kids and adults alike.
Ingredients
Cookie Dough
- 110 g salted butter (cubed)
- 100 g white caster sugar (superfine sugar)
- 1 medium free range egg
- ½ tsp vanilla extract
- 250 g plain white flour (all purpose flour)
- ¼ tsp bicarbonate of soda (baking soda)
- ¼ tsp baking powder
- ¼ tsp salt
For Dusting
- 1 tsp cornflour (cornstarch)
Decorations
- 500 g orange sugar paste (vegetarian, if required)
- 2 tbsp icing sugar (powdered sugar)
- Black writing icing
Instructions
- Prepare the Dough: Cream the cubed salted butter and white caster sugar together until light and fluffy. Add the medium egg and vanilla extract, mixing well to combine.
- Combine Dry Ingredients: Sift together the plain flour, bicarbonate of soda, baking powder, and salt. Gradually add these dry ingredients to the wet mixture, stirring until the dough comes together into a smooth ball.
- Chill the Dough: Wrap the dough in cling film and refrigerate for at least 30 minutes to firm up, making it easier to handle and cut shapes.
- Prepare to Roll: Preheat your oven to 180°C (350°F). Lightly dust your work surface with cornflour to prevent sticking. Roll out the chilled dough to an even thickness of about 5mm.
- Cut Out Cookies: Using a pumpkin-shaped cookie cutter, cut out as many cookies as you can from the dough. Place them on a baking tray lined with parchment paper, spaced evenly to allow for slight spreading.
- Bake the Cookies: Bake in the preheated oven for 6 minutes or until the edges are just starting to turn golden. Remove from the oven and let cool completely on a wire rack.
- Decorate with Sugar Paste: Roll out the orange sugar paste thinly and use the same pumpkin cookie cutter to cut shapes. Use a little water or icing sugar paste mixed with water as glue to attach the sugar paste shapes to the cooled cookies.
- Add Detail: Use the black writing icing to pipe faces and spooky details on the pumpkins, allowing your creativity to shine with different expressions.
- Finish: Let the icing set completely before serving or storing the cookies in an airtight container to maintain freshness.
Notes
- These Halloween pumpkin cookies are perfect for serving as a treat this spooky season.
- The cookies are simple sugar cookies iced with rolled fondant (sugar paste) for vibrant decoration.
- You can substitute black writing icing with edible markers if preferred.
- Ensure cookies are completely cool before applying sugar paste to prevent melting.
- Store cookies in an airtight container at room temperature for up to 5 days.
Nutrition
- Serving Size: 1 cookie
- Calories: 128 kcal
- Sugar: 16 g
- Sodium: 54 mg
- Fat: 4 g
- Saturated Fat: 2 g
- Unsaturated Fat: 2 g
- Trans Fat: 1 g
- Carbohydrates: 23 g
- Fiber: 1 g
- Protein: 1 g
- Cholesterol: 13 mg
