If you’re looking to wow your friends or family this fall with something both adorable and delicious, this Halloween Hot Chocolate Bombs Recipe is exactly what you need. I absolutely love how these spooky little spheres transform a regular cup of hot milk into a decadent, cozy treat—with fun little marshmallows and chocolate melting out in the best way. They’re surprisingly simple to make, and you’ll find that the look on everyone’s face when the bomb “explodes” their hot chocolate is priceless. Stick with me, and I’ll walk you through every step so your Halloween Hot Chocolate Bombs turn out perfect every time.
Why You’ll Love This Recipe
- Super Festive and Fun: These bombs really bring Halloween vibes with candy eyes and that magical chocolate melt.
- Impress Without Stress: I used to think they were complicated, but once you try my tips, you’ll find making them easy and even relaxing.
- Perfect for Gifting: They store well and make adorable little presents for friends, kids, or coworkers.
- Customizable Fun: You can tweak fillings and decorations to match your taste or party theme.

Ingredients You’ll Need
Getting your ingredients right is key because they work together not only for flavor but also the way these bombs hold their shape and melt perfectly. I mostly stick to white chocolate here since it gives that spooky ghostly vibe, but a few simple swaps can be fun too.
- Powdered Sugar: Helps balance the cocoa’s bitterness and blend sweetly inside the bomb.
- Unsweetened Cocoa Powder (Dutch-process preferred): This adds richness and a deep chocolate flavor that’s essential in hot cocoa.
- Finely Chopped White Chocolate: Using finely chopped rather than big chunks ensures it melts evenly when you make the bombs.
- Mini Marshmallows: The little puffy marshmallows add that classic gooey surprise inside your hot chocolate.
- White Chocolate Bark or Tempered White Chocolate: This is what builds the shell—you need chocolate that melts smoothly but sets firm.
- Store-bought Hot Chocolate Powder: You can also substitute homemade; either way, it fills the bomb with cozy cocoa flavor.
- Candy Eyes and Extra White Chocolate or Bark: Perfect for turning the bombs into playful Halloween characters.
- Very Hot Milk: To pour over the bomb and watch the magic happen!
Variations
I love playing with different flavors and looks depending on who I’m making these for. Feel free to get creative—you might find a version that becomes your own Halloween tradition!
- Spiced Pumpkin Bombs: I once added pumpkin pie spice inside the cocoa mix, which gave a warm fall twist that my family went crazy for.
- Dark Chocolate Shell: Swap the white chocolate bark with dark or semi-sweet for a richer, less sweet option—great for adults!
- Vegan Version: Use dairy-free white chocolate alternatives and plant-based mini marshmallows to keep it friendly for everyone.
- Extra Crunch: Sprinkle crushed candy corn or nuts inside for texture that surprises with every sip.
How to Make Halloween Hot Chocolate Bombs Recipe
Step 1: Melt and Prepare Your Chocolate Shell
Start by gently melting your white chocolate bark in a double boiler or in short bursts in the microwave. Patience here is key—overheating can make it grainy or burn, so stir often and stop as soon as it’s almost fully melted. This smooth melted chocolate becomes the shell that holds all the goodies inside. Using a silicone mold designed for half spheres, spoon the melted chocolate into each cavity and swirl it around to coat the edges evenly. Then pop the mold in the fridge for about 10 minutes to firm up—this helps the shells hold their shape without cracking when you assemble the bombs.
Step 2: Fill with Cocoa Mix and Marshmallows
Once the shells are set, it’s time to fill! Mix your homemade cocoa powder blend (powdered sugar, Dutch-process cocoa, chopped white chocolate) or use store-bought hot chocolate powder. Add a small handful of mini marshmallows on top for that melty surprise. I like to keep the amounts balanced so every sip gets a little bit of everything without overwhelming the cup.
Step 3: Seal the Bombs and Decorate
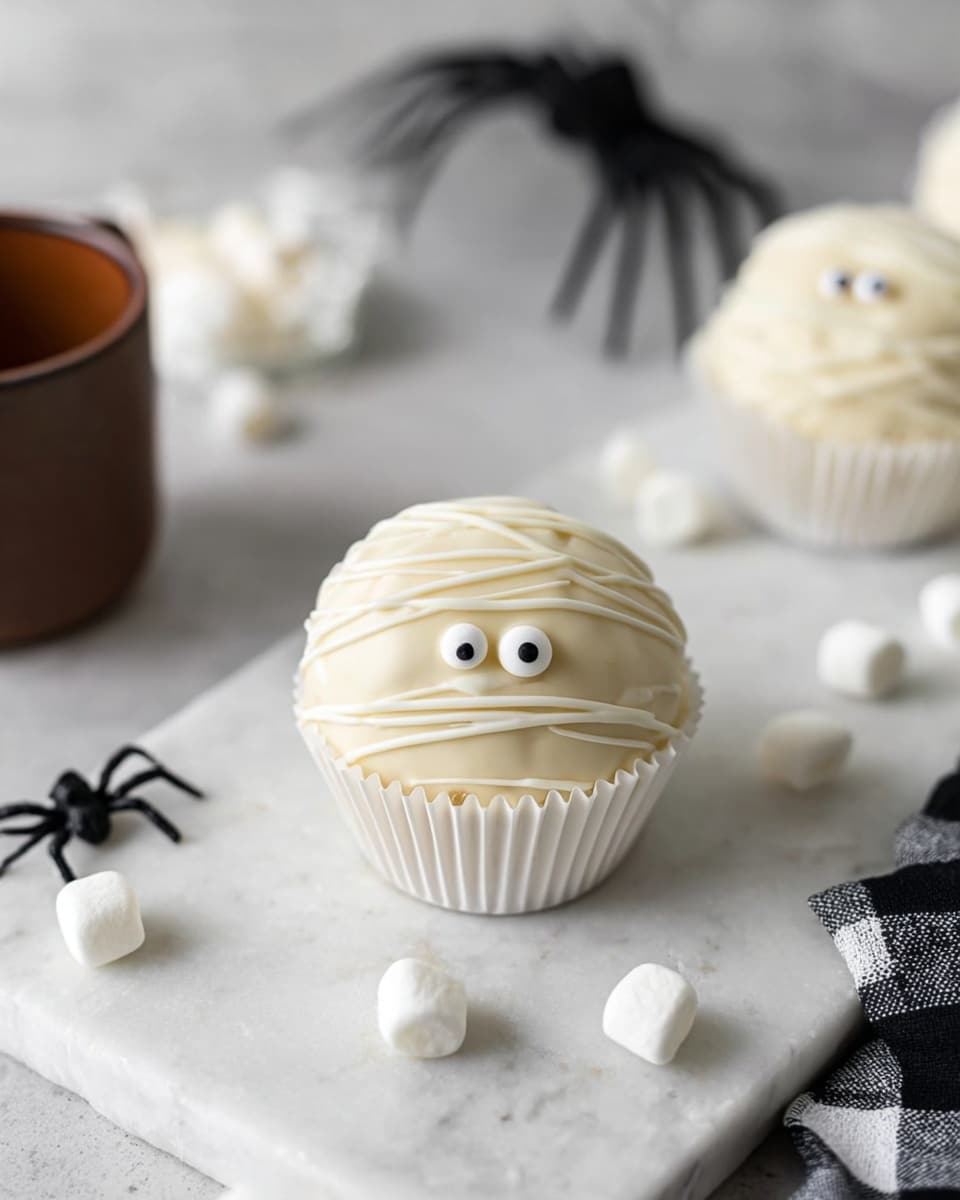
Now the fun part: sealing the bombs! Warm a plate slightly and carefully press the open edge of another chocolate half on the warm surface just long enough to melt the rim, then quickly place it on top of your filled half. Press gently to seal, and refrigerate again to set. Once firm, decorate your bombs with candy eyes affixed using small dots of melted chocolate. This step is where your Halloween Hot Chocolate Bombs Recipe really shines visually, and kids love helping with this part!
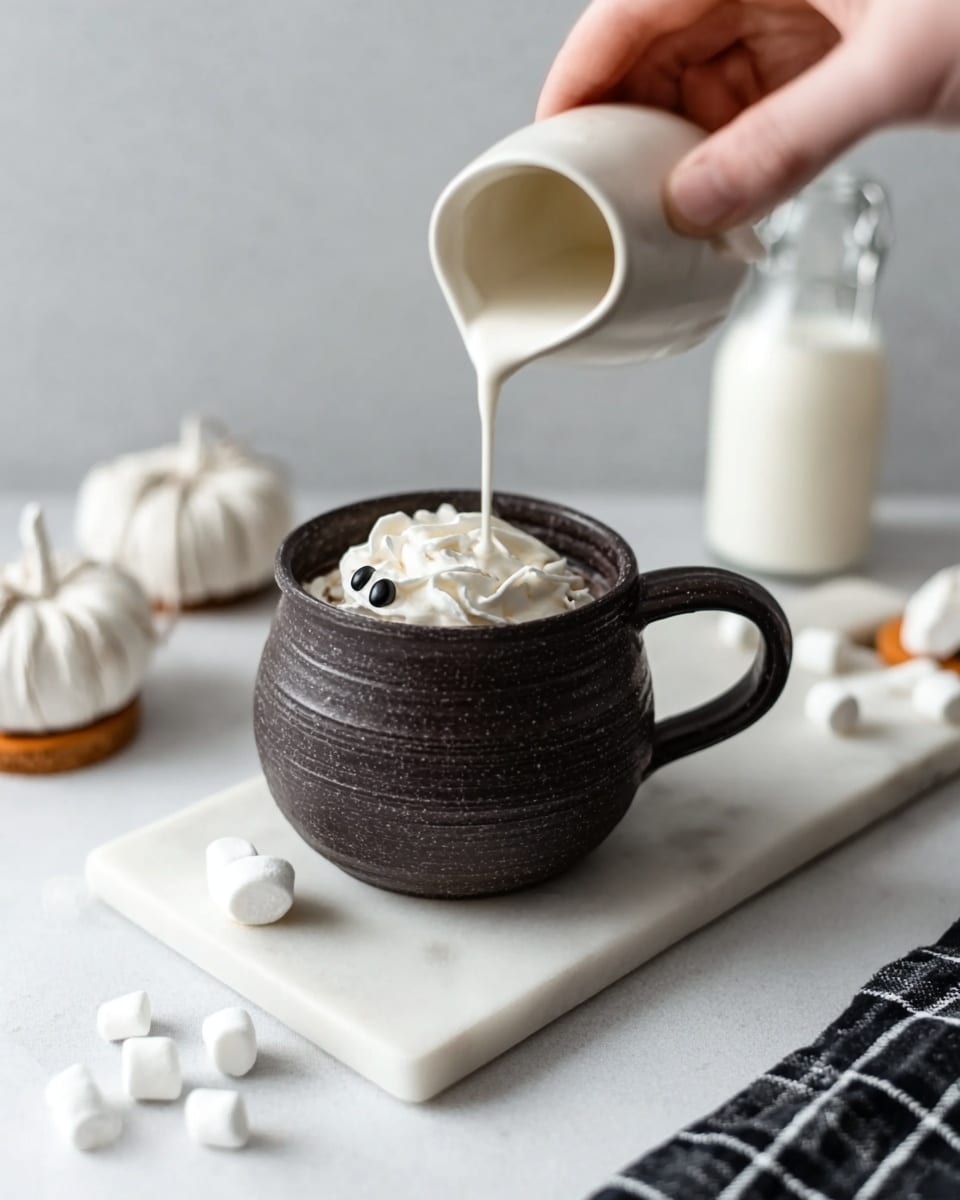
Step 4: Enjoy the Magic
To serve, place a bomb in a sturdy mug and pour 1 to 1.5 cups of very hot milk over it. Watch as the shell melts, releasing marshmallows and cocoa mix into the milk. Give it a gentle stir, and you’ve got instant, irresistible hot chocolate that’s perfect for chilly Halloween nights.
Pro Tips for Making Halloween Hot Chocolate Bombs Recipe
- Tempering Matters: I discovered tempering white chocolate makes the biggest difference in shell snap and shine, but if you’re short on time, carefully melting bark works well, too.
- Don’t Overfill: Overstuffing with marshmallows or cocoa powder can make sealing tricky—you want enough that it’s flavorful, but still room to close with a strong seal.
- Use Silicone Molds: They’re gentle on delicate chocolate and make popping bombs out so easy, saving you lots of frustration.
- Avoid Water Contact: Any moisture can seize your chocolate, so keep everything dry including your tools and workspace.
How to Serve Halloween Hot Chocolate Bombs Recipe
Garnishes
I love topping off the hot chocolate with a little whipped cream, a sprinkle of cinnamon or pumpkin spice, and maybe a few extra mini marshmallows or crushed candy corn on top for vibrant color and texture. It gives that extra cozy touch and lets your creativity shine.
Side Dishes
Since these hot chocolate bombs are rich and sweet, I usually pair them with light, crunchy treats like cinnamon sugar cookies or spiced biscotti. The contrast in texture and flavor balances perfectly, making your Halloween snack spread extra special.
Creative Ways to Present
For parties, I arrange the bombs in small clear jars or cellophane bags tied with orange and black ribbons. You can even float tiny LED tealights inside jars for a spooky glow. If you’re gifting, packaging several bombs in decorated boxes with small recipe notes adds a thoughtful personal touch that always makes people smile.
Make Ahead and Storage
Storing Leftovers
I store my finished hot chocolate bombs in an airtight container in a cool, dry place—away from direct sunlight and humidity—to keep them from melting or becoming sticky. This way, they last up to two weeks perfectly, so you can enjoy them over multiple cozy nights.
Freezing
If you want to save them for later, freezing works like a charm! Just wrap each bomb gently in plastic wrap and place them in an airtight container when freezing. When you’re ready to enjoy, thaw them at room temperature for about 15-20 minutes to avoid condensation.
Reheating
Since the bombs are best enjoyed by melting them in hot milk, I don’t recommend reheating them on their own. Instead, just heat milk on the stove or microwave, then drop a bomb in and watch the magic happen for a fresh, creamy cup every time.
FAQs
-
Can I use milk chocolate or dark chocolate instead of white chocolate for the shell?
Absolutely! White chocolate gives a fun spooky look that’s perfect for Halloween, but milk or dark chocolate shells work just as well. Just be sure to melt and temper them properly to get that sturdy, shiny finish. The flavor will be richer and less sweet, so pick the chocolate type based on your preference.
-
How do I prevent the hot chocolate bombs from cracking?
Chocolate can be delicate, so avoid sudden temperature changes. Make sure your molds and filling are cooled before sealing and handle the finished bombs gently. Tempering the chocolate helps give a snap that resists cracks, and storing them in a cool dry place (not the fridge) keeps them intact longer.
-
What if my chocolate doesn’t melt smoothly or looks grainy?
This usually happens if the chocolate gets too hot or moisture sneaks in. Melt slowly over low heat or in short microwave bursts, stirring frequently. Keep everything dry — even a drop of water can seize chocolate and make it grainy. Starting with good-quality chocolate also helps ensure a smooth, shiny shell.
-
Can I make Halloween Hot Chocolate Bombs Recipe ahead of time for a party?
Yes! These are fantastic for prepping a day or two in advance. Just store them in an airtight container at room temperature and decorate right before the party if you want the candy eyes to look fresh. They really hold up well and save you last-minute stress.
-
What’s the best kind of milk to use?
I stick with whole milk because it adds creaminess that balances the sweetness of the bombs, but any milk or milk alternative works great too—just make sure it’s very hot when pouring over the bomb so it melts quickly and evenly.
Final Thoughts
When I first tried making Halloween Hot Chocolate Bombs, I was hooked immediately—not just because they tasted amazing, but because they brought an extra dash of joy and magic to chilly autumn evenings. They’re really special to me now, especially sharing them with loved ones on a spooky night. I promise, once you try this recipe, you’ll find it’s as much fun making them as it is drinking the resulting hot chocolate. So go ahead, give this Halloween Hot Chocolate Bombs Recipe a whirl and make your next fall gathering irresistibly memorable!
Print
Halloween Hot Chocolate Bombs Recipe
- Prep Time: 20 minutes
- Cook Time: 10 minutes (melting and molding)
- Total Time: 30 minutes
- Yield: 6 hot chocolate bombs
- Category: Dessert
- Method: No-Cook
- Cuisine: American
Description
Halloween Hot Chocolate Bombs are a festive and fun twist on classic hot cocoa. These white chocolate spheres filled with a rich hot chocolate powder and mini marshmallows melt spectacularly when hot milk is poured over them, releasing a decadent, warming drink perfect for Halloween celebrations.
Ingredients
Hot Chocolate Filling
- 1/4 cup (40 grams) powdered sugar
- 2 tablespoons (15 grams) unsweetened cocoa powder (Dutch-process preferred)
- 1/4 cup (22 grams) finely chopped white chocolate
- 1/2 cup (30 grams) mini marshmallows
Chocolate Shell
- 2 pounds (907 grams) white chocolate bark or tempered white chocolate
Decorations
- Candy eyes
- Additional white chocolate or white chocolate bark for decorating
Additional Ingredients
- 1-1 1/2 cups (240ml-355ml) very hot milk
- Alternative hot chocolate filling: 2/3 cup store-bought hot chocolate powder + 1/2 cup mini marshmallows
Instructions
- Prepare the Hot Chocolate Filling: In a mixing bowl, combine the powdered sugar, unsweetened cocoa powder, finely chopped white chocolate, and mini marshmallows. This mixture will fill the chocolate bombs and create the hot chocolate flavor when melted.
- Melt the White Chocolate: Gently melt the white chocolate bark or tempered white chocolate in a double boiler or microwave in short bursts, stirring regularly to avoid burning. Ensure the chocolate is smooth and fluid for molding.
- Mold the Chocolate Shells: Using a silicone sphere mold, coat the cavities evenly with melted white chocolate. Place the molds in the refrigerator to harden the shell.
- Fill the Bombs: Once the chocolate shells are firm, fill each half-sphere with the prepared hot chocolate filling mixture or the alternative store-bought hot chocolate powder and mini marshmallows.
- Seal the Bombs: Warm a small plate and gently press two chocolate-filled halves together by softening the edges of one half on the warm plate, then joining it with the other half. Allow the seam to solidify by refrigerating briefly.
- Decorate the Bombs: Use melted white chocolate and candy eyes to decorate the outer shells, creating a spooky Halloween theme. Let decorations set completely.
- Serve: To enjoy, place one chocolate bomb in a mug and pour 1 to 1 1/2 cups of very hot milk over it. Stir well as the bomb melts, releasing the cocoa and marshmallows into the drink.
Notes
- Use good quality white chocolate for a smooth shell that melts nicely.
- Tempering the white chocolate helps it set with a nice snap and shiny finish but is optional.
- Be careful not to overheat the chocolate during melting to prevent graininess.
- Customize decorations to match your Halloween theme using colored candy melts or sprinkles.
- Serve immediately after pouring hot milk for the best visual and flavor impact.
Nutrition
- Serving Size: 1 hot chocolate bomb
- Calories: 250 kcal
- Sugar: 28 g
- Sodium: 35 mg
- Fat: 13 g
- Saturated Fat: 8 g
- Unsaturated Fat: 4 g
- Trans Fat: 0 g
- Carbohydrates: 30 g
- Fiber: 2 g
- Protein: 3 g
- Cholesterol: 10 mg
