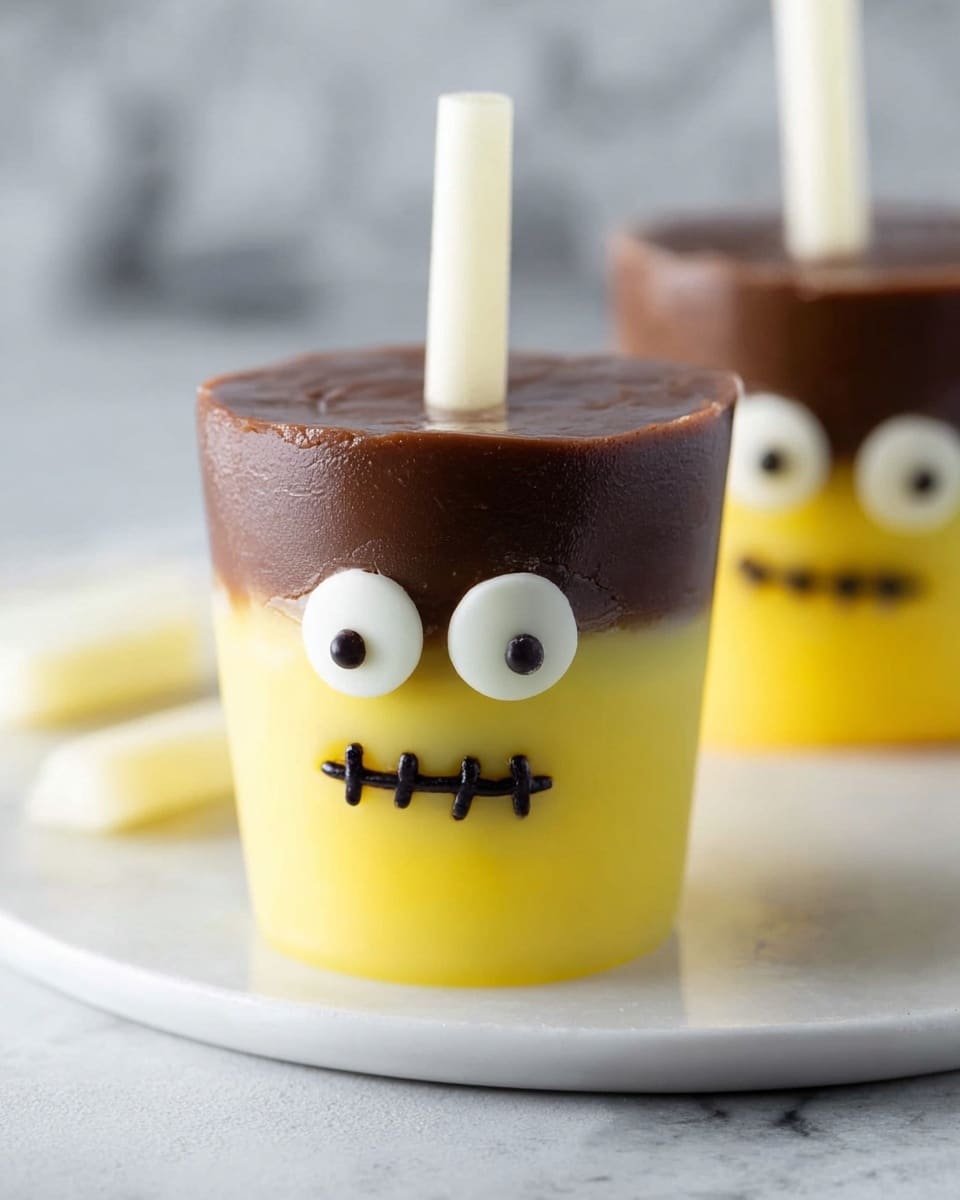
If you’re looking to add a little spooky fun to your Halloween celebrations, this Halloween Frankenstein Pudding Pops Recipe is a total game-changer! It’s easy, festive, and downright delicious — plus, it’s a fantastic way to get the kids involved in the kitchen. I absolutely love how the creamy pudding layers turn into creepy-cute Frankenstein pops that are as fun to make as they are to eat. Keep reading, and I’ll walk you through everything so your Frankenstein pudding pops come out perfectly every time.
Why You’ll Love This Recipe
- Super Simple Ingredients: You probably already have everything on hand — no crazy shopping spree needed.
- Kid-Approved Fun: My kids love helping me create the Frankenstein faces, making this a festive activity as well as a treat.
- Perfectly Portion-Controlled: Each pop is a shareable, mess-free dessert that’s great for parties or snacks.
- Customizable: You can tweak colors, puddings, or decorations to match your own Halloween vibe.

Ingredients You’ll Need
Every ingredient in this Halloween Frankenstein Pudding Pops Recipe is chosen to create those perfect spooky layers with minimal fuss. Picking quality pudding mixes makes a big difference, and I always suggest grabbing candy eyeballs at your local store or online—they really bring the pops to life.
- Chocolate pudding mix: Use your favorite brand for rich, smooth chocolate flavor that contrasts perfectly with the green layer.
- Vanilla pudding mix: This is the base for our green Frankenstein color, so go for a classic vanilla that sets well.
- Green food coloring: Just a couple of drops will give your vanilla pudding that spooky Frankenstein hue.
- Paper cups: These make freezing and peeling the pops so much easier, plus they keep the layers distinct.
- Candy eyeballs: These are a Halloween must-have to give your pops that creepy character.
- Lollipop or wooden sticks: Essential to hold your pudding pops — I prefer wooden sticks for a sturdier grip.
Variations
I love how versatile this Halloween Frankenstein Pudding Pops Recipe is. I’ve tried tweaking the pudding flavors, experimenting with different colors, and even using alternative toppings. Don’t be afraid to make it your own—these pops are a canvas for your creativity!
- Use different pudding flavors: I once swapped vanilla for banana pudding and added orange food coloring for a “Pumpkin Patch” vibe—super tasty and colorful!
- Dairy-free alternative: Try coconut milk-based pudding mixes if you’re avoiding dairy, and it still freezes nicely.
- Add sprinkles or edible glitter: For extra festive sparkle, especially fun for Halloween parties or classroom treats.
- Change the face design: Use black licorice strips for stitched scars or mini chocolate chips for a quirky grin.
How to Make Halloween Frankenstein Pudding Pops Recipe
Step 1: Prepare Your Pudding Bases with a Green Twist
Start by mixing your chocolate and vanilla pudding according to the package instructions. This step is key for smooth, creamy pudding pops. Then, add 1 to 2 drops of green food coloring to your vanilla pudding, stirring gently until you get that just-right Frankenstein green. Don’t overdo it—you want a fun tint, not a neon flood!
Step 2: Layer It Up in Paper Cups
Grab your paper cups and spoon about half a cup of the green pudding into the bottom of each. I like to keep this layer nice and thick because it really gives the pops that signature Frankenstein look. Now, here’s my secret: before dolloping the chocolate pudding on, set aside about a quarter cup for decorating later—this makes stitching the mouth a breeze.
Step 3: Add Chocolate Layers and Insert Sticks
Top each cup with roughly a quarter cup of the chocolate pudding. The goal is a ⅔ green to ⅓ chocolate pudding ratio for that perfect color contrast. Once layered, press a lollipop or wooden stick down into the center—make sure it’s steady but not pushed through the bottom. Pro tip: Place the cups on a baking sheet to keep everything level in the freezer.
Step 4: Freeze and Decorate Your Frankenstein Faces
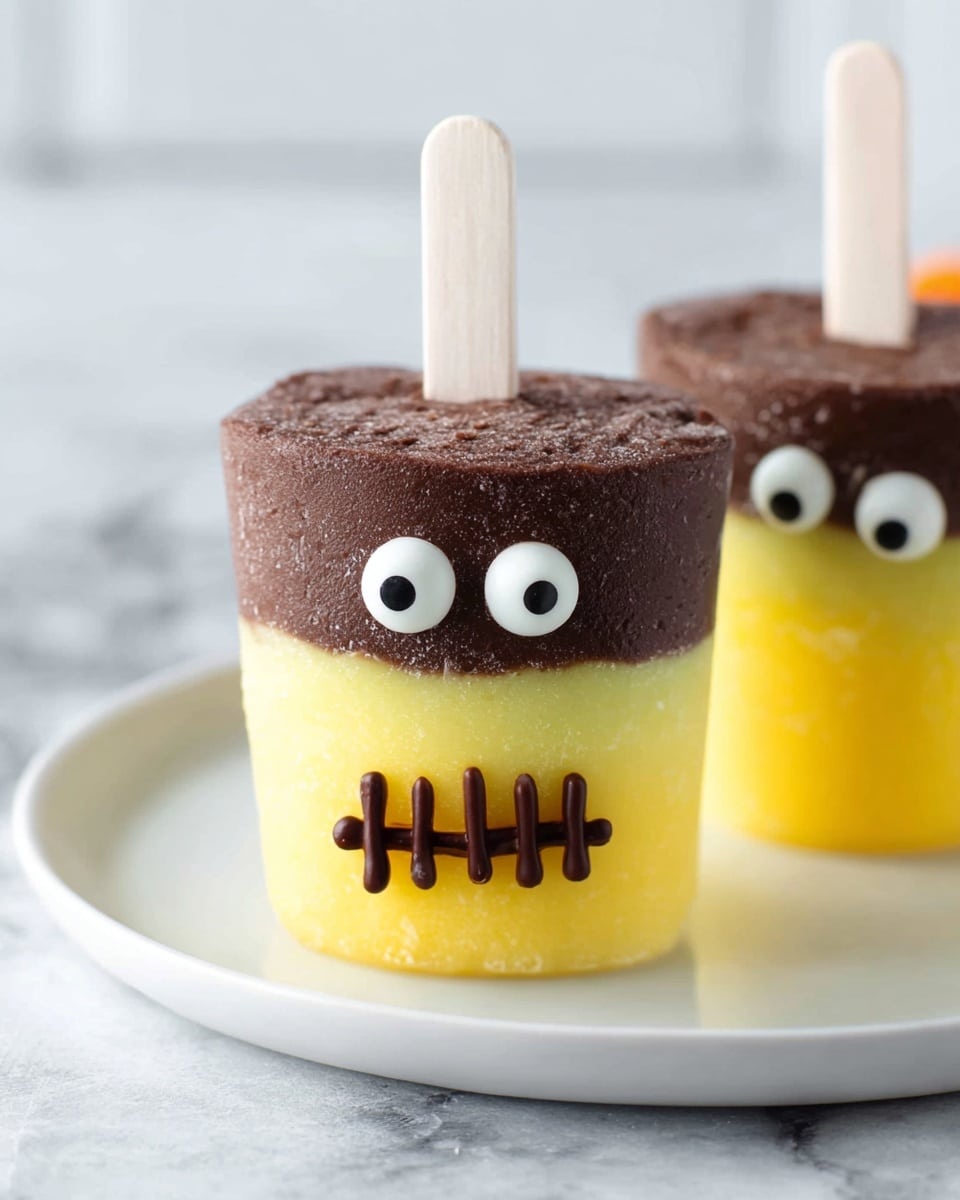
Freeze your pudding pops for about 5 hours or until they’re solid. This is important because you want them fully frozen before removing the paper cups, or else you’ll end up with a sticky mess. Once frozen, gently peel off the cups—this part always feels like unwrapping a Halloween gift. Then, use the reserved chocolate pudding in a piping bag to draw stitched mouths. Stick candy eyeballs on by piping a tiny dot of pudding on their backs and pressing them into place. You can serve immediately or pop them back in the freezer for 10-15 minutes to set the decorations firmly.
Pro Tips for Making Halloween Frankenstein Pudding Pops Recipe
- Keep Paper Cups Upright: Using a baking sheet during freezing prevents spills and keeps your layers neat.
- Don’t Overfill the Cups: Leave a little room at the top so pudding doesn’t squish out when you insert the stick.
- Use a Sharp Knife to Peel Cups: If your paw prints want to stick, gently run a knife around the edges before peeling.
- Pipe Decorations When Firm but Not Frozen Solid: This prevents cracking or smudging your carefully piped stitches and eyeballs.
How to Serve Halloween Frankenstein Pudding Pops Recipe
Garnishes
I like to keep it simple with the candy eyeballs and stitched mouths, but sometimes I add tiny green sprinkles or edible glitter to give the pops a little extra Halloween magic. If you’re feeling artsy, use black icing or licorice strings to add scar lines or hair. It turns these pudding pops into real party conversation starters!
Side Dishes
These pudding pops pair wonderfully with classic Halloween snacks — think apple slices with caramel dip, popcorn tossed with a bit of cinnamon sugar, or even small sandwiches shaped like bats or pumpkins. They’re a nice cool contrast after these savory or sweet sides.
Creative Ways to Present
For Halloween parties, I sometimes set the pudding pops upright in a platter filled with crushed Oreos or “dirt,” which adds a fun visual and keeps pops from tipping over. Another time, I wrapped each pop in cellophane tied with a festive ribbon—makes them super cute as party favors! Get creative with colors and toppings to suit your spooky theme.
Make Ahead and Storage
Storing Leftovers
I usually keep leftover fridge pops in an airtight container in the freezer to keep them fresh and prevent freezer burn. Just make sure the decorations are fully set before storing to avoid smudges. If you’re keeping them for more than a few days, wrap each pop in plastic wrap for extra protection.
Freezing
This Halloween Frankenstein Pudding Pops Recipe freezes really well, which is awesome if you want to make them in advance. Just follow the instructions and freeze for at least 5 hours or overnight for best texture. When you’re ready to serve, thaw for a few minutes at room temp so they’re easier to eat without melting too fast.
Reheating
Since these are frozen pudding treats, I don’t recommend reheating—but you can let them sit at room temperature for 5-10 minutes before serving so they’re creamy and not rock hard. They’re at their best semi-frozen and refreshing on a warm day!
FAQs
-
Can I use homemade pudding for this Halloween Frankenstein Pudding Pops Recipe?
Absolutely! Homemade pudding works wonderfully, especially if you want to control sweetness or avoid additives. Just make sure your pudding is firm enough to hold layers and freeze properly—chilling it well before assembling helps maintain structure.
-
What if I don’t have candy eyeballs—what can I use instead?
No worries! You can use small chocolate chips, mini marshmallows with a dot of chocolate, or even draw eyes with black icing or edible markers. These alternatives add a fun homemade touch and still give your Frankenstein pops personality.
-
How do I prevent the pudding layers from mixing?
The key is to let the first layer set just a bit before adding the chocolate pudding on top. You don’t need to freeze between layers, but give the green pudding a couple of minutes to thicken so it holds its shape better and the layers stay distinct.
-
Can I make these ahead for a party?
Definitely! These pudding pops freeze well, so you can prepare them a day or two ahead. Just keep them covered and stored in the freezer until party time, then decorate closer to serving to keep the details fresh.
Final Thoughts
Making the Halloween Frankenstein Pudding Pops Recipe is one of my favorite little seasonal traditions. It’s simple, satisfying, and a great way to get everyone excited for Halloween. Whether you’re decorating with the kids or prepping for a spooktacular party, these pudding pops bring a smile every time. Give them a try—you’ll be surprised how easy and fun it is to turn pudding into a festive treat that’s as tasty as it is adorable!
Print
Halloween Frankenstein Pudding Pops Recipe
- Prep Time: 10 minutes
- Cook Time: 0 minutes
- Total Time: 5 hours 10 minutes
- Yield: 8 pops
- Category: Dessert
- Method: Freezing
- Cuisine: American
- Diet: Vegetarian
Description
Create spooky and delicious Halloween Frankenstein pudding pops using chocolate and vanilla pudding, green food coloring, candy eyeballs, and lollipop sticks. Perfect for festive treats that are fun to make and enjoy during Halloween parties or kid-friendly activities.
Ingredients
Base Ingredients
- 1 box (5.9 oz) chocolate pudding, prepared
- 1 box (5.9 oz) vanilla pudding, prepared
- 1-2 drops green food coloring
Additional Ingredients
- 8 paper cups (5-9 oz each)
- Candy eyeballs
- Lollipop or wooden sticks
Instructions
- Prepare the puddings: Mix the chocolate and vanilla puddings separately according to package instructions to ensure smooth consistency ready for layering.
- Color the vanilla pudding: Add 1-2 drops of green food coloring into the vanilla pudding, stirring gently until you achieve the desired Frankenstein green shade.
- Layer the pudding: Spoon about ½ cup of the green vanilla pudding into the bottom of each of the 8 paper cups to create the base layer.
- Reserve chocolate pudding for decorating: Set aside ¼ cup of the prepared chocolate pudding for later use in decorating the Frankenstein mouth.
- Add chocolate layer: Top each cup with approximately ¼ cup of chocolate pudding, creating a two-tone effect with roughly ⅔ green pudding and ⅓ chocolate pudding per cup.
- Insert sticks: Place a lollipop or wooden stick into the center of each cup to serve as the handle of the pudding pop.
- Freeze: Arrange the cups on a baking sheet for stability and freeze for about 5 hours or until fully firm and solid.
- Remove paper cups: Once frozen, carefully peel off the paper cups to reveal the pudding pops.
- Decorate the faces: Fill a piping bag or plastic bag with the reserved chocolate pudding and pipe stitched mouths onto the pudding pops.
- Add candy eyeballs: Dab a small dot of chocolate pudding on the back of each candy eyeball and press them onto the pops in place of eyes for a spooky effect.
- Final freeze: Serve immediately or place the decorated pops back in the freezer for 10-15 minutes to set the decorations firmly in place.
Notes
- Turn traditional pudding pops into adorable Frankenstein treats with this easy tutorial.
- Perfect for Halloween party treats or as a fun, spooky activity to make with kids.
- Ensure the pudding is fully firm before removing cups to avoid breaking the pops.
- Use paper cups that are the right size (5-9 oz) for easy removal and proper pops formation.
Nutrition
- Serving Size: 1 pop
- Calories: 142 kcal
- Sugar: 18 g
- Sodium: 100 mg
- Fat: 4.5 g
- Saturated Fat: 3 g
- Unsaturated Fat: 1 g
- Trans Fat: 0 g
- Carbohydrates: 25 g
- Fiber: 1 g
- Protein: 2 g
- Cholesterol: 10 mg


