
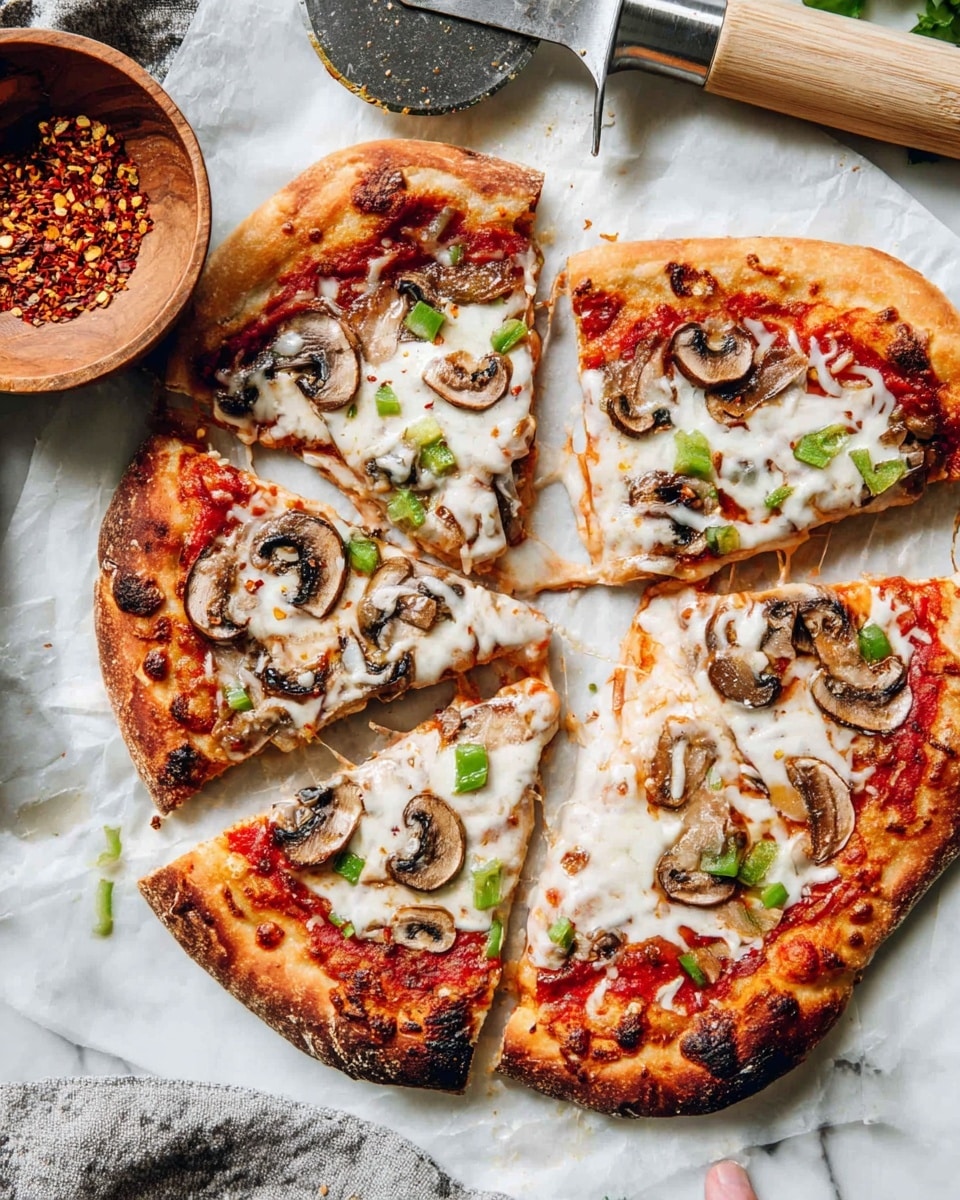
I absolutely love sharing this Grilled Pizza Recipe with friends because it feels like such a fun and fresh way to make pizza at home. There’s something magical about that smoky char from the grill combined with a crispy, bubbly crust that you just can’t get from your oven. It’s a perfect recipe for summer cookouts or when you want pizza without heating up the entire kitchen.
When I first tried grilling pizza, I was a little nervous about sticking and uneven cooking—but after a few tries, I discovered simple tricks that make it so easy and delicious. You’ll find that this Grilled Pizza Recipe is not only quick but super customizable, meaning you can pack it with your favorite toppings, sauces, and cheeses for a totally personalized meal.
Why You’ll Love This Recipe
- Quick & Easy: You can have pizzas ready in under 30 minutes—perfect for busy weeknights or spontaneous gatherings.
- Crispy, Smoky Crust: The grill gives the dough a wonderful char and crispiness that’s hard to replicate indoors.
- Fully Customizable: Whether you love classic margherita or loaded meat and veggies, you control every topping and sauce.
- Great for Entertaining: Make multiple smaller pizzas so everyone can build their own—super fun and engaging!

Ingredients You’ll Need
Choosing quality ingredients makes all the difference in this Grilled Pizza Recipe. While homemade dough elevates the flavor, using great sauces and fresh toppings truly brings it home. I often recommend picking toppings you enjoy eating fresh to balance the smoky grill flavors.
- Pizza dough: Homemade preferred for flavor, but store-bought dough works great for convenience.
- Olive oil: Helps prevent sticking and adds richness—don’t skip brushing this on the dough!
- Pizza sauce: Your choice—classic tomato, garlic white, BBQ, or even alfredo all work wonderfully.
- Cheese: Mozzarella is classic, but feel free to mix in provolone, parmesan, or a bold goat cheese for complexity.
- Desired toppings: From pepperoni to fresh veggies, keep them evenly sliced and not too wet to avoid soggy crust.
Variations
I love how flexible this Grilled Pizza Recipe is—you can easily tailor it to your mood or pantry. Over time, I’ve enjoyed playing around with everything from sauce options to crust thickness, and it always turns out great.
- BBQ Chicken Pizza: Swapping out traditional sauce for BBQ and topping with cooked chicken and red onions became an instant family favorite in my house.
- Veggie Loaded: Pile on zucchini, bell peppers, mushrooms, and olives for a colorful, healthy vibe that still grills perfectly.
- Cheese Lovers: Mixing mozzarella with cheddar and gouda gives a deeper cheesy flavor that melts beautifully without burning.
- Gluten-Free: Using a gluten-free pizza dough blend works just as well on the grill if you need that dietary adaptation.
How to Make Grilled Pizza Recipe
Step 1: Prepare Your Grill and Dough
Start by cleaning your grill grates thoroughly and then oil them really well—this is a key step to stop the delicate dough from sticking. Preheat the grill to about 425°F (medium-high heat). While the grill heats, divide your pizza dough into portions based on how large or thick you want your pizzas—somewhere between 5 to 8 pieces works well. Stretch or roll each piece into your desired shape on a piece of parchment paper.
Step 2: Grill the Dough, Oil Side Down
Brush the top of each dough piece with olive oil, then carefully flip the dough so the oiled side touches the grill, removing the parchment underneath. Cover the grill and let them cook for 2-3 minutes. Peek underneath with tongs to check for nice grill marks and a golden brown bottom—it should be firm enough to flip but not burnt.
Step 3: Add Sauce and Toppings
Once you flip the dough onto a plate, spread your favorite sauce on the cooked side, then add cheese and toppings. Try not to overload the pizza here—too many wet toppings can make the crust soggy or slow cooking.
Step 4: Finish Grilling
Lower the grill heat slightly, then slide the topped pizza back onto the grill to cook the sauced side. Close the lid and cook for another 3-5 minutes until the cheese melts and the bottom crust is beautifully golden and crisp. Keep an eye on it so nothing burns—every grill varies a bit!
Pro Tips for Making Grilled Pizza Recipe
- Oil the Grill Grates Thoroughly: I learned the hard way that skipping this makes your dough stick and tear—use a paper towel dipped in oil and tongs to grease well before heating.
- Watch for Color Changes: Keep an eye on the bottom of the crust and pull the pizza off when you see golden grill marks, which means it’s perfectly cooked without burning.
- Don’t Overload Toppings: Less is more for grilling; too many toppings slow down cooking and can make the crust soggy.
- Use Parchment Paper for Easy Flips: This trick keeps the dough stable and makes transferring on and off the grill a breeze.
How to Serve Grilled Pizza Recipe
Garnishes
I usually finish my grilled pizzas with a sprinkle of fresh basil or arugula because the brightness contrasts beautifully with the smoky crust. A drizzle of good-quality olive oil or balsamic glaze is something I swear by—it adds that extra zing that elevates the flavor.
Side Dishes
To keep things simple and fresh, I often serve grilled pizza alongside a crisp Caesar salad or a bowl of grilled vegetables. For heartier occasions, garlic bread or a vibrant pasta salad pairs nicely without competing with the pizza’s flavors.
Creative Ways to Present
When hosting, I like making mini grilled pizzas so guests can customize their own. Laying out a toppings bar with sauces, cheeses, and veggies turns the meal into a fun DIY experience everyone enjoys. You can also slice grilled pizzas into wedges and serve on wooden boards for that casual but elegant vibe.
Make Ahead and Storage
Storing Leftovers
Leftover grilled pizza keeps best when cooled completely and stored in an airtight container in the fridge. I like cutting it into portions first for easy reheating without making a mess.
Freezing
If I end up with a lot of leftovers, I freeze slices individually wrapped in plastic wrap and then foil—this way they don’t stick together and thaw quickly when ready to eat.
Reheating
To reheat, I pop leftover pizza slices back on a medium-heated grill or in a hot oven for a few minutes to crisp back up the crust and melt cheese—it’s miles better than microwave sogginess.
FAQs
-
Can I use store-bought pizza dough for this Grilled Pizza Recipe?
Absolutely! While I love using homemade dough for flavor, store-bought dough works wonderfully and saves time. Just make sure to bring it to room temperature before stretching to make it easier to handle on the grill.
-
What if my dough sticks to the grill?
This is a common issue. To prevent sticking, clean and oil your grill grates thoroughly before heating and brush olive oil on the dough’s top side so when flipped onto the grill, the oiled side contacts the grates. Using parchment paper during transfer also helps a lot.
-
How thick should I make my pizza dough for grilling?
I find dough rolled to about ¼ to ⅓ inch thick grills best—thin enough to cook through quickly but thick enough to handle flipping and hold toppings without sagging.
-
Can I cook the entire pizza on the grill without flipping?
Grilling one side first and then flipping for toppings is key. Cooking the entire pizza on one side leads to burnt crust on the bottom and unmelted cheese on top. Flipping after grilling the first side ensures even cooking and melting.
-
Is this Grilled Pizza Recipe safe for gas and charcoal grills?
Yes! Both types of grills work well, though charcoal adds a lovely smoky flavor. Just maintain medium-high heat and avoid flare-ups that can burn your crust.
Final Thoughts
This Grilled Pizza Recipe has become one of my go-to meals when I want something easy but impressive. It’s a joy to make, especially sharing the experience with family or friends gathered around the grill. I know you’ll enjoy the crispy crust, smoky flavors, and endless topping possibilities just as much as I do—give it a try and make it your own!
Print
Grilled Pizza Recipe
- Prep Time: 20 minutes
- Cook Time: 8 minutes
- Total Time: 28 minutes
- Yield: 16 servings
- Category: Main Course
- Method: Grilling
- Cuisine: Italian
Description
This grilled pizza recipe offers a quick and flavorful way to enjoy homemade pizza with a smoky twist. Using simple ingredients like homemade or store-bought pizza dough, olive oil, your favorite sauce, and toppings, the pizzas are cooked directly on a preheated grill for a crispy crust and deliciously melted cheese. Perfect for outdoor cooking enthusiasts, this method ensures a perfectly grilled crust with customizable toppings in just under half an hour.
Ingredients
Dough
- Pizza dough: homemade (recipe makes 2 large pizzas) or store-bought, divided into 5-8 portions depending on desired pizza size and thickness
Other Ingredients
- 2 Tablespoons olive oil
- Pizza sauce: your choice of pizza sauce, 5-minute pizza sauce, white garlic sauce, BBQ sauce, or alfredo sauce
- Desired toppings: cheese, pepperoni, assorted meats, vegetables, etc.
Instructions
- Prepare the Grill: Clean the grill thoroughly and oil the grates well to prevent the pizza crust from sticking. Preheat the grill to 425°F (medium-high heat).
- Shape the Dough: Divide the pizza dough into 5 to 8 portions depending on your preferred pizza size and thickness. Stretch or roll out each portion to the desired size and place the dough on a piece of parchment paper.
- Oil and Grill the Dough: Brush the top side of the prepared dough portions with olive oil. Carefully lift the parchment paper and flip the dough onto the grill, with the oiled side down. Remove the parchment paper from underneath the crust.
- Initial Grilling: Cover the grill and cook the dough for 2 to 3 minutes. Check using tongs for grill marks and a golden-brown bottom crust.
- Add Sauce and Toppings: Flip the grilled dough onto a plate so the cooked side is facing up. Spread your chosen sauce evenly over the grilled side, then add cheese and your desired toppings.
- Finish Grilling: Reduce the heat slightly on the grill, then slide the pizza back onto the grill to cook for an additional 3 to 5 minutes. Cook until the cheese melts and the bottom crust turns golden and crispy.
Notes
- Using parchment paper makes transferring the dough onto the grill much easier and helps maintain the dough’s shape.
- Adjust the number of dough portions to make thicker or thinner pizza crusts according to preference.
- Keep an eye on the grill to prevent burning; cooking times may vary depending on your grill’s heat output and outdoor conditions.
- If you prefer a less smoky flavor, you can finish the pizza in an oven after grilling the crust.
- Be cautious when handling the hot grill and pizza to avoid burns.
Nutrition
- Serving Size: 1 slice
- Calories: 125 kcal
- Sugar: 2 g
- Sodium: 1 mg
- Fat: 3.5 g
- Saturated Fat: 1 g
- Unsaturated Fat: 2.5 g
- Trans Fat: 0 g
- Carbohydrates: 20 g
- Fiber: 1 g
- Protein: 5 g
- Cholesterol: 5 mg

