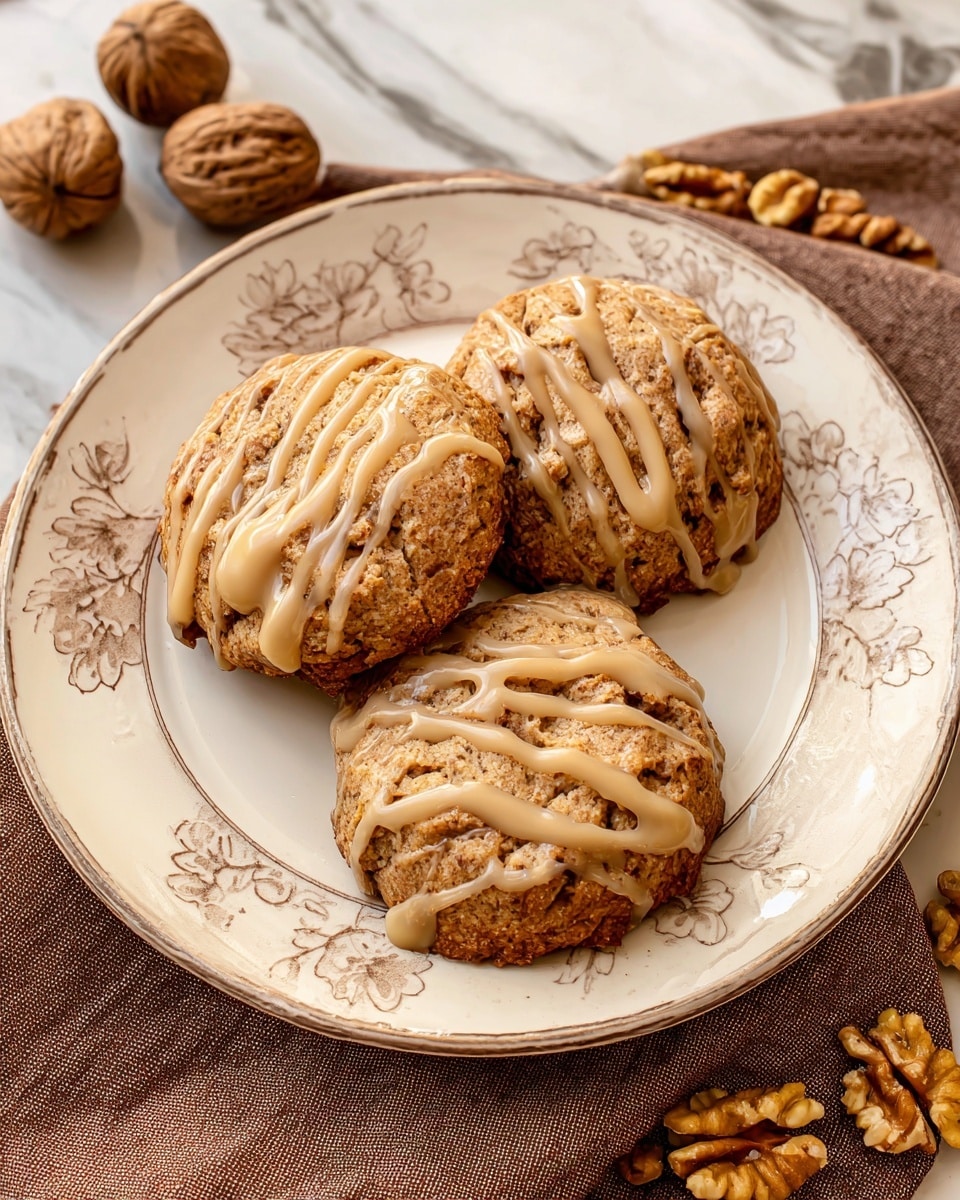
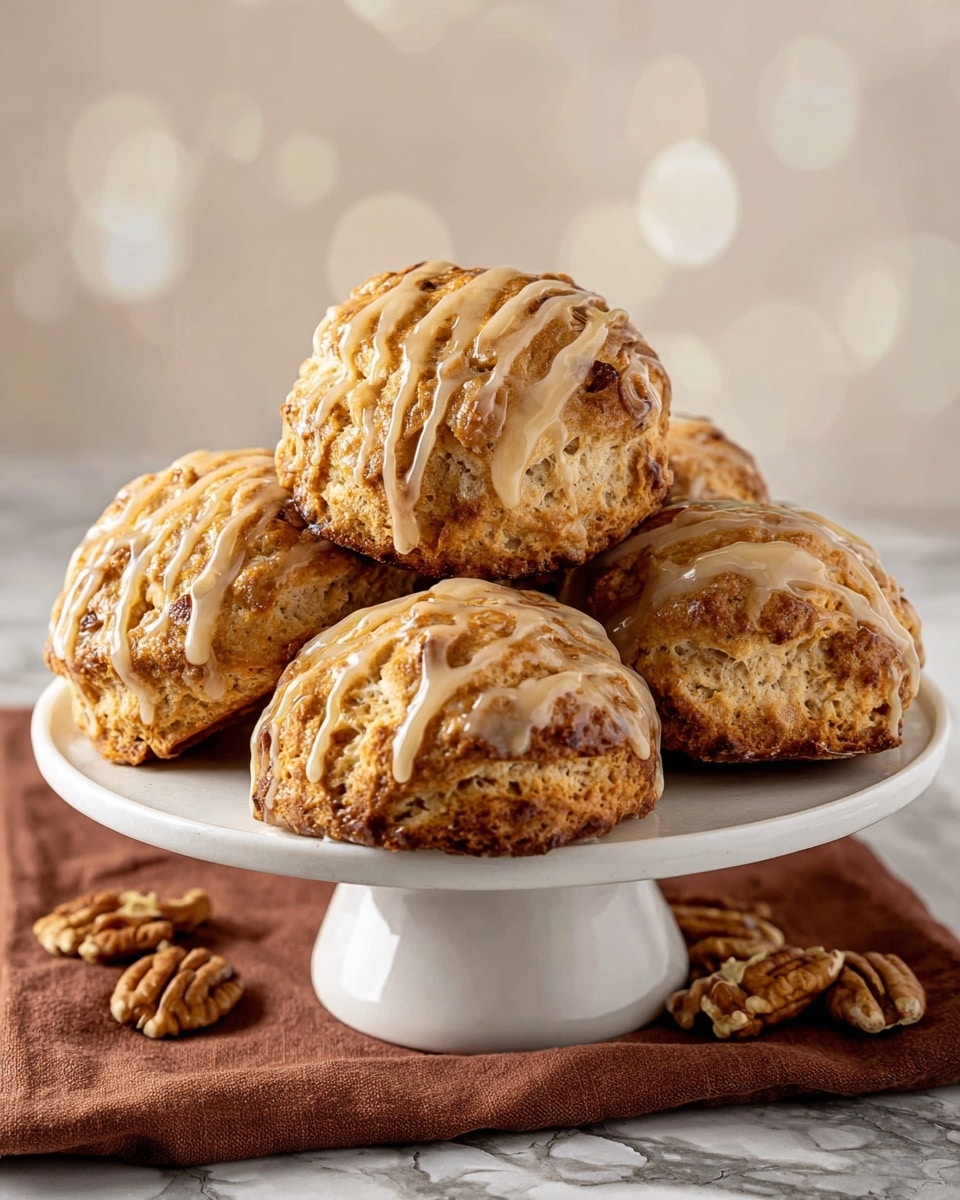
If you adore that beautiful mix of sweet and nutty with a tender crumb, you’re going to fall head over heels for this Glazed Maple Walnut Scones Recipe. These scones are just bursting with the rich flavor of maple syrup, studded with crunchy walnuts, and finished off with a luscious maple glaze that’s basically irresistible. I promise, once you try these, they’ll become your go-to for breakfast, brunch, or even an afternoon treat with coffee or tea.
Why You’ll Love This Recipe
- Incredible Flavor: The blend of dark amber maple syrup and toasted walnuts creates a rich, comforting taste you won’t forget.
- Tender, Flaky Texture: Grated frozen butter keeps the scones light and flaky, just like bakery-style scones.
- Easy to Make: With straightforward steps and common ingredients, this recipe is approachable even if you’re new to baking scones.
- Perfectly Sweet Finish: The maple glaze adds just enough sweetness without overpowering the delicate walnut flavor.

Ingredients You’ll Need
For this Glazed Maple Walnut Scones Recipe, you’ll want to use fresh, quality ingredients because they make all the difference—especially with the simple flavor profile where every component shines. I always grab real pure maple syrup labeled “Dark Amber” for a richer taste, and fresh walnuts add that perfect crunch and toasty aroma.
- All-purpose flour: The base for your scones, providing structure and tenderness.
- Baking powder: Gives your scones that lovely rise and light texture.
- Kosher salt: Enhances all the flavors and balances the sweetness.
- Unsalted butter (frozen, grated): Using frozen butter grated into the flour creates those flaky layers you’ll love.
- Heavy cream: Keeps the scones moist and tender, plus used for brushing on top for a golden crust.
- Pure maple syrup (Dark Amber): Adds deep maple sweetness both in the dough and in the glaze.
- Brown sugar (packed): Offers a subtle molasses note and adds to the tenderness.
- Large egg: Helps bind everything together and enriches the dough.
- Walnuts (coarsely chopped): Adds crunch and a warm, nutty flavor balance.
- Coarse sugar (optional): Sprinkled on top for a little sparkle and sweet crunch.
- Powdered sugar: For making the smooth, shiny maple glaze.
Variations
I love to mix things up with this recipe depending on what I have on hand or the season. The great thing is these scones are a flexible base, so feel free to get creative and make them your own. Here are a few variations I’ve tried and totally enjoyed.
- Adding dried cranberries or cherries: I tossed these into the dough once, and it gave a lovely tart contrast to the sweet maple and crunchy walnuts—perfect around the holidays.
- Using pecans instead of walnuts: They give a slightly sweeter, buttery flavor. My family actually prefers pecans now, but walnuts keep it classic.
- Maple Glaze with a hint of cinnamon: Adding a pinch of cinnamon to the powdered sugar glaze adds warmth and extra fall vibes.
- Vegan Version: Swap heavy cream with full-fat coconut milk, butter for vegan butter, and egg for a flax egg—I’ve had great success with this tweak.
How to Make Glazed Maple Walnut Scones Recipe
Step 1: Prep your baking space and ingredients
First things first, preheat your oven to 400 °F, and line two baking sheets with parchment paper or a silicone baking mat. I find a Silpat mat helps prevent sticking and promotes even browning. Also, make sure your butter is frozen before you start and then grate it using a box grater—this little trick makes all the difference for light, flaky scones.
Step 2: Mix dry ingredients and incorporate butter
In a large mixing bowl, whisk together your flour, baking powder, and salt. Toss in the grated frozen butter bit by bit, then use a pastry blender or your fingers to cut the butter into the flour until you get pea-sized crumbs. It should look coarse but not uniform. Those butter bits are your secret to the flaky layers, so don’t overwork the dough.
Step 3: Mix wet ingredients and combine with nuts
In a separate bowl, whisk together the heavy cream, maple syrup, brown sugar, and egg until you have a smooth, lump-free mixture. Gently pour this into the dry ingredients along with the chopped walnuts. Stir everything just until combined—it’s okay (and preferable!) if the dough looks a bit shaggy and you still see some small butter bits. This means the scones will bake up tender and flaky.
Step 4: Portion, shape, and bake
Use a large cookie scoop (or ice cream scoop) to drop about ¼-cup mounds of dough onto your prepared pans. I always leave about 3 inches between each so they have room to rise evenly. Brush each scone lightly with cream, then sprinkle with coarse sugar if you like a bit of extra crunch and sparkle on top. Bake for 18 to 23 minutes, rotating your pans halfway through to get an even golden finish. When done, the edges will have a beautiful light golden color and the center barely firming up.
Step 5: Prepare and drizzle the maple glaze
While the scones bake, warm your maple syrup and butter together on low in a small saucepan, whisking until melted and combined. Let it cool a few minutes, then whisk into powdered sugar to make a smooth glaze that’s thick but drizzle-able—think molasses consistency. Adjust with tiny bits of water or more powdered sugar if needed. When the scones come out of the oven and are still warm, drizzle the glaze generously over the top and let it set for about 10 minutes if you can wait that long!
Pro Tips for Making Glazed Maple Walnut Scones Recipe
- Keep Butter Cold: I learned the hard way that warm butter makes scones dense—grate butter straight from the freezer for best flakiness.
- Don’t Overmix the Dough: Stir until just combined. Overworking causes tough scones and blunts the delicate texture.
- Use a Silpat or Parchment: Prevents sticking and promotes golden and even baking without hassle.
- Glaze While Warm: Drizzling glaze immediately after baking helps it set beautifully and soak in just a bit for extra flavor.
How to Serve Glazed Maple Walnut Scones Recipe
Garnishes
I like to keep the garnishes simple to let the scones shine. A few extra toasted walnut pieces sprinkled on after glazing add a lovely crunch and visual appeal. Sometimes, a tiny swipe of softened butter or a dollop of clotted cream on the side takes it to the next level without competing with the maple flavor.
Side Dishes
These scones pair perfectly with a warm cup of coffee or maple-flavored latte for a cozy morning. I also love serving them alongside fresh fruit salad or a simple yogurt parfait with honey and granola for a balanced brunch spread.
Creative Ways to Present
For special occasions, I like arranging these scones on a wooden board surrounded by small bowls of whipped cream, jam, and extra maple syrup for drizzling. Adding fresh herbs like a sprig of rosemary or thyme not only looks beautiful but brings an unexpected aroma that guests always comment on!
Make Ahead and Storage
Storing Leftovers
Leftover scones keep great at room temperature covered lightly for up to 2 days. If you can’t finish them that fast, I store scones wrapped in plastic or airtight containers in the fridge for up to 5 days. Just bring them to room temp or warm gently before enjoying—they taste almost freshly baked.
Freezing
I freeze both baked and unbaked scones with excellent results. For baked scones, wrap individually in plastic wrap and place in a freezer bag for up to 3 months. For make-ahead, drop portioned dough mounds on a tray, freeze until firm, then bag them—no thawing needed before baking. This trick saved me countless mornings!
Reheating
To reheat, pop scones in a preheated 350 °F oven for about 8–10 minutes or microwave briefly with a damp paper towel to keep moisture. I find the oven method keeps the texture best, especially if you want that crisp edge back.
FAQs
-
Can I use a different nut instead of walnuts?
Absolutely! While walnuts provide a classic flavor and crunch, pecans or hazelnuts work wonderfully too. Just chop them coarsely and use the same amount. Toasting the nuts briefly enhances their flavor even more.
-
What if I don’t have maple syrup? Can I substitute?
If you don’t have maple syrup, you can substitute honey or agave syrup, though the unique maple flavor will be less pronounced. For the glaze, adjust sweetness to taste. Using pure maple syrup really adds a special warm depth to the scones, so I recommend it when possible.
-
How do I avoid dry scones?
Be careful not to overmix or overbake your scones. Mixing just until combined and watching the baking time closely helps keep them tender. Also, using heavy cream and real butter adds moisture and richness that prevent dryness.
-
Can I make these scones vegan?
Yes, you can! Replace butter with vegan butter, heavy cream with full-fat coconut milk or plant-based cream, and the egg with a flax egg (1 tablespoon ground flaxseed mixed with 3 tablespoons water). The texture changes slightly but they still taste amazing.
Final Thoughts
I absolutely love how these Glazed Maple Walnut Scones turn out every single time—moist, flavorful, and with that perfect balance of sweet and nutty. When I first tried this recipe, I couldn’t believe how approachable it was, but the results were so impressive. Whether you’re baking for weekend breakfast or a special brunch, you’ll find this recipe rewarding and sure to get compliments. Give it a go, and I’m betting it’ll become a cherished favorite in your kitchen too!
Print
Glazed Maple Walnut Scones Recipe
- Prep Time: 30 minutes
- Cook Time: 25 minutes
- Total Time: 70 minutes
- Yield: 12 scones
- Category: Baked Goods
- Method: Baking
- Cuisine: American
Description
Glazed Maple Walnut Scones are tender, buttery scones sweetened with rich maple syrup and brown sugar, studded with crunchy walnuts for texture, and topped with a luscious maple glaze. Perfect for an Autumn morning or afternoon snack, these scones come together easily and deliver a comforting, seasonal treat that’s both satisfying and flavorful.
Ingredients
Scone Ingredients
- 2½ cups all-purpose flour
- 1 tablespoon baking powder
- ½ teaspoon kosher salt
- ½ cup unsalted butter (frozen and grated)
- ½ cup heavy cream (plus more for brushing on top)
- ⅓ cup pure maple syrup (Dark Amber, robust taste)
- ¼ cup brown sugar (packed, light or dark)
- 1 large egg
- 1 cup walnuts (coarsely chopped)
Glaze Ingredients
- 3 tablespoons pure maple syrup (Dark Amber, robust taste)
- 1 tablespoon unsalted butter
- ½ cup powdered sugar (sifted)
- Water (optional, to adjust glaze consistency)
- 1 tablespoon coarse sugar (for sprinkling, optional)
Instructions
- Preheat Oven and Prepare Pans: Preheat your oven to 400 °F. Line two half-sheet baking pans with a Silpat silicone mat or parchment paper and set aside for later use.
- Mix Dry Ingredients: In a large bowl, whisk together the all-purpose flour, baking powder, and kosher salt until evenly combined.
- Incorporate Butter: Grate the frozen unsalted butter using a box grater and gradually toss it into the flour mixture. Use a pastry blender, two forks, or your hands to work the butter into the flour until you achieve coarse, pea-sized crumbs. This ensures flaky texture in your scones.
- Chop Walnuts: Coarsely chop the walnuts into medium-sized pieces and set aside.
- Combine Wet Ingredients: In a medium bowl, whisk together the heavy cream, pure maple syrup, brown sugar, and large egg until the mixture is smooth and lump-free.
- Form the Dough: Pour the wet ingredients into the dry flour mixture, add the chopped walnuts, and stir gently just until the dough looks moistened. Be careful not to overwork the dough; you should still see bits of butter within.
- Portion the Dough: Using an extra-large cookie scoop or ice cream scoop, portion out ¼-cup mounds of dough onto the prepared baking pans, spacing them at least 3 inches apart. You may need a spoon to help release the sticky dough from the scoop.
- Brush and Sprinkle: Lightly brush the tops of the scones with heavy cream and optionally sprinkle coarse sugar for added crunch and sweetness.
- Bake Scones: Bake the scones in the preheated oven for 18 to 23 minutes, rotating the pans halfway through the baking time for even browning. The scones should be lightly golden when done. Remove from the oven and allow to cool for a few minutes.
- Prepare Maple Glaze: While the scones bake, combine the maple syrup and unsalted butter in a small saucepan over low heat. Whisk occasionally until the butter melts completely, then remove from heat and let the mixture cool for about 3 minutes.
- Make Glaze Consistency: Whisk the cooled maple mixture into the sifted powdered sugar until smooth. The glaze should be thick but still able to drizzle like molasses. Adjust thickness with small amounts of water or powdered sugar if needed.
- Glaze the Scones: Drizzle the maple glaze generously over the warm scones and let it set for approximately 10 minutes before serving. Enjoy your warm, sweet treat!
- Storage Tips: Scones are best fresh but can be kept at room temperature or refrigerated for 3 to 5 days. They freeze well up to 3 months; thaw overnight in the refrigerator and warm before serving.
- Make-Ahead Instructions: Freeze cut, unbaked scones in a ziplock bag. Bake directly from frozen at 375 °F for 20 to 25 minutes whenever you want fresh scones.
Notes
- For best texture, use frozen butter grated into the flour mixture to create flaky layers.
- Do not overwork the dough to keep scones tender and flaky.
- Maple syrup used in both the dough and glaze should be Dark Amber for robust flavor.
- Coarse sugar on top adds a pleasant crunch but is optional.
- These scones freeze well — perfect for make-ahead breakfasts or snacks.
- Rotate baking pans midway through baking to ensure even browning.
- Allow glaze to set before serving to avoid messiness.
Nutrition
- Serving Size: 1 scone
- Calories: 359
- Sugar: 19 g
- Sodium: 219 mg
- Fat: 20 g
- Saturated Fat: 9 g
- Unsaturated Fat: 11 g
- Trans Fat: 0 g
- Carbohydrates: 42 g
- Fiber: 1 g
- Protein: 5 g
- Cholesterol: 53 mg

