
If you’re looking for a cookie that’s both cozy and a little bit fancy, you’re going to adore this Gingerbread Thumbprint Cookies with White Chocolate Recipe. I absolutely love how these cookies bring together the warm spices of gingerbread with the sweet, creamy surprise of white chocolate inside each little thumbprint. When I first tried this recipe, it quickly became my go-to for holiday baking and beyond — my family goes crazy for them year-round! Keep reading, and I’ll walk you through everything you need to know to make these beauties turn out perfect every time.
Why You’ll Love This Recipe
- Perfect Balance of Flavors: The spicy warmth of ginger and cinnamon plays beautifully off the sweet white chocolate filling.
- Fun and Easy Thumbprint Technique: Creating the indentations is simple, and the result looks so impressive.
- Great for Gifting: These cookies hold up well and can be packaged beautifully, making them ideal for holiday gifts or parties.
- Versatile Recipe: You can tweak spices or fillings to suit your taste or dietary needs.

Ingredients You’ll Need
Everything in this Gingerbread Thumbprint Cookies with White Chocolate Recipe comes together to build layers of flavor and texture, from the soft molasses-rich dough to the warm spiced white chocolate filling. I always make sure to have good-quality molasses and fresh spices—that really makes a difference!

- Unsalted Butter: Room temperature butter helps create a smooth, creamy dough that’s easy to work with.
- Sugar and Light Brown Sugar: A combo that balances sweetness and moisture, giving the cookies a nice chew.
- Molasses: This is what brings that classic gingerbread depth and richness—don’t skip it!
- Egg: Helps bind everything together and adds a little lift to the dough.
- All-Purpose Flour: The sturdy base that gives the cookies structure without toughness.
- Ground Ginger and Cinnamon: Essential spices that give gingerbread its signature warm aroma.
- Salt: Enhances all the flavors and balances the sweetness.
- Baking Soda: Makes the cookies light and tender.
- Vanilla Extract: Adds a subtle depth that ties all the ingredients together.
- Sugar (for sprinkling): Adds a little sparkle and extra crunch on top before baking.
- White Chocolate Chips: Both melted into the filling and drizzled on top—this is the star surprise inside!
- Milk: Helps melt the white chocolate into a smooth, creamy filling and drizzle.
Variations
This recipe is wonderfully flexible. I often tweak the spices or swap out fillings depending on what I’m craving or what I have on hand. Don’t be afraid to make it your own!
- Spice it Up: Sometimes I add a pinch of cloves or nutmeg into the dough for a deeper spice profile—it turns these cookies into a serious holiday treat.
- Chocolate Lovers Option: Replace the white chocolate filling with semi-sweet or dark chocolate if you prefer a richer, more intense flavor.
- Gluten-Free Twist: Using a gluten-free flour blend works pretty well if you want to make these for friends or family with dietary needs.
- Vegan Version: You can try swapping butter for coconut oil and using flax egg instead of regular egg, plus vegan white chocolate chips.
How to Make Gingerbread Thumbprint Cookies with White Chocolate Recipe
Step 1: Prepare Your Dry Ingredients
Start by whisking together the flour, ground ginger, cinnamon, salt, and baking soda in a medium bowl. This step ensures your spices are evenly distributed, so every bite has that perfect gingerbread warmth you’ll love. Set this mixture aside—you’re going to use it shortly.
Step 2: Cream the Butter and Sugars
Grab another medium bowl and use a hand mixer to beat the softened butter with the sugar and brown sugar on medium speed for about 3 to 4 minutes. You’ll see it become smooth and fluffy, which is exactly what you want because it traps air and makes the cookies tender.
Step 3: Add Molasses, Egg, and Vanilla
Mix in the molasses until fully combined. Then beat in the egg and vanilla extract. I usually stop to scrape down the bowl sides with a spatula to make sure everything’s well mixed—you don’t want pockets of unmixed ingredients!
Step 4: Combine Wet and Dry Ingredients and Chill
With your mixer on low, slowly add the flour mixture to the wet ingredients in batches. Don’t rush this part; you want it just combined to keep your cookies tender, not tough. Cover the dough with plastic wrap, and pop it in the fridge for about an hour. This chilling step is key—it firms the dough so it’s easier to shape and helps the flavors meld.
Step 5: Scoop and Shape Your Cookies
Preheat your oven to 350°F (175°C) and line a baking sheet with parchment paper. Use a cookie scoop or ice cream scoop to portion about one tablespoon of dough per cookie, rolling each into a ball. Place them on your baking sheet about an inch apart—that gives them room to spread and keeps them neat.
Step 6: Make the Thumbprint Indentations and Sugar Sprinkle
This thumbprint technique is my favorite part. Lightly spritz the bottom of a ½ teaspoon measuring spoon with nonstick spray to keep the dough from sticking, then gently press down in the center of each dough ball to create an indentation—just don’t press all the way through to the baking sheet. If it sticks, no worries, using your knuckle works just as well! Then, sprinkle sugar over the tops and sides for that extra sparkle and crunch once baked.
Step 7: Bake and Re-Indent the Thumbprints
Bake for 8 to 10 minutes until the edges just start to set, but don’t let them get too brown. Right after baking, while the cookies are still soft, press down gently again using a tablespoon measuring cup to reshape the thumbprints—not too hard, just enough to keep a nice little well for the filling. Then, let them cool completely.
Step 8: Prepare and Add the White Chocolate Filling
In a small saucepan over medium-low heat, melt together white chocolate chips, milk, ground ginger, cinnamon, and molasses, stirring gently until smooth and creamy. This filling is the magic touch—warm, spicy, and sweet. Carefully spoon about 2 teaspoons of this filling into each cookie’s indentation. If the chocolate thickens too much, just rewarm gently to keep it pourable. Pop the filled cookies back into the oven for about 10 minutes to set the filling.
Step 9: Drizzle with Extra White Chocolate
While those cool a bit, melt the remaining white chocolate chips with milk over medium-low heat until smooth. Use a spoon to drizzle this luscious topping over the cookies, adding a pretty finishing touch that also amps up the chocolatey goodness. Let everything cool and set fully before serving.
Pro Tips for Making Gingerbread Thumbprint Cookies with White Chocolate Recipe
- Chill the Dough Thoroughly: Trust me, chilling the dough for at least an hour makes it way easier to handle and helps your cookies keep their shape.
- Use Nonstick Spray on Tools: Spraying the measuring spoon or your fingers helps prevent the dough from sticking when you’re making the thumbprints.
- Don’t Overbake: Pull the cookies out when they’re just set but still soft in the middle—a little underdone cookies are moist and tender after cooling.
- Keep an Eye on Chocolate Consistency: Reheat gently if the filling or drizzle thickens to maintain a smooth texture.
How to Serve Gingerbread Thumbprint Cookies with White Chocolate Recipe

Garnishes
I love adding a sprinkle of finely chopped crystallized ginger or a little dusting of powdered sugar over these cookies right before serving—it adds a classy touch and a bit of zing that complements the white chocolate perfectly.
Side Dishes
These cookies pair deliciously with a hot cup of spiced chai or a cozy mug of coffee. For festive gatherings, I like to serve them alongside mulled wine or hot cocoa with marshmallows for the ultimate winter treat spread.
Creative Ways to Present
One year, I arranged these cookies on a tiered dessert stand surrounded by fresh cranberries and rosemary sprigs for a holiday party—it made such a pretty and inviting centerpiece! You can also package them in decorative tins or clear cello bags tied with a ribbon as charming homemade gifts.
Make Ahead and Storage
Storing Leftovers
I store these cookies in an airtight container at room temperature. They keep deliciously soft for up to 5 days—if they ever last that long! If you want to keep them crispier on the outside, you can place a paper towel inside the container to absorb any extra moisture.
Freezing
I’ve frozen these cookies both before and after adding the filling. Wrapped tightly in plastic wrap and placed in a freezer-safe container, they hold up really well for up to 3 months. When you’re ready to enjoy, just thaw at room temperature or warm slightly in the oven for a few minutes.
Reheating
To bring back that just-baked warmth, I pop a couple of cookies in the oven at 300°F (150°C) for 5 minutes. This refreshes the white chocolate filling and softens the cookie without making it too soft or crunchy.
FAQs
-
Can I make these cookies without molasses?
Molasses is key to getting that classic gingerbread flavor and moist texture, so I wouldn’t recommend leaving it out entirely. If you don’t have molasses, you can try using dark corn syrup or honey in the same amount, but the flavor will be milder and less traditional.
-
How do I prevent the dough from sticking while making thumbprints?
To avoid sticking, spray the bottom of your measuring spoon or use your knuckle to press the indentation, and keep your hands lightly dusted with flour. Chilling the dough beforehand also makes it firmer and easier to work with, which helps reduce stickiness.
-
Can I use a different type of chocolate for the filling and drizzle?
Sure! White chocolate is traditional here for its sweet, creamy contrast to the spices, but semi-sweet or milk chocolate chips work well too. Just keep an eye on the melting process so the chocolate doesn’t scorch.
-
Are these cookies good for making gifts or freezing ahead?
Absolutely! These cookies hold up well in storage and freeze beautifully, making them a fantastic option for holiday gifts or baking in advance. Just package them with care to keep the white chocolate drizzle safe during transport.
-
What’s the best way to store leftover cookies to keep them fresh?
I recommend storing them in an airtight container at room temperature. Adding a paper towel inside the container can help absorb moisture, which keeps them from getting soggy. They stay delicious for several days this way!
Final Thoughts
There’s something genuinely wonderful about a cookie that feels cozy and nostalgic but still has that fun little twist—this Gingerbread Thumbprint Cookies with White Chocolate Recipe hits all those notes for me. Every time I make them, I’m reminded of laughter-filled afternoons baking with my family and the sweet anticipation of sharing them with friends. If you try this recipe, I’m confident it’ll become a beloved favorite in your kitchen, too. You’ve got this—happy baking!
Print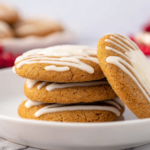
Gingerbread Thumbprint Cookies with White Chocolate Recipe
- Prep Time: 15 minutes
- Cook Time: 20 minutes
- Total Time: 35 minutes
- Yield: 24 cookies
- Category: Dessert
- Method: Baking
- Cuisine: American
Description
These Gingerbread Thumbprint Cookies blend the cozy flavors of ginger, cinnamon, and molasses with a luscious white chocolate filling. Perfectly soft and chewy with a sweet, spiced center, these festive treats are ideal for the holiday season or any time you crave a comforting spiced cookie with a decadent twist.
Ingredients
Cookie Dough
- 3/4 cup unsalted butter (softened to room temp)
- 3/4 cup sugar
- 2 tablespoons light brown sugar
- 1/2 cup molasses
- 1 egg
- 3 cups all purpose flour
- 2 teaspoons ground ginger
- 1 teaspoon ground cinnamon
- 1/2 teaspoon salt
- 1 teaspoon baking soda
- 1 teaspoon vanilla extract
Topping and Filling
- 1/3 cup sugar
- 1 cup white chocolate chips (for filling)
- 4 1/2 teaspoons milk (for filling)
- 1 teaspoon molasses (for filling)
- 1/8 teaspoon ground ginger (for filling)
- 1/8 teaspoon ground cinnamon (for filling)
- 1/3 cup white chocolate chips (for topping)
- 2 teaspoons milk (for topping)
Instructions
- Mix Dry Ingredients: In a medium bowl, whisk together the flour, ground ginger, ground cinnamon, salt, and baking soda until well combined. Set aside.
- Cream Butter and Sugars: In another medium bowl, use a hand mixer on medium speed to beat the softened butter, sugar, and brown sugar for 3 to 4 minutes until light and fluffy.
- Add Molasses, Egg, and vanilla: Beat in the molasses thoroughly, then add the egg and vanilla extract. Scrape down the sides of the bowl with a spatula and mix again to ensure everything is fully combined.
- Combine Dry and Wet Ingredients: With the mixer on low speed, gradually add the flour mixture to the wet ingredients until just incorporated. Avoid overmixing. Cover the bowl with plastic wrap and refrigerate the dough for about 1 hour to firm up.
- Preheat Oven and Prepare Baking Sheet: Preheat the oven to 350°F (175°C). Line a large baking sheet with parchment paper to prevent sticking.
- Shape the Cookies: Using a cookie scoop or ice cream scoop, portion out approximately 1 tablespoon of dough. Roll into balls and place them on the prepared baking sheet about 1 inch apart.
- Create Indentations: Lightly spray the bottom of a 1/2 teaspoon measuring spoon with nonstick spray. Use it to press a shallow indentation in the center of each dough ball, being careful not to press all the way through to the baking sheet. If the dough sticks, use your knuckle to create the dips. Sprinkle sugar over the top and sides of each dough ball.
- Bake Cookies: Bake in the preheated oven for 8 to 10 minutes or until edges are set but centers are still soft.
- Re-Indent After Baking: Remove cookies from oven and use a 1 tablespoon measuring cup to gently press down the center indents again to prepare for filling. Let cookies cool before adding filling.
- Prepare Filling: In a small saucepan over medium-low heat, melt 1 cup white chocolate chips with 4 1/2 teaspoons milk, 1 teaspoon molasses, 1/8 teaspoon ground ginger, and 1/8 teaspoon ground cinnamon, stirring until smooth and combined. If chocolate hardens, gently reheat before using.
- Fill Cookies: Spoon about 2 teaspoons of the warm white chocolate filling into the indentations of each cooled cookie.
- Bake Cookies with Filling: Return the filled cookies to the oven and bake for another 10 minutes to set the filling.
- Prepare Topping: While cookies are baking, melt 1/3 cup white chocolate chips with 2 teaspoons milk in a small saucepan over medium-low heat, stirring until smooth.
- Drizzle Topping: Remove the cookies from the oven and carefully spoon or drizzle the melted white chocolate topping over each cookie. Let cool completely before serving.
Notes
- These Gingerbread Thumbprint Cookies perfectly combine spicy warmth with sweet white chocolate, making them a seasonal favorite.
- Chilling the dough beforehand helps maintain the cookie shape and intensifies flavors.
- If the dough sticks while making indentations, use your knuckle or a lightly greased tool to prevent sticking.
- Reheating the filling gently is essential to keep it smooth and easy to spoon.
- Be sure to let cookies cool adequately between steps to avoid melting the filling or topping prematurely.
Nutrition
- Serving Size: 1 cookie
- Calories: 226 kcal
- Sugar: 21 g
- Sodium: 110 mg
- Fat: 9 g
- Saturated Fat: 6 g
- Unsaturated Fat: 2.4 g
- Trans Fat: 0.2 g
- Carbohydrates: 34 g
- Fiber: 0.5 g
- Protein: 3 g
- Cholesterol: 24 mg


