If you’re looking for a spooktacular treat that’ll delight both kids and adults alike, you’re going to want to stick around for this Ghost Cupcakes Recipe. These cupcakes aren’t just delicious—they’re dressed to impress, capturing that perfect mix of creepy and cute that makes Halloween parties or autumn gatherings extra fun. I’ve made these a couple of times now, and honestly, they’re a guaranteed hit every single time. Let me walk you through how to create these festive delights with ease.
Why You’ll Love This Recipe
- Festive & Fun: Perfectly themed for fall celebrations without sacrificing flavor.
- Easy Decoration: Simple candy melts and fruit roll sheets give you impressive results without complicated techniques.
- Rich Chocolate Base: The chocolate cupcakes provide a perfect, moist foundation that pairs well with the decorative elements.
- Customizable: You can tweak frosting colors and accents to match your personal style or party theme.

Ingredients You’ll Need
The magic of this Ghost Cupcakes Recipe lies in balancing simple ingredients that come together to form an eye-catching treat. Nothing too fancy, but each component lends its own charm and flavor to the final product. When shopping, look for good quality candy melts—they really make decorating easier without melting messily.
- White Reese’s Cups: The “ghost” base for your cupcakes—easy to decorate and full of peanut buttery goodness.
- Black Candy Melts: Great for adding spooky details like hair and facial features.
- White Candy Melts: Perfect to add highlights and tiny accents like eyes and fangs.
- Chocolate Frosting: You want a thick, rich black frosting to make a dramatic swirl on your cupcake.
- Chocolate Cupcakes: The moist and deep chocolate flavor complements the candy decorations beautifully.
- White Frosting: Used to create the classic ruffled “shirt” look for your ghostly figures.
- Red Fruit Roll Sheets: Easy to cut into collars and bow ties—adds a pop of color and personality.
Variations
I love to play around with the look of these cupcakes depending on the occasion or mood. Don’t be shy to make the ghost characters your own—you can easily swap in different colors or candy accents to change the whole vibe. Here are a few variations I’ve tried myself.
- Spooky Glow: I once added a drop of edible glitter to the frosting swirl for a magical shimmer effect, and it got rave reviews from my friends!
- Vegan Twist: Swap to dairy-free chocolate cupcakes and coconut-based frosting for a plant-friendly version.
- Fruit Roll-Up Colors: Instead of red, try orange or purple fruit roll sheets for a fall or Halloween palette alternative.
- Peanut-Free: Use white chocolate discs in place of Reese’s cups for anyone with nut allergies.
How to Make Ghost Cupcakes Recipe
Step 1: Get Your Ghost Faces Ready
Start by unwrapping your white Reese’s cups; these will be the “heads” of your ghost cupcakes. Using a food-safe paintbrush, carefully paint a black candy melts “widow’s peak” on the top of each Reese’s cup. This little detail instantly gives your ghosts a charming hairline. Next, create two eyes, a mouth, and eyebrows with the black candy melts—think expressive, spooky, or even silly faces! Pop them into the freezer for a couple minutes until the candy hardens.
Step 2: Add the Final Touches
Bring back the ghost faces and use the white candy melts to add tiny highlights in each eye and two adorable little fangs on the mouth. This really brings your ghosts to life. Let these details harden completely before moving on to assembly.
Step 3: Create the Ghost Lollipop
Dip a Pocky stick into melted black candy melts and lay it down on parchment paper. While it’s still sticky, place one ghost face on top so the stick acts like a lollipop handle. Once the candy melts firm up here, you’ll have a sturdy ghost topper ready to place on your cupcakes.
Step 4: Assemble the Cupcakes
Pipe a generous swirl of black chocolate frosting onto each chocolate cupcake. Then, carefully insert the ghost lollipop face right in the middle of the frosting swirl so it stands tall. Using white frosting, pipe around the base of the ghost to create a ruffled shirt effect—this contrast really makes your ghost pop! Finally, cut collars and bow ties out of the fruit roll sheets and wrap a collar neatly around the frosting swirl, right under the ghost’s head. Add the bow tie on top of the ruffled white frosting to complete the look.
Pro Tips for Making Ghost Cupcakes Recipe
- Candy Melts Tempering: If your candy melts seem too thick, add a few drops of vegetable oil to achieve a smooth painting consistency.
- Frosting Consistency: Use a thicker frosting for piping so the swirl holds its shape and supports the lollipop topper well.
- Assembly Timing: Freeze decorated candy pieces for at least 5 minutes before assembling to avoid any melting or smudging of features.
- Fruit Roll Sheet Handling: If your fruit rolls get sticky or hard, warm them slightly in your hands to make cutting and shaping easier.
How to Serve Ghost Cupcakes Recipe
Garnishes
I usually keep garnishes simple so the ‘ghosts’ stay the main attraction. Sometimes, I sprinkle a little edible glitter or even some black sugar pearls around the base for extra shimmer. You can also scatter mini chocolate chips or candy eyeballs around the cupcakes for an added spooky effect.
Side Dishes
These cupcakes shine on their own, but if you’re hosting a Halloween party, pairing them with pumpkin-spiced beverages like warm cider or a spiced latte complements the flavors beautifully. A simple bowl of fresh berries also helps balance the sweetness if you want a little fresh bite on the side.
Creative Ways to Present
One year, I set the cupcakes on a serving tray lined with edible “spider webs” made from spun sugar—everyone loved the surprise! You can also place your ghost cupcakes around a “graveyard” made with crushed Oreos and gummy worms for extra fun. Mini pumpkin props or tiny plastic spiders make a great finishing touch for themed displays.
Make Ahead and Storage
Storing Leftovers
I wrap leftover cupcakes individually with plastic wrap and store them in an airtight container in the refrigerator. This keeps the frosting fresh and the candy decorations intact. They usually last well for 3-4 days this way, perfect if you want to prep in advance.
Freezing
If you want to freeze these beauties, I recommend freezing the cupcakes without the candy lollipop ghosts attached. Wrap cupcakes tightly in plastic wrap and place in a freezer-safe container. When ready to serve, thaw overnight in the fridge and decorate with the ghosts fresh for best results.
Reheating
Since these are best enjoyed chilled or at room temperature, reheating isn’t usually necessary. But if you want to soften the frosting slightly, just let the cupcake rest at room temperature for about 30 minutes before serving. Avoid microwaving as it can melt the decorations.
FAQs
-
Can I use different candy besides Reese’s Cups for the ghost faces?
Absolutely! While White Reese’s Cups give a great peanut buttery flavor and shape, you can substitute white chocolate discs, white candy wafers, or even marshmallow rounds. Just ensure the candy is firm enough to hold the decorations.
-
How do I prevent the candy decorations from melting?
Keep your decorated candy pieces chilled in the fridge or freezer until just before assembling. Also, handle them with clean, dry hands and avoid warm environments while working to prevent melting.
-
Can I make the frosting ahead of time?
Yes! Both the black and white frostings can be made a day ahead and stored in airtight containers in the fridge. Bring to room temperature and give a quick stir before piping to get the perfect consistency.
-
What if I don’t have black candy melts?
You can melt dark chocolate or use black decorating gel as an alternative, though candy melts tend to be easier to work with for painting detailed features.
-
How long does it take to make these from start to finish?
From unwrapping candy to the final assembly, you’re looking at around 45 minutes total, assuming your cupcakes are already baked. Decorating might take a little extra time the first round but speeds up with practice.
Final Thoughts
This Ghost Cupcakes Recipe is hands down one of my favorite festive treats because it balances creativity with ease. When I first tried it, I was nervous about getting the candy decorations just right, but the simple steps and helpful tips I’m sharing here will make it a breeze for you. Plus, seeing the smiles on my family’s faces when they see these adorably spooky cupcakes is the best reward. Give this recipe a try—you’ll be impressed with how fun and delicious these little ghosts turn out!
Print
Ghost Cupcakes Recipe
- Prep Time: 45 minutes
- Cook Time: 0 minutes
- Total Time: 45 minutes
- Yield: 6 servings
- Category: Dessert
- Method: No-Cook
- Cuisine: American
Description
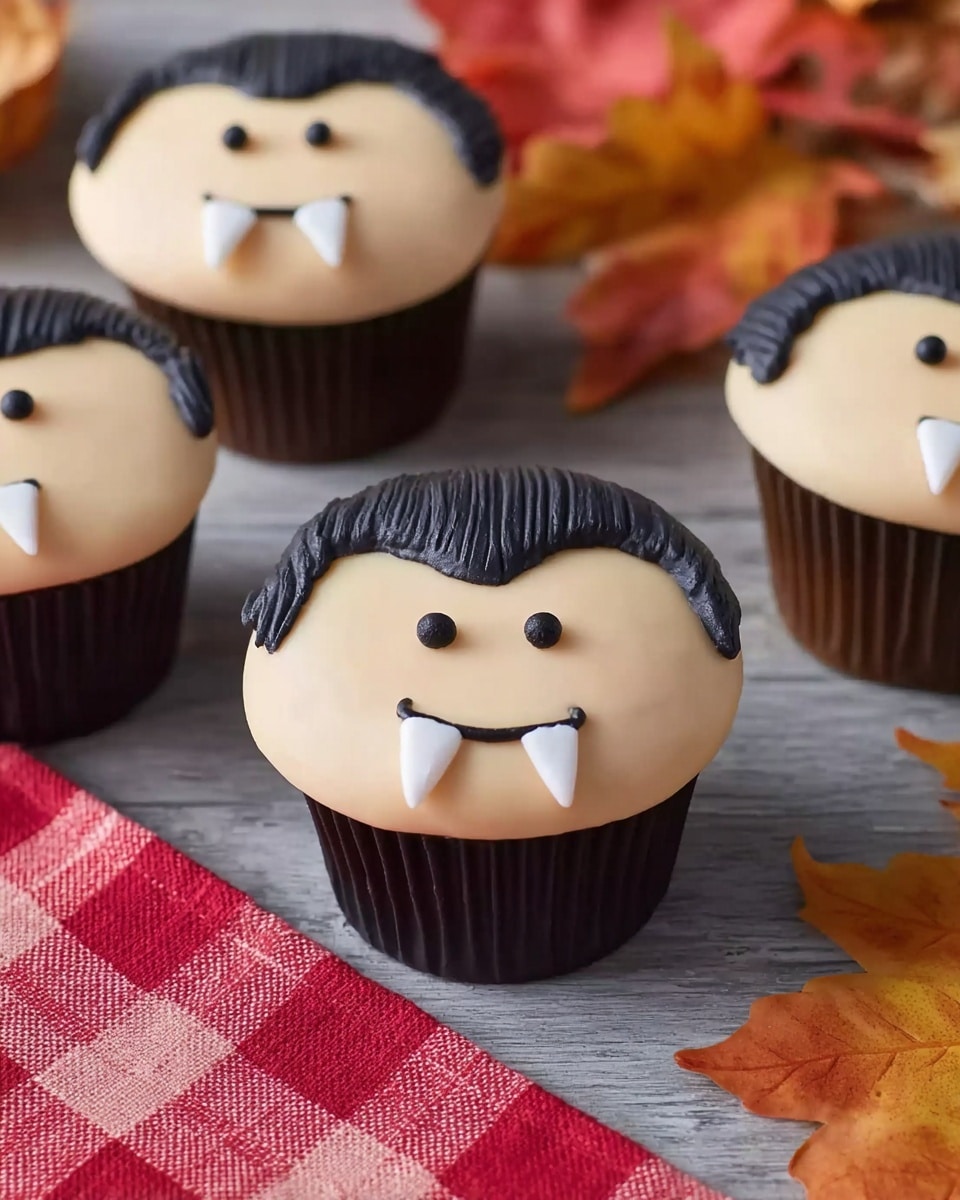
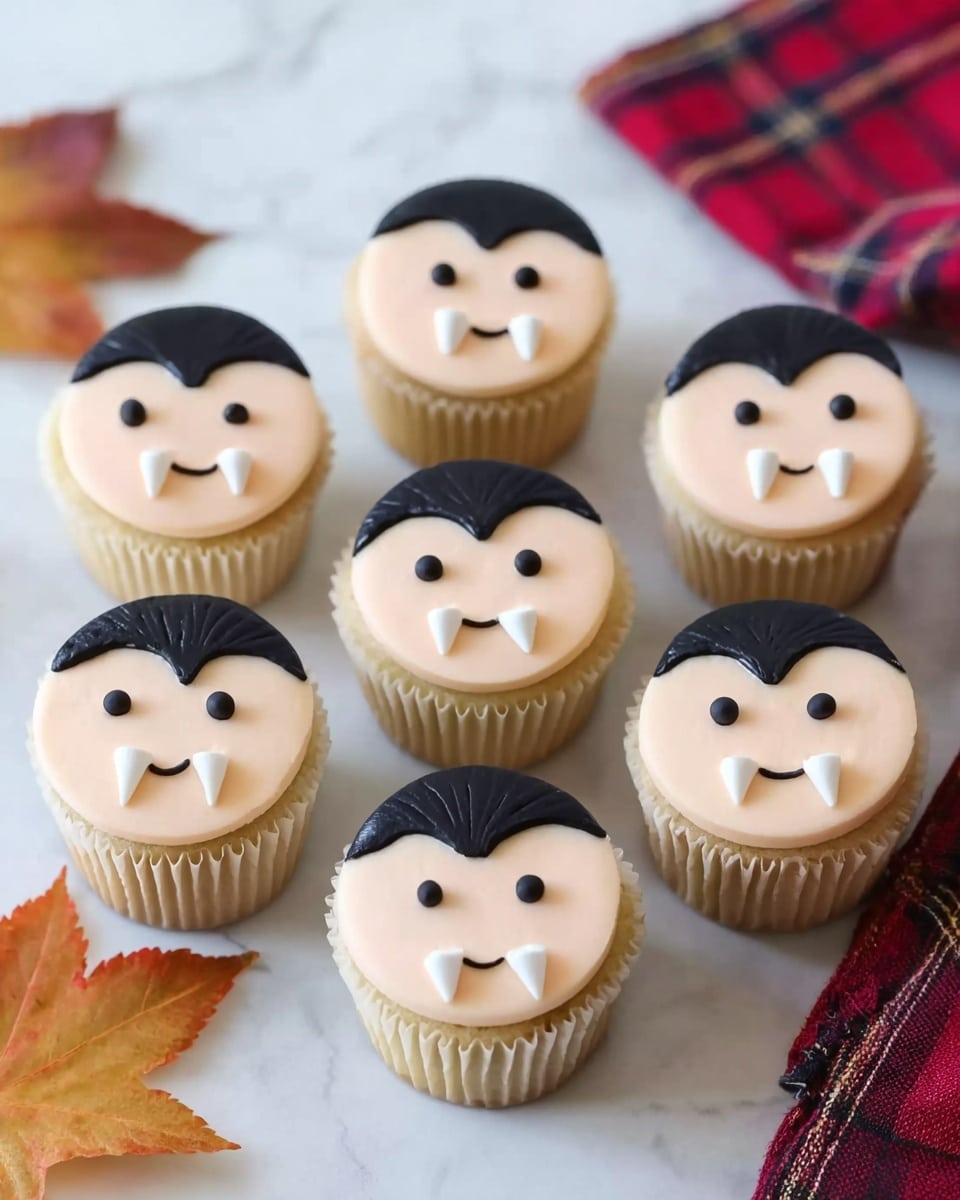
Create spooky and delightful Vampire Cupcakes featuring white Reese’s Cups transformed into vampire heads with black and white candy melts, perched on rich chocolate cupcakes topped with black frosting and decorated with fruit roll collars and bow ties. Perfect for Halloween parties or themed celebrations.
Ingredients
Vampire Heads
- 6 White Reese’s Cups
- 2 ounces Black Candy Melts (melted)
- 1 ounce White Candy Melts (melted)
Frosting and Cupcakes
- 2 cups chocolate frosting, colored black
- 6 chocolate cupcakes
- 1/3 cup white frosting
- 3 red fruit roll sheets
- 6 Pocky Sticks (for lollipop sticks)
Instructions
- Prepare Vampire Heads: Unwrap the White Reese’s Cups carefully. Using a food-safe paint brush, paint a widow’s peak hairline on each Reese’s Cup with melted black candy melts. Add two eyes, a mouth, and two eyebrows using the black candy melts for facial features.
- Harden Candy Melts: Place the decorated Reese’s Cups in the freezer for 1–2 minutes to allow the black candy melts to harden properly.
- Add Highlights and Fangs: Using melted white candy melts, add a tiny highlight dot in each eye for a gleaming effect and pipette two fang shapes onto the mouth. Allow the white candy melts to harden completely.
- Attach Lollipop Sticks: Dip a Pocky Stick halfway into melted black candy melts and lay it on parchment paper. Place one vampire Reese’s Cup on top so the Pocky Stick acts as a lollipop handle. Let this set until the candy melts harden securely.
- Frost Cupcakes: Pipe a large swirl of black-colored chocolate frosting onto each chocolate cupcake to create a dramatic base for the vampire decoration.
- Insert Vampire Lollipops: Carefully insert the Pocky Stick with the vampire head into the center of the frosting swirl on each cupcake, ensuring it stands upright.
- Create Ruffled Shirts: Using white frosting, pipe ruffled details onto the black frosting swirl to resemble a vampire’s shirt front.
- Make Collars and Bow Ties: Cut collar shapes and bow ties from the red fruit roll sheets. Wrap one collar piece around the white frosting ruffle just beneath the vampire’s head and attach a bow tie on the front to complete the vampire’s attire.
Notes
- Use a small food-safe paint brush to paint the candy melts accurately for detailed vampire features.
- Freezing the candy melts briefly helps them set quickly and maintain shape.
- If Pocky sticks are unavailable, substitute with lollipop sticks or pretzel rods for support.
- Color the chocolate frosting using food coloring to achieve the deep black needed for the vampire theme.
- Be gentle when inserting the vampire lollipops into the frosting to avoid breaking the candy decorations.
- The fruit roll collars and bow ties add a festive and elegant touch and can be customized with other colors.
Nutrition
- Serving Size: 1 cupcake
- Calories: 500
- Sugar: 38g
- Sodium: 150mg
- Fat: 28g
- Saturated Fat: 14g
- Unsaturated Fat: 10g
- Trans Fat: 0g
- Carbohydrates: 58g
- Fiber: 2g
- Protein: 5g
- Cholesterol: 25mg


