
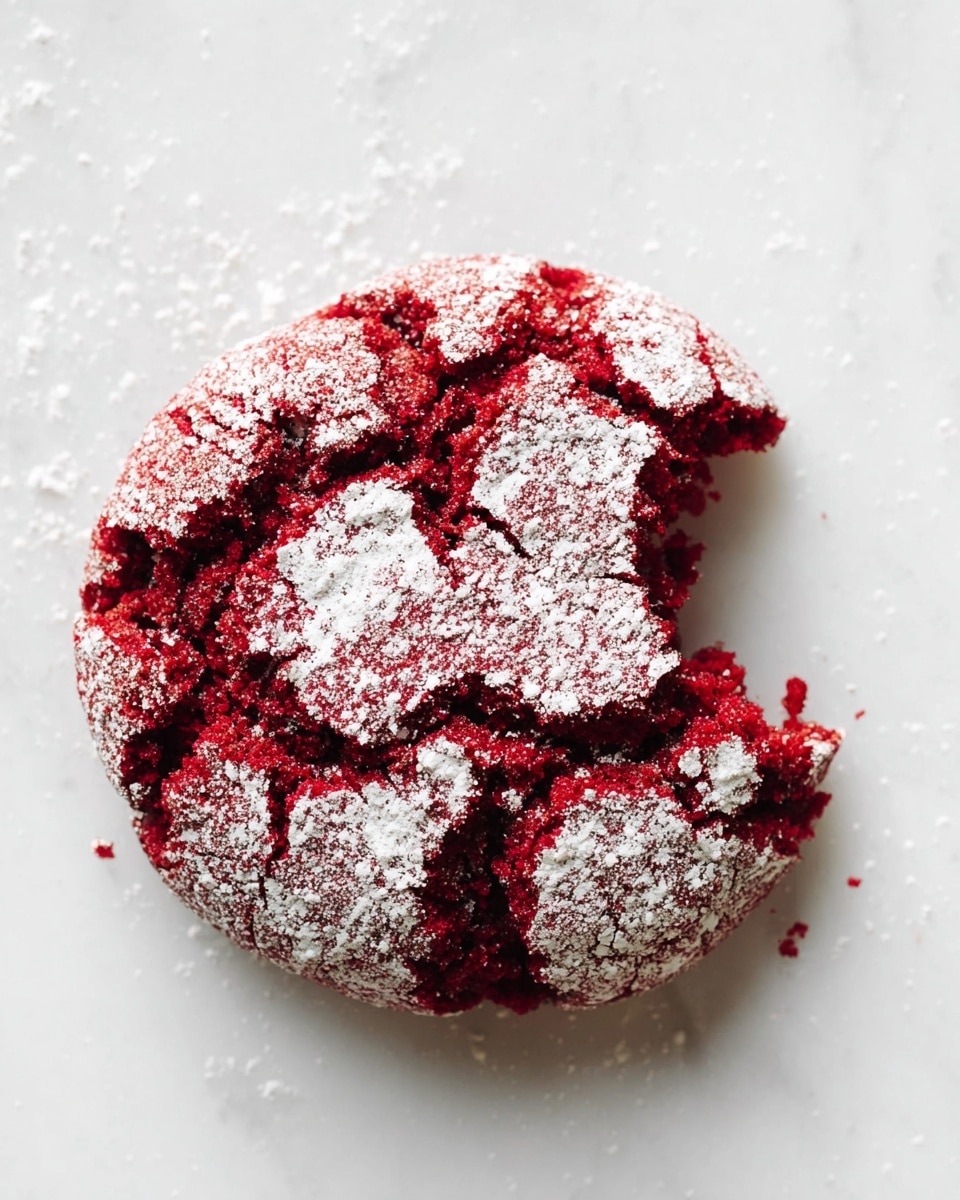
If you’re anything like me and adore that perfect chewy, fudgy cookie that melts in your mouth with a punch of vibrant red velvet flavor, you are going to fall head over heels for these Fudgy Red Velvet Crinkle Cookies (No Mixer!) Recipe. What I absolutely love about this recipe is how it gets that rich, dense texture without needing a fancy stand mixer — just a whisk and some elbow grease, and you’re set to create magic in the kitchen. These cookies are perfect for when you want something a little special for the holidays or just to impress friends with minimal fuss.
You’ll find that the fudgy red velvet crinkle cookie straddles the line between a cake and a cookie in the most delightful way — soft and moist on the inside with that classic crinkled powdered sugar exterior making each bite seriously addictive. Trust me, once you try this Fudgy Red Velvet Crinkle Cookies (No Mixer!) Recipe, it’ll make a regular spot in your baking rotation, especially when you need a quick homemade treat that still feels festive and indulgent.
Why You’ll Love This Recipe
- No Mixer Needed: This recipe saves you from washing extra equipment while still delivering amazing texture.
- Rich, Fudgy Texture: The melted chocolate and butter blend creates moist and chewy cookies you’ll crave.
- Classic Crinkle Finish: The powdered sugar coating cracks perfectly during baking for that signature red velvet look.
- Great for Special Occasions: Whether it’s holidays, birthdays, or just a treat-yourself moment, these cookies shine.

Ingredients You’ll Need
Every ingredient in this Fudgy Red Velvet Crinkle Cookies (No Mixer!) Recipe plays a key role in building that unique texture and flavor. I always recommend using high-quality cocoa and chocolate for the richest taste, and don’t skip the red velvet emulsion or food coloring if you want that classic red hue.
- All-purpose flour: Provides the right structure without weighing down the cookies.
- Baking powder: Helps give just enough lift to keep the cookies soft, not cakey.
- Baking soda: Balances acidity and helps the texture lighten slightly.
- Granulated sugar (plus extra): Sweetens and helps with that crisp exterior when combined with powdered sugar.
- Light brown sugar: Adds moisture and a subtle caramel note, perfect for fudgy cookies.
- Eggs and egg yolks: Provide richness and help bind ingredients without a mixer.
- Canola oil: Keeps the cookies tender with a silky crumb.
- Red Velvet Bakery Emulsion or red food coloring: Essential for that unmistakable velvet color and flavor; I’ve found emulsion gives a better depth than just food coloring.
- Vanilla extract: Enhances all the other flavors beautifully.
- Salt: Balances the sweetness and highlights chocolate notes.
- Unsalted butter: Melted with chocolate for intense fudginess.
- Semisweet or bittersweet chocolate: Gives a rich, slightly bitter edge to balance the sweetness.
- Cocoa powder: Boosts the chocolate flavor and deepens the color.
- Confectioners’ sugar: For rolling the cookies to create the classic crinkle crackle on top.
Variations
I love how flexible this Fudgy Red Velvet Crinkle Cookies (No Mixer!) Recipe is — you can easily tweak it to your taste or dietary needs. Over the years, I’ve tried a few fun twists that make these cookies even more special.
- White Chocolate Chips: Adding a handful makes for a sweet surprise that pairs wonderfully with the cocoa flavor.
- Vegan Version: Swap eggs for flax eggs and use vegan butter — I’ve tested this and the texture is surprisingly close!
- Spiced Red Velvet: Stir in a pinch of cinnamon and a little chili powder for a festive twist that wakes up your palate.
- Mini Cookies: Roll smaller balls for bite-sized treats perfect for parties or lunchboxes.
How to Make Fudgy Red Velvet Crinkle Cookies (No Mixer!) Recipe
Step 1: Whisk Dry Ingredients Together
Start by combining your all-purpose flour, baking powder, and baking soda in a small bowl — this step ensures your leavening agents are evenly distributed for an even rise. I always sift mine lightly to avoid any lumps, which helps your cookies have smooth consistency. Set this aside while you prep the wet ingredients.
Step 2: Mix Sugars, Eggs, and Flavorings
In a large bowl, whisk together granulated sugar, brown sugar, eggs, egg yolks, canola oil, red velvet bakery emulsion (or red food coloring), vanilla, and salt. This part is so satisfying because you see the batter start to get velvety glossy without needing a mixer. Whisk just until combined — you want to keep the air in there for lift but don’t overdo it.
Step 3: Melt Butter and Chocolate, Then Add Cocoa
Place butter and chocolate in a small saucepan over low heat, stirring often so nothing burns. Once melted and smooth, remove from heat and whisk in cocoa powder until fully incorporated. This warm chocolate mixture is the base of our fudgy texture, and it’s crucial to add it warm — not hot — to avoid scrambling the eggs in the next step.
Step 4: Combine Wet and Dry Ingredients
Slowly fold the warm chocolate mixture into the sugar and egg mixture, whisking gently to combine. Then add your flour mixture and use a rubber spatula to fold everything together. Be gentle here — you want the dough just combined to avoid tough cookies. The dough will be sticky and thick, which is exactly right!
Step 5: Chill the Dough
This is a game changer: cover your dough and chill it in the fridge for at least 6 hours or even overnight. I discovered this trick when I found that chilled dough not only makes scooping easier but also results in cookies that spread less and develop a better texture. Patience here pays off big time.
Step 6: Prep and Bake Your Cookies
Preheat your oven to 350°F (180°C) and line baking sheets with parchment paper. Mix your confectioners’ sugar with the remaining granulated sugar in a small bowl. Use a cookie scoop or a spoon to portion out 1½ tablespoons of dough, then roll each ball in the sugar mixture. The sugar helps create that irresistible crinkle top as the cookies bake. Place about eight cookies per pan and bake one sheet at a time for 12 to 14 minutes. Look for puffed edges that are set but still soft in the center — this signals perfect fudgy deliciousness.
Pro Tips for Making Fudgy Red Velvet Crinkle Cookies (No Mixer!) Recipe
- Chill the Dough: Refrigerating your dough overnight is the secret for manageable, less sticky dough and better-shaped cookies.
- Use a Cookie Scoop: It makes evenly sized cookies that bake uniformly, plus rolling in sugar is easier when portioned neatly.
- Don’t Overbake: Pull them out while centers still look soft — they’re firming up as they cool and this keeps them fudgy.
- Mixing Technique: Fold gently to avoid tough cookies but whisk well in earlier steps to aerate the batter for lightness.
How to Serve Fudgy Red Velvet Crinkle Cookies (No Mixer!) Recipe
Garnishes
I like to keep it simple with a light dusting of extra sifted powdered sugar right before serving for a snowy, festive look. For extra flair, a small dollop of cream cheese frosting or a drizzle of melted white chocolate complements the red velvet flavor beautifully without overpowering it.
Side Dishes
These cookies are fantastic on their own, but I often serve them alongside a steaming cup of hot cocoa or a creamy latte. If you’re hosting, some fresh berries or a scoop of vanilla ice cream on the side take the experience to next-level indulgence.
Creative Ways to Present
For holidays or parties, arranging these fudgy red velvet crinkle cookies on a tiered cake stand with sprigs of fresh rosemary and cranberries adds a stunning contrast and festive vibe. Wrapping a few in cellophane tied with a pretty ribbon also makes a sweet homemade gift that everyone will rave about.
Make Ahead and Storage
Storing Leftovers
I store leftover cookies in an airtight container at room temperature, layered between parchment paper to keep them from sticking. I’ve found they stay wonderfully soft for up to three days, though they rarely last that long in my house!
Freezing
If you want to prep ahead, these cookies freeze exceptionally well. After baking and cooling completely, wrap them tightly in foil or plastic wrap, then place in a freezer-safe container. When you’re ready, thaw at room temperature — a perfect way to have a sweet treat ready to go anytime.
Reheating
To refresh frozen cookies, pop them in the microwave for about 10 seconds or warm slightly in a low oven (275°F) for 5 minutes. This brings back that soft, fudgy goodness just like freshly baked.
FAQs
-
Can I make Fudgy Red Velvet Crinkle Cookies (No Mixer!) Recipe without red velvet emulsion?
Yes! You can substitute with red food coloring if you don’t have red velvet bakery emulsion. The emulsion adds a subtle depth of flavor that pairs perfectly with the cocoa, but food coloring will still give you that iconic red look.
-
Why does the recipe suggest chilling the dough overnight?
Chilling helps the dough firm up, making it easier to scoop and roll. It also prevents the cookies from spreading too much in the oven, resulting in a thicker, fudgier texture—which is exactly what you want!
-
Can I make these cookies gluten-free?
You can substitute the all-purpose flour with a gluten-free flour blend designed for baking. Keep in mind the texture might be slightly different but still delicious. Adding a pinch of xanthan gum can also help with binding.
-
How do I know when the cookies are done baking?
The edges should look set and the cookies puffed, but the center will still appear soft. If you overbake, they’ll lose their fudgy texture. It’s better to slightly underbake than overdo it here!
-
Can I mix the dough by hand without a whisk?
Absolutely. A sturdy fork or rubber spatula works fine. Just be sure to combine the wet ingredients well before adding the dry for the best texture.
Final Thoughts
Making these Fudgy Red Velvet Crinkle Cookies (No Mixer!) Recipe feels like a little kitchen celebration every time I bake them. Whether you’re a beginner or seasoned baker, you’ll enjoy the straightforward process, the wonderful red velvet flavor, and that perfect fudgy texture that keeps everyone coming back for seconds. So grab your whisk and try them out — I promise they’ll be a new favorite, cozy treat that makes your day just a bit sweeter.
Print
Fudgy Red Velvet Crinkle Cookies (No Mixer!) Recipe
- Prep Time: 20 minutes
- Cook Time: 13 minutes
- Total Time: 6 hours 33 minutes
- Yield: 20 cookies
- Category: Dessert
- Method: Baking
- Cuisine: American
Description
These Fudgy Red Velvet Crinkle Cookies deliver rich chocolatey flavor with the classic red velvet twist, all without the need for a mixer. Soft and chewy with a crackled sugar-coated exterior, these cookies offer an indulgent treat perfect for holidays or special occasions. The dough is chilled for enhanced fudginess and rolled in a sweet sugar blend for that signature crinkled look.
Ingredients
Dry Ingredients
- 1 1/2 cups (213 grams) all-purpose flour
- 1 teaspoon baking powder
- 1/8 teaspoon baking soda
- 1/4 cup (25 grams) cocoa powder
- 1/2 teaspoon salt
Wet Ingredients
- 3/4 cup (150 grams) granulated sugar
- 3 tablespoons granulated sugar (for rolling)
- 1/2 cup (100 grams) light brown sugar
- 2 large eggs plus 2 large egg yolks, at room temperature
- 1 tablespoon canola oil
- 1 tablespoon Red Velvet Bakery Emulsion or red food coloring
- 1 teaspoon pure vanilla extract
- 4 tablespoons (57 grams) unsalted butter
- 3 ounces (85 grams) semisweet or bittersweet chocolate
- 1/2 cup (60 grams) confectioners’ sugar (for rolling)
Instructions
- Mix Dry Ingredients: In a small bowl, whisk together the all-purpose flour, baking powder, and baking soda until well combined.
- Combine Sugars and Eggs: In a large bowl, whisk together ¾ cup granulated sugar, light brown sugar, eggs, egg yolks, canola oil, Red Velvet Bakery Emulsion or red food coloring, vanilla extract, and salt until smooth and uniform.
- Melt Butter and Chocolate: Place the unsalted butter and semisweet or bittersweet chocolate in a small heavy-bottom saucepan over low heat. Stir frequently to melt gently and prevent scorching. Once smooth, remove from heat.
- Add Cocoa Powder: Off the heat, whisk the cocoa powder into the melted butter and chocolate mixture until completely combined, about 45 seconds. The mixture will thicken.
- Combine Wet Mixtures: Pour the warm chocolate-butter mixture into the egg and sugar mixture. Whisk thoroughly until fully incorporated.
- Add Dry Ingredients: Add the flour mixture to the wet ingredients and gently fold with a rubber spatula just until combined. Avoid overmixing.
- Chill Dough: Cover the dough and chill in the refrigerator for at least 6 hours or overnight to develop fudgy texture and ease handling.
- Prepare to Bake: Preheat oven to 350°F (180°C) and adjust oven rack to middle position. Line three baking sheets with parchment paper.
- Roll Cookies: In a small bowl, combine confectioners’ sugar with the remaining 3 tablespoons granulated sugar. Using a cookie scoop or spoon, portion out 1½ tablespoon dough balls and roll them thoroughly in the sugar mixture to coat.
- Bake Cookies: Place 8 cookies on each prepared sheet pan. Bake one pan at a time, rotating the pan halfway through baking, for 12 to 14 minutes or until edges are set and cookies puffed but centers remain soft.
- Cool and Store: Transfer baked cookies to a wire rack to cool completely. Store cooled cookies in an airtight container at room temperature for up to 3 days.
Notes
- The dough is very sticky; it works best to use a cookie scoop to portion. Drop dough balls into the sugar mixture and then gently roll them to coat well; coated dough is easier to handle.
- If you don’t have a cookie scoop, chill the dough for 15 minutes to firm it up before scooping.
- Cookies are best enjoyed fresh for maximum softness but store well for up to 3 days at room temperature.
- This recipe is adapted from the Baking for the Holidays cookbook by Chronicle Books.
Nutrition
- Serving Size: 1 cookie
- Calories: 140
- Sugar: 15g
- Sodium: 95mg
- Fat: 7g
- Saturated Fat: 3.5g
- Unsaturated Fat: 2.5g
- Trans Fat: 0g
- Carbohydrates: 19g
- Fiber: 1.5g
- Protein: 2g
- Cholesterol: 55mg


