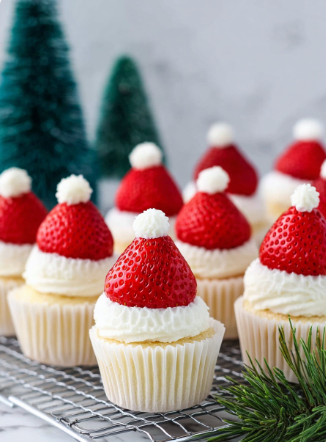
If you’re on the hunt for an irresistibly cute holiday treat that tastes as amazing as it looks, you’re going to adore this Festive Santa Hat Mini Cheesecakes Recipe. These tiny, festive desserts bring together creamy cheesecake, a buttery graham crust, and a sweet strawberry “hat” topped with whipped cream — perfect for holiday parties or a fun family dessert. Trust me, once you try these, you’ll want to make them every season!
Why You’ll Love This Recipe
- Adorable & Festive: The strawberry “Santa hats” make these mini cheesecakes a standout, crowd-pleasing dessert at any holiday event.
- Single-Serving Convenience: They’re perfectly portioned, so no awkward slicing or sharing needed—everyone gets their own little indulgence.
- Easy to Make in Batches: You can whip up dozens to cover your party table, or do a few for a special family treat without fuss.
- Classic, Creamy Flavor: The rich cheesecake pairs beautifully with the graham crust’s crunch and the fresh strawberry’s brightness.

Ingredients You’ll Need
The magic behind these Festive Santa Hat Mini Cheesecakes Recipe lies in simple, fresh ingredients that are easy to find—and when combined, deliver that classic cheesecake flavor and texture we all love. I always recommend using room temperature cream cheese and eggs since it makes mixing so much smoother and prevents lumps.

- Graham cracker crumbs: Look for finely ground crumbs for a sturdy, buttery crust that won’t crumble apart.
- Salted butter: Melted butter binds the crust—don’t swap for unsalted unless you adjust salt elsewhere.
- Cream cheese: Softened to room temp to ensure a smooth, creamy cheesecake filling without lumps.
- Granulated sugar: Balances the tangy cream cheese with a nice sweetness.
- Eggs: Room temperature eggs blend easier with the other ingredients, giving you a silky custard.
- Sour cream: Adds richness and a subtle tang to brighten the cheesecake.
- Vanilla extract: A little vanilla elevates the flavor and rounds everything out.
- Heavy whipping cream: Whipped to add fluffy, creamy “fur” on the Santa hats.
- Powdered sugar: Sweetens the whipped cream without graininess.
- Whole strawberries: Fresh, ripe strawberries make the perfect “hat” — pick uniform-sized ones for consistent minis.
Variations
I love how this Festive Santa Hat Mini Cheesecakes Recipe is so flexible! You can tweak it slightly to accommodate different flavors or dietary needs—plus, it’s fun to get creative with toppings and crusts.
- Crust Swap: I once swapped graham crackers for crushed ginger snaps to add a warm, spicy note—it was a hit and felt extra holiday cozy!
- Berry Twist: Swap strawberries for raspberries or halved cherries for a different “hat” color and flavor.
- Dairy-Free Option: Use dairy-free cream cheese and coconut cream for whipping to make these friendly for dairy-sensitive guests.
- Lighter Version: Substitute sour cream with Greek yogurt for tanginess with less fat.
How to Make Festive Santa Hat Mini Cheesecakes Recipe
Step 1: Prep Your Crust Like a Pro
Start by preheating your oven to 350°F and line your mini muffin pan with cute mini cupcake liners. Combine graham cracker crumbs and melted salted butter until the mixture looks like wet sand—this texture helps the crust stick together without crumbling. Press a tablespoon of this mixture evenly into each muffin cup using your fingertips—firm but gentle. Bake for 5 minutes to set the crust, then let them cool while you move onto the filling.
Step 2: Whip Up the Cheesecake Filling
Bring your oven temperature down to 325°F. Beat the softened cream cheese and sugar together on low speed until totally smooth—don’t rush here or you’ll get lumps. Add in your eggs one at a time, then mix in sour cream and vanilla. Keep mixing until silky and well combined, about a minute. You’ll love how creamy this batter feels—it’s the heart of your cheesecake magic.
Step 3: Fill and Bake
Spoon a generous teaspoon of the batter into each crust-lined muffin cup, filling it right up to the top of the liner for a full, nice mini cheesecake. Bake for 15-17 minutes; the edges should be set, but the centers might still have a little wiggle—that’s perfect. Let them cool completely before decorating. If you’re making a big batch, no worries—do these in batches and keep the extras refrigerated.
Step 4: Whip Your Topping and Assemble the Santa Hats
While the cheesecakes cool, whip your heavy cream with powdered sugar until stiff peaks form—I love this as it gives that stable, fluffy “fur” look for the Santa hats. Transfer your whipped cream to a piping bag—no fancy tip needed, just a plain round one or even a zip-top bag with the corner cut works fine. Pipe the cream onto each cheesecake, then gently press a hulled strawberry (flat side down) right in the middle as your “hat.” Finish it off by piping a little dollop of whipped cream to the tip of the strawberry. Pop them in the fridge to chill until serving.
Pro Tips for Making Festive Santa Hat Mini Cheesecakes Recipe
- Room Temperature Ingredients: I learned that soft cream cheese and eggs blend better, giving you that silky texture without lumps.
- Don’t Overbake: A tiny jiggle in the center means the cheesecakes will firm up beautifully as they cool—avoid dryness by watching closely.
- Piping Bag Hack: If you don’t have a piping bag, spoon whipped cream into a sandwich bag and snip a tiny corner—easy and mess-free!
- Strawberry Prep: Cut strawberry tops evenly and press gently to avoid squishing your “hat.” It keeps the presentation clean and cute.
How to Serve Festive Santa Hat Mini Cheesecakes Recipe

Garnishes
For garnishes, I usually stick to the classic look — fresh whipped cream and strawberries do all the work visually. Sometimes, I lightly dust a bit of edible glitter or powdered sugar for extra sparkle. A tiny mint leaf can add a refreshing green pop, but be careful not to overpower the Santa hat charm.
Side Dishes
These mini cheesecakes pair beautifully with a hot cup of spiced cider or a cozy mug of peppermint hot chocolate — the perfect cozy combo during holiday gatherings. I’ve also served them alongside a platter of assorted cookies and they fit right in!
Creative Ways to Present
For party presentations, I like to place these cheesecakes on a tiered serving tray surrounded by festive greenery like pine sprigs or holly branches. Try arranging them in a circle with a centerpiece candle for a warm and inviting holiday vibe. Wrapping each mini cupcake in a tiny holiday-themed cupcake liner adds an extra festive touch that people notice and love.
Make Ahead and Storage
Storing Leftovers
I store leftover Festive Santa Hat Mini Cheesecakes in an airtight container in the fridge—they keep beautifully for up to 3 days without losing their softness or flavor. Just make sure you cover them gently so you don’t squish those adorable strawberry hats!
Freezing
Freezing these mini cheesecakes works surprisingly well! I freeze them on a baking sheet first, then transfer to a freezer-safe container. When you’re ready to serve, thaw overnight in the fridge. Keep in mind the whipped cream topping is fresher if added after thawing, so you can pipe fresh cream on top once defrosted.
Reheating
Since these are best served chilled, I usually just bring them to room temperature if needed—about 15 minutes out of the fridge is perfect. I don’t recommend microwaving as it affects the texture, but letting them sit at room temp gently wakes up the flavors and creamy texture.
FAQs
-
Can I make Festive Santa Hat Mini Cheesecakes ahead of time?
Yes! You can prepare them a day or two ahead, refrigerate after assembly, and they’ll stay fresh. If freezing, add the whipped cream topping after thawing for best results.
-
What type of strawberries work best for the Santa hats?
Choose firm, bright red strawberries that are roughly uniform in size so your mini cheesecakes look consistent and hold their shape well when placed on the whipped cream.
-
How can I prevent cracks in the cheesecake filling?
Make sure your ingredients are at room temperature before mixing. Bake at the lower temperature of 325°F and avoid overbaking; a slight jiggle in the center is ideal. Cooling gradually also helps prevent cracks.
-
Can I make these without a mini muffin pan?
A mini muffin pan really helps keep these tiny cheesecakes perfectly shaped. If you don’t have one, you might try silicon molds or small ramekins, but baking times and results may vary.
Final Thoughts
I absolutely love how this Festive Santa Hat Mini Cheesecakes Recipe brings joy and smiles to any holiday occasion. The sweet and tangy cheesecake, crunchy crust, and playful strawberry hats make for a dessert that’s as fun to make as it is to eat. I remember the first time I made these for a holiday potluck—everyone kept coming back for seconds (and thirds!). Give it a try, and I’m sure you’ll add this recipe to your yearly traditions too. Happy baking and happy holidays!
Print
Festive Santa Hat Mini Cheesecakes Recipe
- Prep Time: 15 minutes
- Cook Time: 15 minutes
- Total Time: 5 hours 10 minutes
- Yield: 48 mini cheesecakes
- Category: Dessert
- Method: Baking
- Cuisine: American
Description
These Santa Hat Mini Cheesecakes are a delightful and festive single-serving dessert perfect for the holiday season. Featuring a buttery graham cracker crust, creamy cheesecake filling, and topped with whipped cream and a fresh strawberry to resemble a Santa hat, these bite-sized treats are easy to make and sure to impress your guests at any Christmas gathering.
Ingredients
Crust
- 1 ½ cups graham cracker crumbs
- 10 tablespoons salted butter, melted
Cheesecake Filling
- 2 (8 ounce) blocks cream cheese, softened to room temperature
- ⅓ cup granulated sugar
- 2 large eggs, room temperature
- ¼ cup sour cream
- 1 teaspoon vanilla extract
Whipped Cream Topping
- 1 cup heavy whipping cream
- ¾ cup powdered sugar
Decoration
- Whole strawberries, tops removed
Instructions
- Preheat oven: Set your oven to 350°F and line a mini muffin pan with mini cupcake liners for easy removal.
- Make crust: In a mixing bowl, combine graham cracker crumbs and melted butter until the mixture resembles wet sand. Scoop about 1 tablespoon into each liner and press evenly to form a crust layer.
- Bake crust: Bake the crusts for 5 minutes, then let them cool while preparing the cheesecake batter.
- Prepare oven: Reduce oven temperature to 325°F to bake the cheesecakes.
- Make cheesecake batter: In a large bowl, beat softened cream cheese and granulated sugar on low speed until smooth and well combined. Add eggs, sour cream, and vanilla extract, then beat for about 1 minute until smooth and creamy.
- Fill crusts: Spoon a generous teaspoon of the cheesecake mixture into each muffin liner, filling them right to the top.
- Bake cheesecake: Place in the oven and bake for 15-17 minutes until set. Allow them to cool. Repeat for remaining batter if needed.
- Make whipped cream: In a medium bowl, beat heavy whipping cream and powdered sugar with a handheld mixer until stiff peaks form. Transfer whipped cream to a piping bag.
- Assemble Santa hats: Pipe whipped cream onto the center of each cheesecake. Top each with a strawberry, flat side down, pressing gently. Add a small dollop of whipped cream on the strawberry tip to complete the ‘hat.’
- Chill: Refrigerate the mini cheesecakes until ready to serve to let flavors meld and whipped cream firm up.
Notes
- These mini cheesecakes are perfect for holiday parties and are an easy way to serve festive single portions.
- Make them a day ahead to allow cheesecakes to fully set and flavors to develop.
- Use fresh strawberries for the best appearance and flavor; ensure tops are removed cleanly for proper placement.
- For easier cleanup and removal, use non-stick or silicone mini cupcake liners.
- If you don’t have a piping bag, you can use a plastic sandwich bag with a small corner cut off.
Nutrition
- Serving Size: 1 mini cheesecake
- Calories: 67 kcal
- Sugar: 4 g
- Sodium: 41 mg
- Fat: 5 g
- Saturated Fat: 3 g
- Unsaturated Fat: 1.2 g
- Trans Fat: 0.1 g
- Carbohydrates: 5 g
- Fiber: 0.1 g
- Protein: 1 g
- Cholesterol: 19 mg


