
If you’re looking for a fun, healthy, and absolutely adorable centerpiece to wow your guests this holiday season, let me introduce you to the **Festive Fruit Christmas Tree Recipe**. I absolutely love this because it combines fresh, vibrant fruits into a charming tree shape that not only looks amazing but tastes fresh and delightful. Whether you’re throwing a kids’ party or just want a light, festive snack on the table, this recipe is fan-freaking-tastic. Keep reading—I’m about to walk you through every step so you can easily build your own juicy holiday masterpiece!
Why You’ll Love This Recipe
- Visually Stunning: The colorful fruits form a beautiful Christmas tree shape that instantly lights up your holiday table.
- Healthy & Refreshing: It’s packed with fresh fruits, so you can indulge without any guilt.
- Kid-Friendly Fun: I discovered kids adore helping build and nibble on the fruit tree, making it a fantastic activity.
- Simple Assembly: No fancy tools needed—just easy prep and a few toothpicks for an impressive result.

Ingredients You’ll Need
The magic of this Festive Fruit Christmas Tree Recipe lies in the fresh fruit medley you choose. The combination works wonderfully together because of the colors, textures, and flavors, giving your tree a lively and inviting look. When shopping, pick fruits that are fresh, firm, and ripe but not mushy so your tree holds up nicely.
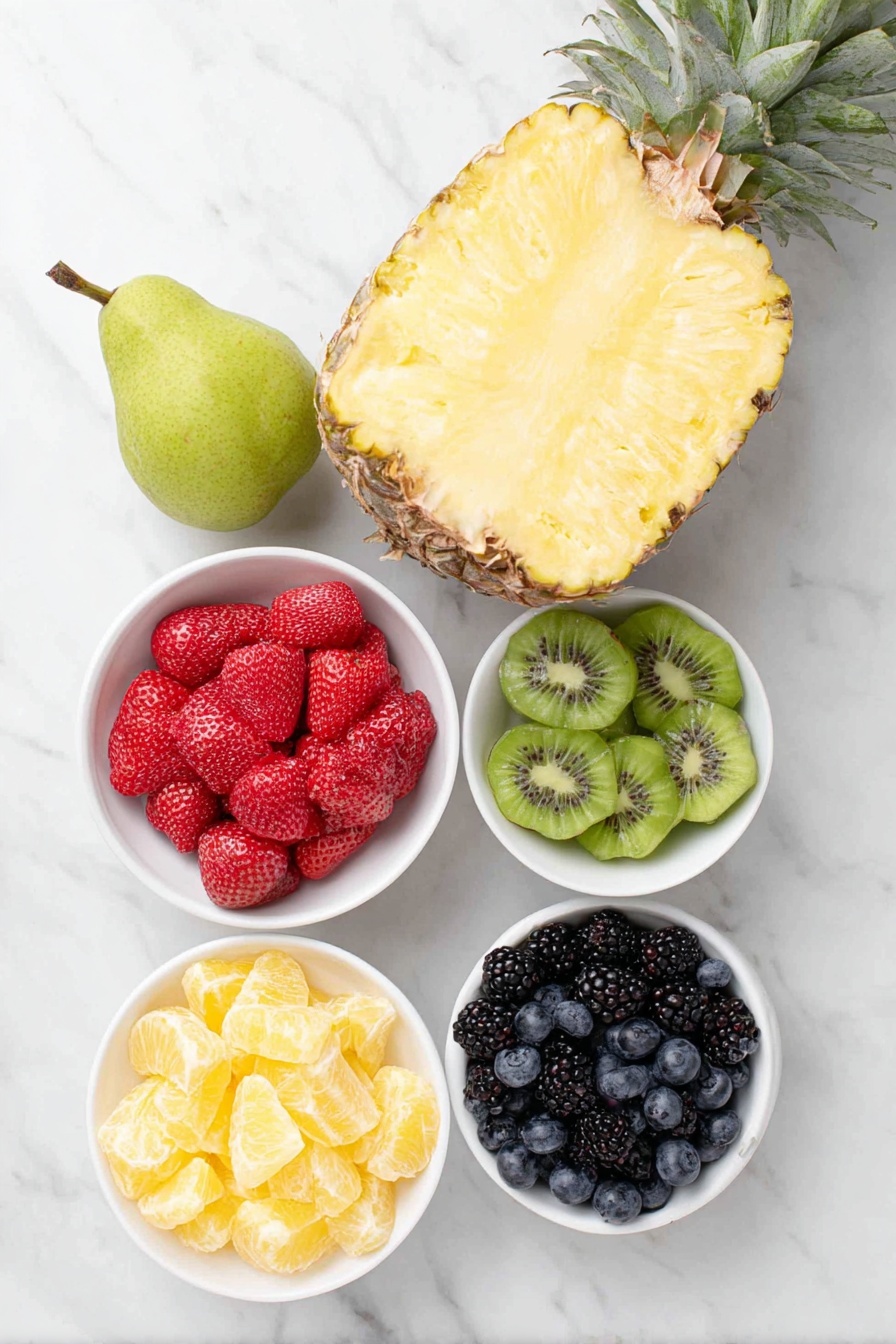
- Pineapple: This forms the sturdier base of your tree—choose a small or medium one that’s juicy but firm.
- Pear: A great natural “tree topper” stand—make sure it’s ripe enough to eat but holds its shape.
- Blackberries: These small berries add depth and gorgeous dark color spots.
- Strawberries: Sweet and bright, cut them depending on their size to fit nicely on the tree.
- Kiwi: Use a star-shaped cookie cutter to transform this tangy fruit into festive decorations.
- Clementines: Perfect peeled and segmented for that burst of citrus and bright orange color.
- Green Grapes: Adds pops of green; keep them whole for easy skewering.
- Blueberries: Small and sweet, these fill in the tiny gaps beautifully.
- Fresh Mint: Adds a refreshing aroma and hides any gaps with greenery.
- Toothpicks and a Large Skewer: Essential tools to securely assemble your fruit tree.
Variations
I love customizing this Festive Fruit Christmas Tree Recipe based on what’s in season or my family’s preferences. You can tailor the fruit to fit what you have on hand or swap out to accommodate allergies and dietary needs. The best part? It’s so forgiving and still looks incredible!
- Tropical Twist: Swap kiwi and pears for mango stars and papaya chunks—I tried this last year, and it was a hit with the exotic fruit lovers in my family.
- Berry-Only Version: Use strawberries, blueberries, raspberries, and blackberries for a simple yet stunning monochrome tree—perfect if you want something quick and less fiddly.
- Vegan & Allergy-Friendly: This recipe is naturally vegan and gluten-free, but if you have nut allergies, just avoid adding extras like almond sprinkles.
- Mini Trees: For a party, I’ve made smaller individual trees using mini pineapples or even stacked layers of melon slices—super fun for guests!
How to Make Festive Fruit Christmas Tree Recipe
Step 1: Prep Your Fruits
Start by washing and gently drying all your fruits—this step feels tedious, but trust me, it makes a big difference to keep everything looking fresh and prevent slipping while assembling. Next, cut off the very top and bottom of the pineapple to create a stable base and a flat surface to work with. From the top slice, you’ll use your star-shaped cookie cutter to create the beautiful pineapple star that sits atop the tree—save any extra star shapes to tuck in as decorations. When cutting the pineapple into a cone shape, try to keep the edges smooth so it looks more like a real tree.
Step 2: Create the Tree Trunk and Topper
Trim the bottom of the pear just enough so it can stand upright on its own. The pear acts as the trunk and creates a perfect holder for the pineapple star topper. Using a large skewer, carefully attach the pear to the top of your pineapple base—be gentle so you don’t break the fruit. Then, stick a toothpick into the top of the pear and carefully attach the pineapple star on it. This creates a cute, natural “star on top” for your fruit tree!
Step 3: Decorate Your Tree with Fruit
Now comes the fun part—decorating! Start by attaching larger fruits like strawberries, clementine segments, and green grapes around your pineapple cone using toothpicks. Spread them out evenly to balance the colors and sizes. Next, fill in the gaps with smaller fruit such as blackberries, blueberries, and those charming little pineapple and kiwi stars you cut earlier. You’ll want to step back every few minutes to see how it’s shaping up so the tree looks full and vibrant from all sides. Tuck mint leaves here and there—not only do they add a fresh aroma, but they also cleverly hide any bare spots on your fruit base.
Step 4: Final Touches & Serving
Once you’re happy with your fruit arrangement, place the pineapple star securely on top and give the tree a little spin. Voilà—your festive fruit Christmas tree is ready to impress! It’s best served the same day because the fruit is freshest then. If you have leftovers, store them in an airtight container in the fridge and enjoy within two days before fruit starts to soften or lose its vibrant appeal.
Pro Tips for Making Festive Fruit Christmas Tree Recipe
- Choose Firm Fruits: I learned the hard way that overly ripe fruit makes the tree unstable and soggy—stick to firmer, fresh specimens for the best hold.
- Use Sharp Tools: A sharp knife and a good-quality star cookie cutter make cutting cleaner and easier, which really ups the presentation.
- Balance Colors Evenly: I like to place bright fruits like strawberries and clementines spaced out evenly to make the tree pop from every angle.
- Assemble Just Before Serving: To keep fruit fresh and juicy, put your tree together the same day you plan to serve it.
How to Serve Festive Fruit Christmas Tree Recipe
Garnishes
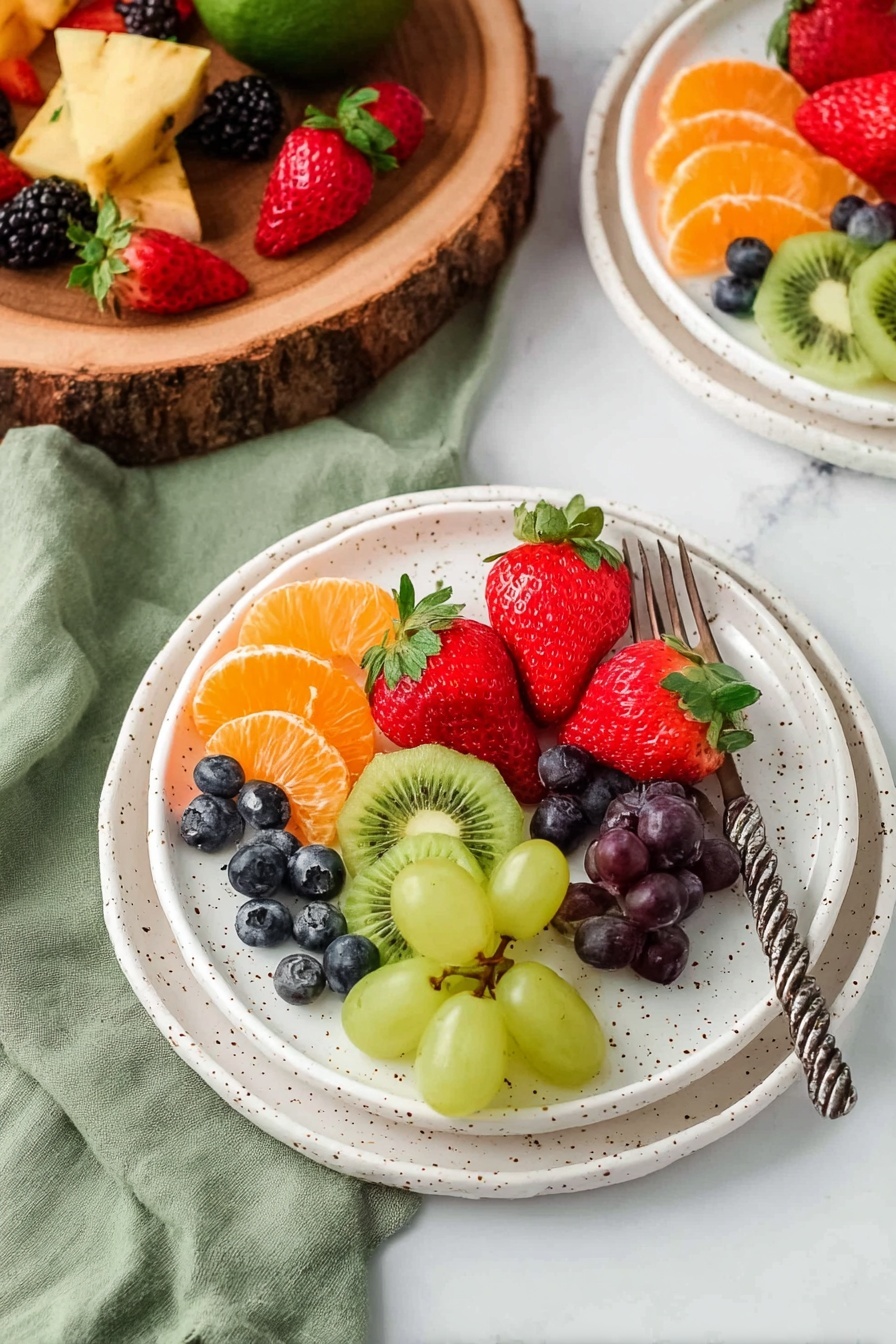
Fresh mint leaves are my go-to garnish since they add that lovely green pop and a refreshing scent that complements the fruit beautifully. You could also sprinkle a tiny bit of shredded coconut for a snowy effect or use edible flowers in wintery hues to make it even more festive.
Side Dishes
This fruity centerpiece pairs wonderfully with a platter of assorted nuts, cheese, or even a creamy yogurt dip that guests can use for dipping the fruit pieces. For a brunch setting, I love serving it alongside cinnamon-spiced pancakes or a warm batch of muffins.
Creative Ways to Present
One Christmas, I wrapped fairy lights gently around the base (being careful to keep them away from the fruit) to add a magical glow. Another time, I placed the tree on a mirror tray to amplify the colors and used sparkly toothpicks shaped like stars for that extra festive touch. Try crafting mini trees for each guest as party favors—everyone loved the personal touch!
Make Ahead and Storage
Storing Leftovers
If you have leftovers (which can happen if the tree is too pretty to devour all at once), I store cut fruit pieces and any assembled parts separately in airtight containers in the fridge. This helps maintain freshness without turning soggy. Avoid storing the whole assembled tree—it’s better freshly built!
Freezing
Freezing isn’t ideal for this recipe since fresh fruit textures change dramatically after freezing. I tried freezing a leftover star once, and it became mushy after thawing. So, I recommend enjoying this recipe fresh for the best experience.
Reheating
Since this is a fresh fruit assembly, reheating isn’t necessary—or recommended for that matter! Serve chilled or at room temperature. If your fruit gets a little cold straight from the fridge, letting it sit out for 10 minutes brings back some sweetness and enhances the flavors.
FAQs
-
Can I make the Festive Fruit Christmas Tree Recipe ahead of time?
You can prep the fruits ahead by washing, cutting, and storing them separately in airtight containers for up to two days. However, I recommend assembling the tree just before serving to keep everything fresh, colorful, and sturdy.
-
What fruits work best for the festive fruit Christmas tree?
Firm fresh fruits like pineapple, pear, grapes, strawberries, kiwi, clementines, blackberries, and blueberries work beautifully. These provide a variety of colors, textures, and flavors while holding together well on toothpicks.
-
Can I use other shapes instead of stars for decoration?
Absolutely! While stars are classic and festive, you can use any cookie cutter shapes you like—hearts, snowflakes, or even circles. Just make sure the fruits are firm enough to hold their shape after cutting.
-
How long will the fruit tree stay fresh?
The assembled tree is best enjoyed the same day. If you need to store it, keep it covered in the fridge and eat within 24 to 48 hours to avoid sogginess and browning, especially from the cut fruits.
Final Thoughts
This Festive Fruit Christmas Tree Recipe has become a holiday favorite in my home because it hits all the right notes—fun, fresh, seasonal, and simple. It’s always a conversation starter and a crowd-pleaser. I encourage you to give it a try for your next holiday gathering. You’ll find it’s not only a feast for the eyes but a tasty way to sneak in some healthy fruit during the festivities. Trust me, once you make it, you’ll want this charming tree center stage year after year.
Print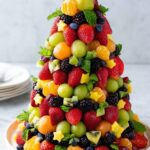
Festive Fruit Christmas Tree Recipe
- Prep Time: 20 minutes
- Cook Time: 0 minutes
- Total Time: 20 minutes
- Yield: 12 servings
- Category: Appetizer
- Method: No-Cook
- Cuisine: American
- Diet: Vegetarian
Description
This delightful Fruit Christmas Tree is a visually stunning and healthy holiday centerpiece crafted from a variety of fresh fruits such as pineapple, pear, strawberries, kiwi, and more. It’s easy to assemble and perfect for festive gatherings or as a kid-friendly treat, offering a refreshing alternative to traditional holiday snacks.
Ingredients
Fruits
- 1 small or medium pineapple
- 1 pear
- Small pack fresh blackberries
- Small pack fresh strawberries (whole or halved/fourths depending on size)
- 3 kiwi (cut into small stars using a cookie cutter)
- 3 fresh clementines (peeled and segmented)
- Small pack green grapes
- Small pack fresh blueberries
Others
- Fresh mint leaves for garnish
- Toothpicks
- Large skewer
Instructions
- Prepare Fruits: Wash and pat dry all the fruit thoroughly with paper towels to remove excess moisture, which helps the fruit stay fresh and easier to work with.
- Prepare Pineapple Base: Cut off the very top and bottom of the pineapple to create a stable base and flat top. Then slice off another piece from the top of the pineapple that will be used to cut out a star shape for the tree topper using a cookie cutter. Set this star aside.
- Shape Pineapple Tree: Using a sharp knife, carefully cut around the sides of the pineapple base to create a nice cone shape that resembles a tree.
- Prepare Pear for Trunk: Cut the bottom of the pear so it can stand upright, as the pear will act as the tree trunk. Attach the pear to the top of the pineapple base securely using the large skewer.
- Attach Star Topper: Insert a toothpick into the top of the pear and then impale the pineapple star onto the toothpick to fix the star on top of the pear trunk securely.
- Create Pineapple Stars: Use the star cookie cutter to cut additional stars out of the pineapple slices you cut off earlier for decorating the tree.
- Assemble the Tree with Fruit: Begin attaching the larger fruit pieces like strawberries, clementine segments, and green grapes around the pineapple base using toothpicks, spacing them evenly to cover the surface.
- Fill in Gaps: Add smaller fruits like blackberries, blueberries, small pineapple stars, and kiwi stars to fill in any gaps and create a lush, full tree appearance.
- Garnish with Mint: Insert fresh mint leaves in various places around the tree to add color contrast, freshness, and help hide any visible pineapple base spots.
- Final Touches: Place the pineapple star securely on top of the tree as the finishing decorative element.
- Storage: Store any leftover fruit pieces in an airtight container in the refrigerator for up to 2 days to maintain freshness.
Notes
- This festive fruit Christmas tree is a fun and healthy holiday centerpiece ideal for parties or family gatherings.
- Use a variety of fresh fruits with contrasting colors for the best visual appeal.
- Cutting fruits into star shapes adds a festive, decorative touch that enhances the holiday theme.
- Make sure to secure fruits well with toothpicks to prevent them from falling off during display or serving.
- Use fresh mint leaves for a pop of color and refreshing aroma.
- If storing leftovers, keep fruit in an airtight container and consume within 2 days for optimal freshness.
Nutrition
- Serving Size: 1 serving
- Calories: 68 kcal
- Sugar: 13 g
- Sodium: 2 mg
- Fat: 0.2 g
- Saturated Fat: 0.02 g
- Unsaturated Fat: 0.13 g
- Trans Fat: 0 g
- Carbohydrates: 18 g
- Fiber: 3 g
- Protein: 1 g
- Cholesterol: 0 mg


