
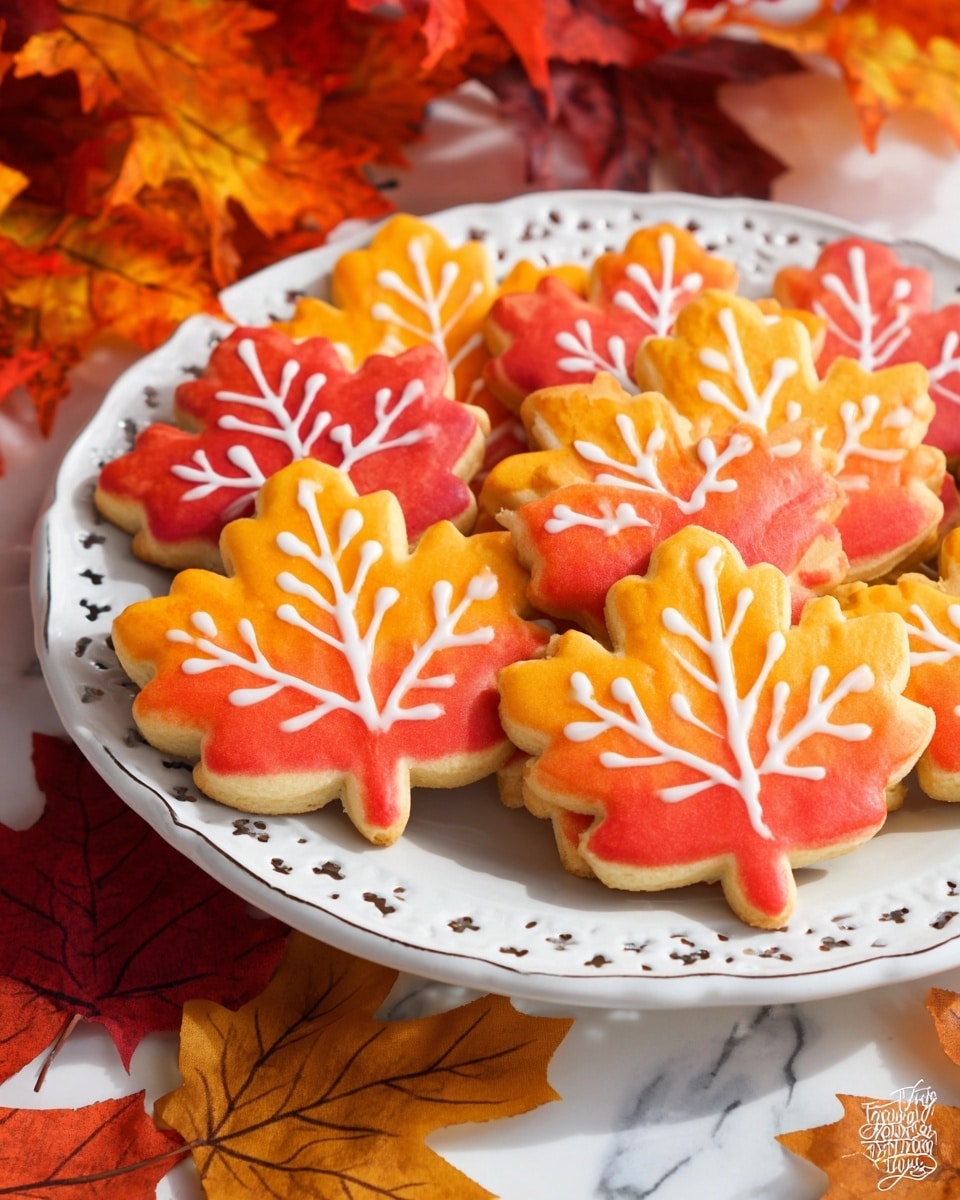
If you’re on the hunt for a cookie recipe that not only tastes amazing but also brings a festive autumn vibe to your kitchen, then you’re in for a treat. This Fall Leaf Cookies Recipe is one of my absolute favorites—I love how buttery and soft these cookies turn out, all while sporting gorgeous fall colors that get everyone excited for the season. Stick around, and I’ll walk you through all the little steps and tips to make these marbled, leaf-shaped treats with ease.
Why You’ll Love This Recipe
- Perfect Texture: The cookies come out soft, buttery, and hold their shape beautifully for that classic sugar cookie feel.
- Festive Colors: Using gel food coloring to create swirled, marbled fall shades makes these cookies as pretty as they are tasty.
- Easy Decorating: You can keep them simple or add royal icing for a stunning finishing touch.
- Family Favorite: My family goes crazy for these every fall—kids and adults alike enjoy making and eating them.

Ingredients You’ll Need
The magic of this Fall Leaf Cookies Recipe lies in simple ingredients coming together in perfect harmony. I always recommend using good quality butter and fresh vanilla extract—you’ll taste the difference. Also, gel food coloring works best here because it won’t alter the dough’s consistency.
- Unsalted Butter: Softened, not melted, to get that creamy dough texture.
- Granulated Sugar: Provides sweetness and helps with the cookie’s crispy edges.
- Pure Vanilla Extract: Adds warm, comforting aroma and flavor.
- Egg: At room temperature to help the dough bind without making it tough.
- All Purpose Flour: The base that gives cookies their structure; scoop accurately!
- Baking Powder: Just enough to give a little lift without puffing the cookies up too much.
- Salt: Balances the sweetness and enhances flavors.
- Gel Food Coloring: In orange, red, and yellow for those gorgeous fall leaf swirls.
- Royal Icing: Optional, but perfect for decorating after baking.
Variations
I love making this Fall Leaf Cookies Recipe my own depending on the season or crowd. Feel free to personalize—this cookie dough is a great canvas for all kinds of creative tweaks and decoration styles.
- Flavor Twist: I sometimes add a pinch of cinnamon or pumpkin pie spice to amplify those fall vibes; it’s subtle but lovely.
- Gluten-Free: Swap the all-purpose flour for a 1:1 gluten-free flour blend—I tried it and was surprised how well the dough behaved.
- Vegan-Friendly: Replace butter with a vegan butter substitute and use flax eggs; the texture won’t be quite the same but still delicious.
- Decoration Level: You can simply bake and enjoy or get fancy with royal icing designs—my little ones adore helping with the decorating part!
How to Make Fall Leaf Cookies Recipe
Step 1: Cream the Butter and Sugar
Start by preheating your oven to 350°F (180°C). Then, in the bowl of your stand mixer fitted with a paddle attachment, beat the softened butter with the sugar for about 2 to 3 minutes until it becomes light, creamy, and smooth. This step is crucial because it creates the perfect texture and sweetness base for your cookies.
Step 2: Add the Egg and Vanilla
Next, mix in the vanilla extract and the egg until fully incorporated. A quick tip: don’t over-whip after adding the egg, or your dough might puff up a bit, causing the cookies to rise and lose their classic sugar cookie shape. A couple of seconds is all you need here.
Step 3: Combine the Dry Ingredients
Now add the flour, baking powder, and salt. Mix just until everything is combined—no need to overblend. Scrape down the dough from the sides of the bowl to catch any stray bits of flour. You want the dough to pull away from the bowl’s sides; if it’s still sticky, sprinkle in a little more flour (about ½ cup) and mix gently until it’s manageable.
Step 4: Color and Marble the Dough
Divide your dough into three equal balls. Add a few drops of gel food coloring—yellow, red, and orange—to each ball and knead by hand until the colors are vibrant and evenly distributed. Remember, gel coloring is key here to keep the texture perfect.
Take about a quarter from each colored dough ball, tear them into small pieces, then spread and gently press the pieces together on a lightly floured surface. Roll the combined dough to about ¼ to ½ inch thickness. You’ll get this beautiful marbled effect that looks like a real fall leaf mosaic.
Step 5: Cut and Bake
Use a leaf-shaped cookie cutter dipped in flour to cut shapes from your marbled dough slab (flouring it helps prevent sticking). Lift the cookies carefully using an offset spatula—this helps keep the beautiful marbling intact.
Bake on a lined cookie sheet for about 8 to 9 minutes, rotating the pan halfway through to ensure even browning. Don’t overbake—the cookies should be just set and slightly golden at the edges.
Step 6: Cool and Decorate
Let the cookies cool on the sheet for about 5 minutes before transferring them to a wire rack to cool completely. Once cool, decorate with royal icing if you like—a thin white outline or delicate vein patterns on the leaf shapes look especially charming.
Pro Tips for Making Fall Leaf Cookies Recipe
- Soft Butter is Key: Always use softened—not melted—butter for creamy, well-incorporated dough.
- Don’t Overmix Egg: Mixing too long after adding the egg can puff your dough and make cookies lose shape.
- Use Gel Colors: Gel food coloring packs bright color without watering down your dough.
- Roll Evenly: Rolling the dough to uniform thickness bakes the cookies evenly and makes decorating easier.
How to Serve Fall Leaf Cookies Recipe
Garnishes
I often keep these cookies simple with just a light dusting of powdered sugar or a drizzle of white royal icing to mimic leaf veins—that little extra touch always impresses. For a festive twist, you can also sprinkle edible glitter or tiny sugar pearls for an elegant sparkle.
Side Dishes
These cookies pair wonderfully with warm beverages like chai tea, spiced latte, or a rich hot chocolate—perfect for cozy fall afternoons. If you’re serving a bigger spread, pair them with pumpkin bread or apple cider for that ultimate autumn vibe.
Creative Ways to Present
For parties, I like arranging the cookies on a wooden platter rimmed with fresh mini pumpkins, colorful leaves, and cinnamon sticks. Another fun idea is stacking them in clear cellophane bags tied with twine and a hand-written note—makes a heartfelt, homemade gift!
Make Ahead and Storage
Storing Leftovers
I store leftover cookies in an airtight container at room temperature, layered between parchment paper to keep them from sticking together. They usually stay fresh and soft for up to 5 days—though I promise, they rarely last that long in my house!
Freezing
If you want to freeze the dough, I recommend shaping and cutting the cookies first, then arranging them flat on a baking sheet to flash-freeze before transferring to a freezer-safe bag. You can also freeze baked cookies in airtight containers for up to 3 months—just thaw them at room temp before serving.
Reheating
To bring frozen or leftover cookies back to fresh-from-the-oven warmth, pop them in a preheated 300°F oven for about 5 minutes. This revives their softness without drying them out, making each bite taste freshly baked again.
FAQs
-
Can I use regular liquid food coloring instead of gel?
While you can use liquid food coloring, it’s not ideal for this recipe because it adds extra liquid that can affect the dough consistency, making it sticky and harder to handle. Gel colors are concentrated and maintain the dough’s texture much better.
-
Why do these cookies stay soft instead of hardening like other sugar cookies?
This recipe balances butter, sugar, and leavening in a way that creates a tender, soft crumb. Also, baking just until set and not overbaking ensures they don’t dry out and become hard.
-
Can I prepare the dough in advance?
Absolutely! You can mix the dough and refrigerate it for up to 48 hours before shaping and baking. Just let it sit at room temperature for a few minutes before rolling out to make it easier to work with.
-
How do I prevent the colors from mixing into a muddy mess?
When mixing the colored dough pieces, gently press them together without over-kneading. Rolling softly and not overworking the dough keeps the distinct swirls vibrant and avoids blending the colors too much.
Final Thoughts
This Fall Leaf Cookies Recipe has become my go-to every autumn because it combines the warmth of homemade baking with the visual delight of seasonal colors. I love sharing these with friends and family—it’s like sharing a little piece of fall magic in each bite. I hope you give this recipe a try and enjoy the process as much as the yummy results. Trust me, once you try these, they’ll be a fall staple in your cookie rotation too!
Print
Fall Leaf Cookies Recipe
- Prep Time: 20 minutes
- Cook Time: 9 minutes
- Total Time: 29 minutes
- Yield: 36 cookies, approximately 4 inches each
- Category: Dessert
- Method: Baking
- Cuisine: American
Description
These Fall Leaf Cookies are a delightful way to celebrate the season. Featuring soft, buttery sugar cookie dough tinted in vibrant autumn colors with gel food coloring, these marbled cookies are shaped like leaves and decorated with royal icing. Perfectly soft and tender while holding their shape beautifully, they offer a festive, colorful treat ideal for fall gatherings and holidays.
Ingredients
Cookie Dough
- 1 cup (225g) unsalted butter, softened
- 1 cup (200g) granulated sugar
- 1 teaspoon pure vanilla extract
- 1 large egg, at room temperature
- 3 ½ cups (420g) all purpose flour, plus extra as needed
- 1 ½ teaspoons baking powder
- ½ teaspoon salt
- Gel food coloring in orange, red, and yellow
Decoration
- Royal icing, for decorating
Instructions
- Preheat Oven and Prepare Baking Sheet: Preheat your oven to 350°F (180°C), or 160°C if you have a fan oven. Line a cookie sheet with parchment paper or a silicone mat and set aside to ensure the cookies bake evenly without sticking.
- Cream Butter and Sugar: Using a stand mixer fitted with the paddle attachment, cream the softened butter and granulated sugar together until the mixture is smooth, light in color, and creamy. This process should take about 2 to 3 minutes to achieve the perfect texture.
- Add Vanilla and Egg: Add the pure vanilla extract and the room temperature egg to the creamed butter and sugar. Mix just until the egg is incorporated without overwhipping, as excessive air could cause the cookies to rise undesirably.
- Incorporate Dry Ingredients: Add the all purpose flour, baking powder, and salt to the wet mixture. Mix just until the dry ingredients are combined and the dough begins to pull away from the sides of the bowl. Scrape down the sides with a spatula to make sure everything is incorporated. If the dough seems too sticky, add an additional ½ cup of flour gradually.
- Divide and Color Dough: Separate the dough evenly into three balls. Add a few drops of gel food coloring to each portion to create orange, red, and yellow dough. Knead each ball by hand until the color is thoroughly blended.
- Create Marbled Dough: Take about one fourth of each colored dough ball. Break these portions into pieces and place the pieces together on a lightly floured surface. Gently press and slightly swirl the pieces together, then roll out the marbled dough using a rolling pin to a thickness between ¼ and ½ inch.
- Cut Leaf Shapes: Use a leaf-shaped cookie cutter, dipping it in flour first to prevent sticking. Cut shapes from the marbled dough slab. Use an offset spatula to carefully lift and transfer the cutouts onto the prepared baking sheet.
- Bake Cookies: Bake the cookies for 8 to 9 minutes, rotating the baking sheet at around 6 minutes for even browning. Bake only one sheet at a time to maintain temperature and consistency.
- Cool Cookies: Remove the cookies from the oven and let them cool on the baking sheet for 5 minutes. Then transfer them to a wire rack to cool completely before decorating.
- Decorate: Once fully cooled, decorate the cookies with white royal icing to enhance their festive fall appearance.
Notes
- This sugar cookie recipe is excellent for holding shapes because of its sturdy yet soft texture.
- Using gel food coloring ensures vibrant fall colors without altering dough consistency.
- If the dough seems too sticky at the mixing stage, add flour gradually until it reaches a workable texture.
- Rotate the cookie sheets during baking to ensure even cooking and browning.
- Allow cookies to cool completely before decorating to prevent royal icing from melting or running.
Nutrition
- Serving Size: 1 cookie
- Calories: 236 kcal
- Sugar: 26 g
- Sodium: 57 mg
- Fat: 6 g
- Saturated Fat: 3 g
- Unsaturated Fat: 2 g
- Trans Fat: 1 g
- Carbohydrates: 44 g
- Fiber: 1 g
- Protein: 3 g
- Cholesterol: 19 mg


