If you’re craving a homemade focaccia but dread the kneading and complicated steps, you’re going to adore this Easy No-Knead Focaccia Bread Recipe. Trust me, this bread turns out beautifully airy and golden without all the fuss, and I can’t wait to share with you how simple (and satisfying!) it is to make. Whether you’re a newbie or a seasoned baker, this recipe will quickly become your go-to for fabulous, fluffy focaccia.
Why You’ll Love This Recipe
- Minimal Effort: No kneading means less mess and less time standing over the counter.
- Perfect Texture: Cold fermentation gives you an airy, bubbly crumb that’s crispy on the outside.
- Versatile and Customizable: Easy to add your favorite herbs, sea salt, or toppings to make it your own.
- Great for All Skill Levels: Whether you’re a beginner or expert, it’ll turn out beautifully every time.

Ingredients You’ll Need
The beauty of this Easy No-Knead Focaccia Bread Recipe is in its simplicity. Just a handful of pantry staples come together to create something magical, so you don’t have to run to specialty stores. Using quality olive oil and flaky sea salt really makes a noticeable difference here, so keep that in mind when shopping.
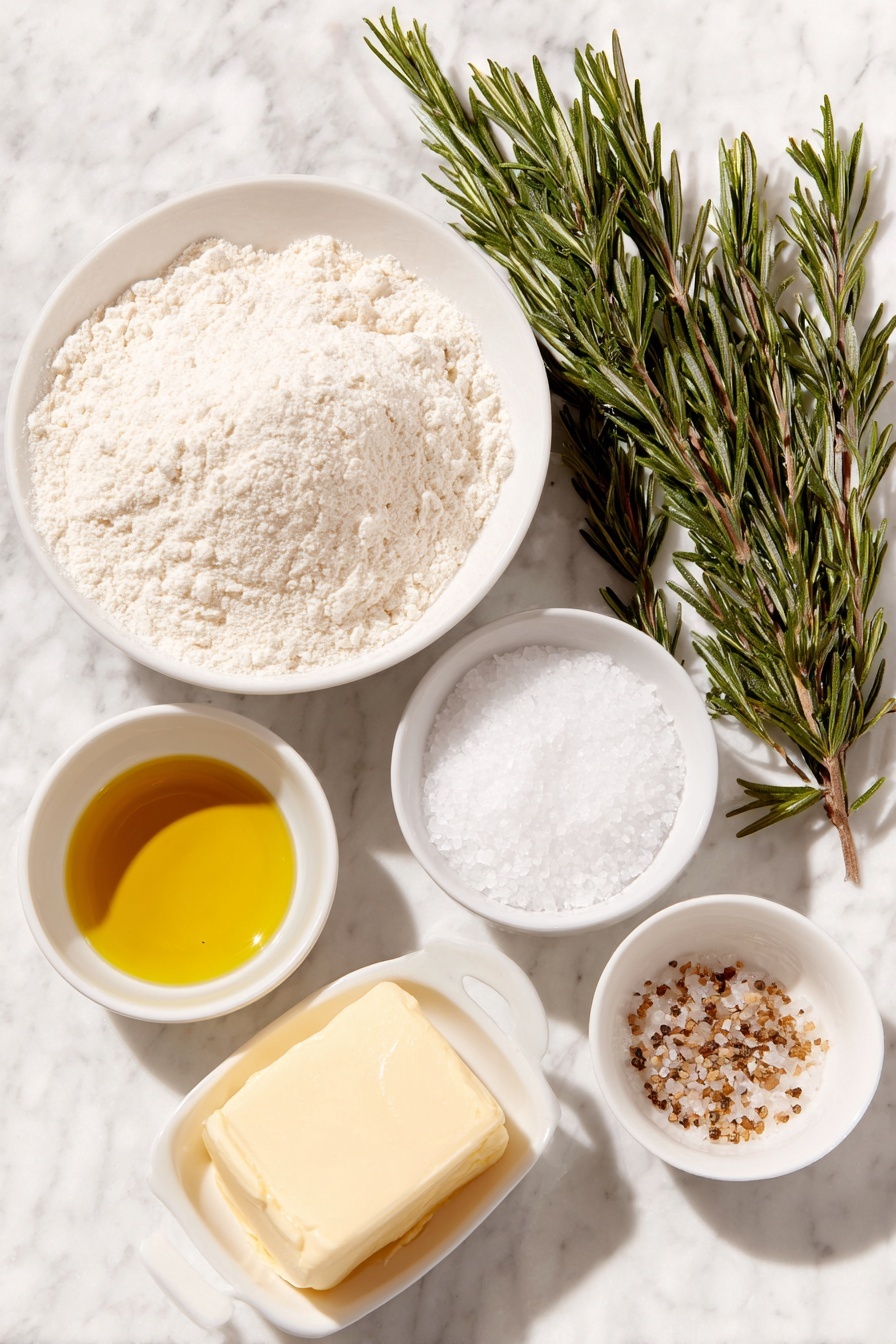
- All-purpose or Bread Flour: Bread flour gives a chewier texture, but all-purpose works just fine.
- Kosher Salt: Adds flavor and helps balance the dough; Diamond Crystal kosher salt is my favorite because it dissolves perfectly.
- Instant Yeast: Makes the process super quick—no need to proof, just mix and go.
- Lukewarm Water: Mix a bit of boiling and cold water to get just the right temperature to activate the yeast.
- Butter for Greasing: Keeps the dough from sticking to your pans, especially if they’re glass.
- Olive Oil: Both for the dough and coating—use extra virgin for the best flavor.
- Flaky Sea Salt: Maldon or similar varieties give that perfect crunchy finish right before baking.
- Rosemary Leaves (Optional): Fresh or dried, they add a lovely aromatic touch, but don’t worry if you skip it.
Variations
I love that this recipe is your blank canvas—you can tweak it to suit your mood or pantry. Over the years, I’ve tried all sorts of little twists and found they add a fun, personal touch without any extra hassle.
- Herb Infusions: Rosemary is classic, but I’ve also mixed in thyme, oregano, or even chopped basil for different flavor profiles.
- Garlic Lovers: Minced garlic or garlic powder sprinkled on top before baking creates an irresistible aroma.
- Cheese Addition: A sprinkle of parmesan or mozzarella before baking adds a golden, bubbly richness my family goes crazy for.
- Gluten-Free Twist: While this exact recipe is wheat-based, you can experiment with gluten-free flour blends but expect some textural differences.
How to Make Easy No-Knead Focaccia Bread Recipe
Step 1: Mix and Rest Your Dough
Start by whisking your flour, kosher salt, and instant yeast together in a large bowl. Then, pour in your lukewarm water and gently stir with a rubber spatula until everything’s wet and sticky—don’t worry if it looks shaggy. Cover it up, let it rest for 30 minutes, and if you’ve got the time, give it a quick stretch and fold to encourage bubbles for that perfect focaccia texture. This hands-off mix-and-rest step is what makes this recipe truly no-knead and delightfully forgiving.
Step 2: Refrigerate for Flavor and Texture
Now here’s the trick I learned the hard way: slick your dough’s surface with olive oil before covering. This little step prevents it from drying out in the fridge. Pop it in your fridge for at least 12 hours, but ideally 18-24 hours or even up to 3 days. I swear by this cold rise—it transforms the dough into something unbelievably airy and flavorful. If you’re in a rush, you can skip the chill, but trust me, the extra wait is worth it.
Step 3: Shape and Let it Rise Again
Grease your pans thoroughly with butter or olive oil (especially if you’re using glass) and divide your dough into two balls if using two smaller pans. Coat each ball in olive oil, place them in the pans, and let them quietly rest at room temp for 3 to 4 hours. You don’t even need to cover them during this rise! This step is where the dough really puffs up and gets ready to become that golden, dimpled focaccia we love.
Step 4: Dimple, Season, and Bake
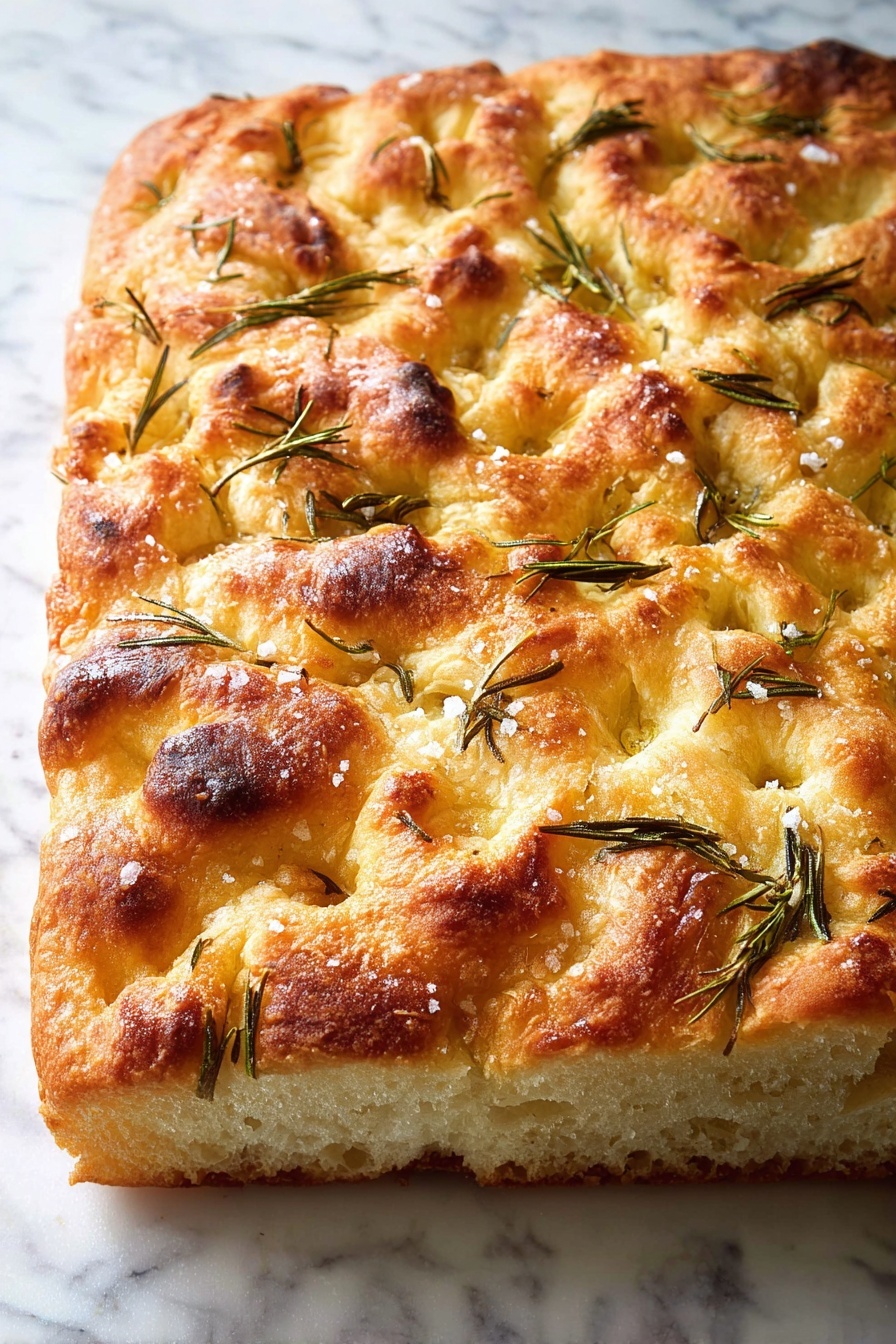
Preheat your oven to 425°F with the rack in the center. Sprinkle rosemary on top if you’re using it, then drizzle olive oil over your dough rounds. Here’s my favorite part—dip your fingertips in olive oil and press deep dimples all over the dough. Don’t worry if you have to gently stretch the dough to fill in the pan; those dimples trap lovely pools of oil and flavor. Sprinkle a generous amount of flaky sea salt on top, then slide it into the oven. Bake for about 25 to 30 minutes until the bottom is golden and crisp. You’ll know it’s ready when it smells like pure heaven!
Step 5: Cool and Enjoy (or Store!)
Once out of the oven, transfer the focaccia to a cooling rack so it doesn’t sweat underneath and let it cool for at least 10 minutes before slicing—or a bit longer if you plan to make sandwiches. The bread stores wonderfully at room temp for a few days, or you can freeze it to save for later.
Pro Tips for Making Easy No-Knead Focaccia Bread Recipe
- Olive Oil Slick: Don’t skip oiling the dough’s surface before chilling—it locks in moisture and prevents crusty tops.
- Room Temperature Rise: The second rise is where the magic happens; be patient and allow the dough to double at room temp for best texture.
- Finger Dimples: Use your fingertips, not nails, and coat them in olive oil to make those classic dimples without tearing the dough.
- Don’t Rush the Chill: If you skip the fridge fermentation, expect a denser crumb; the overnight rest really builds flavor and air pockets.
How to Serve Easy No-Knead Focaccia Bread Recipe

Garnishes
I usually keep things classic with fresh rosemary and flaky sea salt on top—the aroma fills the kitchen and it’s deliciously simple. Sometimes, I add thinly sliced garlic or sundried tomatoes before baking for a little extra punch. A final drizzle of good-quality olive oil right after baking is my favorite finishing touch—it keeps the crust luscious and shiny.
Side Dishes
This focaccia pairs beautifully with almost anything! I love serving it alongside a warm bowl of minestrone or alongside a fresh, crisp salad. It’s also fantastic with cheeses and cured meats for an impromptu charcuterie night. For a cozy dinner, try it with roasted veggies and a drizzle of balsamic glaze.
Creative Ways to Present
For holidays or special occasions, I sometimes cut the focaccia into small squares and serve it as finger food with olive oil and balsamic vinegar for dipping. Another fun way is layering it open-faced with fresh mozzarella, tomatoes, and basil for an elevated bruschetta that everyone raves about. The airy crumb also makes it perfect for sandwiches or picnic-ready flatbread wraps.
Make Ahead and Storage
Storing Leftovers
I usually wrap any leftover focaccia tightly in plastic wrap or store it in an airtight container at room temperature. It stays soft for up to 3 days, though I recommend reheating it to refresh the crust before eating.
Freezing
This focaccia freezes beautifully. After it’s completely cooled, I slice it, wrap portions tightly in foil or plastic wrap, then pop them in a freezer-safe bag. When I’m ready to eat, I let it thaw at room temp, then warm it in the oven to bring back the fresh-baked goodness.
Reheating
To revive the focaccia’s crispy crust and soft crumb, I reheat it in a 350ºF oven for about 15 minutes, sometimes wrapping in foil partway through if it’s getting too brown. This really restores that just-baked feeling and keeps it from becoming chewy or stale.
FAQs
-
Can I make this Easy No-Knead Focaccia Bread Recipe without instant yeast?
Yes! If you only have active dry yeast, sprinkle it over the lukewarm water and let it sit for 15 minutes until foamy before mixing it with the dry ingredients. This activation step replaces the instant yeast shortcut, but your rising time might be slightly longer.
-
How important is the cold fermentation step?
The cold rise in the fridge is key to developing that signature airy texture and deep flavor in this focaccia. While you can speed things up by letting the dough rise at room temp, the texture and complexity won’t be quite as good. I highly recommend planning ahead for the best results.
-
Can I make this focaccia in one large pan instead of two smaller ones?
Absolutely! Using a 9×13-inch pan without dividing the dough creates a thicker focaccia. Just adjust your baking time slightly to make sure it’s cooked through, and remember to oil the pan well to prevent sticking.
-
Should I cover the dough during the room temperature rise?
Interestingly, during the second rise at room temperature, there’s no need to cover the dough. This uncovered rise helps form the crust texture we want while the dough relaxes and puffs up beautifully.
Final Thoughts
I absolutely love how this Easy No-Knead Focaccia Bread Recipe comes together with minimal hands-on effort but maximum flavor and texture payoff. When I first tried this, I was amazed at how bubbly and tender my focaccia tasted without the usual struggle of kneading and shaping. It’s such a crowd-pleaser at every meal, and I genuinely enjoy sharing it with friends and family. Give it a try—you might just fall in love with baking all over again!
Print
Easy No-Knead Focaccia Bread Recipe
- Prep Time: 18 hr
- Cook Time: 30 min
- Total Time: 18 hr 30 min
- Yield: 2 loaves
- Category: Bread
- Method: Baking
- Cuisine: Italian
Description
This is the best and easiest focaccia bread recipe that yields a wonderfully airy, pillowy, and flavorful Italian flatbread. Made with simple ingredients and a cold fermented dough, the focaccia offers a crispy golden crust and a tender interior, perfect for sandwiches, snacks, or as a side. The optional rosemary and flaky sea salt topping enhances its traditional aroma and taste.
Ingredients
Dough Ingredients
- 4 cups (512 g) all-purpose flour or bread flour
- 2 to 3 teaspoons (10 to 15 g) kosher salt
- 2 teaspoons (8 g) instant yeast (or active dry yeast with adjustment)
- 2 cups (455 g) lukewarm water (made by combining 1/2 cup boiling water with 1 1/2 cups cold water)
For Preparation and Topping
- Butter for greasing pans
- 4 tablespoons olive oil, divided
- Flaky sea salt, such as Maldon, for sprinkling
- 1 to 2 teaspoons whole rosemary leaves (optional)
Instructions
- Mix the Dough: In a large bowl, whisk together the flour, salt, and instant yeast. Add the lukewarm water and use a rubber spatula to mix until the dough comes together into a sticky ball and all liquid is absorbed.
- Rest and Stretch & Fold: Cover the bowl and let the dough rest for 30 minutes. Optionally, perform a stretch and fold by wetting your hand, grabbing an edge of the dough, pulling it towards the center, and repeating 8 to 10 times around the dough’s edge. This improves dough texture.
- Oil and Refrigerate: Lightly rub the dough’s surface with olive oil, cover the bowl with a lid or plastic wrap, and refrigerate immediately for at least 12 hours and up to 3 days. Proper oiling prevents drying and crust formation on the dough surface.
- Prepare Baking Pans: Line two 8- or 9-inch pie plates or a 9×13-inch pan with parchment paper or grease well with butter or nonstick spray. Pour 1 tablespoon olive oil into each pie plate or 2 tablespoons into the 9×13-inch pan.
- Divide and Shape Dough: Using two forks, deflate the dough by pulling it toward the center while rotating the bowl. Split the dough into two equal pieces if using pie plates, or keep whole for the 9×13-inch pan. Place into the pans, roll the dough balls in oil to coat evenly, and let rest at room temperature for 3 to 4 hours until puffed up. No need to cover during this rise.
- Preheat Oven: Place oven rack in the middle position and preheat the oven to 425°F (220°C).
- Top and Dimple Dough: If using rosemary, sprinkle it over the dough. Pour 1 tablespoon of olive oil over each dough round (or 2 tablespoons if using the larger pan). Rub your hands lightly in oil, then press all fingers straight down to create deep dimples in the dough. Gently stretch the dough as you dimple it to fill the pan. Sprinkle generously with flaky sea salt.
- Bake: Place the pans in the preheated oven and bake for 25 to 30 minutes until the bottom is golden and crisp.
- Cool and Store: Remove focaccia from pans and transfer to a cooling rack. Allow to cool for 10 minutes before cutting and serving; cool completely if making sandwiches. Store at room temperature in an airtight container up to 3 days or freeze for up to 3 months. Reheat at 350°F for 15 minutes to refresh the crust.
Notes
- Cold, refrigerated dough resting for 18 to 24 hours (up to 3 days) is key to a pillowy, airy focaccia. For a quick option, prepare and bake within 3 hours using a shorter rise.
- For short timeframes, let the dough rise at room temperature until doubled (1.5-2 hours), then proceed with the recipe; second rise shortens to ~30 minutes.
- Use different pans as desired: two 9-inch pie plates for round focaccia, a 9×13-inch pan for thicker focaccia, or a 13×18-inch sheet pan for thinner focaccia suitable for slab sandwiches.
- Measure flour and water with a digital scale for best results.
- Adjust salt quantity based on personal taste: 10 grams for less salty, 12-15 grams for regular saltiness. Sea salt topping adds more saltiness.
- Active dry yeast users should proof yeast in lukewarm water for 15 minutes until foamy before mixing.
- Bread flour can improve texture in humid climates or UK/Canada settings; adjust water accordingly.
Nutrition
- Serving Size: 1 slice (about 1/12th of a loaf)
- Calories: 180
- Sugar: 0.3 g
- Sodium: 330 mg
- Fat: 7 g
- Saturated Fat: 1 g
- Unsaturated Fat: 6 g
- Trans Fat: 0 g
- Carbohydrates: 25 g
- Fiber: 1 g
- Protein: 5 g
- Cholesterol: 0 mg


