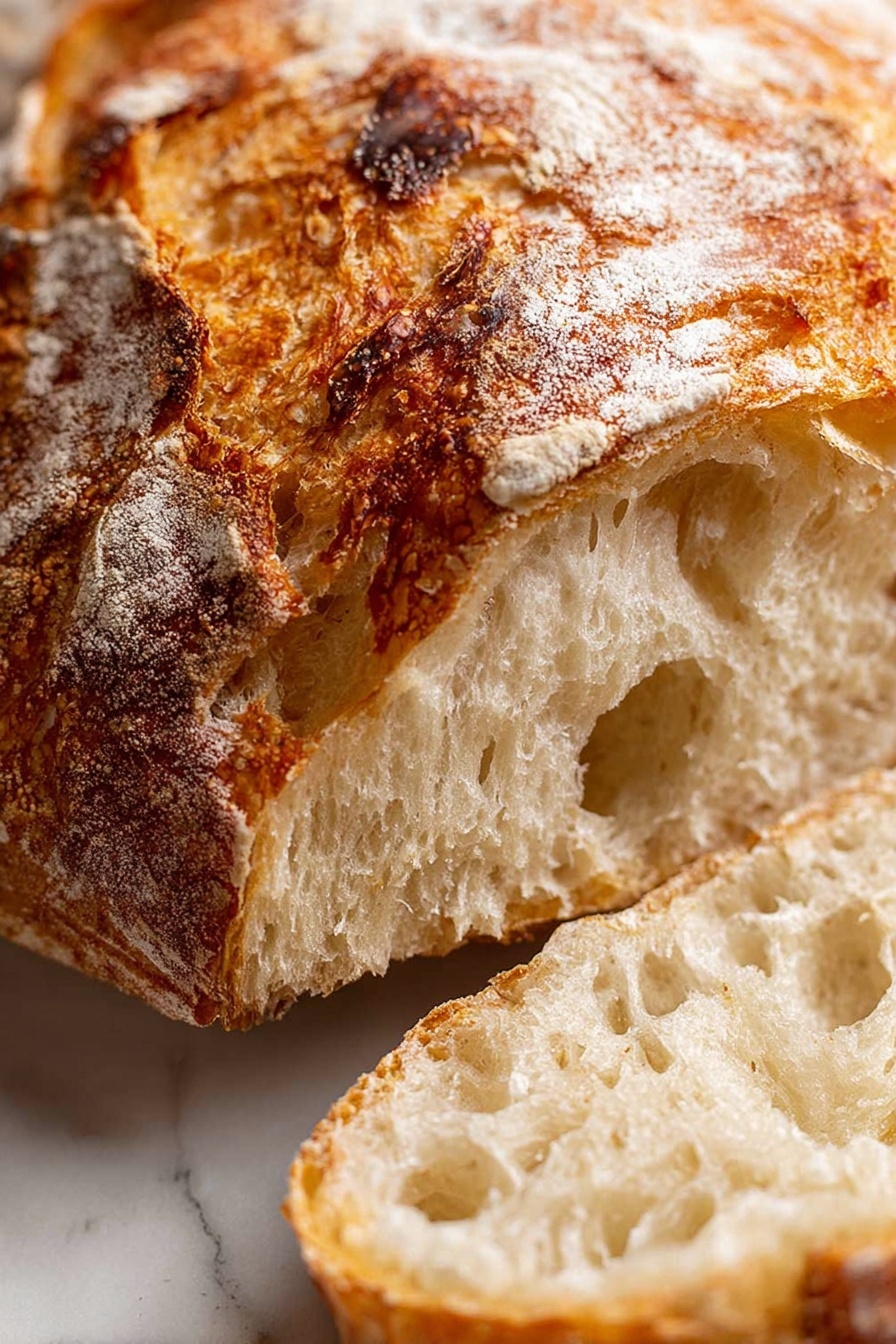
If you’ve ever wanted to bake your own beautiful, crispy, artisan-style bread without breaking a sweat, you’re in for a treat. This Easy No-Knead Artisan Yeast Bread Recipe is genuinely a game-changer — it’s as straightforward as it gets but yields that crusty, chewy loaf that makes everyone swoon. Trust me, once you make this, you’ll wonder why you ever doubted homemade bread. Let me walk you through how it’s done, sharing all my personal tips so you nail it every time.
Why You’ll Love This Recipe
- No Kneading Required: You’ll save time and effort while getting that gorgeous artisan texture.
- Simple Ingredients: Just pantry basics you probably already have on hand.
- Delicious Crust and Chewy Crumb: Big holes and a crackly crust that will impress any bread lover.
- Flexible Timing: You can bake immediately or refrigerate for up to 3 days, making it super convenient.

Ingredients You’ll Need
This recipe uses a handful of ingredients that come together beautifully. Using the right kind of flour and yeast really makes a difference, so here are my tips on each.

- Flour (Bread or Plain/All-Purpose): Bread flour gives a great chew, but plain flour works too—just pick what you prefer or have on hand.
- Instant or Rapid Rise Yeast: I love instant yeast because it skips the proofing step; if you have active dry yeast, no worries—just see the notes below.
- Kosher or Cooking Salt: Avoid table salt here; kosher salt makes the flavor pop without being harsh.
- Very Warm Water: Aim for warm, but not hot—around 130°F/55°C—because too hot can kill the yeast.
- Extra Flour for Dusting: Helps handle the dough without sticking, especially since the dough’s wet.
Variations
I love how flexible this Easy No-Knead Artisan Yeast Bread Recipe is. Over time, I’ve tweaked it a bit to suit different moods and tastes — and you totally can too!
- Add-Ins: I sometimes stir in herbs like rosemary or a handful of olives. It adds a rustic twist that my family adores.
- Whole Wheat Version: Substituting half the flour with whole wheat adds nuttiness and more fiber, perfect for a more rustic loaf.
- No Dutch Oven: If you don’t have a Dutch oven, no worries — I’ll share tips below for still getting that crispy crust on a regular baking tray.
- Cheese Bread: A favorite variation is folding in shredded cheese at shaping — it’s a gooey, cheesy dream!
How to Make Easy No-Knead Artisan Yeast Bread Recipe
Step 1: Mix Your Dough Like a Pro
Start by combining your flour, yeast, and salt in a large bowl. Then, pour in your warm water and use the handle of a wooden spoon to mix everything until just combined. The dough will be wet, sticky, and a bit sloppy—that’s exactly what you want. Don’t fret if it feels messy; it’s supposed to be this way. If it feels too dry, add a splash more water; if it’s too runny, a sprinkle of flour will help. Getting comfortable with this wet dough consistency was a game changer for me—it leads to that open crumb and chewy texture you’re after!
Step 2: Let the Dough Rise and Work Its Magic
Cover the bowl with cling wrap or a plate and leave it on your counter for 2 to 3 hours. You’ll notice it puffing up and looking jiggly like jelly—that’s your rising dough doing its thing. The top should be bubbly when it’s ready. If after an hour you don’t see much action, just move it somewhere a little warmer. I remember the first time I left mine in a chilly room; no rise, no luck! But a warm spot is like a cozy blanket for the yeast.
Step 3: Optional — Refrigerate for Flavor
Once the dough has risen, you can bake right away or pop it in the fridge for up to 3 days to develop even more flavor. When ready to bake, just take it out and let it sit at room temperature for about 45 to 60 minutes before moving to the next step; cold dough won’t rise as well in the oven. I absolutely love how the flavor deepens with this slow cold ferment—truly worth the wait!
Step 4: Preheat Your Oven and Dutch Oven
This is the secret to that crusty artisan loaf. Place your Dutch oven (at least 10 inches/26cm) with the lid on into your oven and preheat to 450°F (230°C) for a full 30 minutes. This gets the pot screaming hot, creating steam when you bake, which gives your bread that signature crust. No Dutch oven? No problem — later I’ll tell you how to improvise.
Step 5: Shape Your Dough Without Kneading
Dust your work surface with a tablespoon of flour, then scrape the dough out. Sprinkle a little more flour on top. Use a dough scraper or any wide spatula to fold the dough’s edges inward about six times, forming a loose round shape. This isn’t about perfection—think of it as gently deflating the bubbles and creating a shape you can handle. Then, place a large piece of parchment paper next to the dough, flip the dough upside down onto it (seam side down), and reshape lightly into a round. Lopsided shapes actually make extra crunchy bits, so don’t stress about symmetry!
Step 6: Bake for Crunchy Perfection
Carefully take your scorching hot Dutch oven out and lift the dough on the parchment paper into the pot. Put the lid back on and bake covered for 30 minutes. Then remove the lid and bake uncovered for another 12 minutes or until the crust is beautifully deep golden and crunchy. Once done, cool the loaf on a wire rack for at least 10 minutes before slicing—this lets the bread finish cooking and firms up the crumb. I used to slice too soon and ended up with gummy bread, so this pause is key.
Pro Tips for Making Easy No-Knead Artisan Yeast Bread Recipe
- Water Temperature Matters: Using water that’s too hot can kill your yeast, so aim for warm tap water, around 130°F/55°C—not boiling.
- Handling Sticky Dough: Don’t worry about the wet dough—it’s meant to be sloppy, which leads to airy bread. Flour your hands and tools lightly instead of adding too much extra flour.
- Dutch Oven Substitute: No Dutch oven? Bake on a heavy baking sheet and place an oven-safe pan with water in the oven bottom for steam—this helps crust formation.
- Don’t Skip the Rest: Letting the bread cool fully before slicing preserves the crumb texture and prevents doughy slices.
How to Serve Easy No-Knead Artisan Yeast Bread Recipe

Garnishes
I often brush the crust lightly with olive oil and sprinkle flaky sea salt right after baking—this adds an irresistible flavor and sparkle. Fresh herbs like rosemary or thyme also make charming garnishes if you want an elegant touch.
Side Dishes
This bread pairs beautifully with soups and stews, especially hearty tomato basil or creamy butternut squash. It’s also fantastic alongside a big cheese and charcuterie board—my go-to for casual entertaining.
Creative Ways to Present
For special occasions, I love slicing and serving this bread as mini crostini — just toast slices, rub with garlic, and top with tomatoes or tapenade. It looks so festive and bites are easy to enjoy at parties.
Make Ahead and Storage
Storing Leftovers
I store leftover bread in a paper bag at room temperature to keep the crust crisp; plastic bags can make it soggy. If you finish half a loaf, wrapping the rest lightly in foil works well too.
Freezing
This bread freezes wonderfully. I slice it first, wrap slices in plastic wrap or foil, then place them in a freezer bag. When I’m ready, I pull out a slice or two and thaw or toast directly from frozen.
Reheating
To refresh crusty goodness, I like reheating slices in a toaster oven or normal oven at 375°F for 5-7 minutes. This brings back that fresh-baked crunch and warms the crumb perfectly—no microwave needed.
FAQs
-
Can I use active dry yeast instead of instant yeast?
Yes! If you’re using active dry yeast, proof it first in the warm water with a pinch of sugar for about 5-10 minutes until foamy before adding it to the flour. This step isn’t needed with instant yeast, which you can add directly to the dry ingredients.
-
What if my dough doesn’t rise well?
Make sure your water isn’t too hot or cold, and your kitchen is warm enough. If the dough isn’t rising, you can place it in a slightly warmer spot like near a radiator or on top of the fridge. Also, check your yeast’s freshness—expired yeast often fails to rise.
-
How do I store this bread to keep the crust crisp?
Store the bread at room temperature in a paper bag or bread box. Avoid airtight plastic bags as they trap moisture and soften the crust. If you want to keep it longer, freeze the bread and toast slices as needed.
-
Can I make this recipe gluten-free?
This recipe isn’t ideal for gluten-free flours as the dough structure depends on gluten for that airy crumb. However, you might experiment with specialized gluten-free bread mixes designed for no-knead methods, but results will vary.
Final Thoughts
I absolutely love how this Easy No-Knead Artisan Yeast Bread Recipe makes artisan-style baking accessible to everyone—even if you’ve never made bread before. The simplicity, the amazing flavor, and the wonderful crust are why I keep baking it week after week. Once you try it, you’ll find baking bread no longer feels like a chore but a joyful part of your kitchen routine. So grab your flour, set your timer, and get ready to impress yourself and your loved ones with homemade bread that tastes way more complicated than it really is!
Print
Easy No-Knead Artisan Yeast Bread Recipe
- Prep Time: 5 minutes
- Cook Time: 42 minutes
- Total Time: 2 hours 47 minutes (including rising)
- Yield: 10 servings (10 – 12 slices)
- Category: Bread
- Method: Baking
- Cuisine: Artisan
Description
This World’s Easiest Yeast Bread recipe creates a rustic artisan loaf with a crispy, chewy crust and big, airy holes similar to sourdough. It requires no kneading and uses simple pantry ingredients, making it perfect for beginners or anyone craving homemade bread with minimal effort. The dough is mixed, left to rise, then baked in a preheated Dutch oven for a perfectly golden, crusty finish.
Ingredients
Dry Ingredients
- 3 cups (450g) flour (bread or plain/all purpose)
- 2 tsp instant or rapid rise yeast
- 2 tsp cooking/kosher salt (NOT table salt)
- 1 1/2 tbsp flour for dusting
Wet Ingredients
- 1 1/2 cups (375 ml) very warm tap water (up to 55°C/130°F)
Instructions
- Mix Dough: In a large bowl, combine the flour, yeast, and salt. Add the warm water and use the handle of a wooden spoon to stir until all the flour is incorporated into a wet, sloppy dough. The dough should not be kneadable but also not as runny as cake batter. Adjust with additional water or flour if needed to reach the right consistency.
- Rise: Cover the bowl with cling wrap or a plate and leave it on the counter for 2 to 3 hours until the dough doubles in volume, becomes wobbly like jelly, and develops bubbles on the surface. If it is not rising after 1 hour, move it to a warmer spot.
- Refrigerate (Optional): For enhanced flavor, refrigerate the dough at this point for up to 3 days. Before baking, remove it and let it sit at room temperature for 45 to 60 minutes to take the chill off.
- Preheat Oven and Dutch Oven: Place a Dutch oven (26cm/10” or larger) with its lid on inside your oven. Preheat the oven to 230°C / 450°F (220°C fan) for 30 minutes.
- Shape Dough: Lightly flour your work surface with about 1 tablespoon of flour. Scrape the dough onto the surface, sprinkle about half a tablespoon of flour on top, and use a dough scraper or similar tool to fold the edges inward approximately six times to form a roundish shape. This deflates the bubbles and shapes the dough for transfer.
- Transfer to Parchment: Place a large piece of parchment paper beside the dough. Flip the dough upside down (seam side down, smooth side up) onto the parchment. Slide it toward the center and reshape into a round form. Don’t worry about perfect shape; irregularities create crunchy crust bits.
- Bake Covered: Carefully remove the hot Dutch oven from the oven and use the parchment paper to lift and place the dough inside the pot. Cover with the lid and bake for 30 minutes.
- Bake Uncovered: Remove the lid and bake the bread for an additional 12 minutes or until the crust is deep golden and crispy.
- Cool: Transfer the bread to a cooling rack and let it cool for 10 minutes before slicing.
Notes
- This recipe does not require kneading, making it easy and quick for even beginner bakers.
- You can use active dry yeast instead of instant yeast but follow standard yeast activation instructions.
- Use cooking or kosher salt, not table salt, for better flavor and texture.
- Water should be very warm but not boiling, ideally around 55°C/130°F for optimal yeast activation.
- If after an hour the dough hasn’t started to rise, placing it in a warmer location will help.
- Refrigerating the dough for up to 3 days enhances flavor and develops better texture.
- Preheating the Dutch oven is essential to achieve the signature crispy crust; if you don’t have a Dutch oven, see alternate baking methods in the original recipe notes.
- The parchment paper facilitates easy transfer of dough to the hot pot without deforming the shape.
- For variations, try the cheese bread version mentioned in the original notes for added flavor and richness.
Nutrition
- Serving Size: 1 slice
- Calories: 155
- Sugar: 1 g
- Sodium: 469 mg
- Fat: 1 g
- Saturated Fat: 1 g
- Unsaturated Fat: 0 g
- Trans Fat: 0 g
- Carbohydrates: 32 g
- Fiber: 2 g
- Protein: 5 g
- Cholesterol: 0 mg


