
If you’re looking for a fun and festive treat that’s as adorable as it is delicious, this Easy Ghost Brownies Recipe is an absolute winner. I love this recipe because it combines rich, fudgy brownies with the playful charm of marshmallow ghosts—perfect for Halloween parties or anytime you want to surprise your family with a little whimsy. Stick around, and I’ll share all my best tips so your ghostly brownies turn out perfect every single time.
Why You’ll Love This Recipe
- Simplicity: It starts with a boxed brownie mix, making it great for when time is short but you still want impressive results.
- Fun Presentation: The little marshmallow ghosts with frosting eyes and mouth bring a smile with every bite.
- Perfect for Any Skill Level: Whether you’re a baking beginner or a seasoned pro, you’ll find this recipe straightforward and enjoyable.
- Crowd Pleaser: My family goes crazy for these at Halloween, and my friends always ask for the recipe!

Ingredients You’ll Need
These ingredients are easy to find and work wonderfully together to create moist, chocolaty brownies topped with soft, gooey marshmallow ghosts. Keep an eye out for good-quality chocolate chips and fluffy marshmallows to get the best texture and flavor.
- Brownie mix: I usually grab a classic chocolate boxed mix—it saves time and is super reliable.
- Vegetable oil: Helps keep the brownies moist and tender.
- Milk or water: I prefer milk for a slightly richer batter, but water works just fine too.
- Eggs: These bind everything together and add structure.
- Chocolate chips: I love folding these in for extra melty pockets of chocolate.
- Marshmallows: Big, fluffy ones work best to make cute ghost shapes.
- Buttercream or vanilla frosting: This acts like “glue” and the ghostly coating—make sure it’s smooth for easy spreading.
- Black quins: These tiny edible decorations make perfect ghost eyes and mouths; if you don’t have them, black gel or frosting works wonders too.
Variations
I love how versatile this Easy Ghost Brownies Recipe is—it’s a great base that you can easily tweak depending on what you have on hand or your dietary preferences. Don’t hesitate to get creative here!
- Nut-Free: I’ve made these with dairy-free frosting and nut-free chocolate chips for a safe treat everyone can enjoy.
- Extra Boo-tiful: Try adding orange or purple sprinkles around the ghost topping for a pop of Halloween color that really thrills kids.
- Peanut Butter Swirl: I discovered this trick when swirling some peanut butter into the batter for a rich, nutty twist that’s utterly addictive.
- Mini Brownies: Cutting the brownies into bite-sized squares makes them perfect for party platters or lunchbox treats.
How to Make Easy Ghost Brownies Recipe
Step 1: Prepping for Perfect Brownies
First things first: preheat your oven to 350°F, and spray a 9 x 13 pan with cooking spray. This step is key because it ensures your brownies won’t stick and slicing them out later will be much easier. I always keep my pan well-greased or lined with parchment for stress-free removal.
Step 2: Mix Your Brownie Batter
Grab a large bowl and combine the brownie mix with vegetable oil, milk (or water if you prefer), and eggs—follow the box instructions closely but I like to substitute milk for water to get that extra richness. Mix everything for about one minute until it’s smooth but be careful not to overbeat or your brownies might get cakey instead of fudgy.
Step 3: Fold in the Chocolate Chips
Now, gently fold in 3/4 cup of chocolate chips. This is where the magic happens with melty little chocolate bursts in each bite. Resist the urge to overmix here—you want those chips well-distributed but still intact.
Step 4: Bake to Gooey Perfection
Pour the batter evenly into your prepared pan and bake it according to the package directions—usually between 25 to 30 minutes. I always start checking around 25 minutes and use a toothpick; it should come out with a few moist crumbs but not wet batter. Overbaking is the enemy of fudgy brownies!
Step 5: Cool Completely Before Decorating
Once baked, remove the brownies from the oven and transfer them to a wire rack to cool completely. This is crucial—you really want the brownies fully cooled so the marshmallows and frosting don’t melt off when we add them later. Patience here really pays off!
Step 6: Cut and Ghostify
Cut your brownies into 1 to 1 1/2 inch squares—small enough for cute little ghosts. Next, put a small dot of frosting on the bottom of each marshmallow and stick it onto the center of each brownie square. This frosting dot acts like glue to hold your ghost in place while you add the rest.
Step 7: Frost Your Ghosts
Warm your frosting gently in the microwave, stirring every 20 seconds until it’s pourable but not too runny—think thick but spreadable. Then spoon frosting over each marshmallow ghost, covering it completely and letting some drip down the sides for a spooky effect.
Step 8: Add Eyes and Mouth
Use two black quins for the eyes and one for the mouth per ghost. If you don’t have quins handy, dots of black icing or gel work just as well! This finishing touch really brings your ghosts to life—my kids get such a kick out of decorating this part themselves.
Step 9: Let the Frosting Set
Finally, let the frosting cool and harden for about an hour before storing or serving. This helps the ghosts keep their shape and makes the brownies easier to handle.
Pro Tips for Making Easy Ghost Brownies Recipe
- Perfect Thickness: When spreading frosting, don’t try to skimp—thicker coats set better and trap the ghost shape nicely.
- Mixing Method: I learned to fold in chocolate chips gently so they don’t sink to the bottom of the pan during baking.
- Marshmallow Size: Use large marshmallows for the best ghost effect—mini ones tend to disappear under the frosting.
- Avoiding Sticky Fingers: Chill brownies after applying frosting for easier handling and cleaner slices.
How to Serve Easy Ghost Brownies Recipe

Garnishes
I love sprinkling just a pinch of edible glitter or orange and black sprinkles around the edges of the brownies for an extra festive look. You can also dust a little powdered sugar to mimic a spooky fog effect if you’re feeling creative!
Side Dishes
These brownies are perfect on their own but go great with a scoop of vanilla ice cream or a cup of hot chocolate to keep the cozy vibes going. I often serve them alongside fresh fruit or a simple whipped cream topping to balance the sweetness.
Creative Ways to Present
For parties, I’ve arranged these brownies on a large platter lined with fake spider webs and mini plastic spiders, which gets a lot of laughs! Another fun idea is to wrap individual brownies in clear cellophane with a ribbon for cute Halloween party favors.
Make Ahead and Storage
Storing Leftovers
I store leftover brownies in an airtight container at room temperature for up to three days. The frosting hardens nicely and the marshmallow ghosts stay soft but don’t get too sticky. Just make sure they’re cool and the frosting is fully set before sealing.
Freezing
I’ve frozen uncut brownies after baking (but before decorating), wrapped tightly in plastic wrap and then foil. When you’re ready, thaw overnight in the fridge, add your marshmallow ghosts and frosting fresh for best results. Freezing after decorating tends to mess up the frosting texture.
Reheating
If you like your brownies warm, reheat a single piece gently in the microwave for about 10-15 seconds. I usually remove the marshmallow ghost before warming to keep it from melting too much, then add it back on after reheating.
FAQs
-
Can I use homemade brownies for this Easy Ghost Brownies Recipe?
Absolutely! While this recipe uses a boxed mix for convenience, you can definitely bake your favorite scratch brownie recipe and then decorate with marshmallows and frosting just the same. Just make sure your brownies are fully cooled before adding the decorations.
-
What if I don’t have black quins for the ghost’s eyes and mouth?
No worries! I’ve used black gel icing or even a toothpick dipped in melted chocolate to dot eyes and mouths. You can also try mini chocolate chips or edible marker pens if you want to get creative.
-
How long can I keep these brownies after decorating?
Once decorated, these brownies keep well for about 2-3 days at room temperature in an airtight container. After that, the marshmallows might get a bit sticky or dry out, so it’s best to enjoy them fresh.
-
Can I make these gluten-free?
Yes! Use a gluten-free brownie mix and ensure your frosting and decorations are gluten-free as well. Many brands offer these options nowadays, making it simple to enjoy this spooky treat regardless of dietary needs.
Final Thoughts
This Easy Ghost Brownies Recipe holds a special place in my heart because it’s such a hassle-free way to bring a little Halloween magic into the kitchen—and the smiles it brings make every step worth it. Whether you’re baking with your kids or surprising friends at a party, this recipe is a total winner. I can’t wait for you to try it and see how fun and delicious ghostly brownies can be!
Print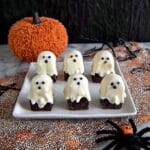
Easy Ghost Brownies Recipe
- Prep Time: 20 minutes
- Cook Time: 25 minutes
- Total Time: 45 minutes
- Yield: Approximately 48 brownies (2 dozen per batch)
- Category: Dessert
- Method: Baking
- Cuisine: American
Description
Delightfully spooky and simple to make, these Easy Ghost Brownies combine rich chocolatey brownies with adorable marshmallow ghost toppers decorated with buttercream frosting eyes and mouths. Perfect for Halloween parties or festive treats, these brownies boast a moist texture, gooey chocolate chips, and a fun frosting design that kids and adults will love.
Ingredients
Brownie Base
- 1 box (18.3 oz) brownie mix
- 2/3 cup vegetable oil
- 1/4 cup milk or water
- 2 eggs
- 3/4 cup chocolate chips
Ghost Topping
- 24 marshmallows
- 1 container buttercream or vanilla frosting
- Black quins (edible decorations) for eyes and mouth
Instructions
- Preheat the oven: Preheat your oven to 350°F (175°C) to ensure the pan is ready for baking the brownies evenly.
- Prepare the pan: Spray a 9 x 13-inch baking pan with cooking spray and set aside to prevent sticking.
- Mix brownie batter: In a large bowl, combine the brownie mix, vegetable oil, milk or water, and eggs according to the box directions. Mix vigorously for 1 minute until fully blended. You may substitute milk for water if preferred.
- Add chocolate chips: Gently fold in the chocolate chips to distribute them evenly in the batter without deflating it.
- Bake the brownies: Pour the batter into the prepared pan and bake for the time instructed on the box, approximately 25-30 minutes, until a toothpick inserted comes out with a few moist crumbs.
- Cool brownies: Remove from the oven and let the brownies cool completely on a wire rack to firm up for easy cutting.
- Cut into squares: Slice the cooled brownies into 1 to 1 1/2 inch squares for individual servings.
- Attach marshmallow ghosts: Place a small dot of frosting on the bottom of each marshmallow and stick it on top of each brownie square as a ghost figure.
- Prepare frosting for covering: Heat the frosting in the microwave in 20-second intervals, stirring well after each, until it becomes pourable but remains thick enough to coat the marshmallows fully.
- Frost the marshmallows: Spoon the warmed frosting over each marshmallow ghost, completely covering it, allowing excess frosting to drip naturally down the sides of the brownie.
- Add ghost faces: Press two black quins into the frosting for the eyes and one for the mouth. If quins are unavailable, use small dots of black frosting to create the faces.
- Set frosting: Allow the frosting to cool and harden for about 1 hour before serving or storing, ensuring the decorations hold firm.
Notes
- These brownies are rich and chocolatey, topped with fun marshmallow ghosts perfect for festive occasions.
- You can substitute water with milk for a richer brownie texture.
- If black edible quins are unavailable, use black decorating gel or icing pens to make the ghost faces.
- Store brownies in an airtight container to keep them moist and fresh for up to 3 days.
Nutrition
- Serving Size: 1 brownie square with ghost topping (approx. 1.5 inch)
- Calories: 190
- Sugar: 22g
- Sodium: 110mg
- Fat: 9g
- Saturated Fat: 3.5g
- Unsaturated Fat: 5g
- Trans Fat: 0g
- Carbohydrates: 28g
- Fiber: 1g
- Protein: 2g
- Cholesterol: 30mg
