If you’re looking to add some festive fun to your Halloween celebrations, then this Easy Decorated Halloween Cupcakes Recipe is absolutely perfect. I love how these cupcakes don’t just taste delicious with their cozy pumpkin spice base, but also look impressively spooky and adorable — without requiring you to be a decorated pro. Whether you’re baking for a kids’ party, your own family, or just for that sweet Halloween vibe at home, you’ll find that these cupcakes bring all the fun and flavor to your kitchen.
Why You’ll Love This Recipe
- Easy and Fun Decorating: I discovered that you don’t need fancy equipment or years of cake decorating experience to create these festive designs.
- Delicious Pumpkin Base: These cupcakes are moist and flavorful, making them a hit even without the frosting decorations.
- Great for Parties & Kids: My family goes crazy for these, especially the spider cupcakes with Oreo mini spiders on top.
- Make Ahead Friendly: You can prep cupcakes and frostings in advance for less stress on the big day.

Ingredients You’ll Need
All these ingredients work perfectly to give you deliciously moist cupcakes topped with creamy, colorful buttercream that’s easy to pipe and decorate. I recommend using gel food coloring for the most vibrant, bold look without messing with frosting consistency.
- Pumpkin Cupcakes: You can use your favorite pumpkin cupcake recipe or even store-bought ones if you’re short on time.
- Unsalted Butter: Make sure it’s softened to room temperature; this is key for smooth, creamy buttercream.
- Confectioners’ Sugar: The base for the buttercream sweetness; sifted for lump-free frosting.
- Heavy Cream (or Half-and-Half or Whole Milk): Helps achieve the perfect frosting texture, adding richness and lightness.
- Pure Vanilla Extract: Adds a warm, sweet flavor to the frosting that pairs perfectly with pumpkin.
- Salt: Just a pinch balances the sweetness in your buttercream.
- Gel Food Colorings: Leaf Green, Fuchsia + Violet, Super Black, Orange – these give you bright, bold colors perfect for Halloween themes.
- Piping Bags and Tips: Small open star tips (Wilton #21), petal tip (Wilton #125), and small round tip (Wilton #4) – essential for creating detailed designs.
- Candy Eyeballs: Both small and large sizes add playfulness and monster vibes to your cupcakes.
- Mini Oreo Cookies: For that adorable spider base you’ll love decorating.
- Optional Sprinkles: For extra fun sparkles and texture—perfect to finish off your monster cupcakes.
Variations
I love that this Easy Decorated Halloween Cupcakes Recipe lets you get creative with little twists and personal touches. Changing up the colors, cupcake flavors, or toppings keeps the excitement fresh year after year.
- Flavor Variations: I once tried chocolate cupcakes instead of pumpkin, and the darker cake made the bright frosting pop even more — super rich and decadent.
- Dairy-Free Option: Swap butter for dairy-free margarine and heavy cream for coconut cream; the cupcakes still come out super tasty and the frosting pipes well.
- Less Sweet Frosting: Reduce confectioners’ sugar slightly or add an extra pinch of salt if you prefer your buttercream less sweet.
- Additional Decorations: Mini chocolate chips, edible glitter, or themed cupcake toppers can add even more personality.
How to Make Easy Decorated Halloween Cupcakes Recipe
Step 1: Make Your Buttercream Base
Start by beating the softened butter on medium speed until creamy and smooth, about 2 minutes. I use my stand mixer with a paddle attachment, but a handheld mixer works fine too. Then add 5 1/2 cups of confectioners’ sugar, heavy cream, and vanilla extract. Mix on low for 30 seconds to avoid sugar clouds, then increase to medium-high and beat for 2 full minutes until fluffy. This step really matters for that silky smooth texture you’ll love. If it’s too sweet, add a pinch of salt — I usually add 1/8 teaspoon. If your frosting looks bubbly, stir it by hand against the side of the bowl to pop the bubbles; it takes some muscle but the finish is worth it.
Step 2: Adjust Consistency and Color Your Frosting
You’ll want your frosting thick enough to hold shape but soft enough to pipe easily. Add more confectioners’ sugar for firmness, or a tablespoon of cream at a time for softness, tasting as you go — you’ll get the hang of it after a couple tries. Divide the frosting into bowls for each color (I divide into five if doing all designs) and mix in gel food coloring. I like to start with a few drops and add slowly until I get that perfect shade. For a less bright tone, a tiny bit of black gel can help. Remember that colors darken as they sit, so don’t get too overly saturated at first!
Step 3: Create Each Spooky Design
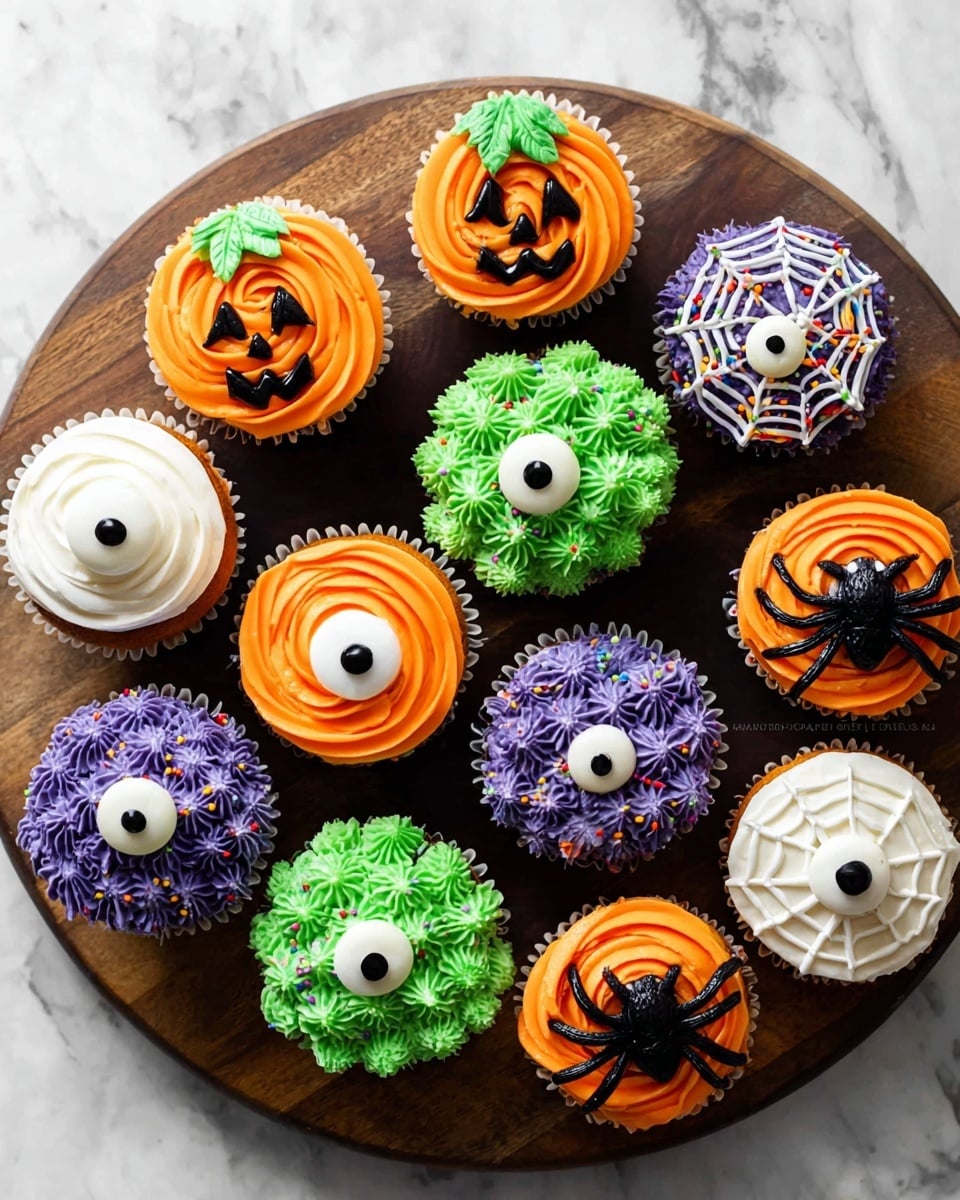
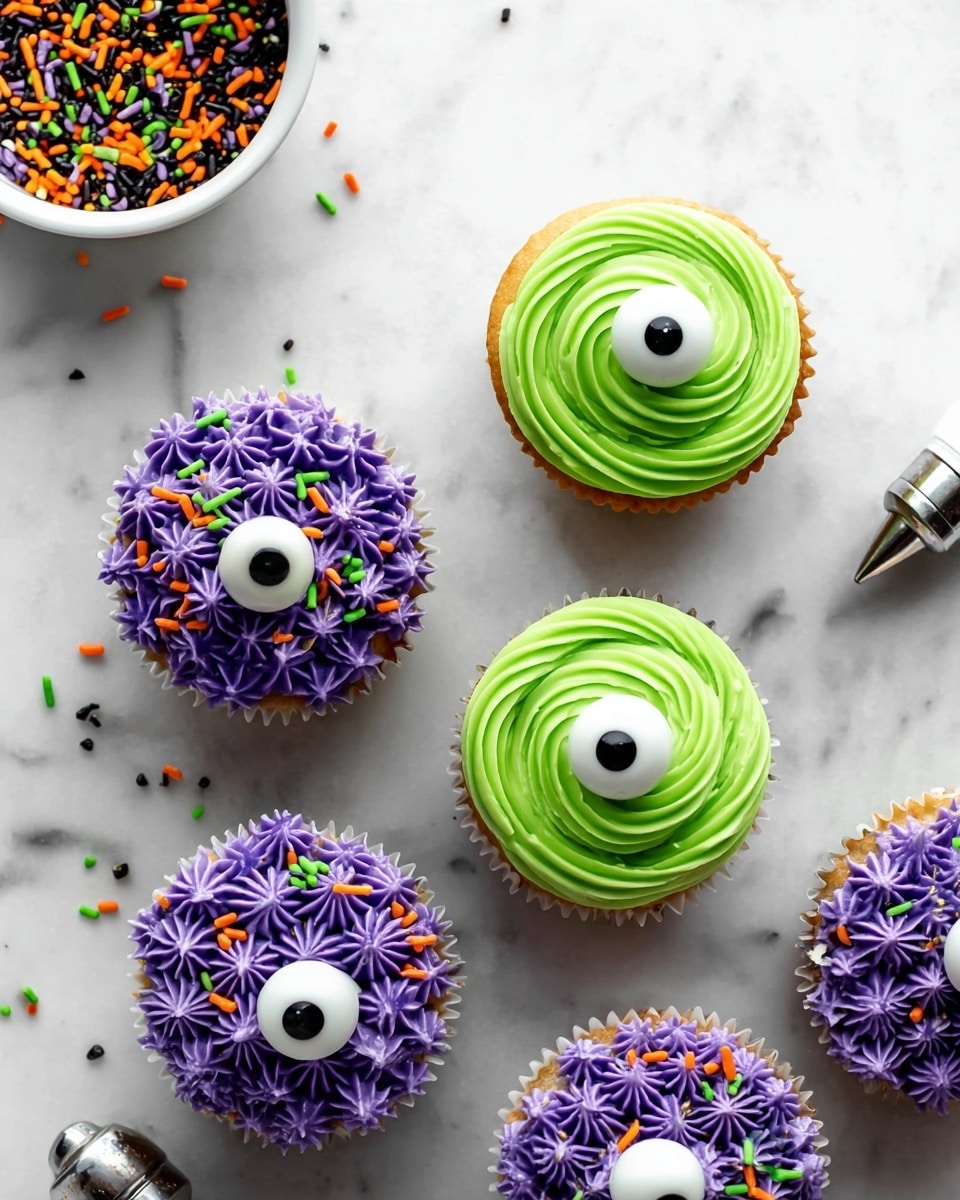
Fit your piping bags with the appropriate tips and colors. For the monster cupcake, pipe a green spiral and press a big candy eyeball in the center. For the purple monster, cover the cupcake with purple stars and add mini eyeballs and optional sprinkles. For the jack-o’-lanterns, pipe orange stripes with a petal tip, green stems, and use black frosting for creepy faces — get as goofy as you’d like here! Finally, for the spiders, smooth white frosting on the cupcake top, pipe a black web, then place a mini Oreo half for the spider’s body, add candy eyes, and pipe legs. My kids love helping here because it’s easy and looks super impressive.
Step 4: Store and Serve
Once decorated, you can keep the cupcakes at room temperature uncovered for a few hours before serving, which is perfect if you’re prepping them shortly before the party. For longer storage, cover them tightly and refrigerate up to 5 days. I love using a dedicated cupcake carrier for easy transport and keeping those fabulous designs safe.
Pro Tips for Making Easy Decorated Halloween Cupcakes Recipe
- Soft Butter is Key: Using butter straight from the fridge can lead to lumpy frosting; let it rest at room temp for a couple hours if possible.
- Pop Those Air Bubbles: Don’t skip the spatula trick to break up bubbles — it makes your frosting look smooth and professional.
- Practice Piping on Plate: Before decorating cupcakes, try piping your shapes on parchment paper to build confidence.
- Don’t Overfill Bags: Filling bags only halfway keeps you in control and prevents messes.
How to Serve Easy Decorated Halloween Cupcakes Recipe
Garnishes
I often finish the cupcakes with a variety of candy eyeballs, a smattering of Halloween-themed sprinkles, or even edible glitter if I want to add a little magical touch. These make the cupcakes pop visually and add texture that makes the experience more fun for everyone, especially kids.
Side Dishes
I like pairing these cupcakes with simple, less sweet treats like salted caramel popcorn or roasted pumpkin seeds. It balances the sweetness and keeps the snack table festive but not sugar-overload central.
Creative Ways to Present
For Halloween parties, I love displaying these cupcakes on a tiered stand decorated with faux spider webs and mini plastic spiders. Using black or orange cupcake liners before baking adds extra flair. Sometimes I place each cupcake in a clear Halloween-themed cupcake box — it’s a nice touch if you want guests to take them home safely.
Make Ahead and Storage
Storing Leftovers
I usually store leftover cupcakes in a cupcake carrier or an airtight container in the fridge. That keeps the buttercream fresh and protects the decorations for up to 5 days. Just remember to bring them to room temperature before serving for the best flavor and texture.
Freezing
Freezing fully decorated cupcakes can be tricky because the buttercream might lose its texture, but you can freeze plain baked cupcakes in an airtight container or freezer bags for up to 3 months. When ready, thaw overnight in the fridge and then decorate fresh — that way, your cupcakes stay moist and your decorations stay perfect.
Reheating
Since these cupcakes are best served at room temperature, I just leave refrigerated leftovers out for about 30 minutes before serving. If you’re in a hurry, a few seconds in the microwave at 10% power helps warm the cake through without melting the frosting.
FAQs
-
Can I use a different cupcake flavor for this Easy Decorated Halloween Cupcakes Recipe?
Absolutely! While pumpkin cupcakes are classic and festive, you can use vanilla, chocolate, or even a funfetti base. The decorations work well on almost any cupcake flavor, and the colorful buttercream always steals the show.
-
Do I have to use gel food coloring?
Gel food coloring is best because it provides bright colors without watering down your frosting. Liquid food coloring can thin your buttercream, making it less stable for piping delicate designs.
-
How far in advance can I decorate the cupcakes?
You can bake the cupcakes a day in advance and store them airtight at room temp. I recommend decorating the cupcakes the day of serving for the freshest look and best frosting texture, but if needed, decorated cupcakes keep well in the fridge for up to 5 days.
-
What if I don’t have all the piping tips mentioned?
No worries! You can substitute with any small star or round tip you have, or even try using a plastic bag with a small hole cut in the corner for piping. The designs are forgiving and meant to be fun, not perfect!
-
Can I make this recipe vegan?
Yes, by using plant-based butter and milk alternatives, you can create vegan buttercream and cupcakes. Just be sure to check your candy decorations for non-vegan ingredients or find vegan-friendly versions.
Final Thoughts
This Easy Decorated Halloween Cupcakes Recipe has become a staple in my holiday baking because it’s approachable, fun, and endlessly customizable. Halloween is all about creativity and joy, and these cupcakes capture that spirit perfectly without overwhelming you in the kitchen. I promise, once you try this, you’ll find so much joy in handing out cupcakes that are as delightful to look at as they are to eat. Go on, dig into this recipe — your Halloween table will never look or taste better.
Print
Easy Decorated Halloween Cupcakes Recipe
- Prep Time: 45 minutes
- Cook Time: 0 minutes
- Total Time: 45 minutes
- Yield: 12 cupcakes
- Category: Baking
- Method: Baking
- Cuisine: American
Description
Celebrate Halloween with these easy decorated cupcakes featuring fun monster, jack-o’-lantern, and spider designs. This recipe uses a creamy, colorful buttercream frosting that’s perfect for piping detailed decorations on your favorite cupcakes, such as pumpkin cupcakes. With simple ingredients and straightforward steps, you can create festive treats to impress friends and family for the spooky season.
Ingredients
Cupcakes
- 12 pumpkin cupcakes or your favorite cupcake recipe
Buttercream Frosting
- 1 and 1/2 cups (340g) unsalted butter, softened to room temperature
- 6 cups (720g) confectioners’ sugar (see note)
- 6 Tablespoons (60ml) heavy cream, half-and-half, or whole milk, at room temperature
- 2 teaspoons pure vanilla extract
- Salt, to taste
Food Coloring and Decorating Tools
- Gel food coloring: Leaf Green, Fuchsia + Violet, Super Black, Orange
- 2 piping bags, 3 piping bags, 1 piping bag
- 2 couplers
- Piping tips: small open star tip (e.g., Wilton #21), large petal tip (e.g., Wilton #125), small round tip (e.g., Wilton #4)
- Small candy eyeballs
- Large candy eyeballs
- Optional: sprinkles
- Oreo Mini cookies
- Mini candy eyeballs
Instructions
- Make the buttercream. Using a handheld or stand mixer with paddle attachment, beat unsalted butter on medium speed until creamy, about 2 minutes. Add 5 and 1/2 cups (660g) confectioners’ sugar, heavy cream, and vanilla extract. Beat on low speed for 30 seconds, then increase to medium-high speed and beat for 2 full minutes. Taste and add a pinch of salt if frosting is too sweet, about 1/8 teaspoon.
- Remove air bubbles. If there are air bubbles in the buttercream, stir by hand with a silicone spatula or wooden spoon, pressing the frosting against the bowl sides until most bubbles pop, about 1–2 minutes.
- Adjust frosting consistency. Add up to 1/2 cup (60g) more confectioners’ sugar if too thin, or add heavy cream 1 Tablespoon (15ml) at a time if too thick; beat and taste after each addition until desired consistency is reached.
- Divide and color the frosting. Divide the frosting into bowls for each color needed (for all 4 designs, use 5 bowls – less black needed). Tint each bowl with gel food coloring to desired shades, using mixes such as Fuchsia + Violet for pinkish purple. To tone down brightness, add a tiny dot of black gel food coloring.
- Monster cupcakes. Fit a piping bag with a small open star tip (Wilton #21) and coupler. Fill with green frosting. Pipe a spiral starting from the outside moving to the center on each cupcake. Place a large candy eyeball in the center, gently tapping to stick.
- Purple monster cupcakes. With a piping bag fitted with the same star tip and coupler, fill with purple frosting. Pipe stars all over the cupcake surface. Press small candy eyeballs into the frosting. Add sprinkles if desired.
- Jack-o’-lantern cupcakes. Fit piping bags with a large petal tip (#125) for orange frosting, a small open star tip (#21) for green frosting, and a small round tip (#4) for black frosting. Pipe rounded vertical lines with the orange frosting, alternating sides to create the pumpkin’s curved segments. Use green for the pumpkin stem on top. Use black frosting to pipe eyes, nose, and mouth to form a jack-o’-lantern face as spooky or goofy as you like.
- Spider web cupcakes. Use white and black frosting only. Spread white frosting smoothly over the cupcake with a small offset spatula or knife. With black frosting in a piping bag fitted with small round tip (#4), pipe three crisscrossing straight lines across the top to create 6 triangle sections. Connect them with slightly curved lines to make the web pattern. Place half a mini Oreo cookie on the web to serve as the spider’s body, pressing gently to stick. Pipe two tiny dots of black frosting for eyes and stick two mini candy eyeballs on top. Pipe 4 black lines on each side of the Oreo to make 8 spider legs.
- Storage and serving. Store decorated cupcakes at room temperature uncovered for a few hours before serving. For leftovers, cover and refrigerate up to 5 days; using a cupcake carrier is recommended for storing and transportation.
Notes
- Learn to decorate Halloween cupcakes with fun but not-too-scary monster, jack-o’-lantern, and spider designs.
- Use your favorite cupcake recipe; pumpkin cupcakes pictured.
- Watch the video tutorial (if available) for a visual guide to decorating.
- If making fewer designs, scale down the buttercream recipe accordingly.
Nutrition
- Serving Size: 1 cupcake
- Calories: 320
- Sugar: 30g
- Sodium: 120mg
- Fat: 18g
- Saturated Fat: 11g
- Unsaturated Fat: 6g
- Trans Fat: 0g
- Carbohydrates: 38g
- Fiber: 1g
- Protein: 3g
- Cholesterol: 55mg

