If you’ve been craving a delicious dessert that’s both impressive and surprisingly simple to whip up, you’re going to adore this Easy Coffee Tiramisu Recipe. I absolutely love how creamy, rich, and coffee-forward this version turns out without any fuss or weird ingredients. When I first tried making tiramisu at home, I was intimidated by all the steps, but this streamlined recipe changed the game—I’m excited to share it with you!
Why You’ll Love This Recipe
- Incredibly Easy: This recipe only takes about 10 minutes to prep, perfect for those busy days when you want to impress with minimal effort.
- Classic Flavors: You’ll get that authentic coffee and mascarpone combo everyone adores, with no complicated steps or special equipment.
- Flexible Ingredients: Whether you want to add a splash of liqueur or keep it kid-friendly, this tiramisu adapts easily.
- Make-Ahead Friendly: It tastes even better after chilling, so you can prepare it a day ahead and free up your serving time.

Ingredients You’ll Need
All the ingredients strike a perfect balance between rich creaminess and bold coffee flavor. Shopping tip: pick the freshest mascarpone you can find and freshly brewed espresso for the best results.
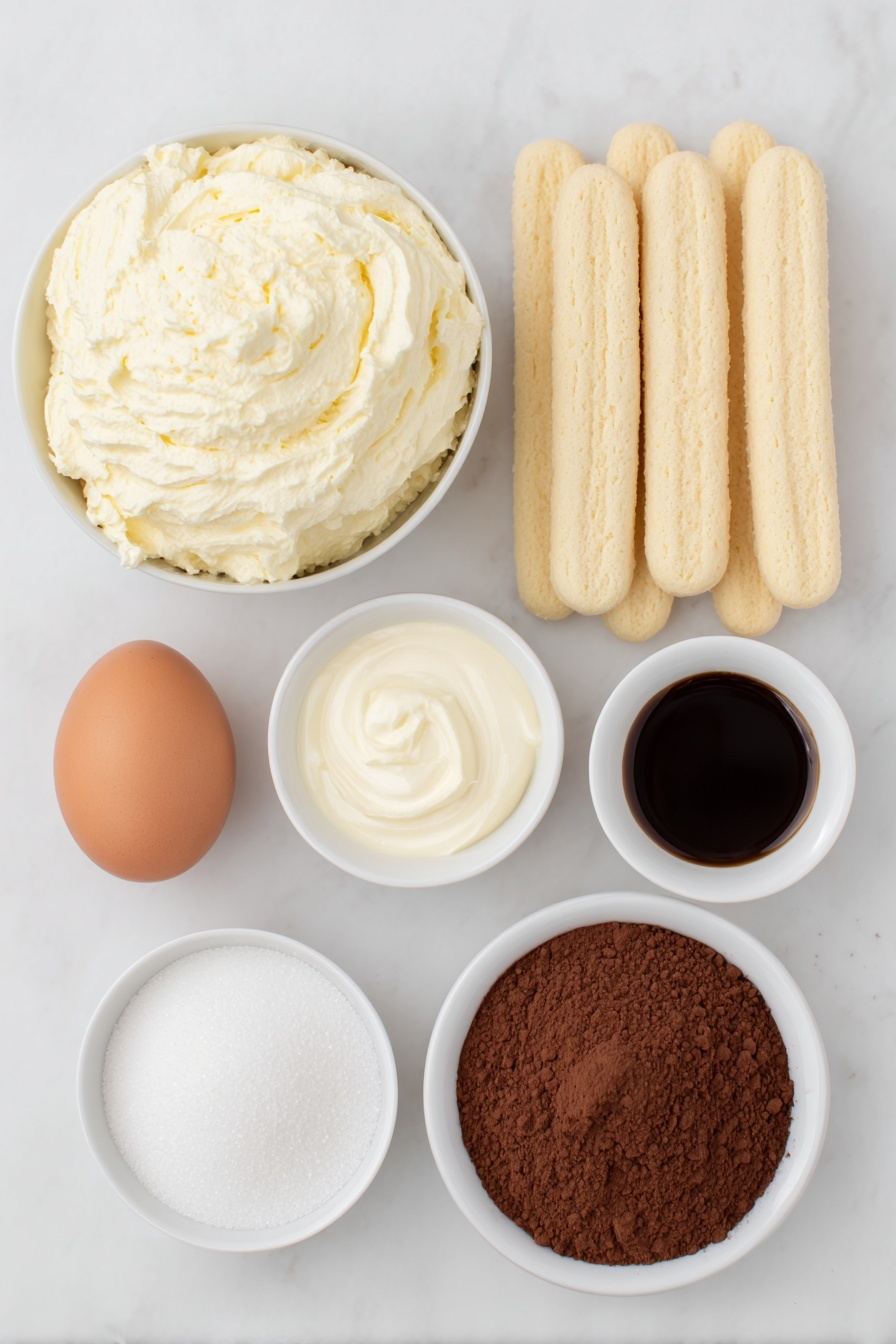
- Heavy whipping cream: It whips up fluffy and light, giving the tiramisu that dreamy texture.
- Mascarpone cheese: The star of the show—make sure it’s at room temperature for a smooth mix.
- Granulated sugar: Just enough sweetness to balance the coffee’s bitterness.
- Vanilla extract: Adds a subtle warmth and depth to the cream mixture.
- Cold espresso: Brew strong espresso and chill it; it gives your tiramisu that signature coffee kick.
- Coffee flavored liqueur (optional): Kahlua or DaVinci brand work great if you want that extra boozy touch.
- Lady Fingers: Look for Savoiardi brand—they soak up the coffee without getting soggy too fast.
- Cocoa powder: Dust generously on top for a gorgeous finish and a hint of chocolate bitterness.
Variations
I love making this Easy Coffee Tiramisu Recipe my own by gently tweaking it depending on the occasion or mood. You should definitely feel free to play around with flavors and textures!
- Alcohol-Free Version: When I have kids or guests who skip alcohol, I just omit the coffee liqueur—espresso alone does the trick beautifully.
- Chocolate Lover’s Twist: Try adding a layer of finely chopped dark chocolate or chocolate shavings between layers for extra indulgence.
- Fruity Flair: Some days, I blend in fresh raspberries or strawberries into the mascarpone mix to brighten the flavor profile.
- Decaf Coffee: If you’re sensitive to caffeine but crave the taste, decaf espresso works wonders without compromising the essence.
How to Make Easy Coffee Tiramisu Recipe
Step 1: Whip Up the Creamy Mascarpone Mixture
Start by pouring your heavy whipping cream into a large mixing bowl. Beat it at medium speed with your electric mixer until it starts to thicken. Then, slowly add the sugar and vanilla extract as you continue whipping until you reach those beautiful stiff peaks. This means the cream should hold its shape without sliding off your whisk. Next, gently fold in the mascarpone cheese—make sure it’s softened to room temperature so it blends in silky smooth, without lumps. Trust me, this mixture is what makes the tiramisu irresistible.
Step 2: Prepare the Coffee Dip and Lady Fingers Layer
Pour your chilled espresso and coffee liqueur (if using) into a shallow bowl. This is your quick-dip station for the lady fingers. Don’t soak them—just a quick, gentle dunk on each side to get them moist without falling apart. Place the dipped lady fingers carefully in a single layer on the bottom of your pan (an 8×8-inch pan works perfectly). I like to use a timer here because if they sit too long in coffee, they turn mushy—and no one wants soggy lady fingers!
Step 3: Assemble Your Layers
Smooth half of your mascarpone cream over the lady fingers gently with a spatula, making sure it’s evenly spread. Repeat the dipping process for another layer of lady fingers, then top with the remaining mascarpone mixture. At this point, your tiramisu is looking dreamy.
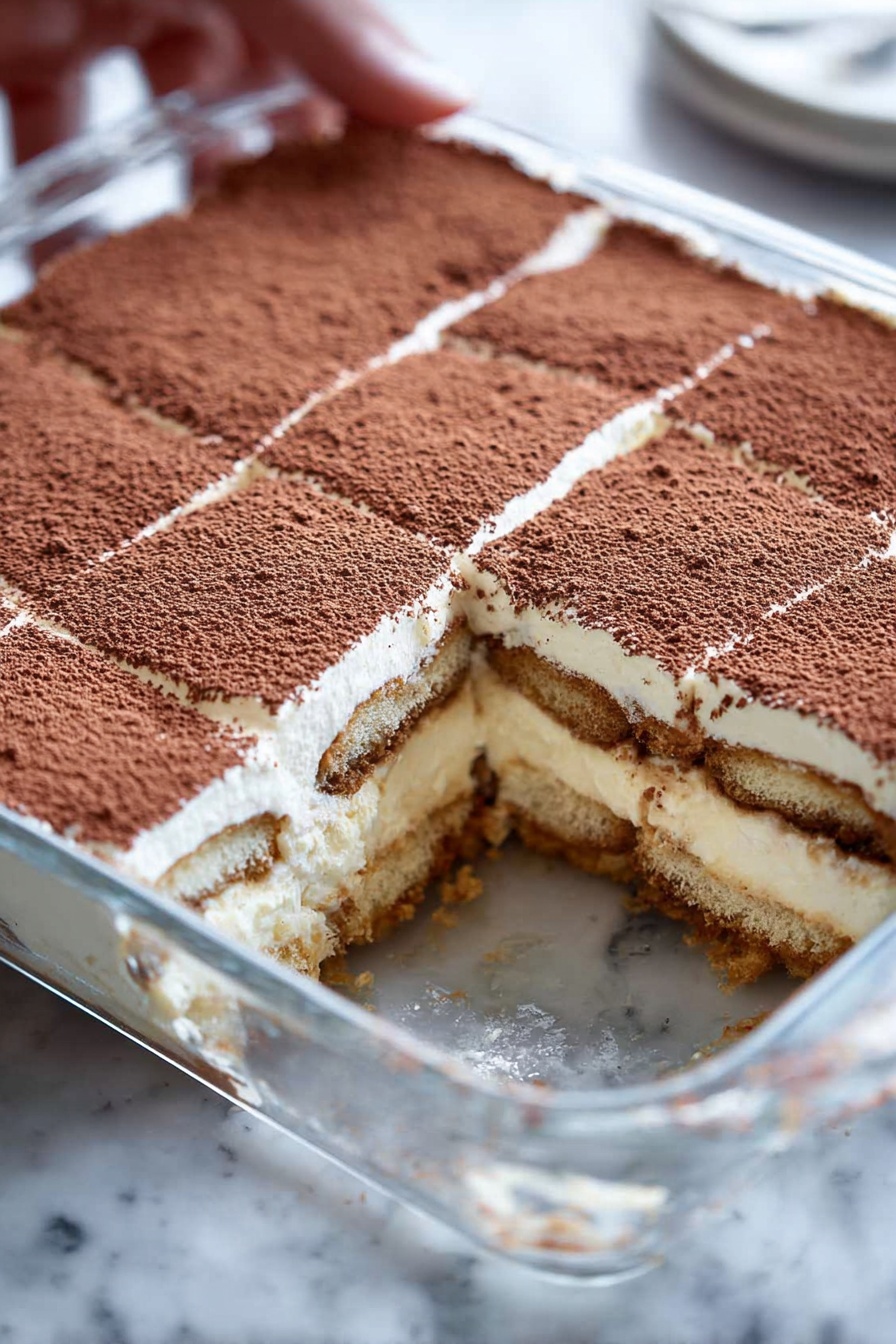
Step 4: Finish with Cocoa and Chill
Dust a generous layer of cocoa powder over the top—using a fine mesh strainer is my trick for a perfectly even sprinkle. Then cover and refrigerate the tiramisu for at least 3 to 4 hours, or ideally overnight. This resting time lets the flavors mingle and the texture set perfectly. I discovered chilling this overnight makes the tiramisu almost magical—the cream firms up, and every bite is a little cloud of coffee-flavored delight.
Pro Tips for Making Easy Coffee Tiramisu Recipe
- Don’t Over-Soak Lady Fingers: Quickly dip them to avoid sogginess; they should be moist but still intact for layering.
- Room Temperature Mascarpone: Letting your cheese come to room temp prevents lumps and gets that ultra-smooth cream you want.
- Use Freshly Brewed Espresso: This is key! Fresh espresso brings vibrant coffee flavor that pre-brewed coffee just can’t match.
- Chill Overnight: Not mandatory, but the best results happen after a long chill—it really lets the flavors marry beautifully.
How to Serve Easy Coffee Tiramisu Recipe

Garnishes
I love dusting tiramisu with rich cocoa powder for that signature look, but I also like adding a few chocolate curls or even some espresso bean decorations on top when I want it to feel extra special. Fresh mint leaves can brighten things up visually, too, and make it pop at the table.
Side Dishes
This dessert pairs perfectly with simple espresso or cappuccino. If you want to round out the experience, try serving with fresh berries or a light almond biscotti—it complements the creamy coffee flavors without overwhelming them.
Creative Ways to Present
For parties, I sometimes serve the tiramisu in individual glass jars or cups layered beautifully so everyone has their own personal treat. You could also layer it in a trifle bowl for an impressive view of all the coffee-soaked fingers and creamy layers. A drizzle of chocolate sauce over the top before dusting cocoa really wows guests during special occasions.
Make Ahead and Storage
Storing Leftovers
I always keep leftover tiramisu tightly covered in the fridge, and it stays fresh for up to 3 days. The texture actually improves after a day or two because the coffee flavor deepens. Just make sure it’s covered well to avoid absorbing fridge odors.
Freezing
Freezing tiramisu isn’t my go-to, but I’ve done it in a pinch. Use an airtight container and thaw in the fridge for 24 hours before serving. The texture might be slightly different—cream may be a little less fluffy—but the flavors hold up nicely.
Reheating
Tiramisu is best served chilled, so I don’t recommend reheating it. If you want it a bit less cold, just let it sit at room temperature for 10-15 minutes before serving to soften the cream without losing that classic texture.
FAQs
-
Can I make this tiramisu without alcohol?
Absolutely! The coffee-flavored liqueur is optional in this Easy Coffee Tiramisu Recipe. You can omit it entirely and just use espresso for dipping the lady fingers. The dessert will still be delicious and full of that classic coffee taste.
-
What kind of coffee should I use for dipping lady fingers?
I recommend using freshly brewed espresso that’s been cooled to cold. It gives the most authentic and robust coffee flavor. Avoid watery or weak coffee, as it won’t soak the lady fingers properly and can make the tiramisu less flavorful.
-
How long should I refrigerate tiramisu before serving?
For best results, chill your Easy Coffee Tiramisu Recipe for at least 3 to 4 hours to allow flavors to meld and the dessert to set. Overnight chilling is even better if you have time—it makes the cream extra silky and the coffee-soaked layers come together beautifully.
-
Can I prepare tiramisu in advance for a party?
Definitely! Tiramisu is one of the best make-ahead desserts. Prepare it up to a day in advance and keep it covered in the fridge. It saves you time on party day and tastes even more incredible after resting.
Final Thoughts
This Easy Coffee Tiramisu Recipe is my go-to when I want an elegant dessert with minimal effort. It’s foolproof, melts in your mouth, and carries that beautiful balance of creamy sweetness and bold coffee flavor every time. I know you’ll enjoy making it as much as I do—it’s the kind of recipe you’ll want to share with friends, family, and anyone who appreciates a classic treat. So go ahead, give it a try, and prepare to be amazed by how effortless and delicious homemade tiramisu can be.
Print
Easy Coffee Tiramisu Recipe
- Prep Time: 10 minutes
- Cook Time: 0 minutes
- Total Time: 4 hours 10 minutes
- Yield: 9 servings
- Category: Dessert
- Method: No-Cook
- Cuisine: Italian
Description
This classic Italian Tiramisu recipe is a creamy, luscious dessert featuring coffee-soaked ladyfingers layered with a sweet mascarpone cream and dusted with cocoa powder. Perfect for an elegant finish to any meal, it combines the richness of mascarpone and whipped cream with the bold flavor of espresso and a hint of coffee liqueur.
Ingredients
Mascarpone Cream
- 1 1/2 cups heavy whipping cream (360 ml)
- 8 ounce container mascarpone cheese, room temperature (225 g)
- 1/3 cup granulated sugar (67 g)
- 1 teaspoon vanilla extract (5 ml)
Assembly
- 1 1/2 cups cold espresso, prepared (360 ml)
- 3 Tablespoons coffee flavored liqueur, optional (Kahlua or DaVinci brands) (45 ml)
- 1 package Lady Fingers (Savoiardi brand preferred)
- Cocoa powder for dusting the top
Instructions
- Prepare the Mascarpone Cream: Add the heavy whipping cream to a mixing bowl and beat on medium speed using an electric mixer or stand mixer. Gradually add the granulated sugar and vanilla extract, continuing to beat until stiff peaks form. Gently fold in the room temperature mascarpone cheese until fully combined and smooth. Set aside.
- Dip Ladyfingers: Combine the cold espresso and coffee liqueur (if using) in a shallow bowl. Quickly dip each ladyfinger in the coffee mixture, making sure not to soak them—just a quick dip on both sides to moisten.
- Layer the Dessert: Arrange a single layer of dipped ladyfingers at the bottom of an 8×8 inch or similar-sized pan. Spread half of the mascarpone cream mixture evenly over the ladyfingers.
- Second Layer: Add another layer of dipped ladyfingers over the mascarpone cream. Smooth the remaining mascarpone cream on top, creating an even layer.
- Finish and Chill: Generously dust the top with cocoa powder using a fine mesh strainer for an even coating. Refrigerate the tiramisu for at least 3 to 4 hours, or preferably overnight, to allow the flavors to meld and the dessert to set before serving.
Notes
- This tiramisu is creamy, delicious, and unbelievably easy to prepare.
- Use good quality espresso for the best flavor impact.
- Do not soak ladyfingers too long to avoid sogginess; a quick dip is sufficient.
- If you prefer a non-alcoholic version, omit the coffee liqueur.
- Refrigeration time is essential to achieve the best texture and flavor blending.
Nutrition
- Serving Size: 1 serving
- Calories: 297 kcal
- Sugar: 11 g
- Sodium: 77 mg
- Fat: 18 g
- Saturated Fat: 11 g
- Unsaturated Fat: 3 g
- Trans Fat: 0 g
- Carbohydrates: 26 g
- Fiber: 1 g
- Protein: 5 g
- Cholesterol: 88 mg


